Learn Authoring Pack
The Learn Authoring Pack provides a series of extensions to help learn.microsoft.com authors work better and more efficiently. You can read more about all of the Learn Authoring Pack features here in the overview guide. The Learn Authoring Pack provides the following extensions to help author content for learn.microsoft.com:
- Learn Markdown, which provides Markdown authoring assistance, including support for inserting custom Markdown syntax specific to learn.microsoft.com. The rest of this readme provides details on the Learn Markdown extension.
- Learn Images, which compresses and resizes images.
- Learn YAML, which validates Learn .yml files against the appropriate YAML schemas.
- Learn Preview, which uses the learn.microsoft.com CSS for more accurate Markdown preview, including custom Markdown.
- Learn Article Templates, which allows users to apply Markdown skeleton content to new files.
- Learn Scaffolding, which automatically generates Learn modules based on standard patterns and automates renaming, inserting, deleting, and reordering units.
- markdownlint, a popular linter by David Anson.
- Learn Training AI Assistant, which harnesses the power of Azure Open AI to help generate module introduction, knowledge check questions and summaries based on the unit/module content.
How to use the Learn Markdown extension
To access the Learn Markdown Authoring menu, type ALT + M. You can click or use up/down arrows to select the function you want, or type to start filtering, then hit ENTER when the function you want is highlighted in the menu.
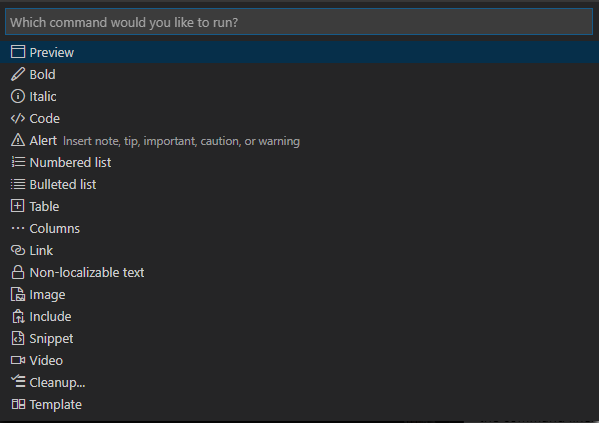
You can also access the Learn commands from the VS Code command palette by hitting F1 and typing to filter. All the Learn commands begin with "Learn".
Prerequisites and assumptions
To accurately insert relative links, images, and other embedded content with Learn Markdown, you must have your VS Code workspace scoped to the root of your cloned OPS repo. Some syntax supported by the extension, such as alerts and snippets, are custom Markdown for Docs, and will not render correctly unless published via Learn.
For more information about the Learn Markdown commands, see the Learn Markdown readme.
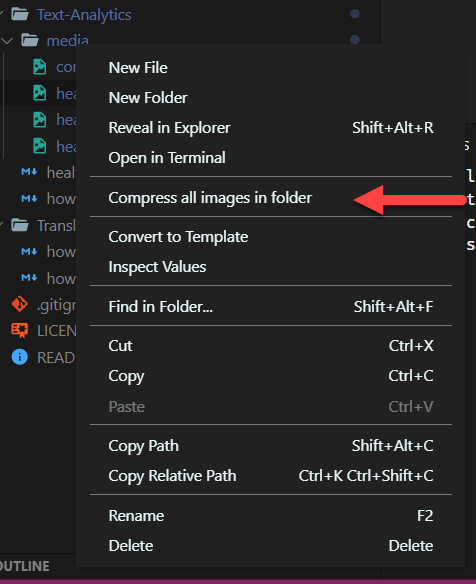
How to use Learn Images extension
To access the Learn Images menu, right click on a folder or individual image file. Select Compress all images in folder or Compress image from the context menu.
For more information about the Learn Images extension, see the Learn Images readme.
How to use Learn YAML extension
- The code intellisense is more intelligent now; the extension can provide the intellisense according to the schema structure, not just text mapping. To invoke intellisense, hit CTRL + Space to view the list of schema options.
- The extension can generate an input template for
object (including required properties and optional properties with default value).
- You can type a
- and hit CTRL + Space to trigger the intellisense for generating a new array item.
Intellisense is automatically triggered by CTRL + Space to get what you can type.

For more information about the Learn YAML commands, see the Learn YAML readme.
How to use Learn Preview extension
You can open Learn Preview by opening a markdown document and clicking on the preview button. One opens the preview in your current window, and the other opens the markdown preview to the side. Alternatively you can hit Alt + M and select Preview or you can hit F1 and select Docs: Preview to open up the markdown preview panel.

For more information about the Learn Preview commands, see the Learn Preview readme.
How to assign keyboard shortcuts
Default keyboard shortcuts are available for some commands, as noted in the table above. You can override them, or add shortcuts for other commands, using the VS Code keyboard shortcut mappings.
Type CTRL+K then CTRL+S to open the Keyboard Shortcuts list.
Search for the command, such as formatBold, for which you want to create a custom keybinding.
Click the plus that appears near the command name when you mouse over the line.
After a new input box is visible, type the keyboard shortcut you want to bind to that particular command. For example, to use the common shortcut for bold, type CTRL+B.
It's a good idea to insert a when clause into your keybinding, so it won't be available in files other than Markdown. To do this, open keybindings.json and insert the following line below the command name (be sure to add a comma between lines):
"when": "editorTextFocus && editorLangId == 'markdown'"
Your completed custom keybinding should look like this in keybindings.json:
// Place your key bindings in this file to overwrite the defaults
[
  {
    "key": "ctrl+b",
    "command": "formatBold",
    "when": "editorTextFocus && editorLangId == 'markdown'"
  }
]
Save keybindings.json.
See Keybindings in the VS Code Learn for more information.
Users of the pre-release version of the extension will notice that the authoring toolbar no longer appears at the bottom of the VS Code window when the Learn Markdown extension is installed. This is because the toolbar took up a lot of space on the VS Code status bar, and did not follow best practices for extension UX, so it is deprecated in the new extension. However, you can optionally show the toolbar by updating your VS Code settings.json file as follows:
In VS Code, go to File > Preferences > Settings (CTRL+,).
Select User Settings to change the settings for all VS Code workspaces, or Workspace Settings to change them for just the current workspace.
In the Default Settings pane on the left, find Learn Markdown Extension Configuration, and select the pencil icon next to the desired setting, and select true. VS Code will automatically add the value to the settings.json file and you will be prompted to reload the window for the changes to take effect.
Now you will see the toolbar at the bottom of your VS Code window:

License
MIT
