TikBook for RouterOS
TikBook is a companion extension to RouterOS LSP, akin to a "plus pack". While RouterOS LSP works with any LSP-enabled editor (like NeoVim), TikBook is specific to Visual Studio Code (and its forks).
TikBook offers a VS Code notebook interface for RouterOS scripts, along with "virtual config", converters, CSV exports, and other RouterOS tools - specifically for VS Code. Together with RouterOS LSP's syntax coloring, diagnostics, and text completion, the combination offers a rich experience for working with RouterOS scripts and configuration in Visual Studio Code.
Both "Known Issues" and a per-version "Changelog" are in CHANGELOG.md, which tracks the current state of affairs for the tikoci/vscode-tikbook project.
Installation
If you don't have Visual Studio Code, download from Microsoft or use your OS's "app store" or package manager to install
To install TikBook for RouterOS extension in Visual Studio Code, install from Marketplace or just search for "TIKOCI" in Extensions within VS Code.
When installing, VS Code will prompt about "no release version available". Make sure to select the "use pre-release" option. If VS Code's extension security prompt appears, select "Trust Publisher and Install".
The RouterOS LSP extension, which provides syntax checking and colorization for RouterOS, should be installed automatically when the TikBook extension is installed. If missing, you can install RouterOS LSP separately.
To install using a .vsix file, download from the project's GitHub Releases. TikBook for RouterOS is also available on Open-VSIX repository for installing into "forked" versions for VS Code.
Setup
Like RouterOS LSP, TikBook requires a REST API connection to a RouterOS device running version 7.12 or higher. Some features, like CSV views, may require version 7.18 or higher. TikBook supports both http and https connections, but requires a valid user and password for access that must be configured.
To configure the RouterOS credentials in VS Code:
- Click on the MikroTik logo on the left side of the status bar appearing in an "error" color. The "RouterOS Connection Menu" will appear at the top of VS Code
- Select "Set Base URL" from the menu, and enter the protocol (
https:// or http://) and host/IP of the RouterOS device. A port can be configured after the hostname to match /ip/service's www or www-ssl port. For example, http://192.168.88.1:80. Do not include any trailing path as that will be added by TikBook
- Select "Set User" from the menu, and enter the user name TikBook will use when connecting
- Select "Set Password as Secret", and enter the password for the account. Stored using VS Code's SecretStorage which uses Electron SafeStorage
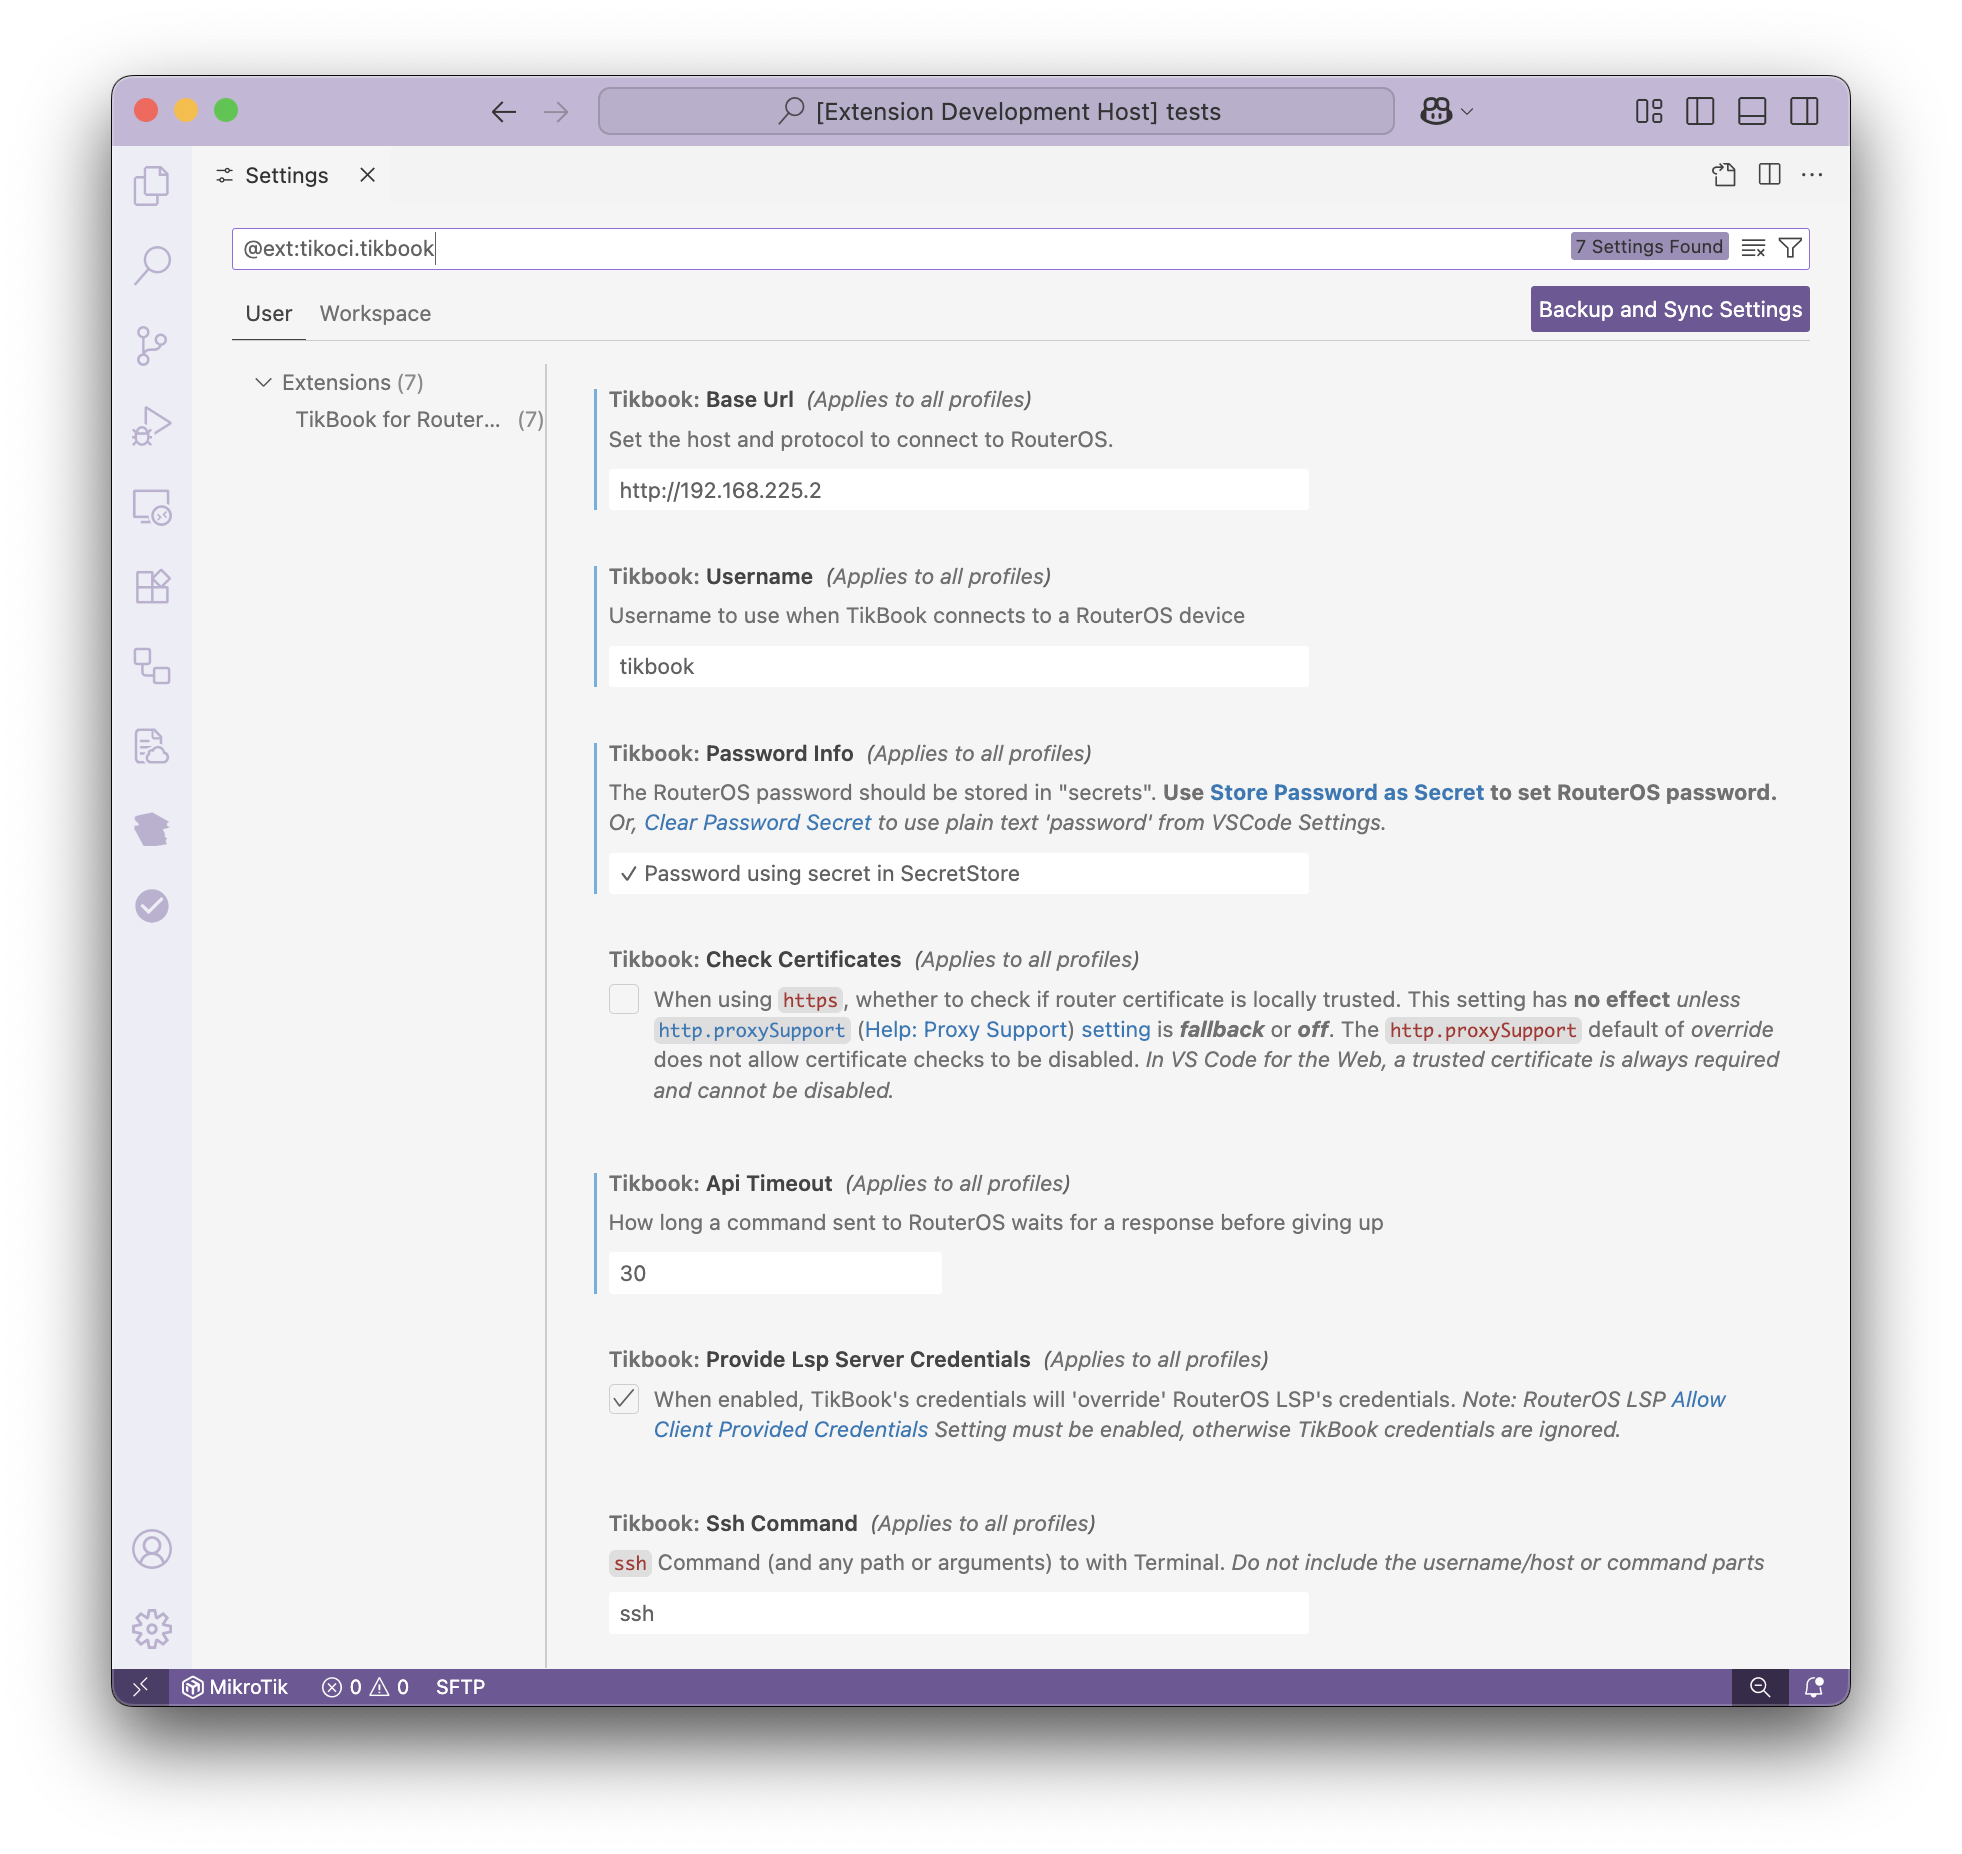
The same options are available under "TikBook" in VS Code's settings interface, which also works to configure TikBook
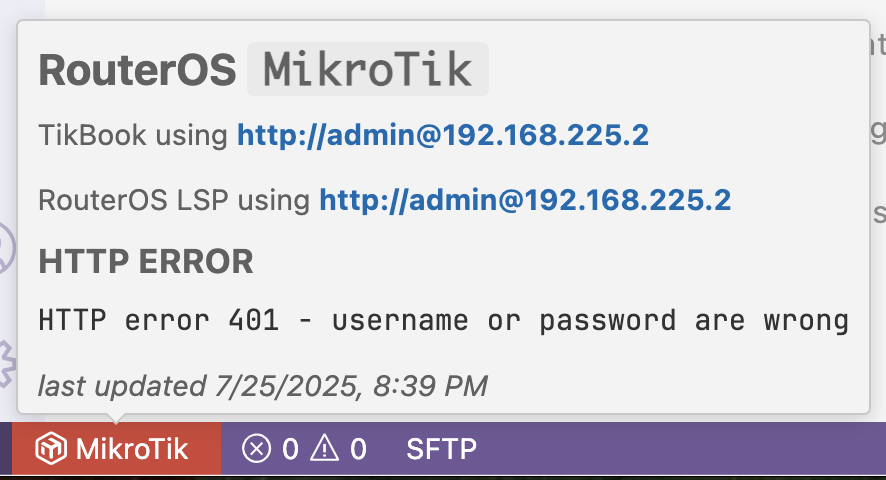
If an error occurs, an error message will be shown in place of RouterOS statistics when hovering over the TikBook status bar item in the bottom left of VS Code. The error message should suggest the problem. For example, if the username/password are wrong, the following will be displayed when hovering over TikBook's status bar item.
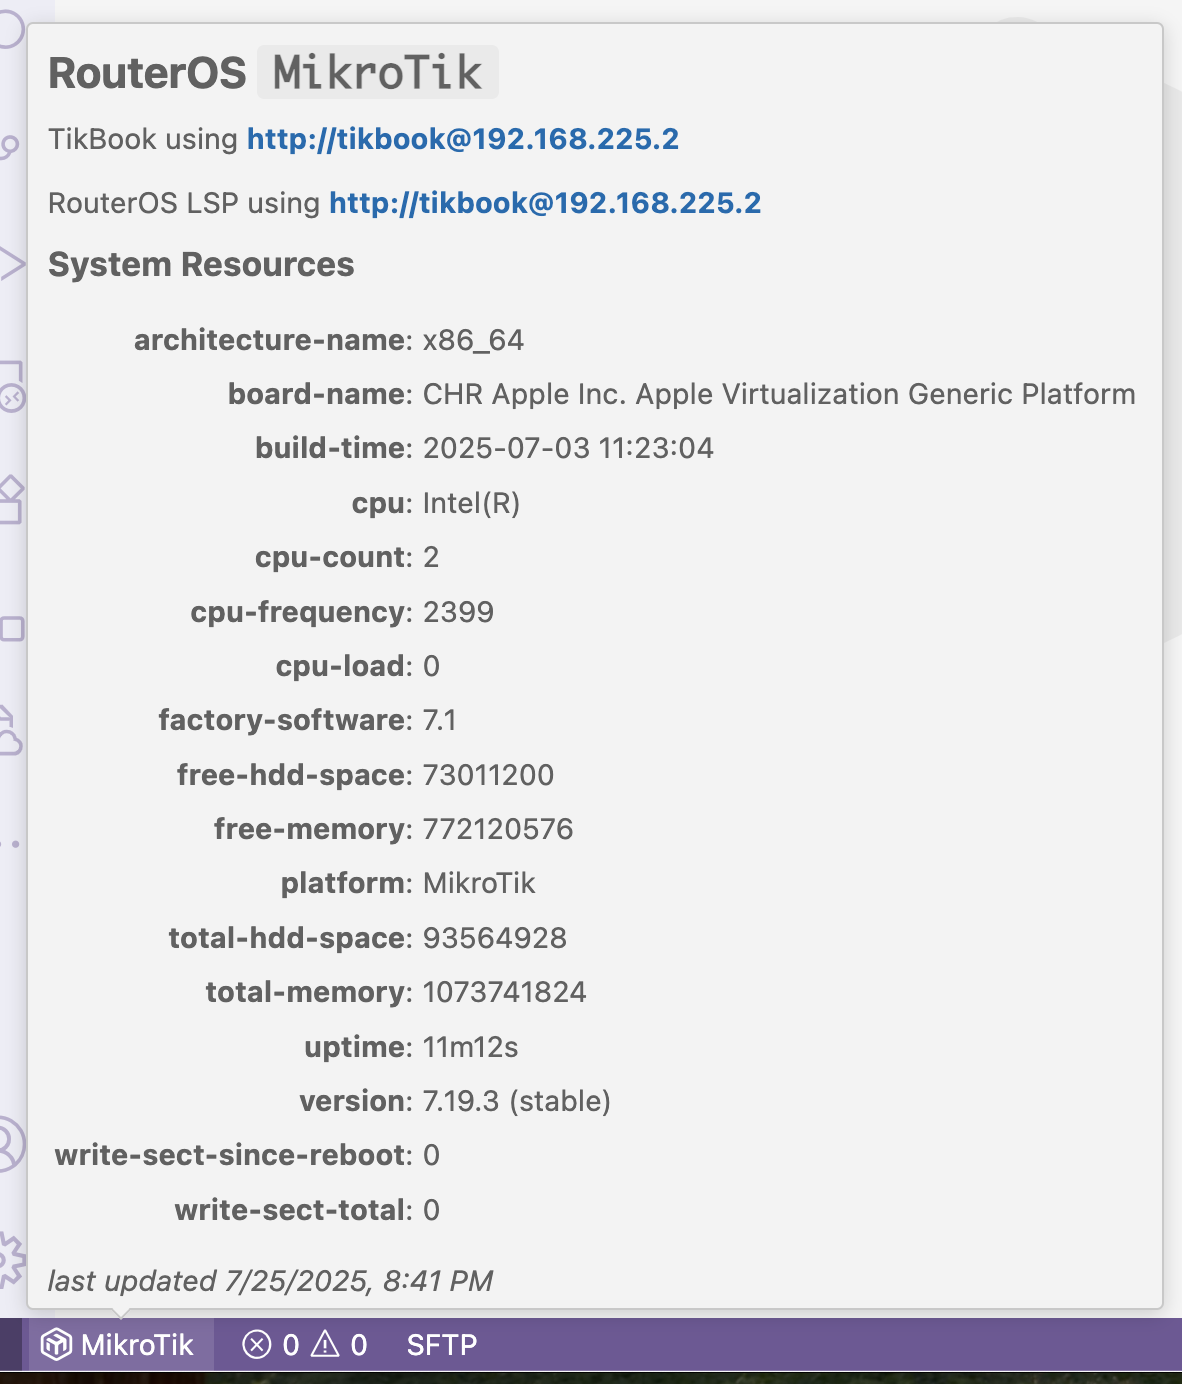
If the connection is successful, the TikBook status bar item will change colors and display the connected router's "name" (/system/identity). Hovering over the MikroTik logo in the status bar should show RouterOS statistics (/system/resource) if connected successfully.
TikBook uses MikroTik's REST API to communicate with RouterOS. For more details on the REST API, see MikroTik's docs or their YouTube on REST API for background on how it works and setup.
Settings
Settings are describe in more detail in sections below, but here are the available settings for TikBook:
Recommendations
Use local RouterOS CHR virtual machine for TikBook
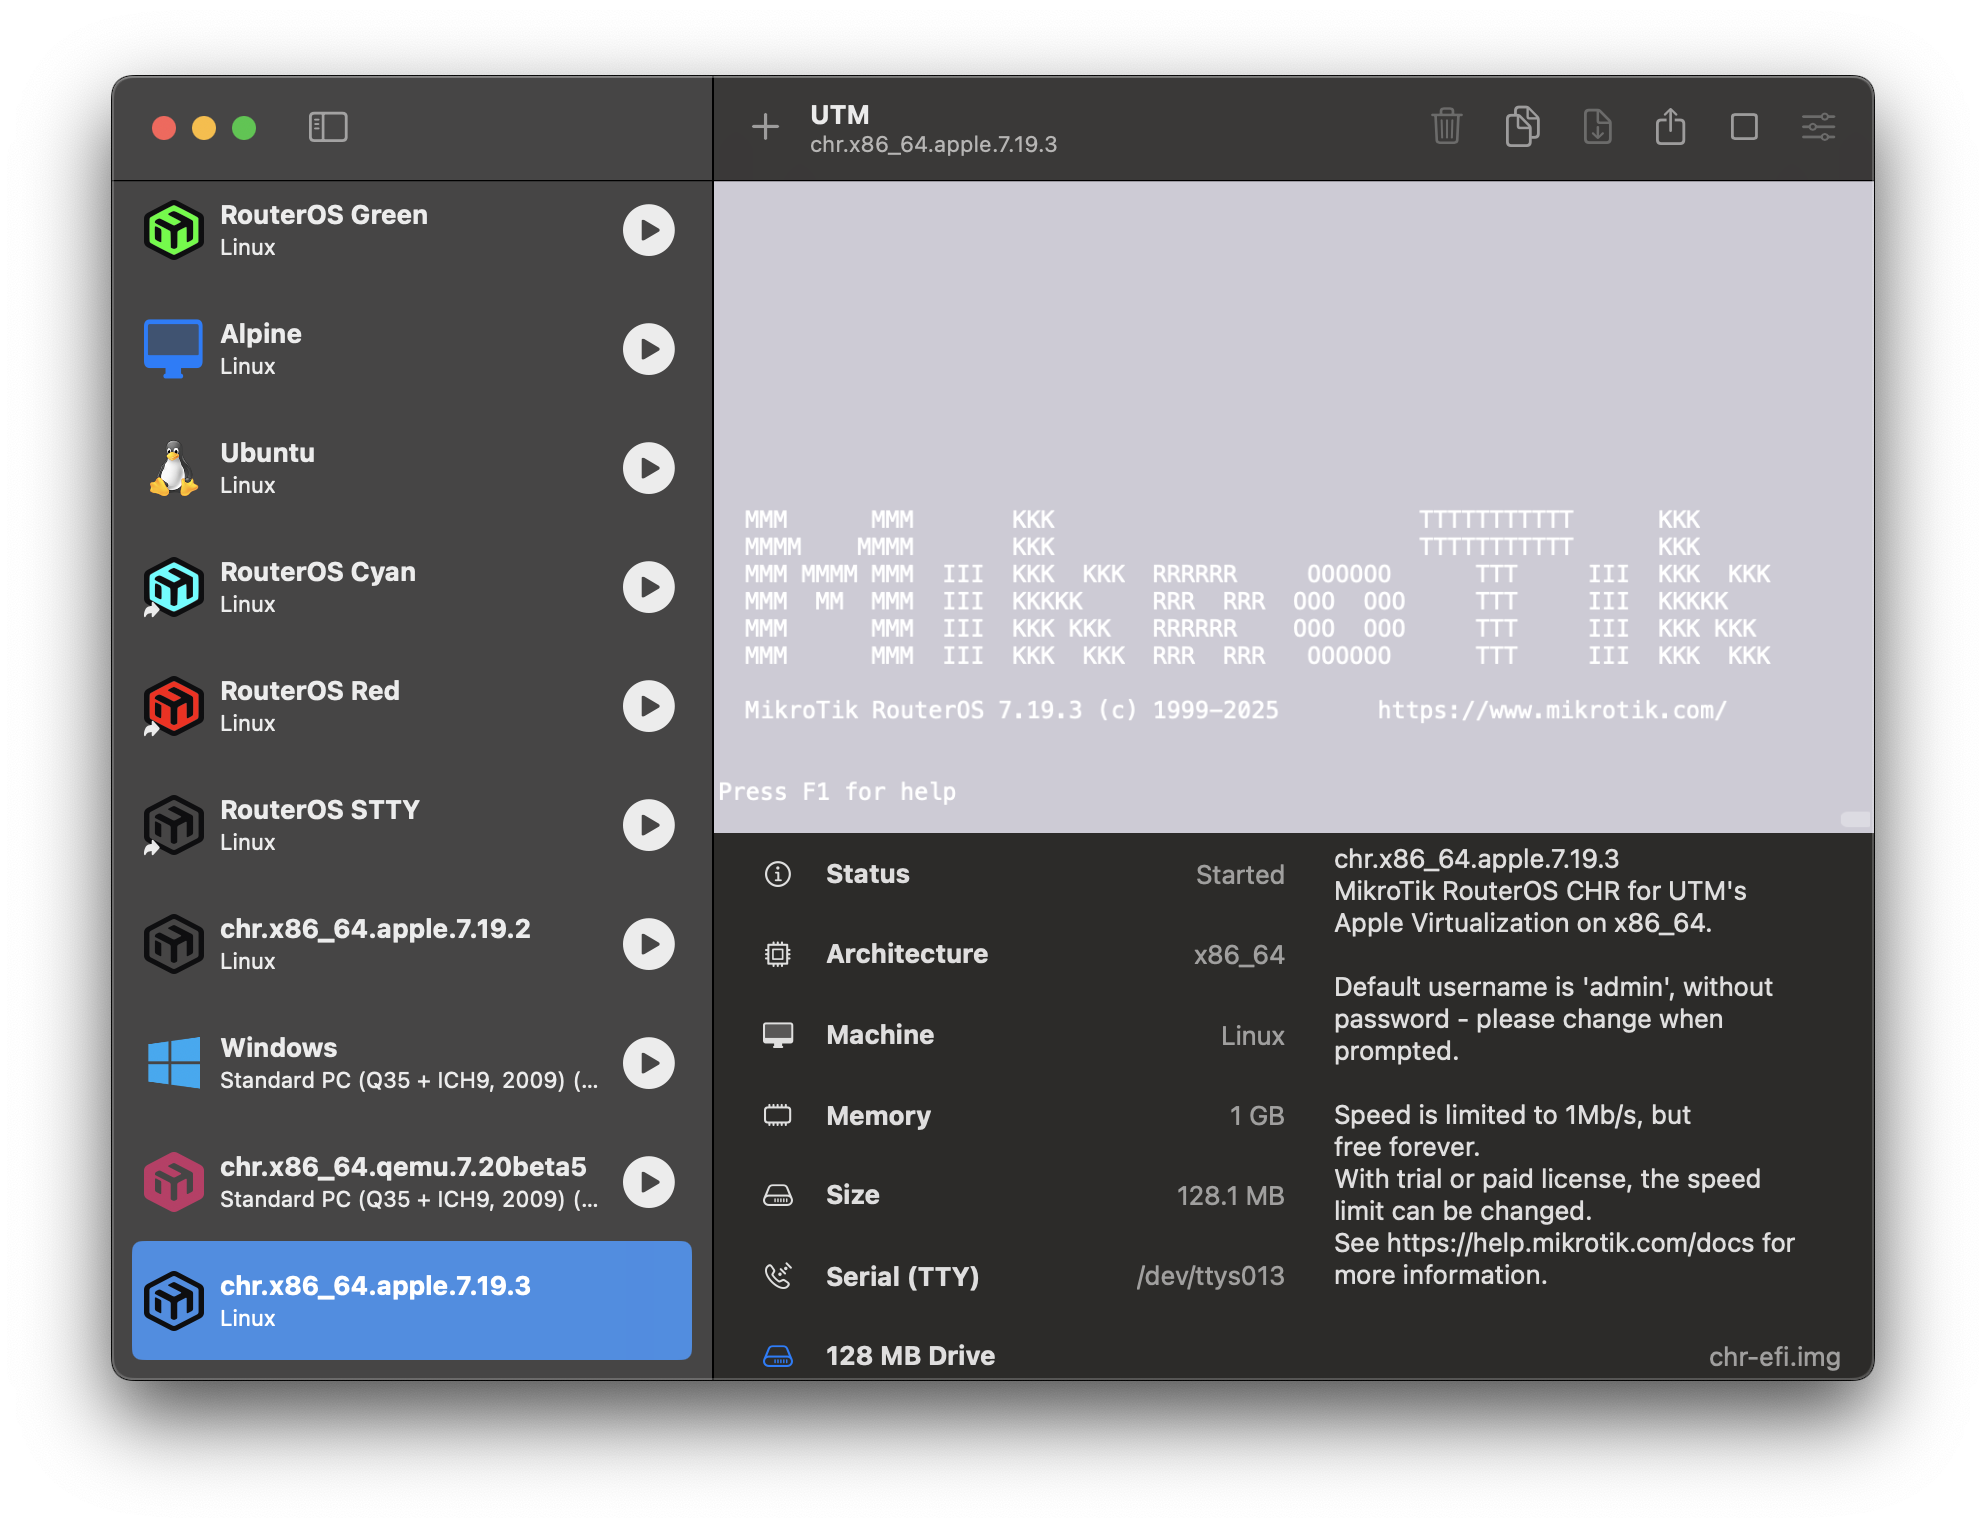
MikroTik offers a free license of RouterOS CHR that can virtualize RouterOS on desktop OSes. This lets you "play" with RouterOS concepts and configuration in TikBook – without fear of "messing up" a real RouterOS. Since TikBook itself uses very little data, the 1Mb/s data limit in the free edition is not an issue. And the additional CPU on a desktop, over a "regular" router, speeds most TikBook operations.
For Mac, TIKOCI offers Ready-to-run CHR images for UTM virtual machine runner that makes quick work of bringing up a CHR for use with TikBook – at least under macOS. For other OSes, VMWare and QEMU are supported, see MikroTik CHR documentation for more details
Use secure HTTPS, not HTTP
TikBook supports making TLS connections to RouterOS via https. While plain-text http may be fine for a test router, such as a local CHR or some "lab" router, when using a router that is in service, it is highly recommended to enable www-ssl in /ip/service, including using a certificate. To create a certificate, /certificate enable-ssl-certificate can be used to generate a Let's Encrypt certificate in /ip/service's www-ssl certificate. For example,
/certificate/enable-ssl-certificate
/ip/service enable www-ssl
When using https:// in TikBook's Base URL, the domain name must‡ match the certificate. So if using the RouterOS's Let's Encrypt generated certificate, the /ip/cloud DDNS name must match the Base URL that should be used. For example, https://123x0fake888.sn.mynetname.net.
For self-signed certificates, the computer running VS Code must have the public key of the self-signed root authority installed into the certificate store ("Keychain" on macOS/iPadOS/ iOS). The name used in the Base URL still has to match the certificate, even with self-signed certificates.
Certificate checking can be disabled in VS Code for Desktop (see Disabling "check certificates" below). When using VS Code for the Web, it is not possible to disable certificate checks or even use HTTP as CORS XSS checks are always enforced by the browser (see Setup CORS for VS Code for the Web below).
Tailor User Permissions
To use the REST API on RouterOS, the account must have at least read,api,rest-api permissions. All of the "built-in" groups like "read", "write", and "full" already include REST API access.
While a "normal" admin account can be used in TikBook, it is recommended to use a different account with permissions tailored to the use cases. For example, if using TikBook to run reports, the account does not need to be a "full" admin. Beyond minimizing permissions, using a different account also allows viewing of TikBook operations in logs if it uses a different account.
To create a custom group with minimum permissions, use:
/user/group add name=tikbook-read policy=read,api,rest-api
/user add name=tikbook group=tikbook-read password=[/terminal/ask prompt="Select password for new 'tikbook' account:"]
Provide Credentials to RouterOS LSP
TikBook, by default, will provide RouterOS LSP credentials to use for language features like colors and completion. While using different routers for each extension is supported, it is not recommended to disable syncing credentials since different versions, interfaces, packages, etc., may result in different syntax validation. i.e. what appears as an error may be valid, or vice versa, when LSP and TikBook use different routers. Disabling "Provide Credentials to RouterOS LSP" in TikBook settings will cause each extension to use its credentials. Additionally, the option can be disabled in RouterOS LSP settings by disabling "Allow Client Credentials", which blocks TikBook from updating them.
Troubleshooting Connection
Some things to review if TikBook cannot connect to RouterOS:
Test using WebFig
To test, use the "Base URL" in a web browser from the same computer running VS Code. The admin web interface ("WebFig") should appear, then log in using the same credentials as TikBook. If that works, the REST API should work.
When using HTTPS, if the browser presents some "Unsafe" message, that means VS Code's certificate check will fail. The browser should be able to open the HTTPS URL without any prompts to work in TikBook under VS Code's default restrictions.
You can launch WebFig from the Quick Command Menu under "RouterOS Management"
Disabling "check certificates"
VS Code by default enforces certificate checks on all extensions – which is why the DNS name in Base URL must match the one in the certificate used by RouterOS www-ssl. It is possible to disable VS Code TLS certificate checks by setting http.proxySupport to override in VS Code Settings. Note changing Proxy Support setting effects all extensions.
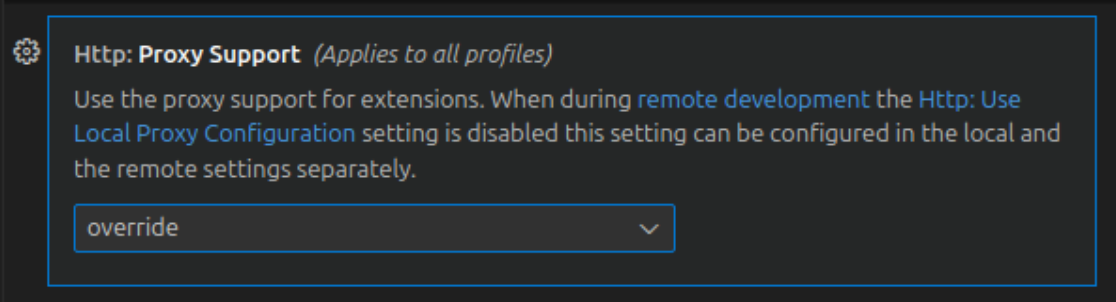
Additionally, TikBook's "Check Certificates" (tikbook.checkCertificate) setting must also be disabled (=false) too.
Find HTTP or HTTPS Port
On RouterOS, use:
/ip/service/print where name~("www|www-ssl") !dynamic`
Which will show ports and status:
#   NAME     PORT  PROTO  CERTIFICATE             VRF
3   www        80  tcp                            main
4 X www-ssl   443  tcp    Lets encrypt1753229987  main
Make sure the port you're using is not disabled. Disabled services are indicated by an X next to the service name. The port must match and can be provided in the "Base URL" in TikBook's settings, and the protocol used must be enabled in RouterOS. www-ssl is https:// and despite the name uses modern TLS
Check Firewall (/ip/firewall/filter)
By default, the RouterOS REST API via http is enabled and running on port 80, and is also available only to LAN devices. As such, TikBook should work "out of the box" with a default router, in a default configuration using http:// without additional router configuration.
For all other configurations, the RouterOS configuration may need to be adjusted. The specifics may vary, but generally, some firewall rule like /ip/firewall/filter with chain=input action=allow dst-port=<HTTP/S_PORT>... may be needed to allow incoming HTTP (or HTTPS) from a computer running VS Code.
See MikroTik's Firewall documentation for details. If you need help setting up a router to enable the REST API, you can also post on Mikrotik's forum for guidance on configuration.
CORS required for VS Code for the Web
TikBook supports running in the "web edition" of VS Code that is used by https://github.dev and https://vscode.dev. However, RouterOS does not respond to the required CORS requests from the browser, so TikBook (and RouterOS LSP) do not work without using a CORS proxy between VS Code in the browser and RouterOS. i.e. an HTTP server that responds to CORS requests to the browser, but forwards the non-CORS request to RouterOS.
There are many approaches to setting up a "CORS Proxy". In all cases, HTTPS must be used for CORS. One method to install a proxy is to run it as a container either on RouterOS or another container host. Various web servers have been tested and known to work on RouterOS containers for use as a CORS proxy, including NGINX, Traefik, and Caddy Server. See those links, or consult the web for more exact details on the setup of a CORS proxy.
Keep in mind, even if using VS Code for the Web, traffic between TikBook and a RouterOS REST is still routed via the local router. So if using VS Code for the Web from a browser on the same LAN as the connected router, the REST API traffic is still local since the browser does make a direct connection from VS Code in the browser to RouterOS. The CORS proxy is needed because the local domain (or IP address) does not match "github.dev"/etc, which is what actually triggers the CORS "cross-site" scripting protections/requirements. Point being, using a VS Code Web with a CORS proxy does not necessarily mean your router is "exposed" on the internet.
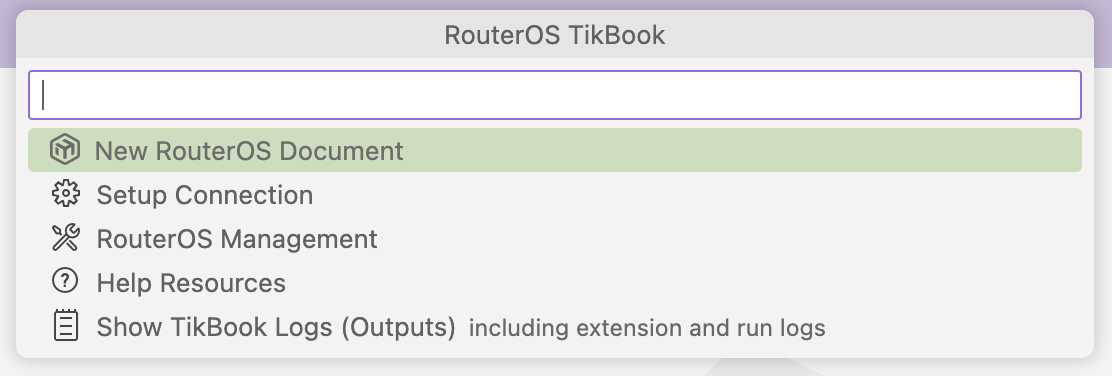
"Quick Commander" Menu
The Quick Commander Menu provides access to various commands and features of TikBook into a friendly "menu tree".
By default, Option + Shift + M will alunch the top menu and access all of the features. This is customizable using "Keybinding" from VS Code for Tikbook: Quick Commander Menu
New RouterOS Document
Create a new RouterOS notebook or script:
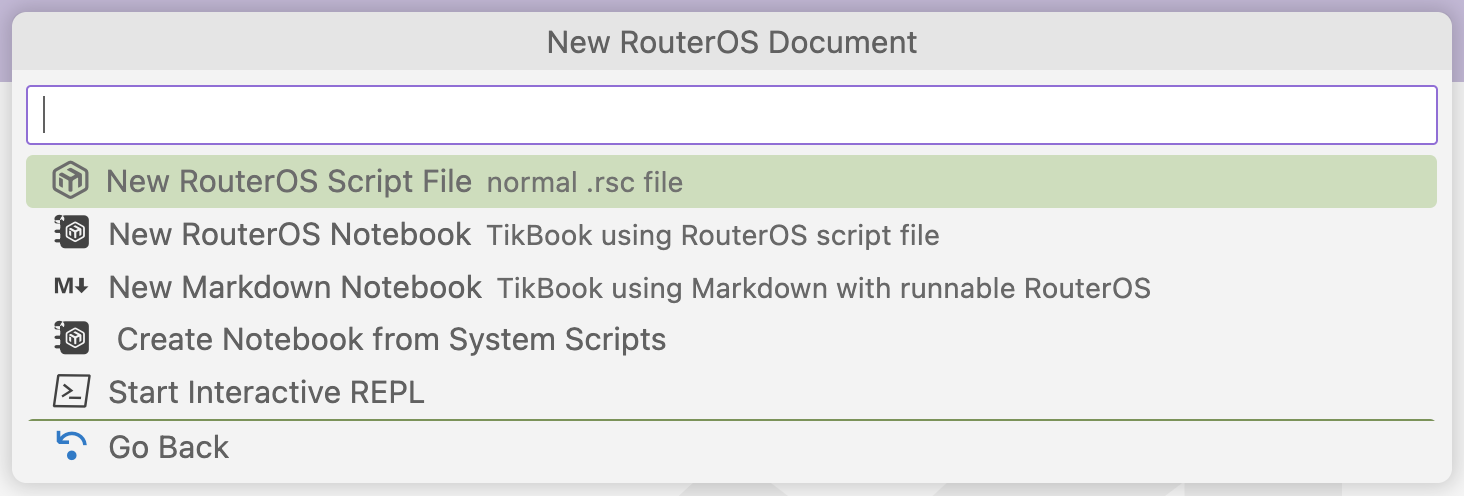
Different notebook formats are discussed in the sections below.
The "Start Interactive REPL" is a view from VS Code that mimics a CLI using a notebook-like interface — but it is still not a notebook since the REPL cannot be saved, and executed commands are stored like an adding machine tape, not next to cells. Not sure it's useful and may be removed in future versions
Setup Connection
To change the connected router or view settings:
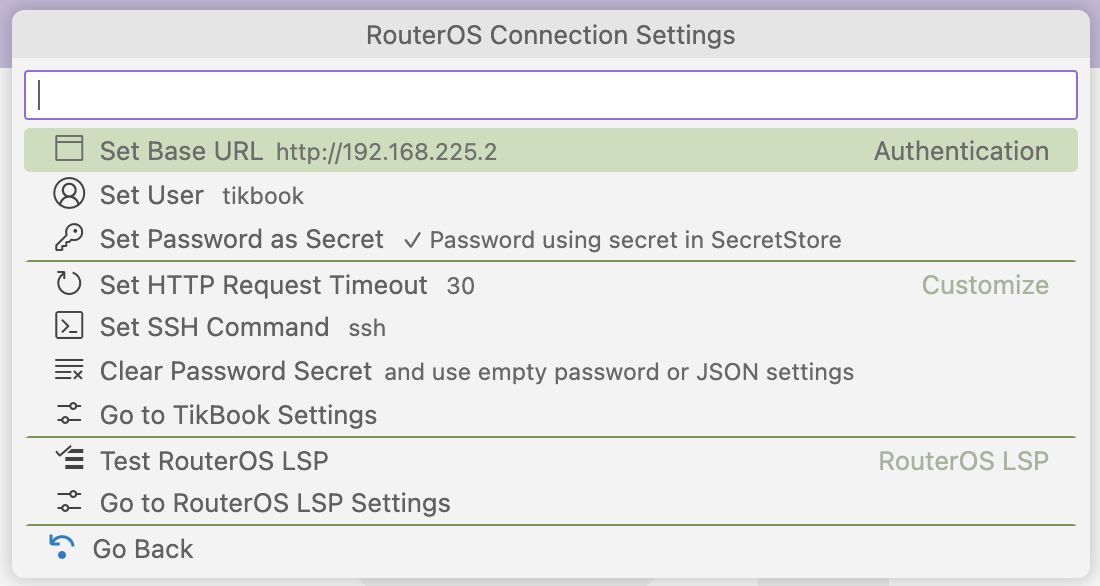
In addition to RouterOS REST API credentials, you can set the apiTimeout (control how long TikBook waits for a response from RouterOS before erroring), sshCommand (used when invoking "Open SSH Terminal" in RouterOS Management menu), and options to go to VS Code settings directly.
Using Set Secret Password" will replace any existing password. The "Clear Secret Password" option is not recommended, but will cause TikBook to use password from settings.json directly, or no password at all. i.e. To use "admin" with "no password", you cannot use a secret to store a 0 length password, so the "Clear Secret Password" needs to be used for "no password".
Additionally, there is an option that invokes the RouterOS LSP's "Test Connection". This tells the RouterOS LSP server to check its connection to RouterOS – since RouterOS LSP uses a separate connection from TikBook. Although, by default, TikBook will "share" its credentials with the LSP, so both should use the same router – you can disable this in settings
RouterOS Management
Provides access to SSH and WebFig, along with various data extracts — including CSV — from the connected router:
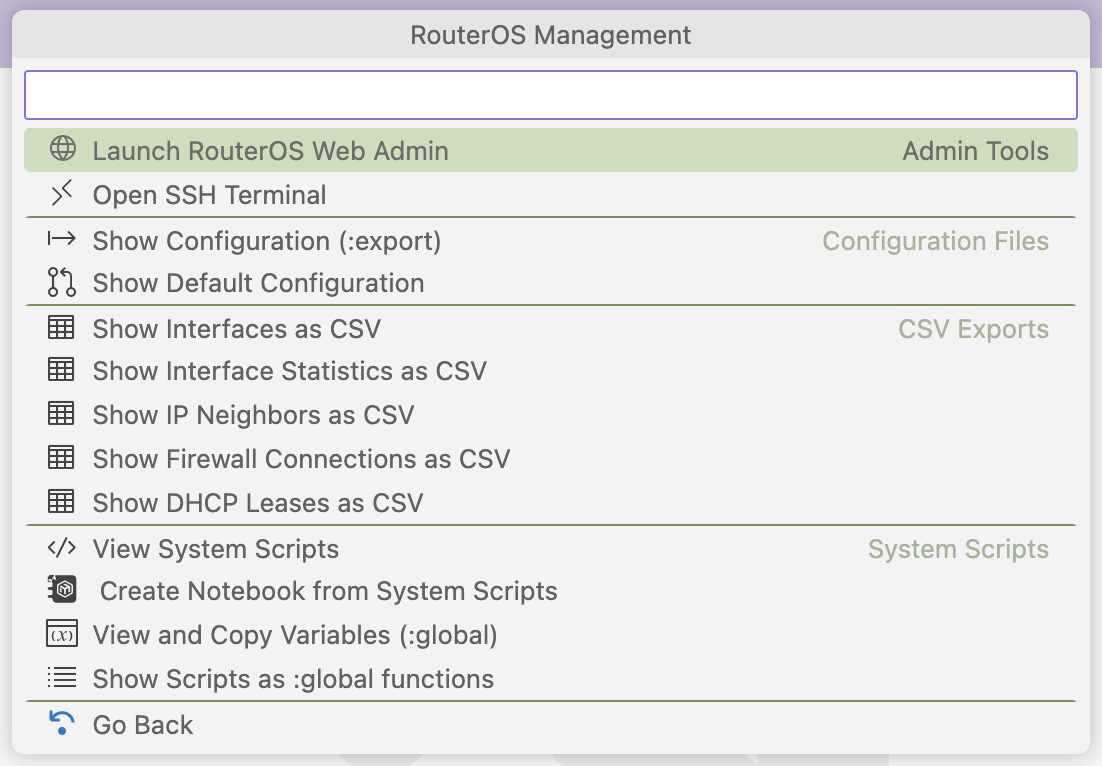
- "Launch RouterOS Web Admin" will open a new browser window and use "Base URL" to connect to WebFig
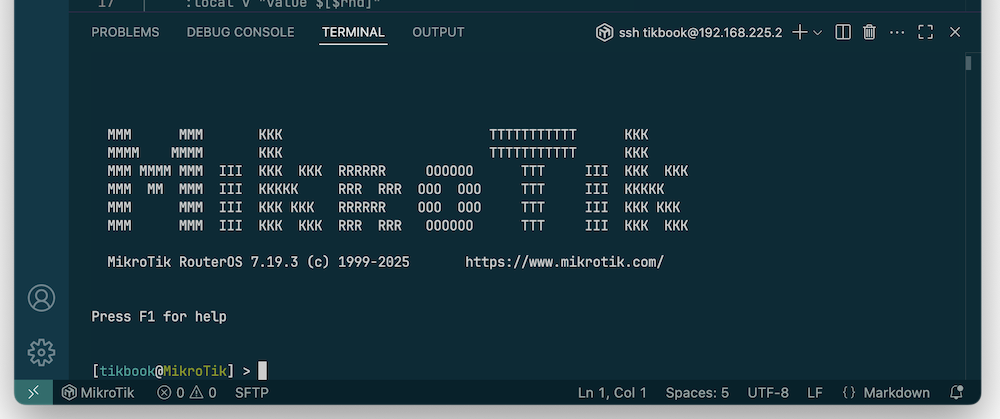
- "Open SSH Terminal" will appear in the "Terminal" view and use the system's existing
ssh command. The ssh command to use, including any options, can be configured in settings or the "Setup Connection" menu.
- The "Show ..." options in the menu provide a read-only "virtual document" that will appear in an editor window. Use "Save As" to be able to edit the read-only document from a "Show". The "Refresh" button in the editor toolbar will re-fetch the virtual document from the router.
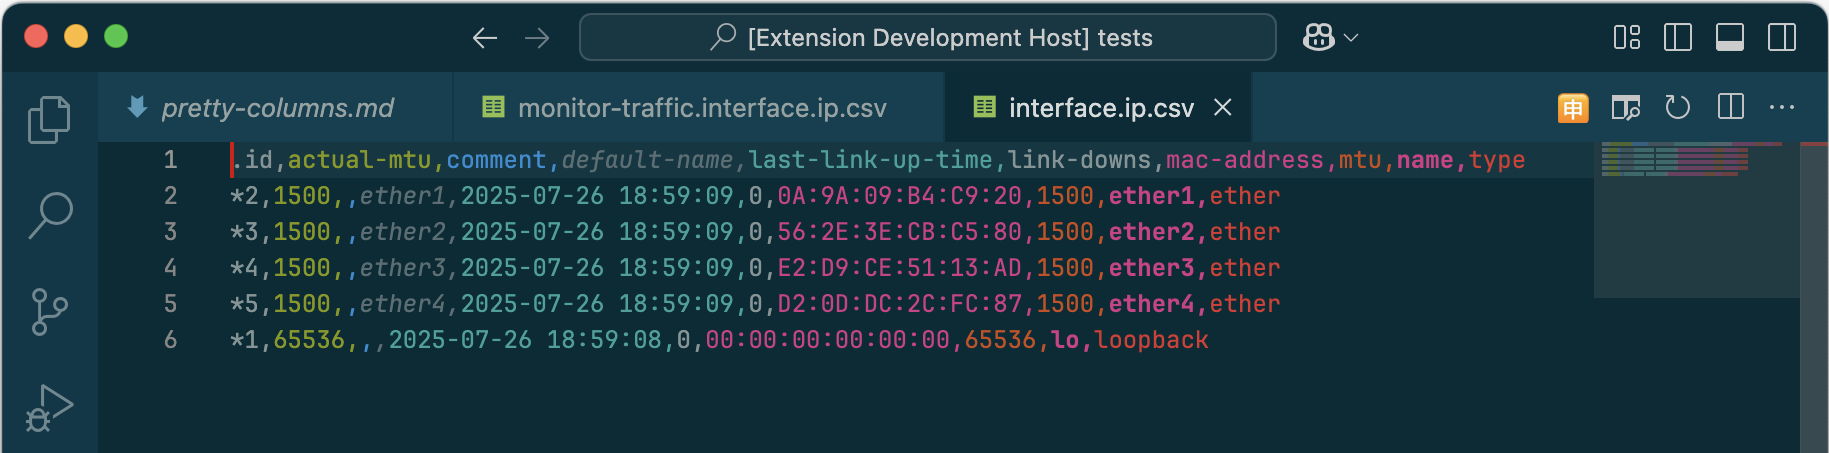 with Rainbow CSV extension installed
- "View and Copy Variables" displays a list of variables and their value stored in
/system/script/env. Selecting an item will copy the variable name to the clipboard.
Interactions with /system/script is a WIP
TikBook currently offers both Create Notebook from System Scripts and Show Scripts as :global functions commands – neither are ideal for working with scripts stored on the router since data is one-way: router to editor. While you can "manually" cut-and-paste a cell back to RouterOS scripts when done editing, better methods to work directly with /system/script in TikBook are under review (for example, a VS Code virtual file system).
Using the current Create Notebook from System Scripts option will create a new notebook using existing scripts from the connected router to populate cells in a RouterOS TikBook Notebook - one cell per script. While Show Scripts as :global functions creates a text document with each system script defined as a :global function. Currently, neither document is synced back to /system/scripts. Instead, these files can be saved to the local disk, like other documents.
Help Resources
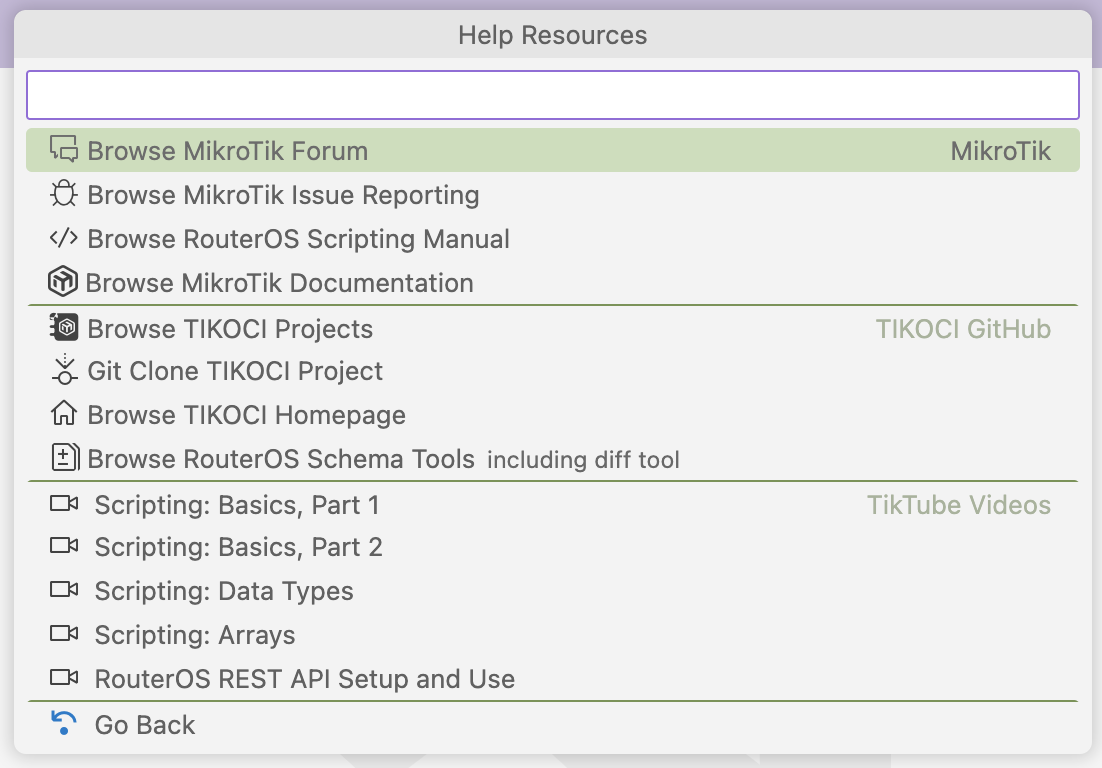
Essentially, "bookmarks" to various other web content with information about RouterOS scripting. All items that start with "Browse" will open a new web browser with the selected page. For example, you can access MikroTik documentation and the forum from the menu. Other options include:
- TIKOCI has other projects than TikBook, including containers. Browser TIKOCI Projects will show another menu that lists TIKOCI projects, and allows navigation directly to the GitHub page for a selected project. The Git Clone will show the same list, but "copy" (
git clone) any TIKOCI project as a local git repo on a computer running VS Code that can be modified as desired.
- Browser RouterOS Schema Tools opens a browser to a web tool to "diff" commands and arguments between different versions, and allows download of RAML and OpenAPI schemas for RouterOS's REST API.
- Selected "TikTube" videos about scripting topics that play inside of VS Code. Experimental, see below
Video Playback is Experimental
There are several menu options in the Help Resources menu to play a video, for example, Scripting: Data Types, among others. One future use case for TikBook is training, where having instructional videos (beyond MikroTik's) would be useful. And by embedding the video, all sorts of "multimedia things" are possible, like loading code or documents from links in the video, or even having the editor window sync with code examples as they are typed/shown in the video. Currently, only a test "Chapter Picker" control is overlaid on the screen to test the concept.
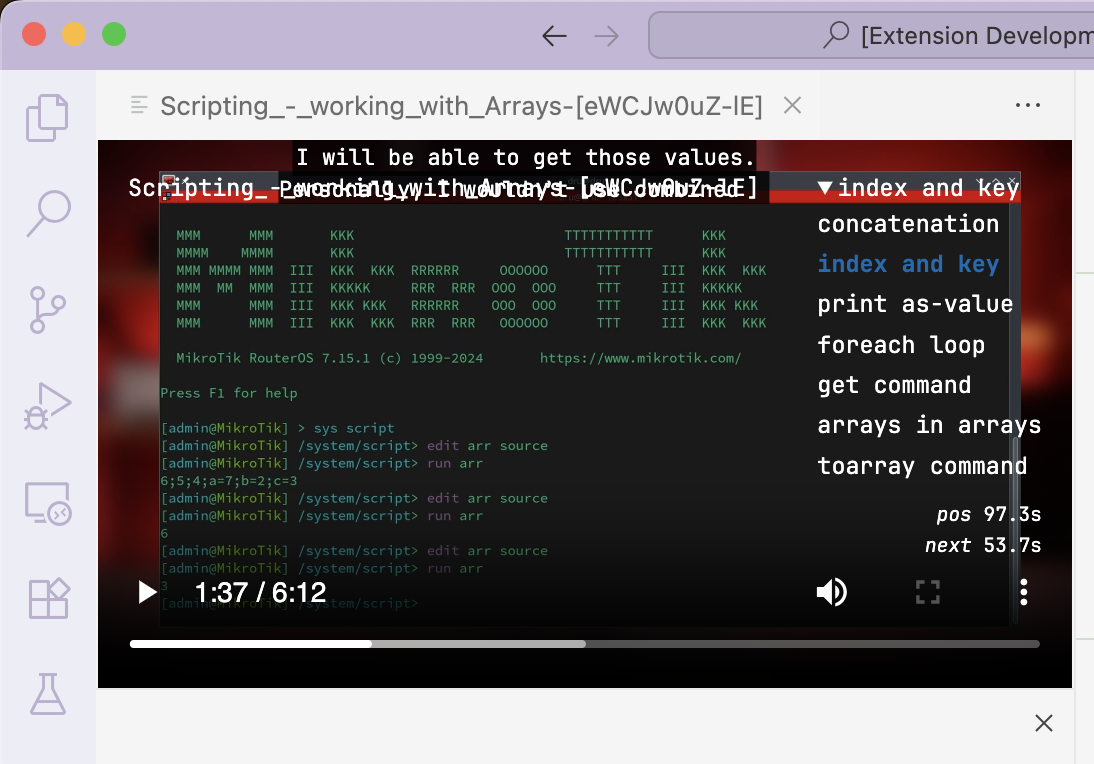
The issue is VS Code is very picky about allowing HTML content, so video playback is not just a "YouTube <iframe>", thus the "experimental" tag. Currently, videos have to have audio re-encoded to MP3 to work in VS Code, and in some environments, there is still no audio. If you try the feature and the audio does not work, please report it along with the OS, VS Code version, and the video name.
Show Logs (Outputs)
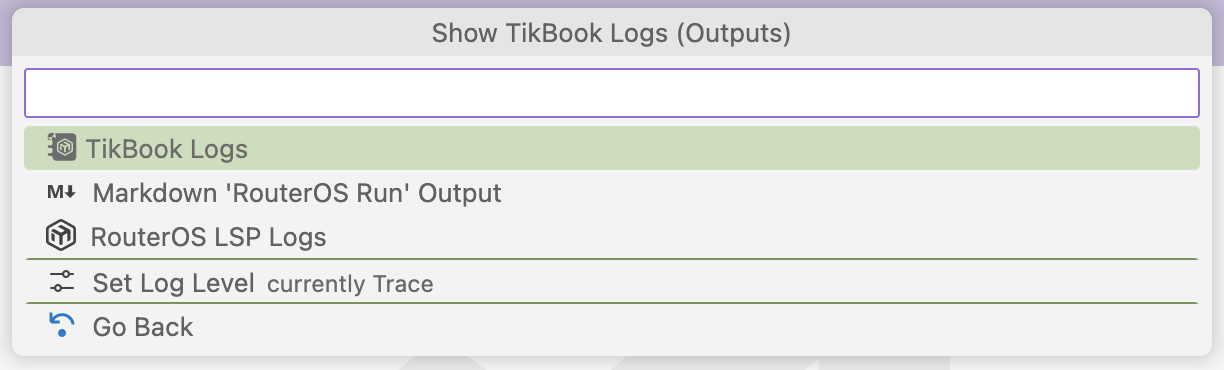
Allows quick access to the Output panel selected for the right log. Also, the log level can be changed. There is both a default log level for all VS Code extensions, or you can customize the log level for TikBook for troubleshooting.
Using Notebook Editor
TikBook supports two notebook formats, and indicated in the top right corner of the notebook:
"RouterOS TikBook" Notebook (*.md.rsc or *.tikbook) - stored as regular RouterOS script text file with #.markdown and #. comments to denote Markdown markup cells

"Markdown RouterOS" Notebook (*.rsc.md or *.rscmd) - stored as a regular Markdown text file with ```routeros code blocks to denote RouterOS code cells

VS Code calls this the "notebook kernel". For TikBook, it only affects the file format used to save the notebook - all other features are identical between "Markdown RouterOS" and "RouterOS TikBook" kernels.
Notebook Cell Types
Notebooks have just two cell types: markup and code. For TikBook, it's Markdown and RouterOS, respectively. The UI has options above and below each cell to add new ones of a particular type. You can have multiple Markdown or multiple RouterOS cells next to one another too.
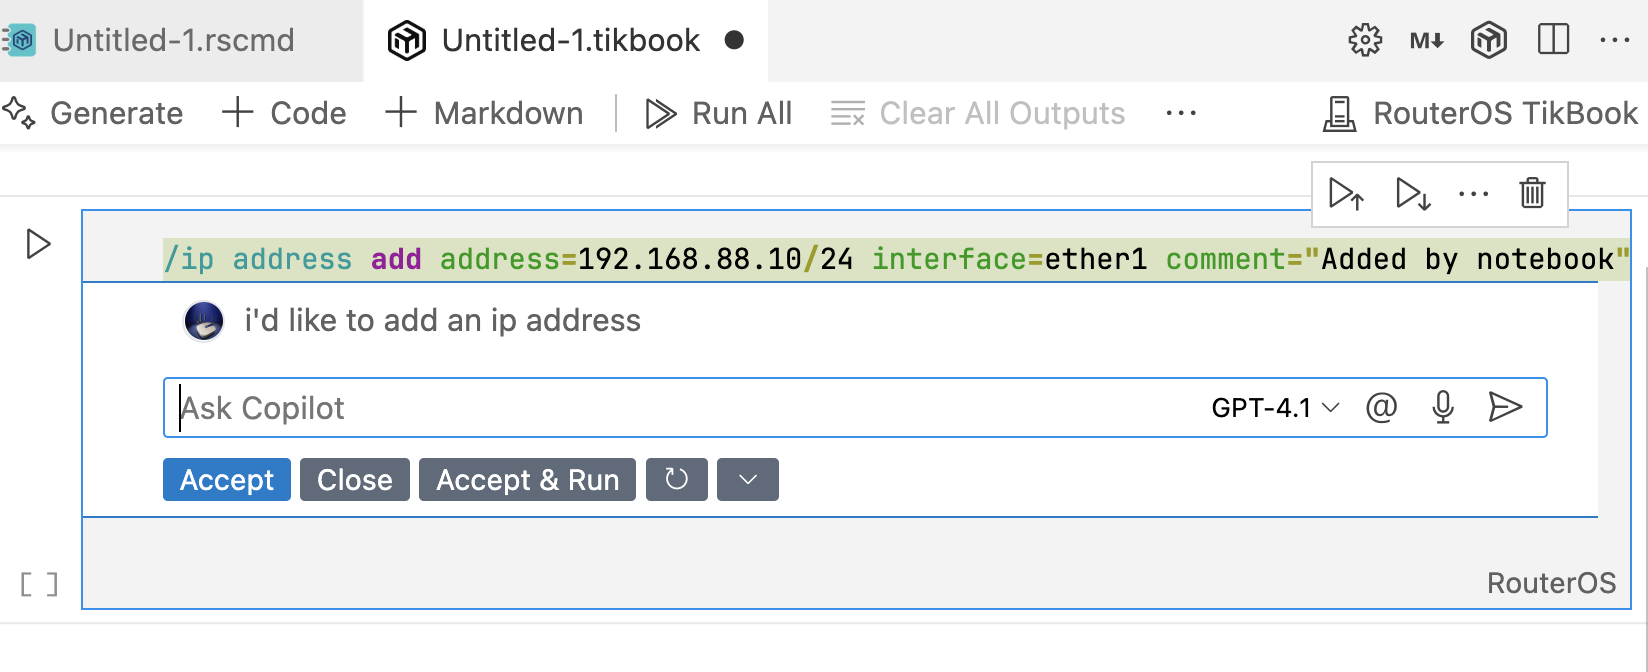
With Microsoft CoPilot installed, you'll see a "Generate" option that uses an LLM to write a cell based on a text description. TikBook currently does not do anything to augment CoPilot, so this feature relies solely on CoPilot's built-in logic today. In the future, it will be possible to offer CoPilot the current configuration or global variables, for example. Or, TikBook could offer more specific prompting tailored to RouterOS to aid CoPilot. As a result, today, you may get marginal results from the "Generate" option – but welcome to try.
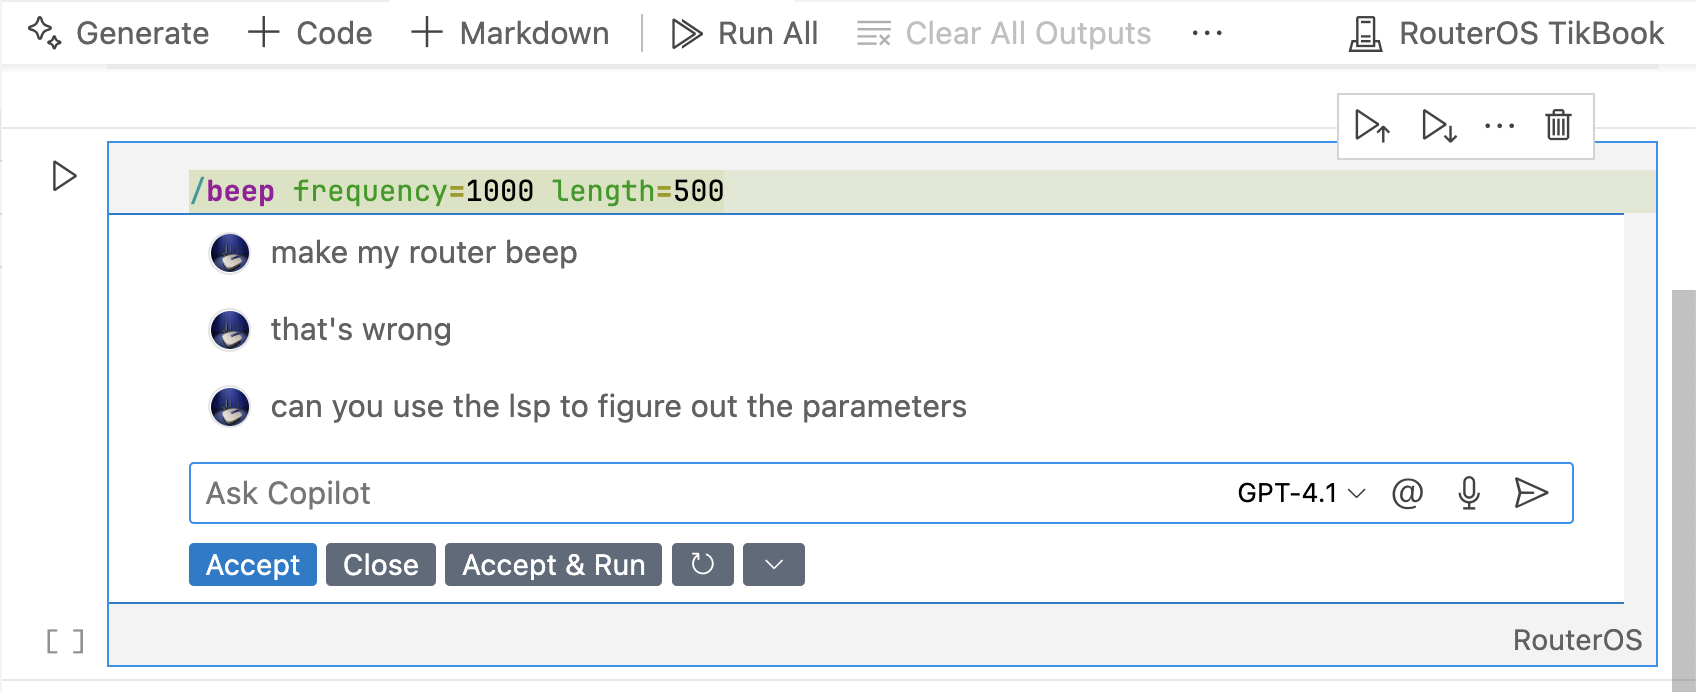
The cell types appear in the notebook toolbar:

Running Code
In the notebook interface, you can choose what cells to "run". For example,
- Run All Cells is shown in the toolbar and runs all "code" cells in the notebook, sequentially in order shown. If an error occurs, execution stops, and the "Go To" button will appear in the toolbar, which jumps to the cell with the error.
- Run Cell is the "play" button next to each code cell in the stop book. It runs just that cell with the output shown below the cell.
- Run Cell in Section is based on "markup" cells heading level in Markdown. In the upper right of markup cells with headers, a "play" button appears that will expand the "section". This is tricky at first to understand. But using
# headers in the markup will "group" code cells below, until another markup cell with the same heading level appears to "close" the section. Essentially, this creates "run groups" within the notebook so "parts" of the notebook can be run without using either "all" or "cell" run option. The Markdown-created section hierarchy can be multiple levels. Unlike "Run All Cells", a section run will stop at the end of the section, not the end of the document.
TIP
In a longer notebook, sections can be collapsed to "hide" internal functions so the notebook is "more presentable". Note that collapsed sections will still run as part of "Run All Cells," and a section still runs even if collapsed – so collapsed sections are just for presentation and do not affect execution. Also, currently, the notebook does not save the "collapsed state"
Maximum Execution Time
The absolute maximum a cell can take is 60 seconds, since the RouterOS REST API will timeout waiting at that point. If a lower timeout value is configured in TikBook settings, then that becomes the maximum execution time. To avoid hitting this limit, break up code into individual cells, since the maximum execution time is enforced on a per-cell basis. The notebook's "Run All Cells" has no limit, but each cell still must complete within the timeout (i.e. the lower of RouterOS REST 60 second limit and TikBook's apiTimeout setting), otherwise a timeout error will result, which stops execution of other cells.
Variables in Code Cells
RouterOS's :global variables work across code cells. So you can declare a like :global color "red" in one cell, and use $color in another cell. :local variables are local to the cell. Any functions declared in a cell still need to have any :global variables the function uses declared in the function body before use, same as "normal" RouterOS.
Output
Output of a "run" is shown below each cell executed by the "kernel" (i.e., TikBook). Internally, TikBook uses RouterOS :execute to run a cell, so the output is plain text if any. Code cells are not parsed into REST API commands; rather, the entire cell is provided to :execute. Output should be nearly identical to what would happen in CLI. Like the CLI, no :put is required to see a command's output. However, a :put may be needed to show variables or output values from functions.
Errors
Error will also be shown, and indicated by "red circled X", with RouterOS (or other) error message shown. Please note that error handling relies on string matching, so it is possible some errors might not be shown as errors (and to a lesser extent, errors shown that are not errors). Please report any instances where the error status is wrong, as TikBook may be missing some error string to look for to determine success/failure.
JSON Output Supported
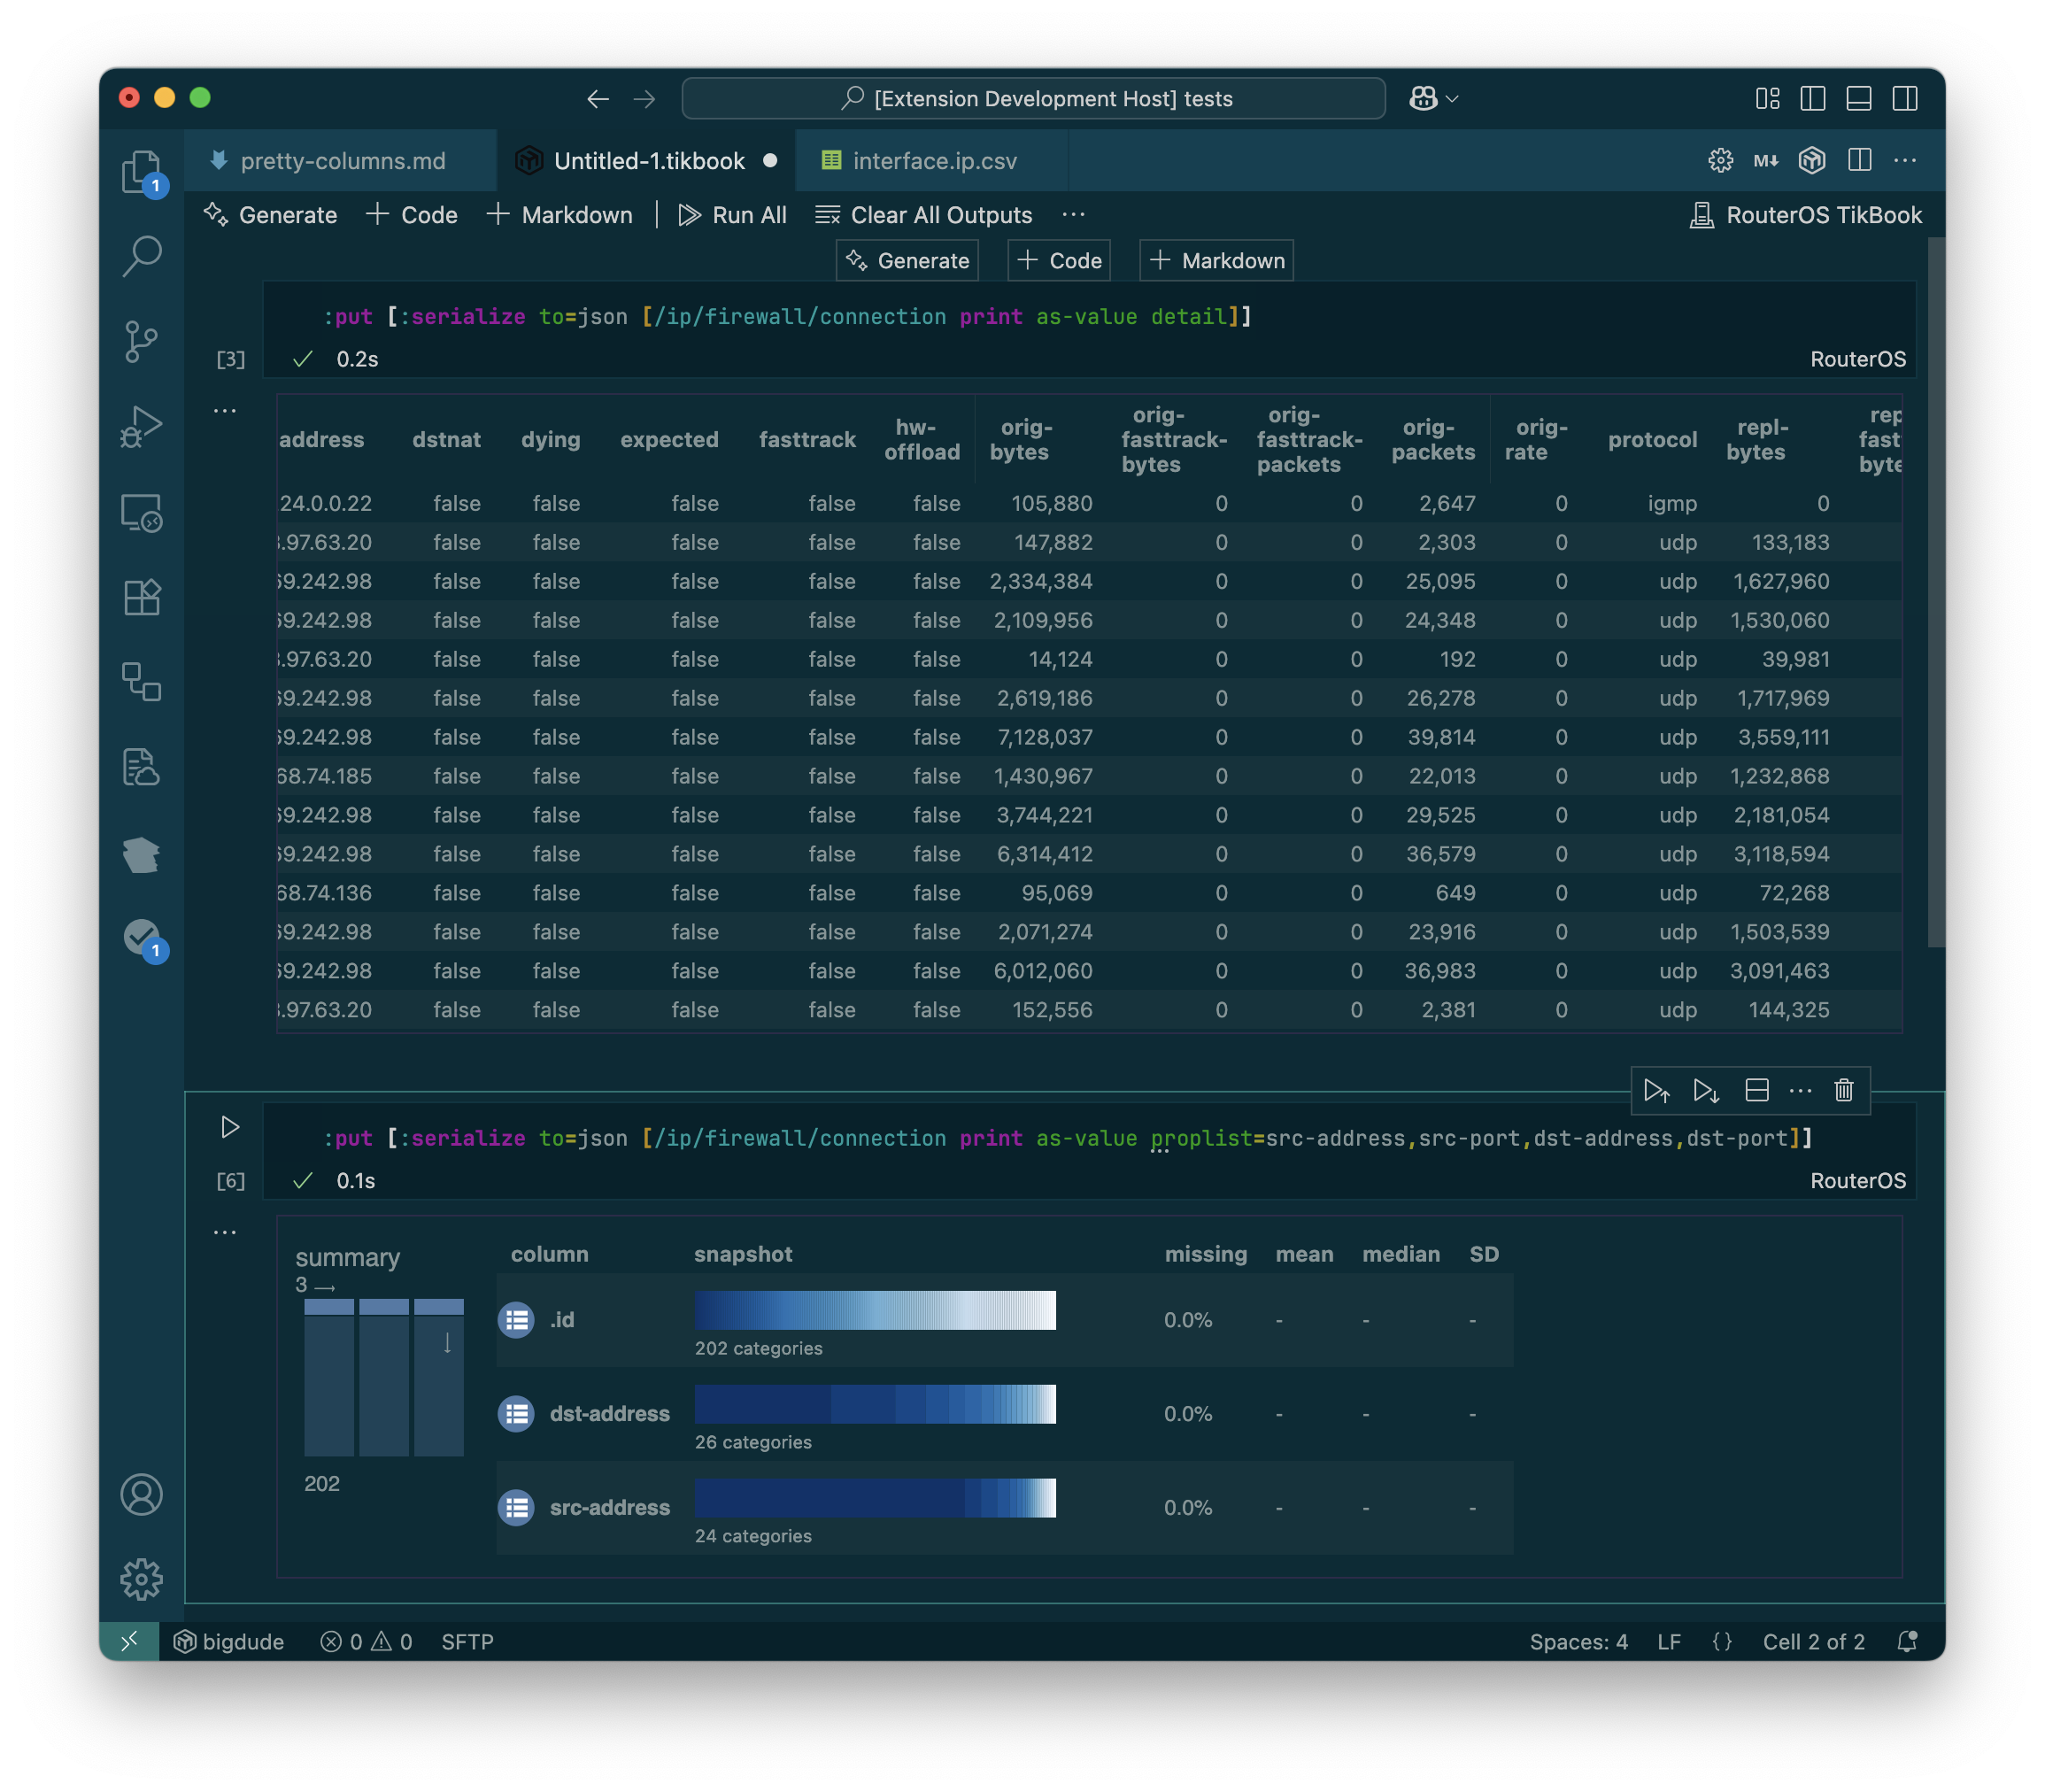
If the output of a cell execution is valid JSON, then a JSON type and output will be shown. This is useful since VS Code uses the mime-type of the output to offer different "output renderers", and plain text is limited in the available renderers. RouterOS's built-in :serialize function can be used to generate JSON, which TikBook will detect when output via a :put. For example, combining "serialize" with "print as-value" can produce data useful for reporting and charting:
:put [:serialize to=json [/ip/firewall/connection/print detail as-value]]
will show a JSON output in TikBook.
Rendering Extensions for Tables and Charts
TikBook has no built-in renderer other than the default plain text and JSON output. However, you can use other extensions to add "renderers" that can be used with TikBook notebook outputs. In general, renderers want JSON data, which can be produced as shown above by RouterOS's :serialize.
For example, Data Table Renderers extension offers some "Excel-like" views of a JSON output:
For CSV data, other extensions like Microsoft's Data Wrangler, Rainbow CSV, and Random Fractal's Data Preview can be used.
This can be used to create reports or other custom metrics from RouterOS data.
Currently, TikBook does not save outputs with the notebook. Only the code and markup cells are stored in a file. Future versions may allow for saving of outputs. Since in some cases you may not want to save the output with the notebook, and likely on a per-notebook or per-cell basis, this makes it tricker since VS Code's UI does not have some builtin mechanism for toggle options in a notebook.
Similar story concerning "metadata", which notebooks also can contain. Currently, no metadata is saved with the notebook. The lack of metadata limits future features, such as saving outputs, since the options for saving outputs are likely to be stored in a notebook's metadata. Or, other features like "skipping cells" during a "Run All Cells" require using metadata to implement.
Both features are planned.
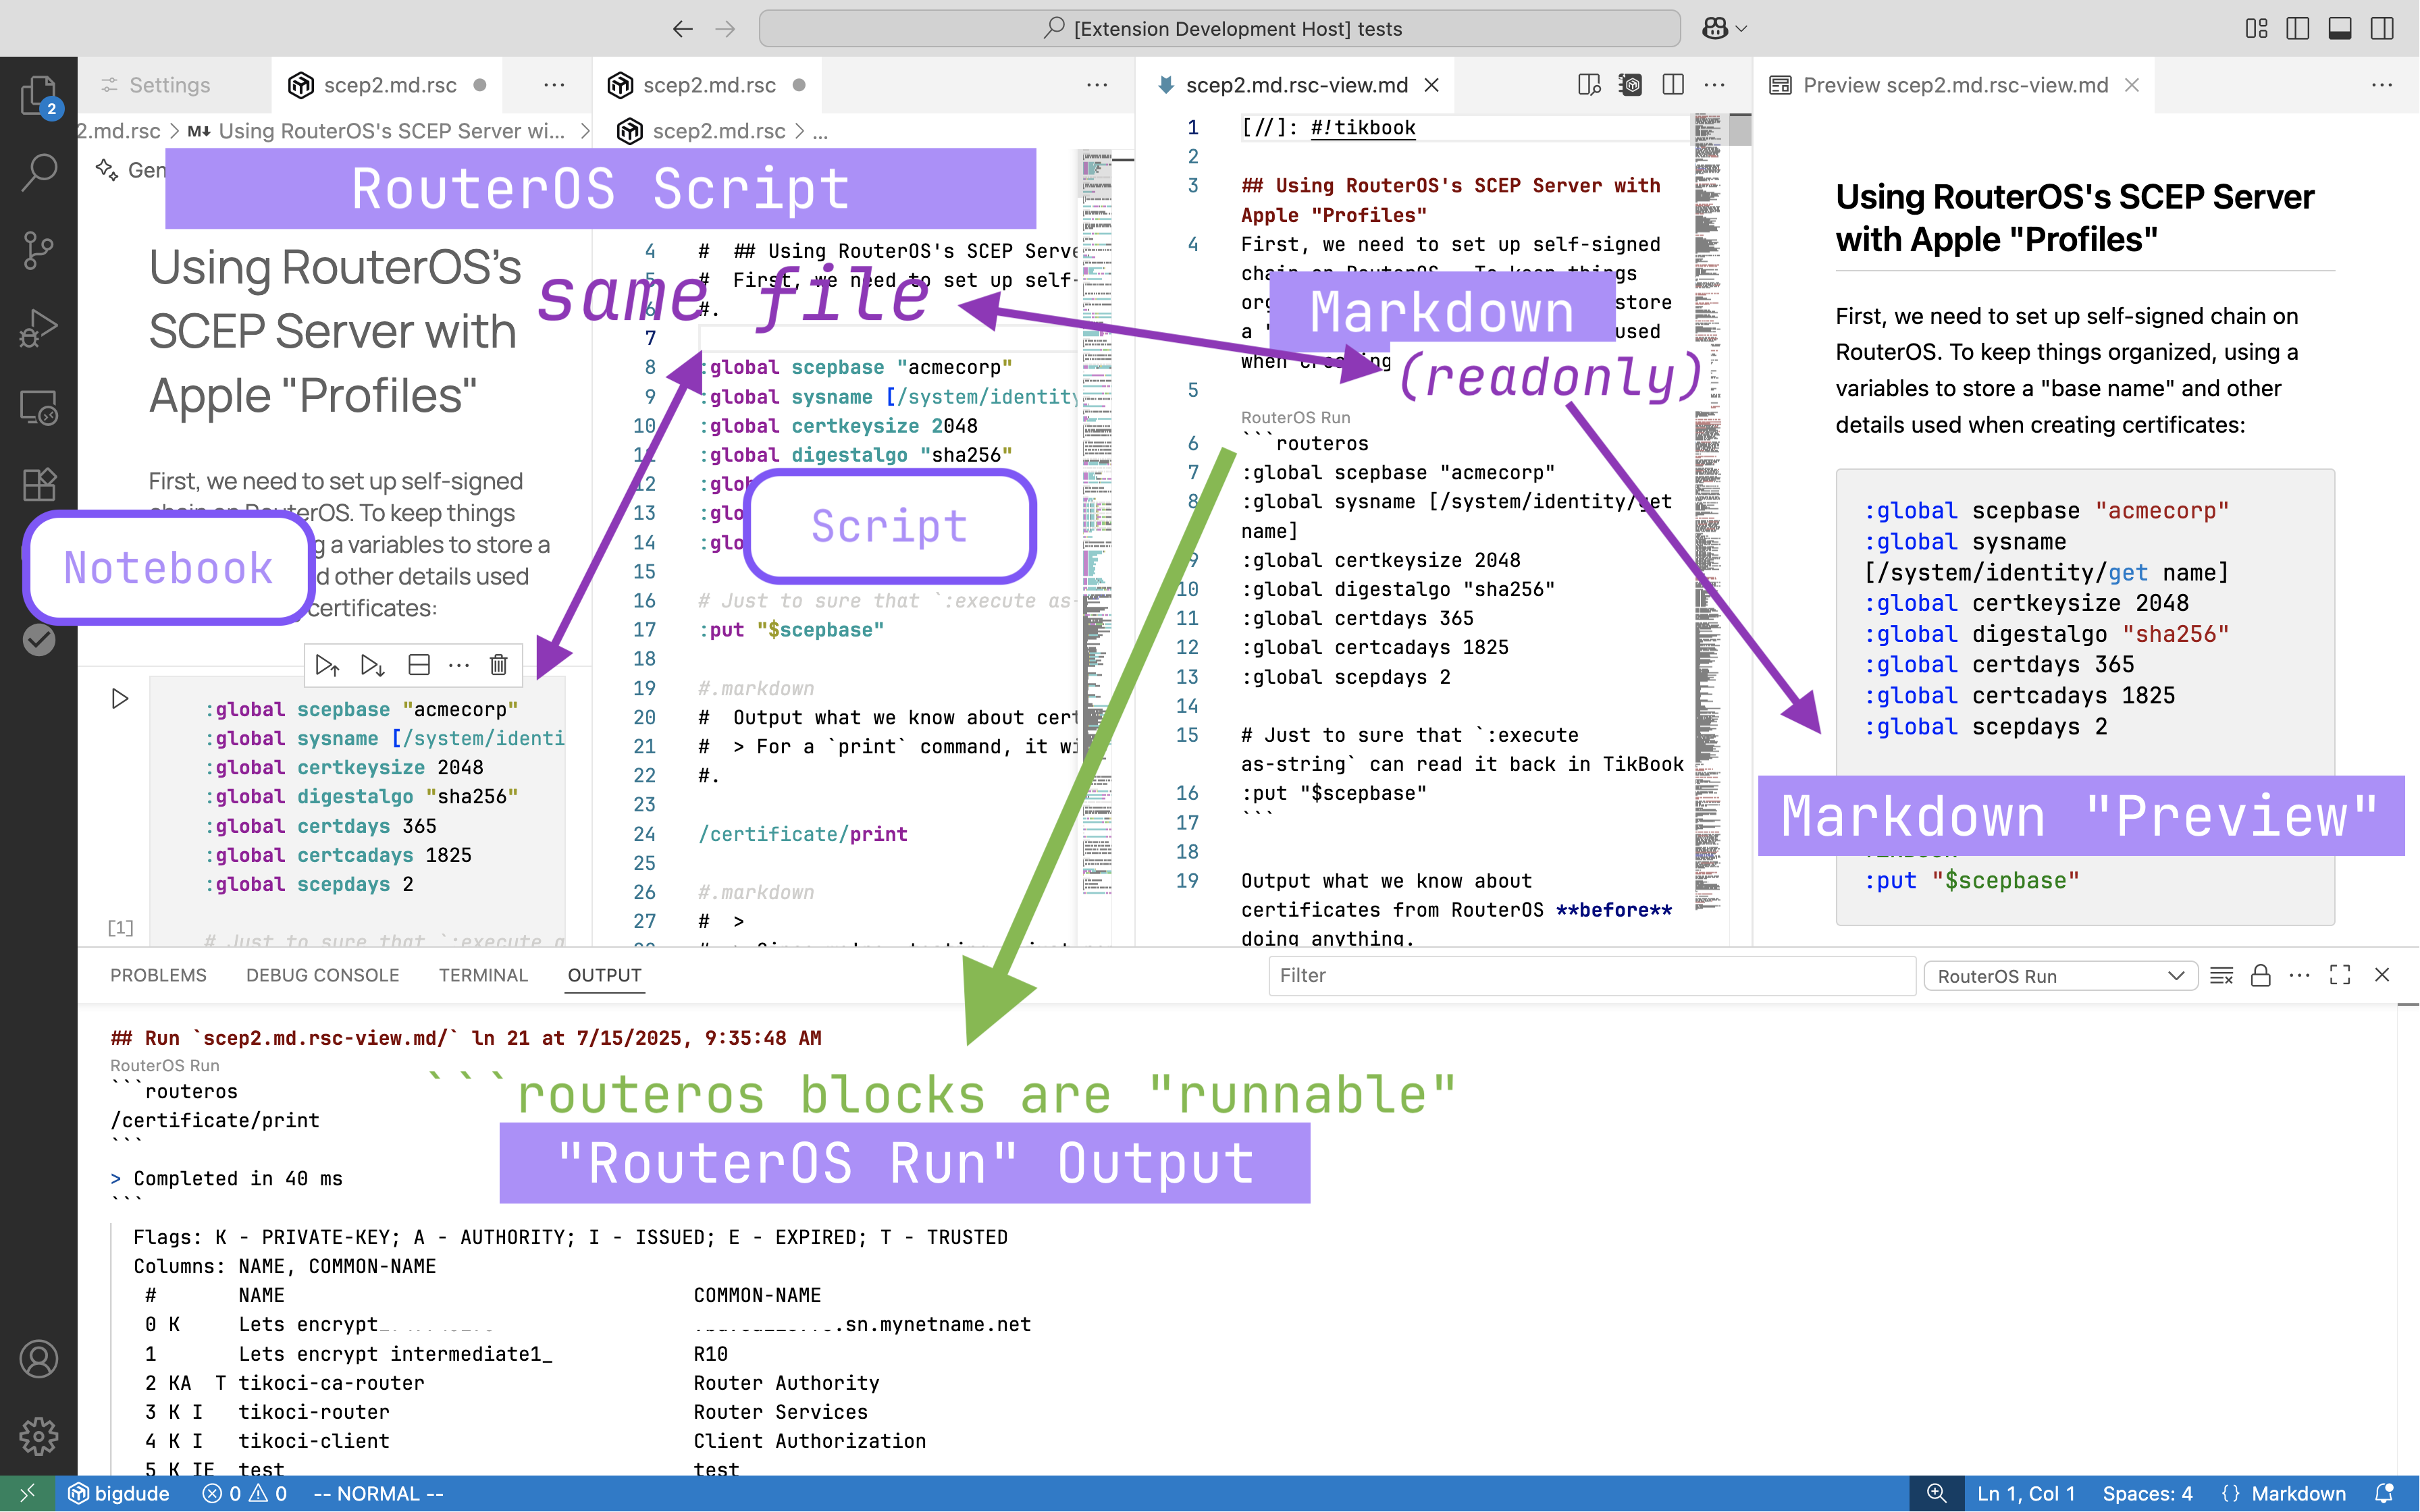
Markdown and ▶️ RouterOS Run
For normal Markdown files, an option to ▶️ RouterOS Run will appear above any code fence blocks marked as ```routeros. When run, the results will appear in the "Output" panel in VS Code under "RouterOS Run". The output panel will automatically be shown when you run a ```routeros code fence block.
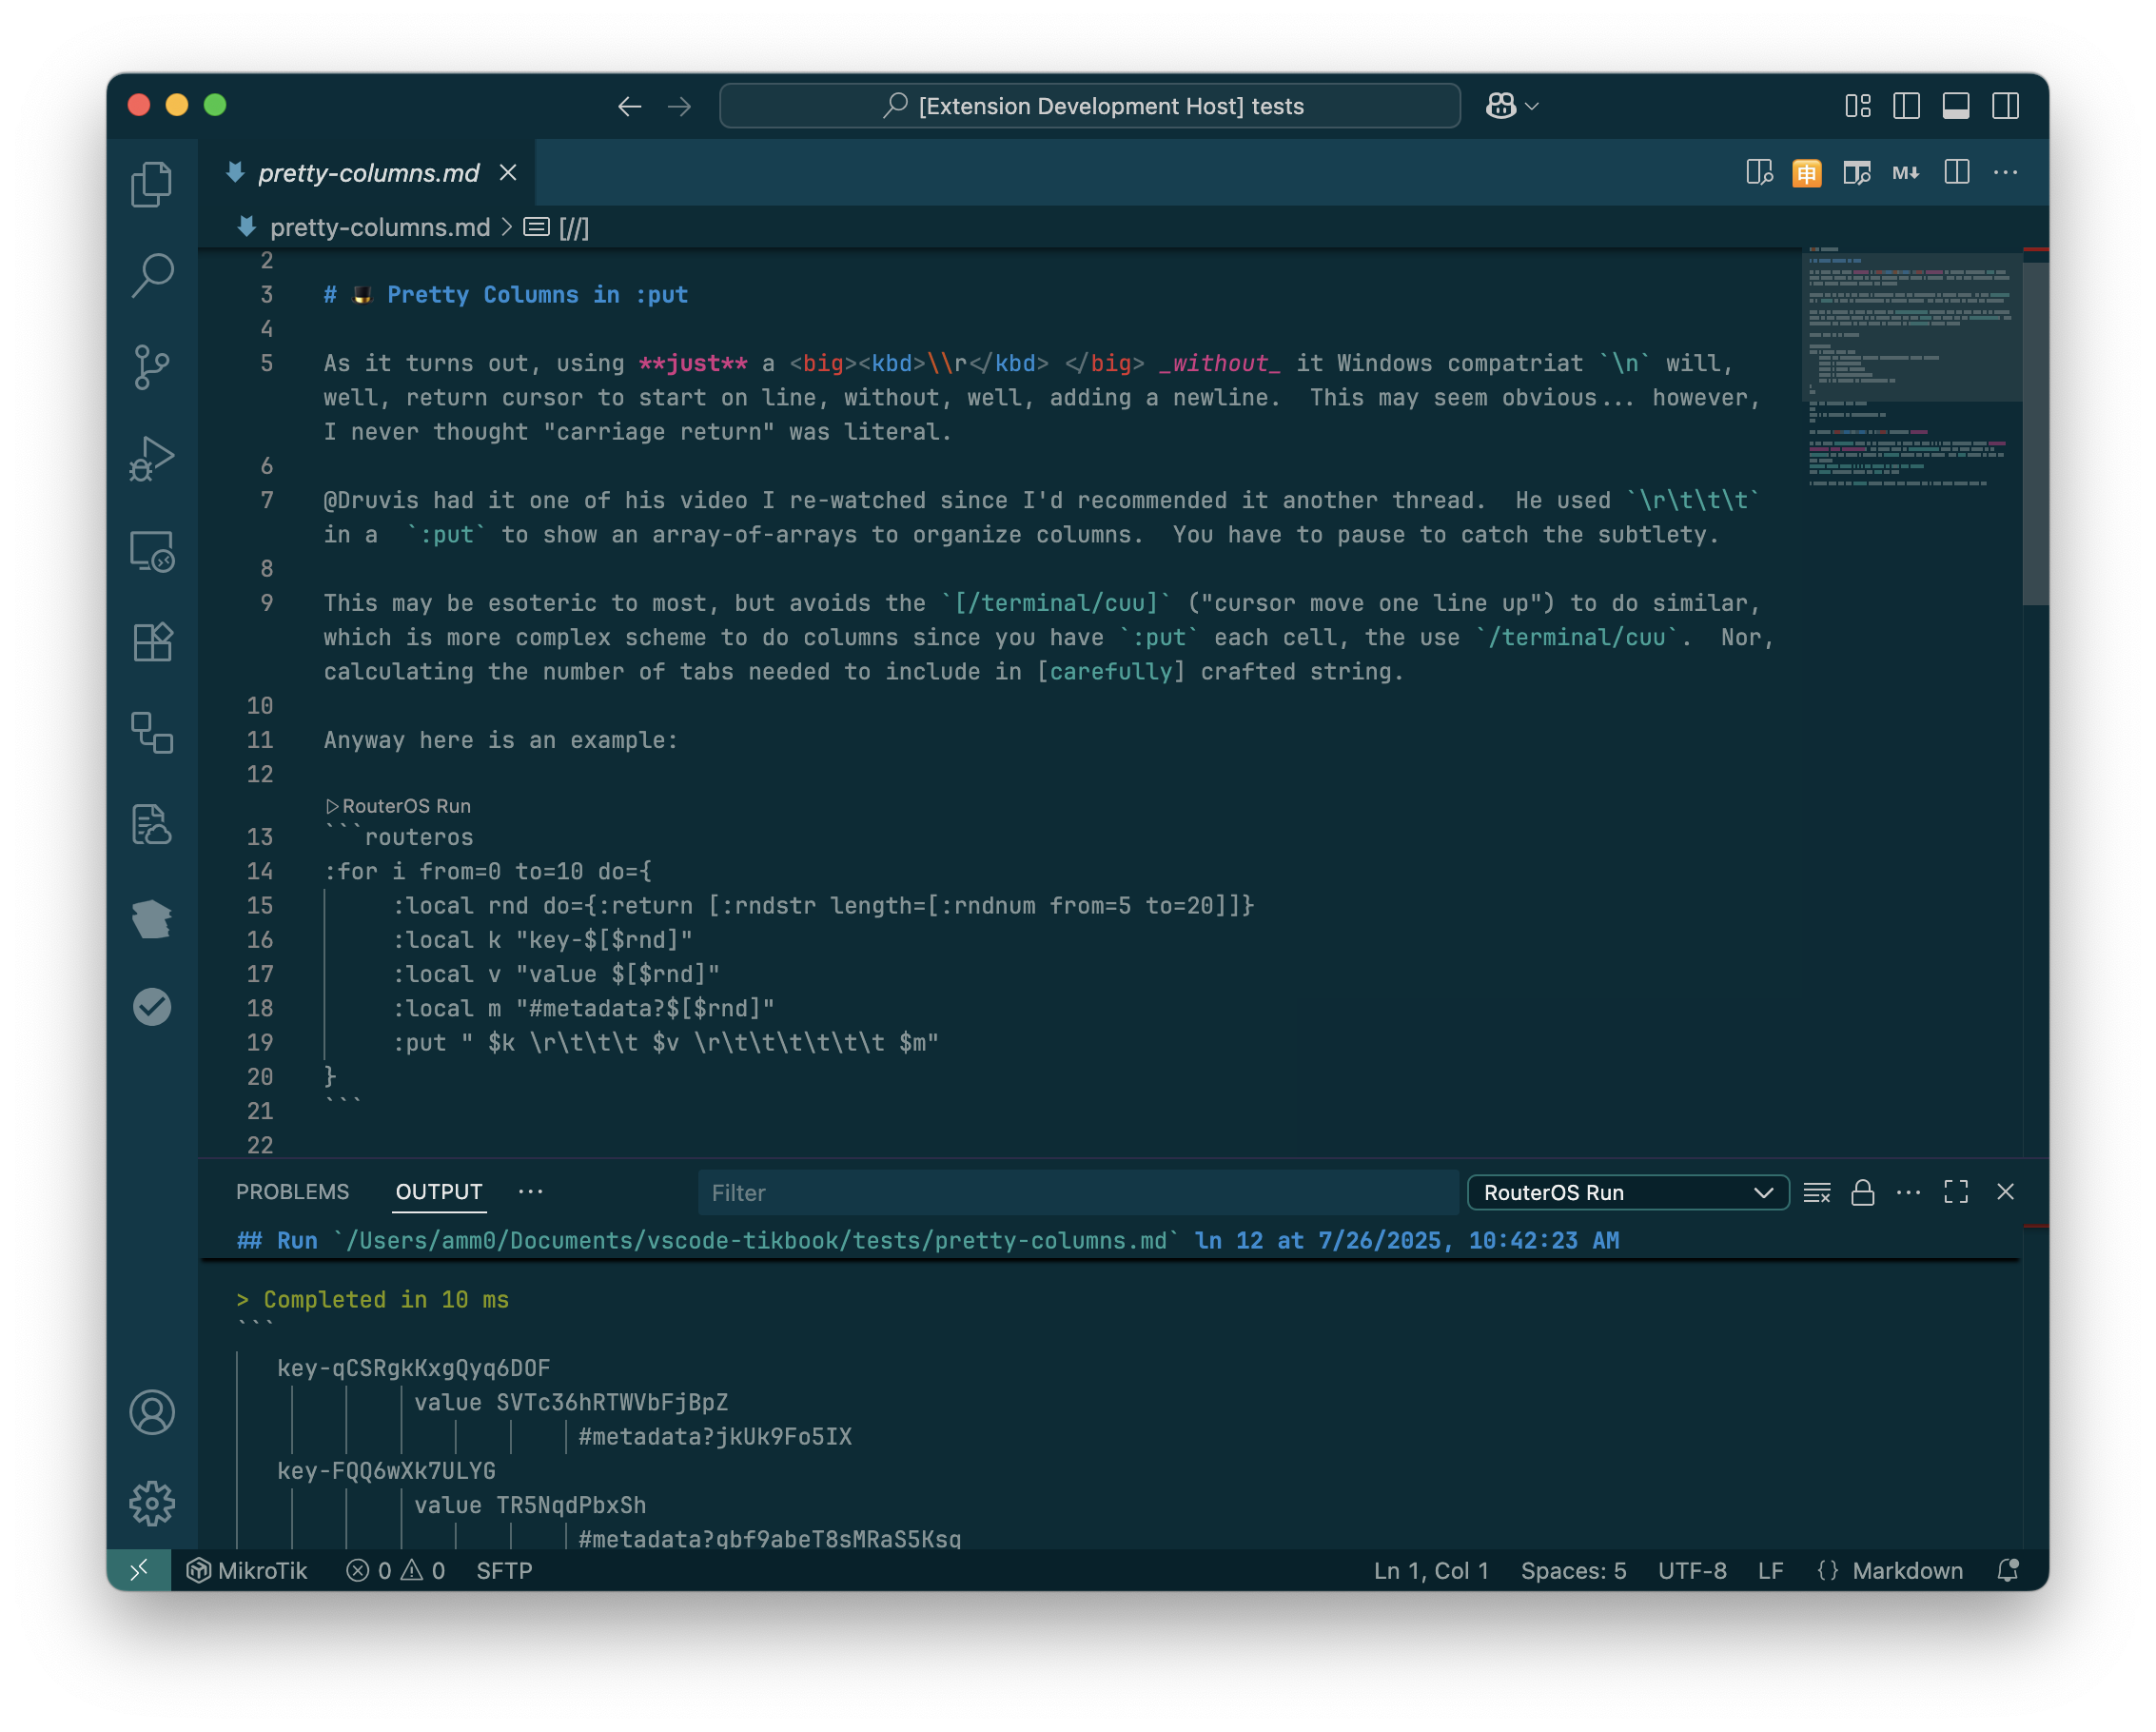
Output is also Markdown to allow for "cut-and-paste" from it to another document. You can even re-run blocks from within the Output view itself using the same_▶️ RouterOS Run_button.
Currently, RouterOS LSP does not support syntax coloring nor completion within Markdown RouterOS blocks.
And the above markdown (which comes from MikroTik's forum) rendered as a "Markdown RouterOS" notebook, has same interface as a RouterOS TikBook - even though it's stored as Markdown (.md):

Conversions and Helper Commands
Copy as RouterOS Array (from JSON)
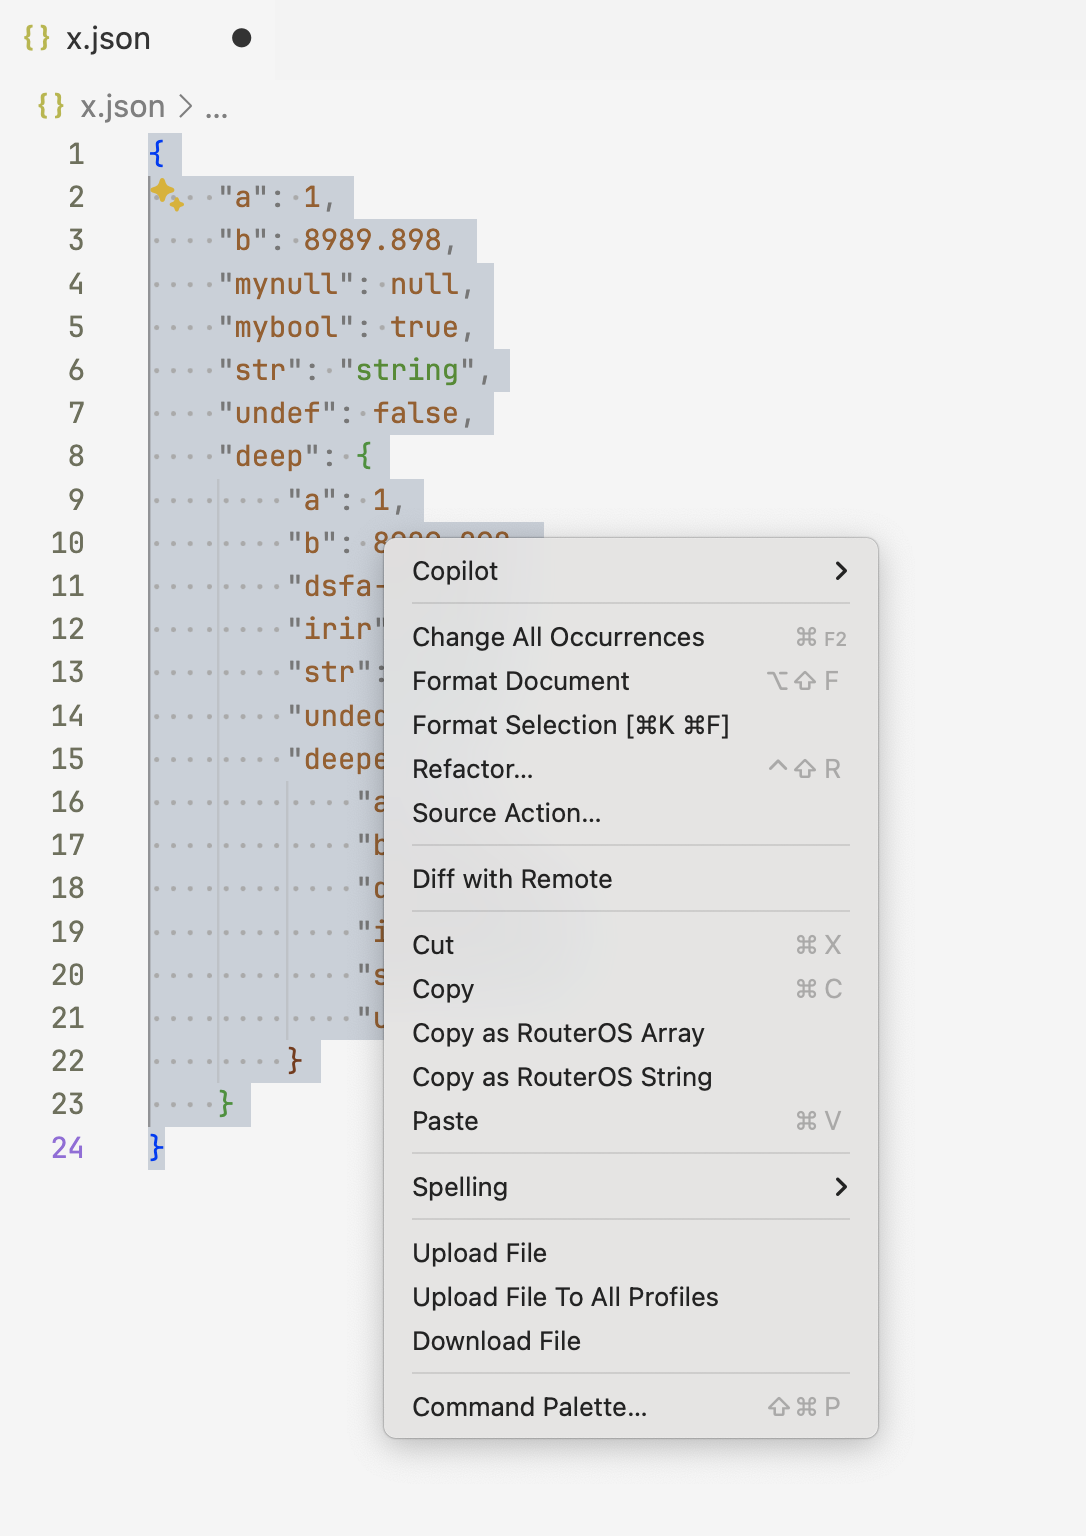
In any JSON file, a button will appear in the editor's toolbar, and an option for Copy as RouterOS Array will appear in the context ("right click") menu. These options can be used to convert JSON into a RouterOS array for use in a script. If nothing is selected, the entire JSON document will be copied to the clipboard as a RouterOS array. If only a portion is selected, only that selection will be converted and placed onto the clipboard.
Some notes:
- Only strings and numbers are supported for conversion currently
- No RouterOS connection is needed for the conversion
- When using a selection, the selected text must be valid JSON as selected; otherwise, it cannot be converted. For example, you need to select an entire subtree, not just elements within a block.
- Conversion to JSON is one-way. There is no RouterOS Array to JSON. However, you can get JSON from RouterOS using
[:serialize to=json] from a notebook that is more exact and consistent.
TIP This command is useful with /tool/fetch, as it is often easier to modify a RouterOS array than using string interpolation to produce JSON for a REST call. Web service APIs specs are often shown in JSON, and may involve some calculation in a RouterOS script to produce. But building a RouterOS array "from scratch" is work. So you can take some example JSON and use the JSON to RouterOS Array to start with some array in your script to modify for an API call.
Copy as RouterOS String (from any text)
If a string is selected in any editor window, the context menu will show an option to Copy as RouterOS String. TikBook will take the selected text, and perform any needed escaping – like for double-quotes or dollar signs – and place the converted string on the clipboard for use in a RouterOS script. The command does not add any quotes, but when using the pasted string, you may need to surround it with double-quotes.
For example, if the JSON shown previously used Copy as RouterOS String instead, the RouterOS script can be converted back to JSON using RouterOS shown in a TikBook:
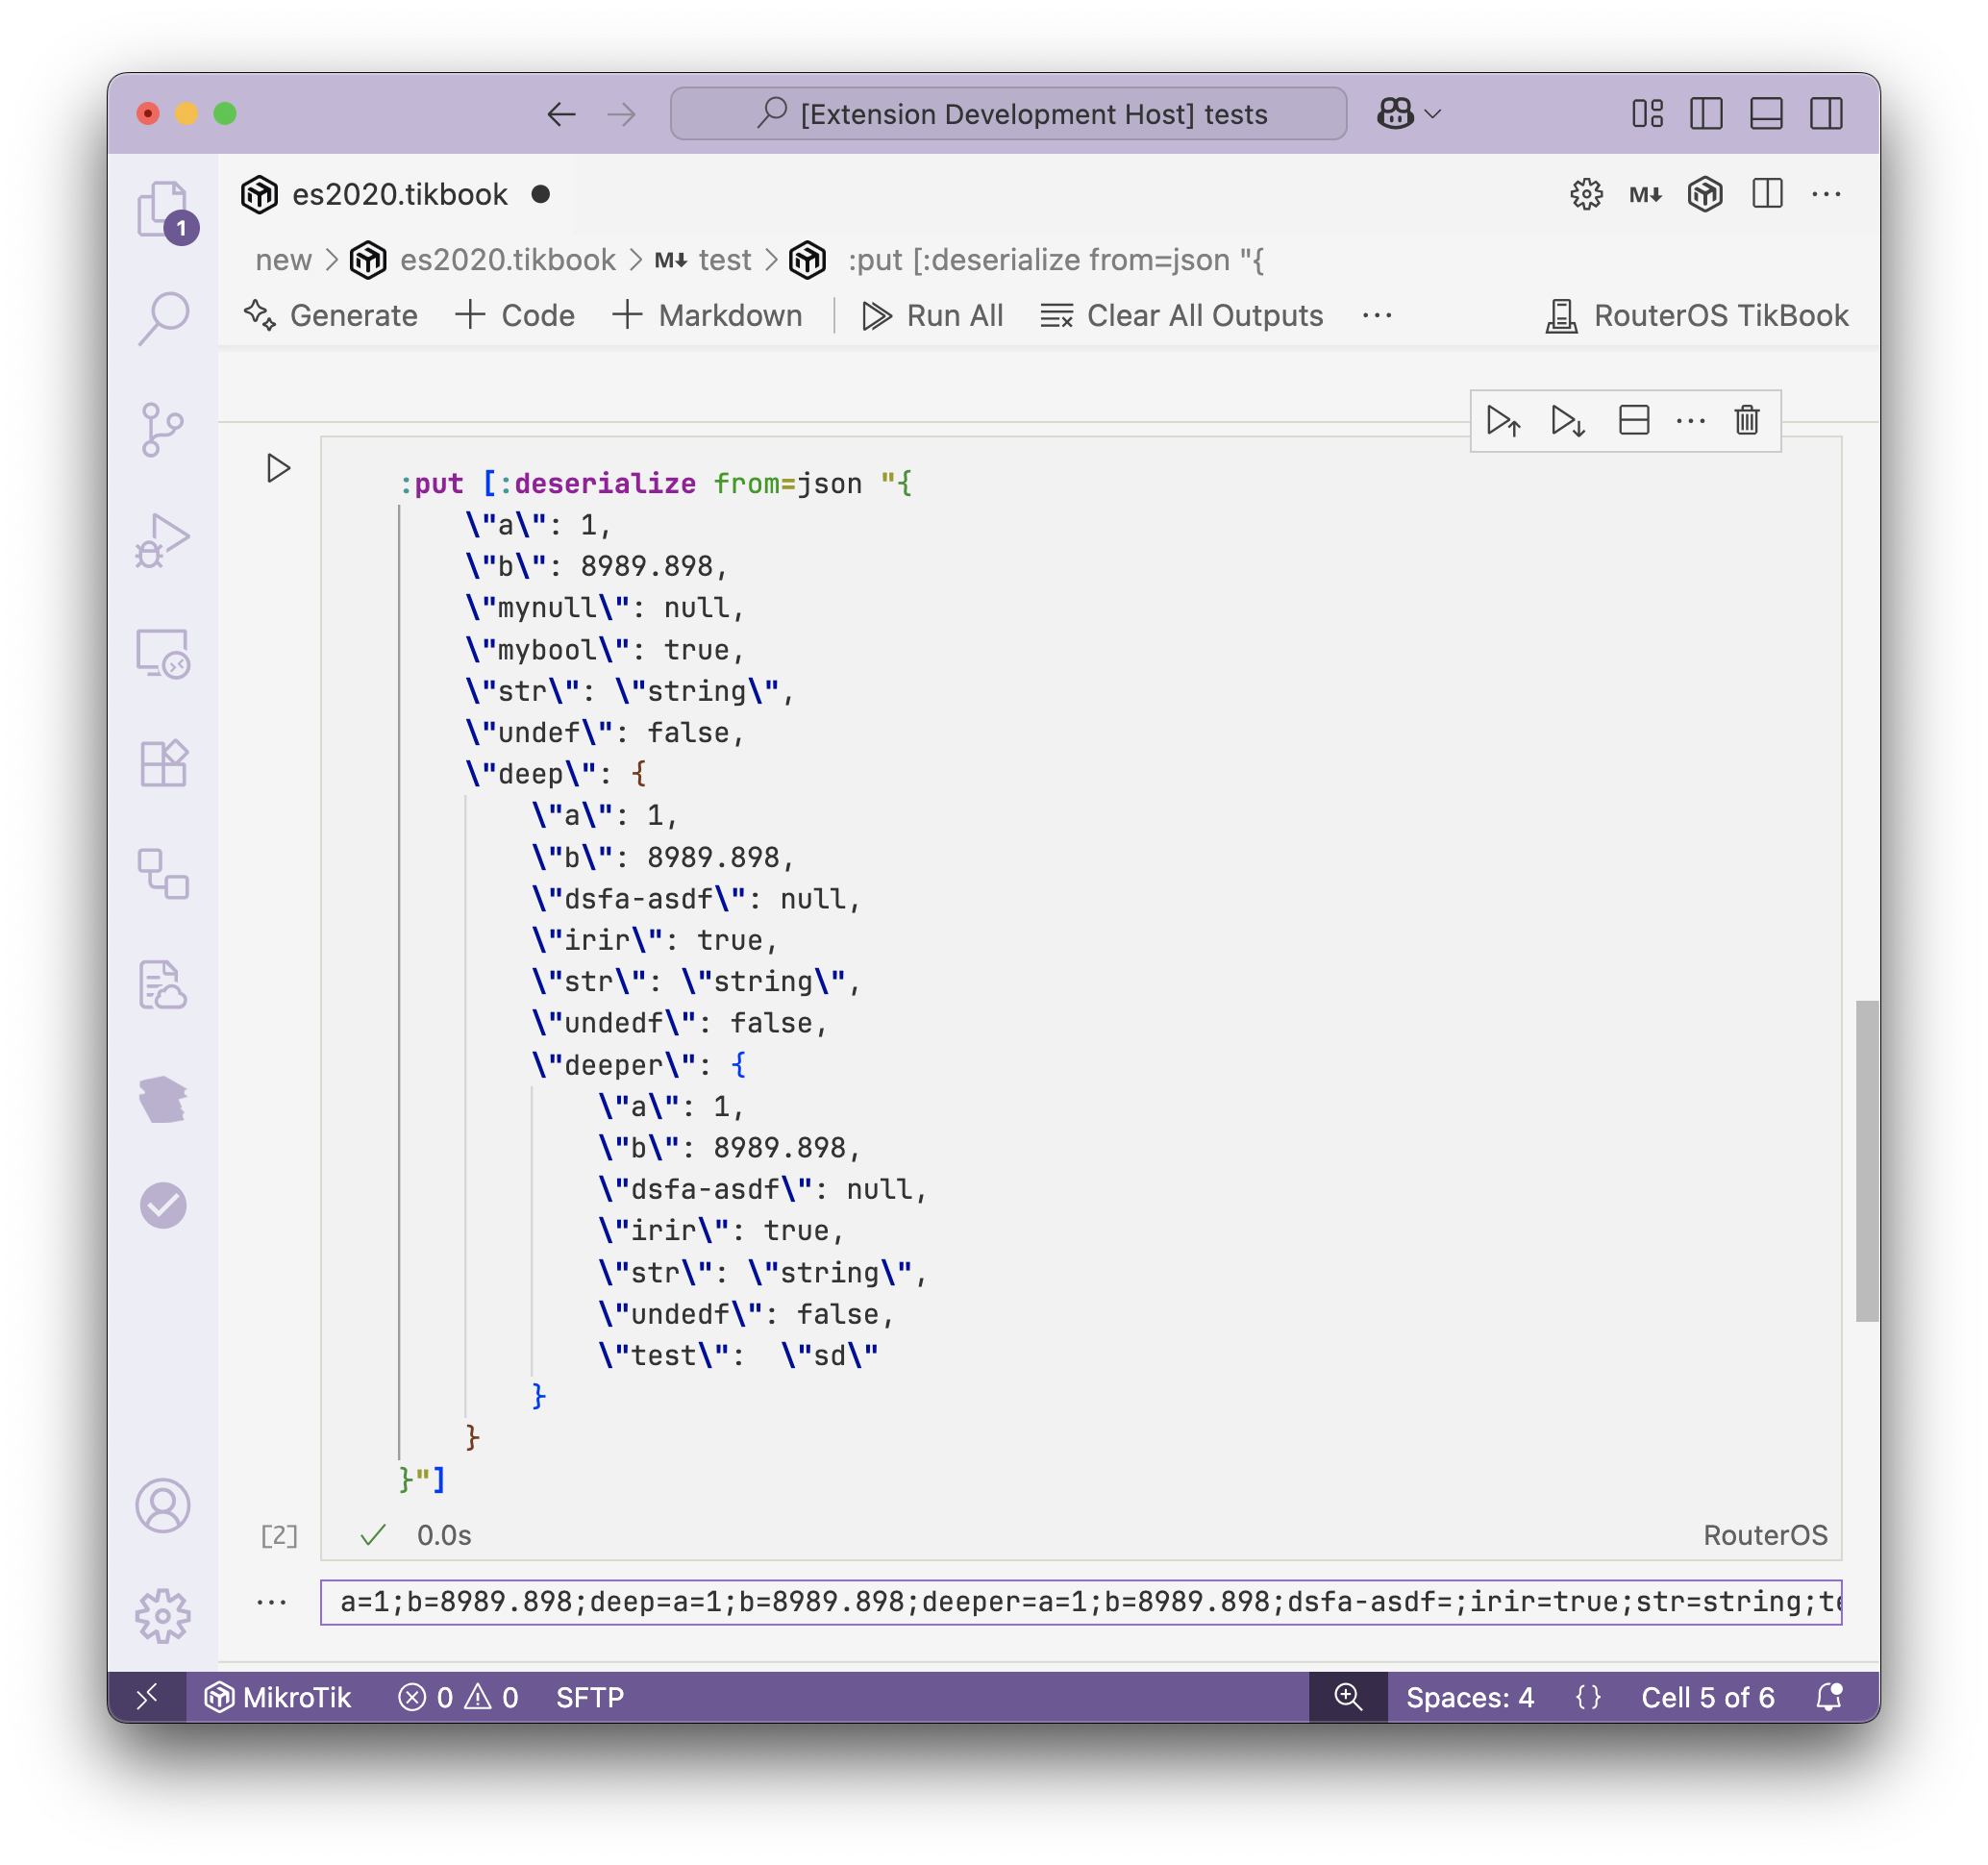 Although in practice this is an unnessary step since Copy as RouterOS Array would return a RouterOS array directly, without an extra
 :deserialize
More converters, code snippets, and other small niceties are on the radar
In VS Code, file extensions are associated with a default language and view. But the same file can be viewed multiple ways. TikBook has many behaviors that are related to the file type.
By default,
.rsc will open as a text document, with the option to "Open As" a RouterOS TikBook Notebook and Preview as Markdown.md will open as a text document, with the option to "Open As" a Markdown RouterOS Notebook and Preview as RouterOS Script, as well as the default Markdown Preview too.md.rsc will open as RouterOS TikBook Notebook (Script-first), with the option to "Open As" an editable text document with the RouterOS script. Changes are synced between any "Open As" documents when either document is saved. "Copy As Markdown RouterOS" is available to convert the notebook to the Markdown-first format..tikbook same as .md.rsc.rsc.md will open as RouterOS TikBook Notebook (Script-first), with the option to "Open As" an editable text document with the RouterOS script. Changes are synced between any "Open As" documents when either document is saved. "Copy As Markdown RouterOS" is available to convert the notebook to the Markdown-first format..rscmd same as .rsc.md
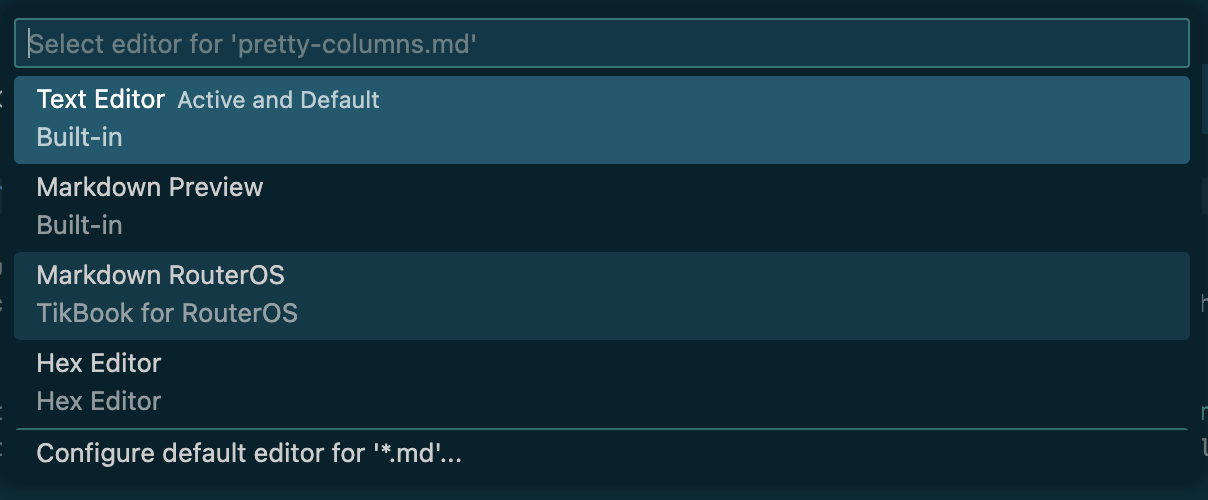
Using VS Code's built "Reopen Editor As" on document works to change the presentation. For example, a normal .md document using "Reopen Editor As" will present a menu of how to reopen, include as a notebook:
Virtual Documents
Some views shown by TikBook are "virtual documents". This forms the basis of many of the "alternative" views of TikBook associated documents, like a "Markdown Preview" of a RouterOS script.
These virtual documents do not exist as normal files and are instead sourced via RouterOS REST API for display use. All virtual documents have a URI scheme of rscena: which TikBook parses to know which virtual document to show. Essentially, putting a URI scheme on top of RouterOS commands, using the file extension in the URI to tell VS Code the appropriate editor to use. For example, the CSV outputs produced from the RouterOS Management menu are all virtual documents using the URI template of rscena:${filename}-view.csv?csv#${command} to generate the different CSV views. Similar to various "Show Configuration" options. For example,rscena:defconf.rsc?default-configuration#script` is the virtual document URI for the default configuration.
Virtual documents have a "Refresh" option in the toolbar that will re-fetch the associated data from RouterOS. Also, all virtual documents are read-only; however, they can be saved as a local file and then edited. Once saved as a normal file, the document can no longer be "refreshed".
"Open as" - Changing between notebook, text editor, and preview views
Various "Open As" options allow easy switching between "text editor" and "notebook" views – or even using multiple views open at the same time. Since TikBook adds "notebook views", the need to "switch views" comes up. Several ways to do this:
VS Code's context menu for a file, or in Command Palette, use the "Reopen with" or "Open with" option. For example, if you have a some.md file, it will by default open in the text editor with Markdown as the language. But you can just use "Reopen with" and select "Markdown RouterOS" to view/edit it using the TikBook notebook interface
From within a TikBook notebook, you can use buttons in the tab bar to take actions to view the notebook it it's text equivalent (i.e. RouterOS TikBook allows Open As to RouterOS script text, while Markdown RouterOS notebook allows Open As to Markdown text).
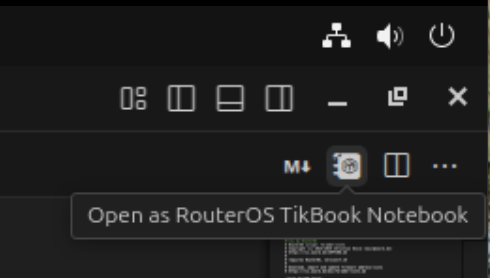
With text documnents of either .md or .rsc type, a TikBook icon will appear that allow reopening as a notebook, respective of format:
Changing the file extension will change the default view used. Since TikBook files are still just md or rsc files, you can remove the TikBook-specific endings:
*.md.rsc or *.tikbook can be just *.rsc to use a normal text editor by default. Or any rsc file can be renamed to the *.tikbook extension to use the notebook interface as the default.- Similar for Markdown, just using
.rscmd to indicate to use the TikBook Markdown Notebook view as default.
- Cannot convert between Markdown and RouterOS notebook file types by simply changing the file extension. To convert between
md and rsc formats, there is a command "Copy As" for notebooks, see the next section
While the notebook interface and execution engine are exactly the same between the formats, the file format used to open and save the notebook is not the same. While a RouterOS script or TikBook notebook can be "Previewed", it is a read-only view. And, conversely with plain Markdown and Markdown RouterOS notebook, it can be previewed as a read-only RouterOS script but is not directly editable.
To copy as a different type, use the "Copy As" option on a file in VS Code's explorer. For example, if a Markdown file is selected, the Copy As RouterOS TikBook option performs conversion from a .md into a new .md.rsc file, leaving the original file unchanged:
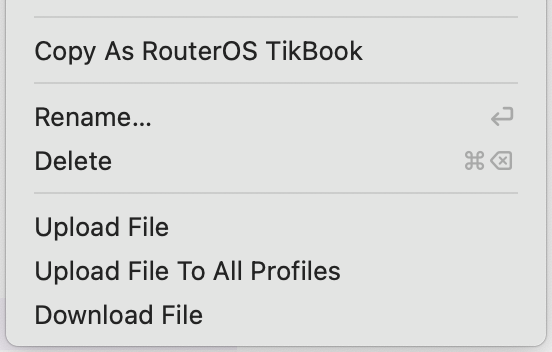 The reverse is also possible, so a Copy As Markdown RouterOS option will appear on
 .rsc files in VS Code's file explorer.
TikBook is built on plain .rsc, and supports .md too, files – so there are two serialization schemes in use. One for RouterOS script, which uses comments to store Markdown, with all other lines assumed to be script. The other serializer is for Markdown, which looks for code blocks.
Both serialization formats appear identical in VS Code's notebook interface. But based on the file extension, the "saved" format may be different. This allows a "markup first" or "script first" rendering of the notebook for different needs. For example, .rsc.md (or .mdrsc) could be used to create a forum.mikrotik.com posting. While .md.rsc (or .tikbook) could be used to document and test a script used to configure a router.
In both formats, code cells are trimmed of extra line endings. However, a single line spacing is added between all blocks when written to disk, including "cell divider" markers.
.md.rsc
All text is assumed to be RouterOS script, with any markup or output encoded into a RouterOS comment.
#.\n token is used to separate code, markup, or output from different cells.
#.<type> on a line indicate the start of "markup" cell, with <type> === markdown.
Non-script content also begins on column 3 with a preceding comment to keep it valid rsc:
#.markdown
#  # TikBook `.md.rsc` Example
#.

/ip/address/print

#.

/ip/route/print

#.markdown
#  > In a notebook, the output of a "print" is also rendered as JSON
#.
Notebooks support "metadata" and saving "outputs"; neither is supported today. Neither saving outputs nor metadata is specified nor implemented currently.
.rsc.md
This is the "reverse" format, so ```routeros marks a code cell - all other ```any-other-lang blocks and text are assumed to be Markdown. In a notebook, RouterOS code fence blocks are treated as a "Code" cell. Markdown broken up into cells, with any RouterOS script blocks also acting as cell dividers.
The only "special" support for a "Markdown First" TikBook notebook is the equivalent of the #. cell separator from .md.rsc/.tikbook file. In Markdown, it uses the unofficial "comment", or more specifically, a fake footnote for this purpose:
[//]: #.
This will create a "cell break" when viewed as a TikBook. _RouterOS code fence blocks automatically break the markdown text at the point of the RouterOS code.
While none today, any persisted metadata could be encoded inside ( ) in the same form as #. but the parentheses are needed to be "compatible" with Markdown-It used by VS Code and Discourse.
[//]: #. (.. key=val .. key=value...)
Notebooks support a "Run All Cells" and all ```routeros block will get run. If you wanted to exclude a block from consideration as a "runnable" cell. You can move the code to a Markdown cell and use the alternative code block marker ~~~routeros.
"Markdown First" TikBook has an additional feature where if you view the Markdown as a VS Code TextDocument – or any .md file – a "Run RouterOS" link will appear above any ```routeros code blocks.
RouterOS LSP currently does not support syntax coloring or other features in Markdown RouterOS code fence blocks
TypeScript Implementation
The TikBook source code is in tikoci/vscode-tikbook on GitHub. It uses Microsoft's TypeScript library for VS Code extensions. Internally, TikBook uses just two libraries axios-http (REST client) and luxon (for human dates). These are then bundled by bun into "-web" and "-node" (desktop) targets since packaging TypeScript varies between VS Code for Desktop and VS Code for the Web. The implementation is largely based on the framework from RouterOS LSP project.
TikBook for RouterOS extension is built and published using GitHub Actions in the repo. Version numbers use an odd number as the minor version for "prerelease"/beta/alpha, while even minor versions are reserved for "released" versions by convention.
Disclaimers
Not affiliated, associated, authorized, endorsed by, or in any way officially connected with MikroTik, Apple, nor UTM from Turing Software, LLC.
Any trademarks and/or copyrights remain the property of their respective holders unless specifically noted otherwise.
Use of a term in this document should not be regarded as affecting the validity of any trademark or service mark. Naming of particular products or brands should not be seen as endorsements.
MikroTik is a trademark of Mikrotikls SIA.
Apple and macOS are trademarks of Apple Inc., registered in the U.S. and other countries and regions.
No liability can be accepted. No representation or warranty of any kind, express or implied, regarding the accuracy, adequacy, validity, reliability, availability, or completeness of any information is offered. Use the concepts, code, examples, and other content at your own risk. There may be errors and inaccuracies that may, of course, be damaging to your system. Although this is highly unlikely, you should proceed with caution. The author(s) do not accept any responsibility for any damage incurred.
