Seedream MCP
Seedream by ByteDance — text-to-image and SeedEdit instruction-based editing.



High-resolution image generation and edit-by-instruction with Seedream 4.0, 4.5, and 5.0.
This extension registers the seedream MCP server with VS Code so GitHub
Copilot and any other agent that speaks the Model Context Protocol
can call it directly from chat.
Quick Start
- Install this extension. VS Code registers the
seedream MCP server automatically.
- Get an application API key using the detailed steps below. Check service access and your current balance before the first request.
- Select a model with tool calling in VS Code Chat. You can use your existing model, or install Ace Data Cloud Chat Models. For the Ace model, first follow its setup guide, open Chat: Manage Language Models, make the model visible, and select it in Chat. BYOK Chat does not require GitHub sign-in or a Copilot plan; organization policies still apply.
- Enable this server's tools. Open Chat → Agent → Configure Tools and select only the tools you need under Seedream MCP. If the list is empty, choose Update Tools. The extension prompts for the API key on first use and saves it in VS Code's
SecretStorage. Disable another copy of the same server from the Ace MCP bundle or manual mcp.json to avoid duplicate tools.
- Verify one result. Check the Tool Reference below and current pricing before running a request. If you already have a task ID, enable its task-query tool and query that same ID first. An accepted generation is not a completed result: poll the original task until it reaches a successful terminal state, open the returned media, and match the task ID in Usage. Do not resubmit generation to poll. Model Chat and background utility calls can add separate charges to the service request.
You can rotate or remove the API key any time from the command palette:
- Seedream MCP: Set Ace Data Cloud API Key
- Seedream MCP: Clear Ace Data Cloud API Key
The default config talks to the hosted streamable-HTTP endpoint at
https://seedream.mcp.acedata.cloud/mcp — no Python, no uvx, no local install needed.
Get your API key
- Open Ace Data Cloud → Applications. Sign in, or register an account first.
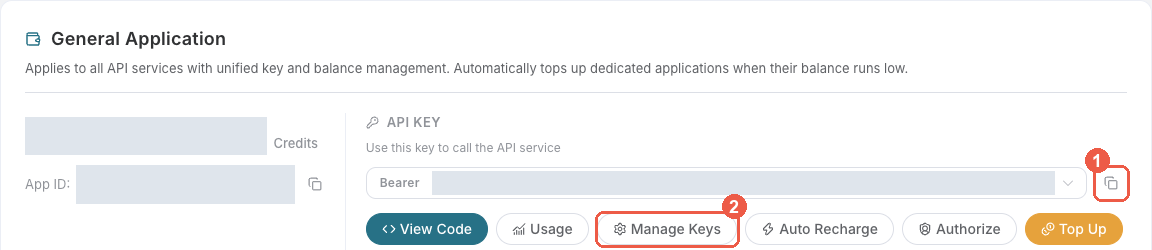
- Find General application. If it has not been created, choose Initialize General Application. A general key can use the services available to your account; a dedicated application's key is limited to its service. Check the required service/model access and current pricing.
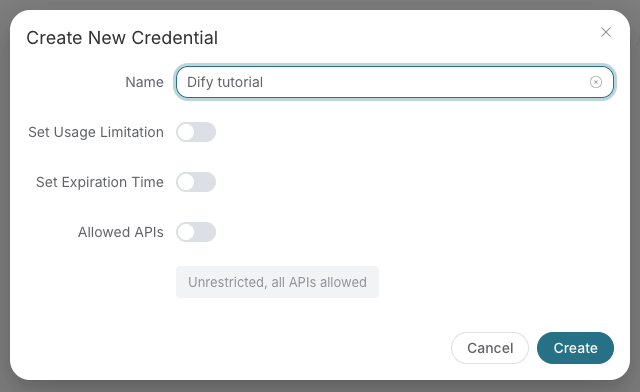
- Copy the API Key from the application card, or open Keys / Manage Keys → Create to create a separate key for this integration. Give it a recognizable name so you can revoke or rotate it independently.
- When creating a key, review Expiration Time, Set Usage Limitation, and Allowed APIs. Enable only the restrictions you need, allow the operations you will call, then click Create and copy the token from the key list. Task lookup does not grant permission to submit a generation. Confirm the application's balance can cover your first request; any trial allowance is whatever your account currently displays.
- Copy only the token value, without quotation marks, spaces, or
Bearer . An API Key / API Token field expects this raw value; only a manually configured HTTP Authorization header needs the Bearer prefix. A platform-... account-management token cannot replace a generation API key.
Save the key in the client's credential store or the environment variable shown below. Never put it in a prompt, shared workflow, screenshot, or Git commit. If authentication fails, check the full copied value, application/service access, expiration, usage limit, and balance before creating another key.
VS Code Setup Guide
For screenshots, token setup, project-level and user-level mcp.json, and Copilot Agent Mode examples, see:
Example prompts
- "Generate a 2K cinematic poster of a samurai in neon Tokyo rain. Use seedream 5.0."
- "Edit https://example.com/cat.jpg — make the cat wear sunglasses."
6 tools available via this server.
| Tool |
Description |
seedream_generate_image |
Generate an AI image from a text prompt using ByteDance's Seedream model. |
seedream_edit_image |
Edit or modify existing images using ByteDance's Seedream/SeedEdit model. |
seedream_get_task |
Query the status and result of a Seedream image generation or edit task. |
seedream_get_tasks_batch |
Query multiple Seedream image tasks at once. |
seedream_list_models |
List all available Seedream models with their capabilities and pricing. |
seedream_list_sizes |
List all available image sizes and resolution options for Seedream. |
Supported Models
seedream-3.0, seedream-4.0, seedream-4.5, seedream-5.0, seededit-3.0
Pricing
From $0.02 per image. Free trial credit on sign-up. See full pricing at https://platform.acedata.cloud/documents/seedream-mcp.
Configuration
This extension implements the mcpServerDefinitionProviders contribution point
and registers a single hosted server with VS Code:
Provider id : acedatacloud.seedream
Server label: Seedream MCP
Server URL  : https://seedream.mcp.acedata.cloud/mcp
Transport   : Streamable HTTP
Auth        : Bearer API key from VS Code SecretStorage (or $ACEDATACLOUD_API_TOKEN)
You don't need to edit mcp.json — the extension handles registration and
token handling automatically. If you'd rather configure things by hand, the
sections below show equivalent mcp.json snippets you can use instead of
this extension.
Alternative: manual mcp.json (hosted)
{
  "servers": {
    "seedream": {
      "type": "http",
      "url": "https://seedream.mcp.acedata.cloud/mcp",
      "headers": { "Authorization": "Bearer ${input:acedatacloud_api_token}" }
    }
  },
  "inputs": [
    {
      "type": "promptString",
      "id": "acedatacloud_api_token",
      "description": "Ace Data Cloud API key",
      "password": true
    }
  ]
}
Alternative: local stdio (no network roundtrip)
For offline dev, air-gapped environments, or pinning to a specific PyPI
version, install uv and use:
{
  "servers": {
    "seedream": {
      "type": "stdio",
      "command": "uvx",
      "args": ["mcp-seedream-pro"],
      "env": { "ACEDATACLOUD_API_TOKEN": "${input:acedatacloud_api_token}" }
    }
  }
}
uvx will download and run the latest mcp-seedream-pro on demand.
Links
License
MIT — see LICENSE.