TO-DO, NOTES AND THINGS
A shareable to-do, notes and reminders extension that uses a github repo as a single source of truth.
One of the only to-do and notes extensions to also feature a web version to grant access to your lists any where, at any time. Even whenever your mobile device is NIS, the web app sync's its local storage with your repo allowing you to view, make edits and more while offline. Whenever the app is able to come back online, it sync's the dirty items with your github repo ensuring that your data is always up to date.
View Demo
·
Report Bug
·
Request Feature
Table of Contents
-
About The Project
-
Getting Started
- Usage
- Roadmap
- Issues
- License
- Contact
- Acknowledgments
About The Project
[!NOTE]
This extension will merge with DevStack in the future. Post-merge, accessing your repo will be as simple as setting a remote for your local GitHub representation.
The latest update adds support for nested list rendering—create unlimited levels of indented to-do items directly in your markdown documents, now properly displayed in the extension's view pane.
Task, Notes and Things is a comprehensive productivity solution built for developers and teams who refuse to compromise on accessibility and end-user interaction.
Why This Exists
Every developer has built a notes/todo app at some point. Yet somehow, there's still no decent option in the marketplace. The existing solutions either have terrible UIs, lock you into their ecosystem, or simply don't work across all your devices. This project solves that problem by leveraging GitHub as your single source of truth—giving you version control, collaboration, and universal accessibility out of the box. No matter the workspace or device you can access your lists and notes at anytime.
The Complete Ecosystem
This isn't just another note-taking app. It's a productivity system that adapts to how you actually work:
- VSCode Extension - Seamlessly integrated into your development workflow
- Mobile App - Full-featured experience with offline capabilities
- Web Access - Open any browser, access your GitHub repo, instant productivity
- GitHub Integration - Every note, todo, and reminder is version-controlled and shareable
- Team Collaboration - Real-time sync keeps everyone updated
- Offline Support - Keep working without internet, sync when reconnected
All the while not skimping out on the UI and / or its functionality, by designing features that make for an easy going end-user experience.
(back to top)
Getting Started
Prerequisites
- The only item needed is a github
personal access token, it's not so much as a prerequisite, as you can do this at any time, but completing this step now and ahead of the other's will make the rest of the process much easier
- to create a token
- within the right sidebar, select
settings
- the last option in the left menu, labeled
Developer Settings
- under
Personal Access Tokens select Fine-grained tokens
- values for your new token
- fill in
Token name required
Description is optional so you are free to leave this blankexpiration has several options including 7, 30, 60 or 90 days along with custom and no exp
- personally, I set it to
No expiration, but you are free to set that date to whatever you desire
- if you want easy, no hassle access to create, edit and switch repos at will, select
All repositories, or you may select one of the other two options, the only labeled Only select repositories will need to have had your notes repo created first before setting this option as it will ask for a list of repos to grant access to
- under
Repositories tab
Add permissions
- ✓
Administration
- ✓
Contents
- ✓
Metadata this is required and will not let you uncheck this option
- under
Account tab
(back to top)
Initial Set-Up
- Once the extension has loaded, in the status bar there will be a quickpick available to use labeled
Task, Notes and Things located to the bottom left of your VSCode UI
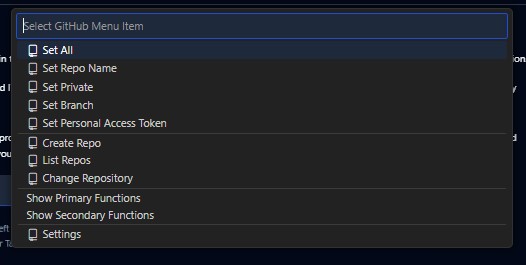
- Several items are available to you to use:
set all
- will walk you through all the required steps in order to set everything up
- before selecting this option, grab a personal access token first, see below for step by step process
set repo nameset privateset branchset personal access token
- to create a token
- within the right sidebar, select
settings
- the last option in the left menu, labeled
Developer Settings
- under
Personal Access Tokens select Fine-grained tokens
- values for your new token
- fill in
Token name required
Description is optional so you are free to leave this blankexpiration has several options including 7, 30, 60 or 90 days along with custom and no exp
- personally, I set it to
No expiration, but you are free to set that date to whatever you desire
- if you want easy, no hassle access to create, edit and switch repos at will, select
All repositories, or you may select one of the other two options, the only labeled Only select repositories will need to have had your notes repo created first before setting this option as it will ask for a list of repos to grant access to
- under
Repositories tab
Add permissions
- ✓
Administration
- ✓
Contents
- ✓
Metadata this is required and will not let you uncheck this option
- under
Account tab
- Once you have set your personal access token the next few items will be of use:
create repolist reposchange reposhow primary functionsshow secondary functions
- all of the functions you are familiar with in using within vscode, are at your disposal here as well when dealing with your repo
[!NOTE]
In the last 6 months of use, I have not had a single issue accessing my notes across all of my workspaces, even when acessing them from multiple workspaces at the time same.
The only error you may see is when you click on multiple line items in quick succession, as it cancels the most recent push if it is already in the process of executing one. It's not really an issue or problem, but to "recitify" this ie have the repo to acquire the most up to date local version, simply click on a line item or if your in you markdown document saving will also push the data.
(back to top)
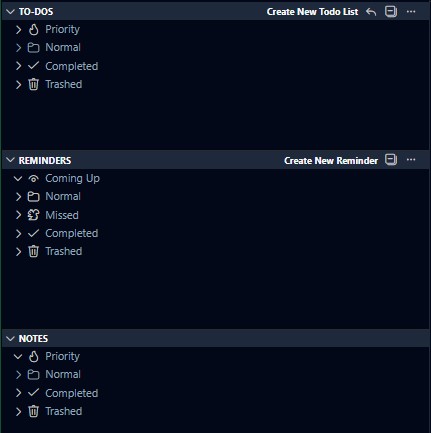
Creating To Do Lists Notes and Reminders
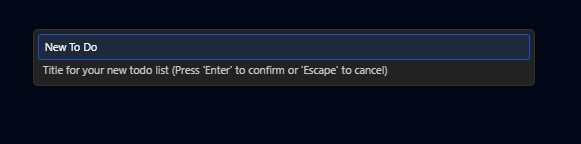
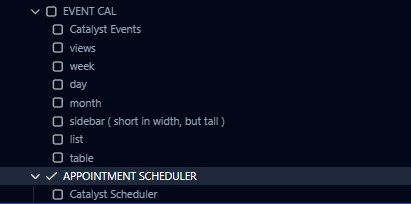
- Once installed you will be presented with the below interface:
- Each sections title bar contains a create function, for its respective item type
- An input will appear asking for a label / title
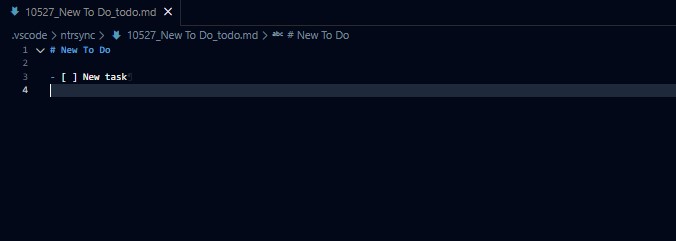
- Once a title has been decided upon, after pressing enter, a new markdown document will be created within the extensions folder
- You are now free to create any list items within the markdown document
(back to top)
Completing To Do Items
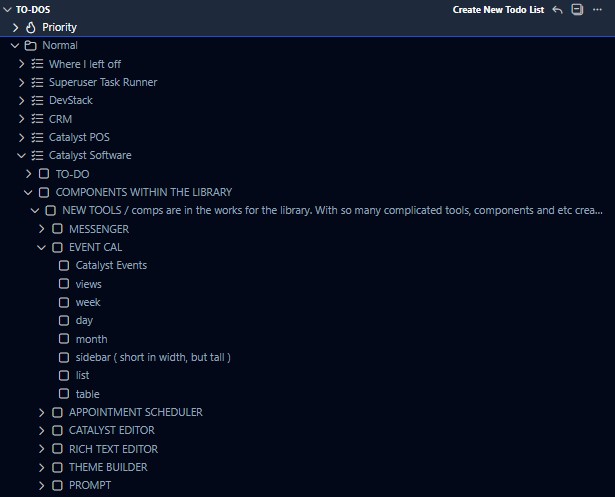
- Whenever you need to review your list and check items off, you can so do right from the extensions panel
- Selecting folders will expand for you to view its contents
- Line items that represent your to-do list ie title / label:
- can either be expanded / collapsed, by clicking the line items arrow
- or when clicking on the actually text of the title, will open the markdown document for you to edit it manually, ie create new line items
- this allows a seamless, and painfree process to do either or
- once your to-do list is open, displaying its line items, you simply have to click the line item in order to set it to complete or
- [x] mean while the rendered view in the list will replace the empty:
- [ ]
- with
✓ at which time the list will push the new data to your repo automatically
- any line item that is currently set as completed /
✓, can just as easily be set back to its oringinal state:
- [ ]
- just by simply clicking the line item again
(back to top)
Editing Lists / Items
- there are two ways to edit lists / items
- the first we have already covered via checking off list items
- the second is creating list items within the markdown document
- just like creating lists in any other md document your left to your own devices to create and to do list in any way you desire
- whether it be total amount of line items
- or creating nested check lists, which will render nested check lists with the extensions pane
- when manually editing the doc, you may push the data to your repo by simply saving the file at any time
- to set a lists
label ie: priority, normal, completed and trashed
- right click on the lists title, the context menu will have the following items
delete file ie shift + del - triggering this will skip the trash and delete the file from the file system and repoMove to completedMove to prioritymove to trash - think of this as your os's recycle bin
Reminders and Notes
- in these items, you may leave whatever data you would like to leave yourself in any markdown format you need / want
- the only
requirement really, as the files title entered at the top can be deleted and it wont effect anything ( in notes )
- reminders - if you wish to be notified in vscode via a toast when that reminder reaches its set time you need to follow the following format
# TITLE

DUE: 2025-05-22 09:00

Note worthy note to remind you about something in regards to this event.
- maybe you need to provide youself a list
- maybe not
- the only required items that need to be in the document are the title and due date ( the due data needs to be in the same format as seen above, and the title can be as long as you need it to be just so long as it does not span more than one line ie, it can be 150 chars long it just cannot contain any
\n )
(back to top)
Usage
As I have been focusing on one project for the last couple of months, I'm sure there are some items that need cleaning up. Thus giving you a real example in relevance to usage. At 5 minutes, a little longer than I was planning to go, but because of that it's posted on youtube.
(back to top)
Roadmap
- [ ] merge with devstack
- [ ] implement a queue system for rapid line item pushes. instead of cancelling subsequent operations, enqueue each push request and process them sequentially in FIFO order, with each waiting for the previous operation to complete before executing
Issues
- None to report
License
Distributed under the MIT License. See LICENSE.md for more information.
Acknowledgments
(back to top)
| |