
SFTP NeoSFTP/FTP sync Installation Launch VS Code Quick Open ( Ctrl+P), paste the following command, and press enter.Copied to clipboard |

🚀 SFTP NeoSync your code to any server without leaving VS Code. 🔒 More Secure · 📦 Updated Libraries · ⭐ More Features
📑 Quick Links✨ Features · ⚡ Quick Start · 🔧 Config Examples · 📖 Configuration🔐 Security · 🔑 SSH Authentication · 🐛 Debug · ❓ FAQ🎉 What's New in v3.6.0 — Preview SyncSee exactly what a sync will do before it touches anything. Changed host keys no longer leave you stuck. When a server is reinstalled or rebuilt, a warning now shows the stored and received fingerprints (OpenSSH 🎉 v3.5.0 — Secure by Default
🎉 v3.4.0 — Rename, Move & Safer DeletesManage remote files without switching to FileZilla or an SSH terminal. ✏️ Rename & Move on the Server
🖱️ Drag to MoveSet 🔁 Local Renames Follow Along
🗑️ Deletes You Can Undo
🔧 Fixes
🎉 Previous Releases
✨ Features
⚡ Quick Start1. InstallGrab it from the VS Code Marketplace or install the 2. ConfigureOpen the SFTP sidebar from the activity bar. If no config exists yet, click "Create SFTP Config" in the welcome view. You can also open the Command Palette ( A
3. Go!
Right-click any file or folder in the Explorer for quick upload / download / diff options. 🔧 Config Examples🎭 ProfilesSwitch between environments on the fly: Use A profile can override any top-level option, including Object options are replaced wholesale rather than merged key-by-key, so repeat
📂 Multiple ContextsSync different parts of your project to different places: 🔗 Connection HoppingReach a server through a bastion host: 📋 Every Option, With Defaults
You only need the handful of options your setup actually uses — the block below is a reference, not a starting point. Copy the lines you want, not the whole thing. Show the full
|




| Option | Default | Why it's off |
|---|---|---|
watcher.autoUpload |
false |
Uploads on any change the watcher sees, including from tools outside VS Code. Pair with uploadOnSave freely — a Ctrl+S will not upload twice. |
watcher.autoDelete |
false |
Destructive. Deletes on the server when a local file disappears. A branch switch or a too-broad ignore can remove remote content. Folder deletes are recursive. |
watcher.autoRename |
false |
Turns a rename into a server-side rename instead of a re-upload. Only covers renames made through VS Code — mv in a terminal still looks like delete + create. |
backup.onDelete |
false |
Makes deletes recoverable, but copies file contents, so deleting a large folder moves a lot of data. |
📖 Every option explained — types, defaults, and behaviour — in docs/options.md.
🔐 Security
SFTP Neo stores passwords & passphrases in your OS credential store (macOS Keychain, Windows Credential Manager, Linux libsecret) via VS Code's Secret Storage API — so your sftp.json stays clean and commit-safe.
How to use it:
- Set
"password": null(or omit it) insftp.json:{ "host": "example.com", "username": "root", "password": null, "remotePath": "/var/www" } - Connect — you'll be prompted for the password.
- Click "Save password to Secret Storage".
- Future connections are automatic & encrypted.
The same works for private key passphrase.
🧹 Manage saved credentials anytime with
SFTP: Delete Saved Password.
🚫
.vscodeis always excluded from transfers, regardless of yourignoreoption and even ifsftp.jsontries to override it. It commonly holdssftp.jsonitself, which bots actively probe for on the open web.
🔑 SSH Authentication
SFTP Neo supports three ways to authenticate SFTP connections. For both security and convenience, SSH keys or ssh-agent are recommended over plaintext passwords.
| Method | Best for | Stored in sftp.json |
Works with Open SSH in Terminal |
|---|---|---|---|
privateKeyPath |
Single key file, no agent running | Path only (never the key contents) | ✅ Yes, with -i /path/to/key |
agent |
Shared workstation, multiple keys, or fully password-less login | No secrets | ✅ Yes — the most seamless option |
password / passphrase |
Servers that require it | null + Secret Storage (recommended) |
❌ No auto-fill in terminal |
SSH private key (privateKeyPath)
Generate a key pair (skip if you already have one):
ssh-keygen -t ed25519 -C "you@example.com"Press Enter to accept the default location (
~/.ssh/id_ed25519). You can set a passphrase for extra security.Copy the public key to your server:
ssh-copy-id -i ~/.ssh/id_ed25519.pub user@example.comConfigure SFTP Neo:
{
  "name": "My Server",
  "host": "example.com",
  "protocol": "sftp",
  "port": 22,
  "username": "user",
  "privateKeyPath": "~/.ssh/id_ed25519",
  "remotePath": "/var/www/html",
  "uploadOnSave": true
}
💡 Encrypted key? Set
"passphrase": trueand SFTP Neo will prompt once, then offer to save it to Secret Storage. Or load the key into ssh-agent (see below) and omitpassphrase.
SSH agent (agent)
Using an ssh-agent is the most convenient option: your key is unlocked once per session, and both SFTP transfers and Open SSH in Terminal work without typing a password.
macOS / Linux
Start the agent and add your key:
eval "$(ssh-agent -s)"
ssh-add ~/.ssh/id_ed25519
Get the agent socket:
echo $SSH_AUTH_SOCK
# Example: /tmp/ssh-XXXXXX/agent.12345
Configure SFTP Neo:
{
  "host": "example.com",
  "username": "user",
  "agent": "/tmp/ssh-XXXXXX/agent.12345",
  "remotePath": "/var/www/html"
}
🍎 On macOS, if your key is stored in Keychain, use
ssh-add --apple-use-keychain ~/.ssh/id_ed25519so you are not prompted after every reboot.
Windows
- Pageant (PuTTY agent): set
"agent": "pageant". - Windows OpenSSH agent: make sure the
OpenSSH Authentication Agentservice is running, then set"agent": "\\\\.\\pipe\\openssh-ssh-agent"(the pipe name may differ on older Windows builds).
Platform-specific tips
| Platform | Tip |
|---|---|
| macOS | ssh-add --apple-use-keychain ~/.ssh/id_ed25519 persists the unlocked key across reboots. |
| Linux | ssh-agent exits when the shell closes. Use your distro’s user service or add the eval/ssh-add commands to your shell profile to keep it available. |
| Windows | For WSL, use the Linux instructions inside WSL. For native Windows, the OpenSSH agent pipe or Pageant are the usual choices. |
A note on Open SSH in Terminal
The sidebar command builds a plain terminal command:
ssh -t user@host -p 22 -i "/path/to/key"
It can automatically use:
- your
privateKeyPath(-i ...) - your ssh-agent (no extra flags)
It cannot auto-type a password or passphrase into the terminal. If you want a fully password-less terminal experience, use an ssh-agent.
🖥️ Remote Explorer
Browse your remote server directly in the VS Code sidebar.
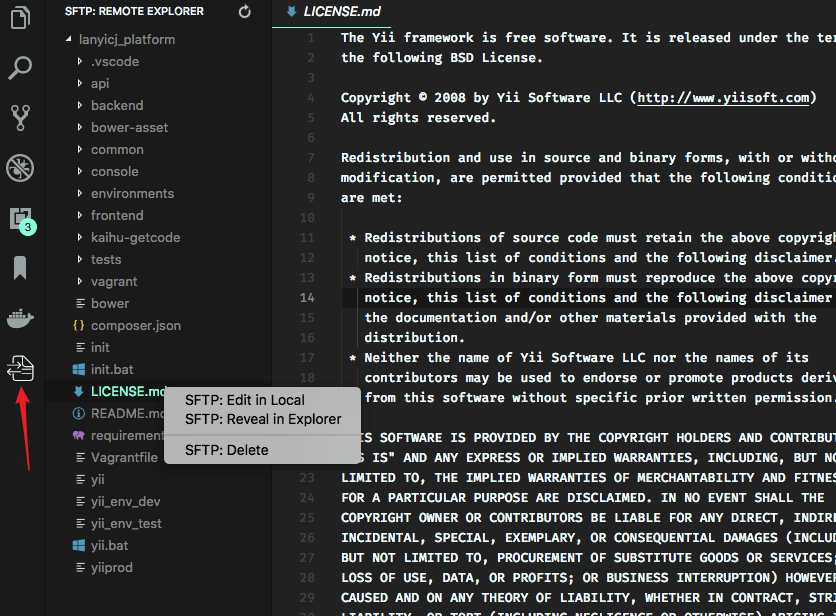
Open it via:
- Command Palette →
View: Show SFTP - Or click the SFTP icon in the Activity Bar
Select multiple files with Ctrl/Shift to download or upload in batches.
🛡️ File Backups
Protect your production files. Every upload is reversible.
Before any remote file is overwritten by an upload or sync-to-remote operation, SFTP Neo automatically creates a timestamped backup copy. Choose to keep backups on the remote server or in your local workspace. Browse, restore, or delete backup versions without leaving VS Code.
🚀 How It Works
Remote backups ("location": "remote", default)
Before Upload                    After Upload
─────────────────                ─────────────────
remote/index.php                 remote/index.php  ← new content
                                 remote/.vsftp-backup/
                                   └─ index.php.20260612194215007.bak  ← old content
Local backups ("location": "local")
Before Upload                    After Upload
─────────────────                ─────────────────
remote/index.php                 remote/index.php  ← new content
                                 workspace/.vsftp-backup/
                                   └─ index.php.20260612194215007.bak  ← old content
The remote directory layout is preserved inside the backup folder so you can mirror the server structure locally.
⚙️ Configuration
Add the backup object to your .vscode/sftp.json:
{
  "name": "Production",
  "host": "example.com",
  "protocol": "sftp",
  "port": 22,
  "username": "root",
  "remotePath": "/var/www/html",
  "uploadOnSave": true,
  "backup": {
    "enabled": true,
    "location": "remote",
    "folder": ".vsftp-backup",
    "versions": 5
  }
}
| Option | Type | Default | Description |
|---|---|---|---|
backup.enabled |
boolean |
false |
Master switch. Set to true to enable backups. |
backup.location |
string |
"remote" |
Where backups are stored. "remote" keeps them on the server under remotePath; "local" keeps them in your workspace root. |
backup.folder |
string |
".vscode/sftp-backup" |
Folder where backups are stored. Resolved relative to remotePath when location is "remote", or relative to the workspace root when location is "local". |
backup.versions |
number |
5 |
Maximum number of backup versions to keep per file. Set to 0 to disable backups even when enabled is true. |
💡 Tip: The backup folder is automatically excluded from sync operations and the Remote Explorer — you never have to worry about backups being uploaded or cluttering your file tree.
📂 Using the Backups Panel
- Enable backups in your
sftp.json(see configuration above). - Upload or sync a file — a backup is created automatically before the overwrite.
- Click any file in the Remote Explorer panel.
- The Backups panel (titled Remote Backups or Local Backups based on your setting) updates to show all backup versions for that file, sorted newest → oldest.
| Action | How |
|---|---|
| 🔄 Restore | Right-click a backup version → Restore Backup. The current live file is backed up first, then replaced. |
| 🗑️ Delete | Right-click a backup version → Delete Backup. |
| 👁️ Preview | Click any backup version to open it in a read-only preview without downloading. |
🔒 Safety Guarantees
- Upload never blocked: If a backup fails for any reason, the upload still proceeds. Your code always goes live.
- Auto-pruning: Old backups beyond your
versionslimit are cleaned up automatically after each upload. - No sync loops: The backup folder is invisible to sync, so local backups are never auto-uploaded and remote backups are never downloaded.
- Context-aware: The panel only shows backups for the file you have selected in Remote Explorer.
🐛 Debug
Need to troubleshoot?
- Open Settings (
Ctrl+,/Cmd+,). - Search for
sftp.debugand set it totrue. - Reload VS Code.
- View logs in Output → SFTP.
📖 Configuration Reference
See docs/options.md for every sftp.json option — types,
defaults, and behaviour.
❓ FAQ
See FAQ.md for common questions and solutions.
Made with ☕ & 🐛 squashing by Philip Daoud