sftp sync extension for VS Code
A maintained fork of a fork of the SFTP/FTP sync extension for VS Code, kept working on current versions of VS Code and Node.js.
Its lineage:
- The original SFTP plugin by @liximomo — no longer maintained.
- The long-running fork by @Natizyskunk, which added many features and fixes over several years but whose development has since stalled (its last official stable release is v1.16.3).
This repository — maintained by @oleg-the-developer — continues from that fork with ongoing fixes and compatibility updates.
Contributions are welcome — feel free to open an issue or a pull request.
Upstream references (Natizyskunk's build): VS Code Marketplace · VSIX releases
VSCode-SFTP enables you to add, edit or delete files within a local directory and have it sync to a remote server directory using different transfer protocols like FTP or SSH. The most basic setup requires only a few lines of configuration with a wide array of specific settings also available to meet the needs of any user. Both powerful and fast, it helps developers save time by allowing the use of a familiar editor and environment.
- Features
- Browser remote with Remote Explorer
- Diff local and remote
- Sync directory
- Upload/Download
- Upload on save
- File Watcher
- Multiple configurations
- Switchable profiles
- Temp File support
- Delete on both local and remote — right‑click a file/folder → SFTP: Delete (Local & Remote) (added in this fork)
- Sensible default
ignore — new configs are scaffolded ignoring .vscode, .git, .DS_Store, node_modules, wp-content/uploads/ (added in this fork)
- Credentials never auto-uploaded —
.vscode/sftp.json is always excluded from folder/project uploads, sync and upload-on-save, no matter your ignore setting; it can still be sent by explicitly right-clicking the file → Upload (added in this fork)
- Commands
- Debug
- FAQ
Installation
Method 1 (Recommended : Auto update)
- Select Extensions (Ctrl + Shift + X).
- Uninstall any other sftp extension to avoid conflicts.
- Install this fork from the VS Code Marketplace : https://marketplace.visualstudio.com/items?itemName=oleg-the-developer.sftp-sync-fork (or run
ext install oleg-the-developer.sftp-sync-fork).
- Voilà!
Method 2 (Manual update)
To install just follow these steps from within VSCode:
- Select Extensions (Ctrl + Shift + X).
- Uninstall current sftp extension from @liximomo.
- Open "More Action" menu(ellipsis on the top) and click "Install from VSIX…".
- Locate VSIX file and select.
- Reload VSCode.
- Voilà!
Documentation
Usage
If the latest files are already on a remote server, you can start with an empty local folder,
then download your project, and from that point sync.
- In
VS Code, open a local directory you wish to sync to the remote server (or create an empty directory
that you wish to first download the contents of a remote server folder in order to edit locally).
Ctrl+Shift+P on Windows/Linux or Cmd+Shift+P on Mac open command palette, run SFTP: config command.- A basic configuration file will appear named
sftp.json under the .vscode directory, open and edit the configuration parameters with your remote server information.
For instance:
{
    "name": "Profile Name",
    "host": "name_of_remote_host",
    "protocol": "ftp",
    "port": 21,
    "secure": true,
    "username": "username",
    "remotePath": "/public_html/project", // <--- This is the path which will be downloaded if you "Download Project"
    "password": "password",
    "uploadOnSave": false
}
The password parameter in sftp.json is optional, if left out you will be prompted for a password on sync.
Note: backslashes and other special characters must be escaped with a backslash.
- Save and close the
sftp.json file.
Ctrl+Shift+P on Windows/Linux or Cmd+Shift+P on Mac open command palette.- Type
sftp and you'll now see a number of other commands. You can also access many of the commands from the project's file explorer context menus.
- A good one to start with if you want to sync with a remote folder is
SFTP: Download Project. This will download the directory shown in the remotePath setting in sftp.json to your local open directory.
- Done - you can now edit locally and after each save it will upload to sync your remote file with the local copy.
- Enjoy!
For detailed explanations please go to wiki.
Example configurations
You can see the full list of configuration options here.
Simple
{
  "host": "host",
  "username": "username",
  "remotePath": "/remote/workspace"
}
Profiles
{
  "username": "username",
  "password": "password",
  "remotePath": "/remote/workspace/a",
  "watcher": {
    "files": "dist/*.{js,css}",
    "autoUpload": false,
    "autoDelete": false
  },
  "profiles": {
    "dev": {
      "host": "dev-host",
      "remotePath": "/dev",
      "uploadOnSave": true
    },
    "prod": {
      "host": "prod-host",
      "remotePath": "/prod"
    }
  },
  "defaultProfile": "dev"
}
Note: context and watcher are only available at root level.
Use SFTP: Set Profile to switch profile.
Multiple Context
The context must not be same.
[
  {
    "name": "server1",
    "context": "project/build",
    "host": "host",
    "username": "username",
    "password": "password",
    "remotePath": "/remote/project/build"
  },
  {
    "name": "server2",
    "context": "project/src",
    "host": "host",
    "username": "username",
    "password": "password",
    "remotePath": "/remote/project/src"
  }
]
Note: name is required in this mode.
Connection Hopping
You can connect to a target server through a proxy with ssh protocol.
Note: Variable substitution is not working in a hop configuration.
Single Hop
local -> hop -> target
{
  "name": "target",
  "remotePath": "/path/in/target",

  // hop
  "host": "hopHost",
  "username": "hopUsername",
  "privateKeyPath": "/Users/localUser/.ssh/id_rsa", // <-- The key file is assumed on the local.

  "hop": {
    // target
    "host": "targetHost",
    "username": "targetUsername",
    "privateKeyPath": "/Users/hopUser/.ssh/id_rsa", // <-- The key file is assumed on the hop.
  }
}
Multiple Hop
local -> hopa -> hopb -> target
{
  "name": "target",
  "remotePath": "/path/in/target",

  // hopa
  "host": "hopAHost",
  "username": "hopAUsername",
  "privateKeyPath": "/Users/hopAUsername/.ssh/id_rsa" // <-- The key file is assumed on the local.

  "hop": [
    // hopb
    {
      "host": "hopBHost",
      "username": "hopBUsername",
      "privateKeyPath": "/Users/hopaUser/.ssh/id_rsa" // <-- The key file is assumed on the hopa.
    },

    // target
    {
      "host": "targetHost",
      "username": "targetUsername",
      "privateKeyPath": "/Users/hopbUser/.ssh/id_rsa", // <-- The key file is assumed on the hopb.
    }
  ]
}
Configuration in User Setting
You can use remote to tell sftp to get the configuration from remote-fs.
In User Setting:
"remotefs.remote": {
  "dev": {
    "scheme": "sftp",
    "host": "host",
    "username": "username",
    "rootPath": "/path/to/somewhere"
  },
  "projectX": {
    "scheme": "sftp",
    "host": "host",
    "username": "username",
    "privateKeyPath": "/Users/xx/.ssh/id_rsa",
    "rootPath": "/home/foo/some/projectx"
  }
}
In sftp.json:
{
  "remote": "dev",
  "remotePath": "/home/xx/",
  "uploadOnSave": false,
  "ignore": [".vscode", ".git", ".DS_Store"]
}
Remote Explorer
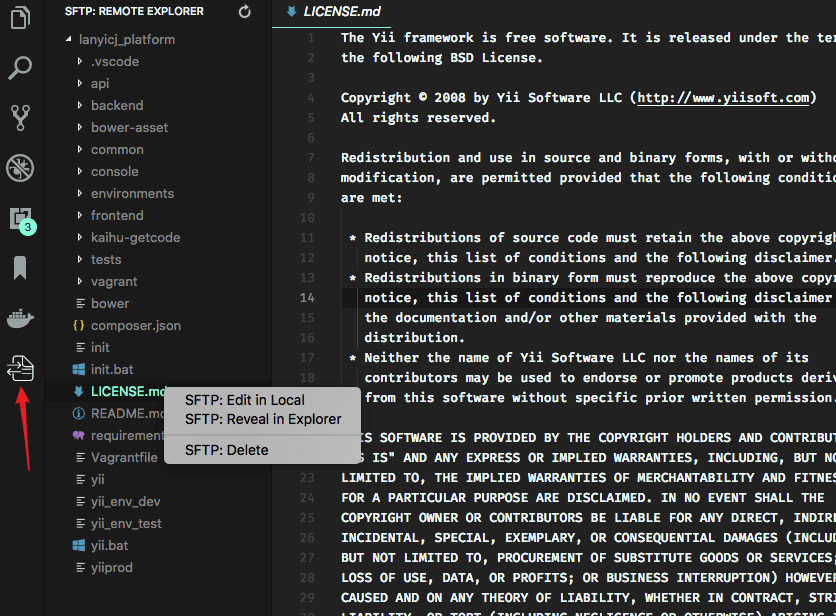
Remote Explorer lets you explore files in remote. You can open Remote Explorer by:
- Run Command
View: Show SFTP.
- Click SFTP view in Activity Bar.
You can only view a files content with Remote Explorer. Run command SFTP: Edit in Local to edit it in local.
Multiple Select
You are able to select multiple files/folders at once on the remote server to download and upload. You can do it simply by holding down Ctrl or Shift while selecting all desired files, just like on the regular explorer view.
Note: You need to manually refresh the parent folder after you delete a file if the explorer isn't correctly updated.
Order
You can order the remote Explorer by adding the remoteExplorer.order parameter inside your sftp.json config file.
In sftp.json:
{
  "remoteExplorer": {
    "order": 1 // <-- Default value is 0.
  }
}
Debug
- Open User Settings.
- On Windows/Linux -
File > Preferences > Settings
- On macOS -
Code > Preferences > Settings
- Set
sftp.debug to true and reload vscode.
- View the logs in
View > Output > sftp.
FAQ
You can see all the Frequently Asked Questions here.