ImageCompare






Flip between image variants instantly — perfect for reviewing ML model outputs, A/B testing designs, or comparing renders across different settings. View one image at a time and switch between modalities with a keypress. Zoom and pan stay locked when switching modalities, so you can compare fine details at any magnification.
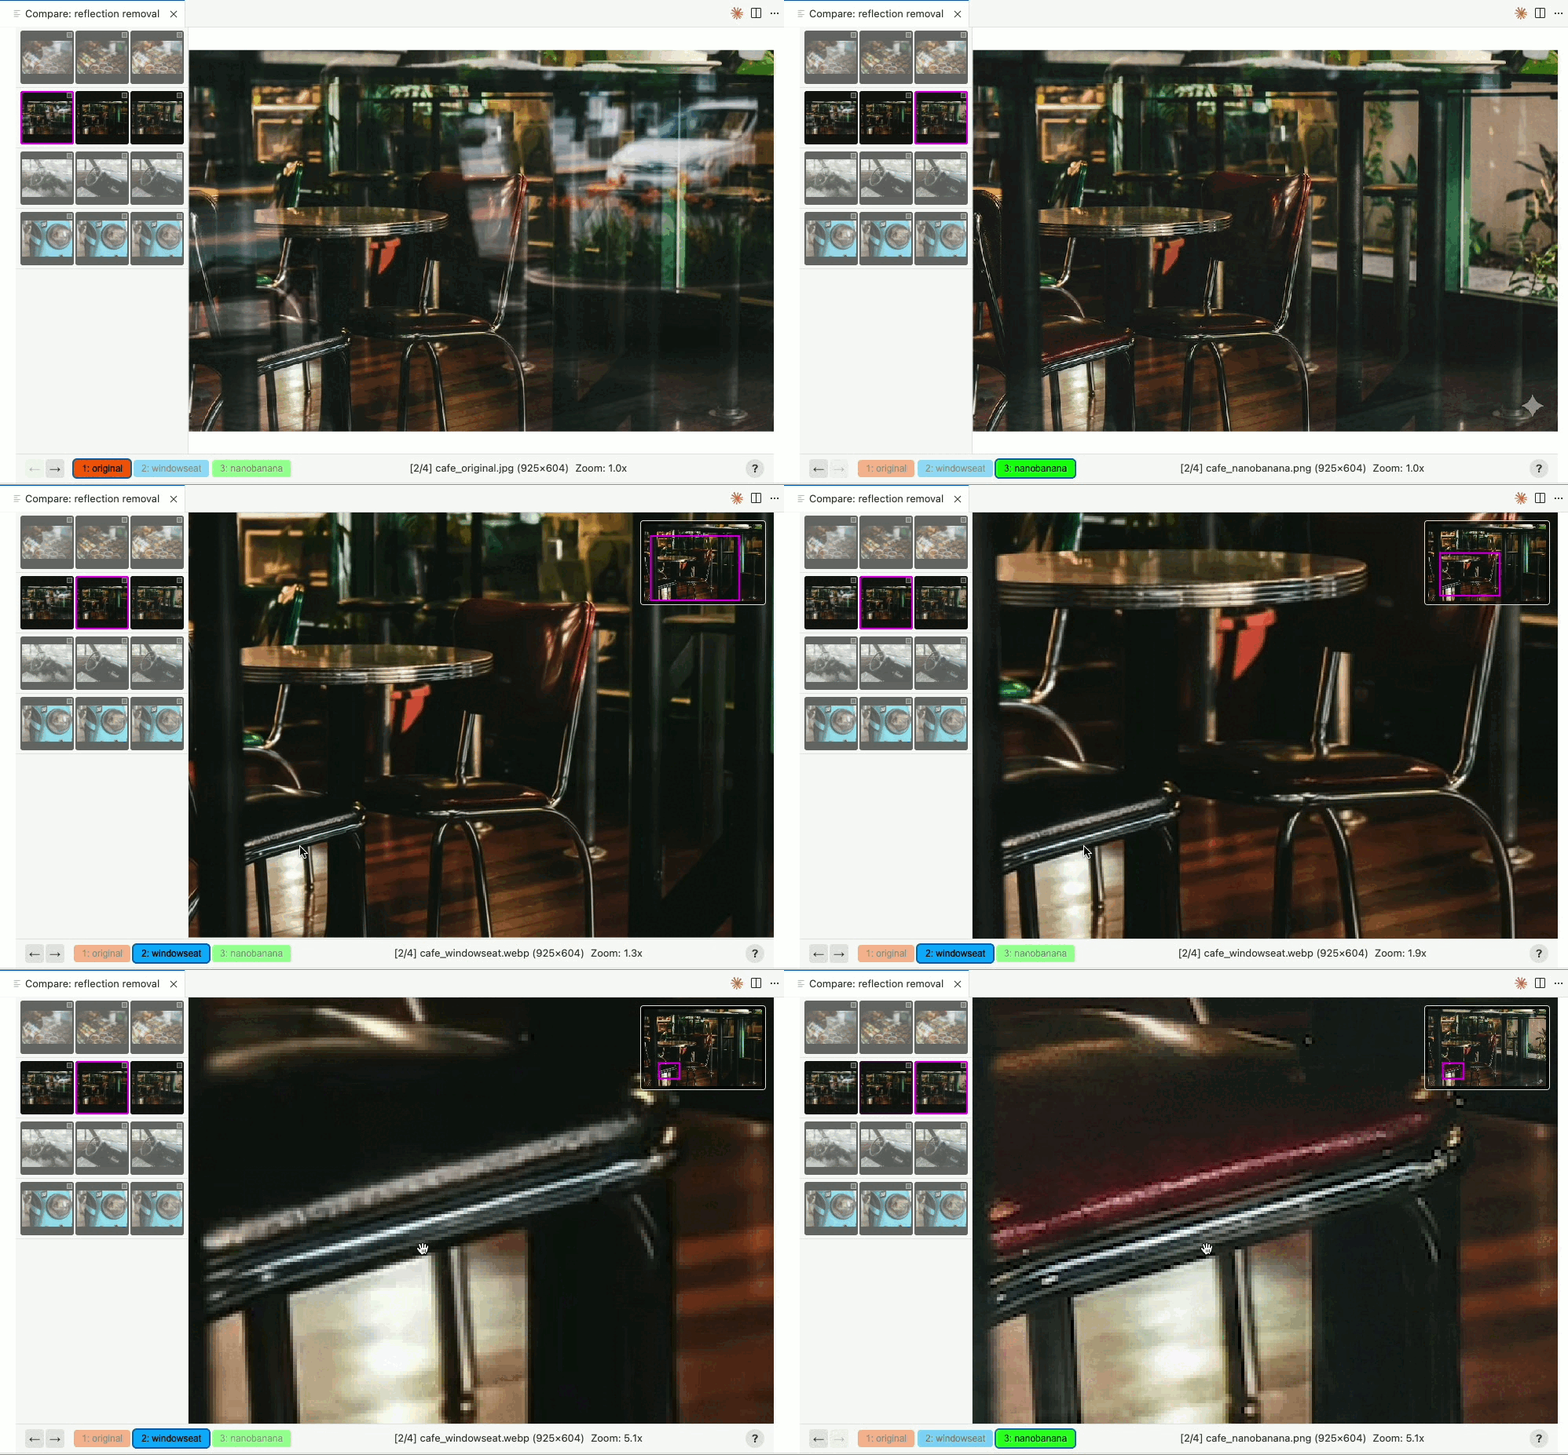
Why ImageCompare?
- Instant Flip Comparison — Hold Space to flip between images. See differences that static side-by-side views miss.
- Batch Processing — Load hundreds of image tuples at once. Navigate with arrow keys.
- Smart Matching — Automatically matches images across folders by filename, even with different suffixes.
- Crop & Export — Crop regions across all modalities, export voted comparisons to PowerPoint.
- Winner Voting — Mark the best result for each comparison. Results saved to a simple text file.
- Remote Ready — Works seamlessly over SSH, WSL, and Dev Containers.
Installation
VS Code: Search for "ImageCompare" in Extensions (Ctrl+Shift+X)
Cursor: Search for "ImageCompare" in Extensions (uses Open VSX)
Quick Start
Compare Folders
Right-click a folder containing subfolders → "Open in ImageCompare"
my_experiment/
├── ground_truth/    → modality 1
├── model_v1/        → modality 2
└── model_v2/        → modality 3
Each subfolder becomes a modality. Images are matched by filename. One subfolder of images is
enough — a comparison of a single column runs, and gains more as they appear.
Compare a Folder of Images
Right-click a folder that holds images and no image subfolders → "Open in ImageCompare"
shots/
├── render_a.png    → modality 1
├── render_b.png    → modality 2
└── notes.txt       → ignored
The images become the modalities of one comparison — the same result as selecting them all by hand.
Non-images are ignored, and so are this extension's own _cropNN outputs, so a folder you have
cropped in before reopens on the originals.
Compare Specific Files
Select 2+ image files → Right-click → "Open in ImageCompare"
Compare Folders from Different Locations
Select multiple folders (Ctrl+Click) → Right-click → "Open in ImageCompare"
Open from a Script or CLI
Write a .imagecompare session file listing folders (or image files) to compare, then open it — from the terminal, a script, or by clicking it in the explorer:
cat > session.imagecompare <<'EOF'
{
  "paths": ["/experiments/run_a/images", "/experiments/run_b/images"],
  "labels": ["baseline", "variant"],
  "colors": ["#0af", "#f60"]
}
EOF
code session.imagecompare
You don't have to write one by hand: with a comparison open, press Ctrl+S (or click the save icon
in the editor title bar) to save a copy of the session file wherever you like — paths are stored
relative when the file lands in the compared folders' parent, so the saved file survives moving the
data with it. Any voting results sidecar is copied along.
Relative paths are resolved against the file's location. The optional labels array (same length as paths, unique) overrides modality names when comparing multiple folders — useful when folders share a basename (e.g. epoch dirs from different training runs). The optional colors array (same length as paths, hex #rgb/#rrggbb) overrides the pill colors, likewise only when comparing multiple folders. Multiple folders that match into a single row are still a folder comparison: labels, colors, voting and results.txt all apply — only the tuple carousel is hidden, because there is just one row. Reopening the file restores the comparison.
Right-click comparisons work the same way under the hood: the selection is saved as a session file in extension storage, so comparisons survive window reloads and appear in File > Open Recent. Auto-generated session files are cleaned up after 30 days (files you write yourself are never touched).
Tip: tab titles show the full filename; add this setting to display session instead of session.imagecompare:
"workbench.editor.customLabels.patterns": { "**/*.imagecompare": "${filename}" }
Keyboard Shortcuts
| Key |
Action |
← → |
Switch between modalities |
↑ ↓ |
Previous / next image tuple |
Space (hold) |
Flip to previous modality |
1-9 |
Jump to modality N |
Enter |
Toggle winner for current modality |
[ ] |
Reorder modalities |
Scroll |
Zoom in/out (over the film strip: scroll the list; over the modality row: scroll it sideways when it overflows) |
Alt+Scroll |
The same, 5× faster — zoom, film strip, or modality row |
Drag |
Pan image |
| Right-click |
Menu: Copy Path / Reveal in Explorer (on the image or a modality pill); Copy Image (on the image only); Hide/Show Modality (on a pill only) |
Ctrl+C |
Copy the current image to the clipboard (as PNG), when no text is selected |
Ctrl+S |
Save Session As — save a copy of the .imagecompare file (also via the title-bar save icon) |
C |
Toggle crop mode |
Del / Backspace |
Delete the current tuple's files — or, comparing a file list, just the image on screen (permanent — see warning below) |
Esc |
Reset zoom / cancel crop / close the help overlay |
The modality row is a single scrollable strip: scroll it with the wheel when it overflows, and any
navigation — an arrow key, a digit jump, a reorder — scrolls it back to the selected pill. The film
strip's columns follow the selection the same way.
Hovering a modality pill shows its full path; clicking one selects that modality. Right-click a
pill to copy its path, reveal it in the Explorer file tree, or hide the modality: a hidden pill
is grayed out and skipped by ← → and Space, but still reachable by click or digit jump, and
still takes part in reordering, voting and export. Right-click again to show it.
In crop mode the table narrows: ← →, Space and 1-9 still switch modality, Scroll still
zooms, and Drag draws/moves/resizes the rectangle instead of panning; Enter confirms the crop,
Esc cancels it and C leaves crop mode. ↑ ↓, [ ] and Del/Backspace are ignored until
you leave.
You can also delete by clicking Delete in the floating Tools panel; the button's tooltip and the
help overlay both name whichever unit is about to go.
Warning: deletion is immediate and permanent. Comparing folders, every image file of the current
tuple is erased from disk in all modalities; comparing a list of files — a folder of images, or a
hand-picked selection — only the one image on screen is. Either way there is no confirmation prompt,
the files do not go to the trash/recycle bin, and there is no undo. Take particular care with
Backspace, which many keyboards make the reflexive "go back" key.
Features
Winner Voting
In batch mode, press Enter to mark the current modality as the winner for that image (press it again on the same modality to clear the vote). Winners are saved to results.txt next to the compared folders. When the folders share no common parent there is no such place, so results go beside the session file as <session>.results.txt instead — for a right-click comparison that session file lives in extension storage, so write your own .imagecompare file (see above) and open that if you want the results somewhere you choose:
# ImageCompare Results
image_001 = model_v2
image_002 = ground_truth
image_003 = model_v1
Win counts appear in the status bar next to each modality name. When carousel tiles are very small (many modalities), the tile's vote dot stops responding to clicks so a navigation click can never mis-vote — use Enter.
Press C or click the Crop button in the floating Tools panel to enter crop mode:
- Draw a rectangle on the image
- Resize using corner and edge handles; double-click a cardinal handle to snap to square
- Press
Enter or click the checkmark to crop all modalities to the same region
The rectangle is stored as relative (0–1) coordinates and rescaled to each modality's own resolution, so modalities of different sizes (e.g. 4K vs 1080p) are all cropped to the same region rather than the same pixel coordinates.
Cropped files are saved as _cropNN.png alongside the originals and appear as new tuples in the carousel.
PowerPoint Export
Click the PPTX button in the Tools panel to export all voted tuples to a PowerPoint file (comparison_NN.pptx next to the compared folders; the notification's Reveal button jumps to it). Each modality gets its own slide with a caption bar showing the tuple name and modality; slide images are downscaled to presentation resolution to keep the file small. Crop files include a callout thumbnail showing the crop region on the full image.
A draggable, collapsible panel in the top-right corner provides:
- Minimap — Thumbnail with viewport indicator when zoomed in (hidden while the panel is collapsed)
- Crop — Enter crop mode to crop all modalities to the same region
- Delete — Delete the current tuple's files, or the single image on screen when comparing a file list
- PPTX — Export voted tuples to PowerPoint
Smart Filename Matching
Images are matched across modalities using a two-pass algorithm:
- Exact match — Identical basenames are matched first
- Fuzzy match — Trie-based longest common prefix with LCS tie-breaking
This handles different naming conventions (e.g., img_001_gt.png matches img_001_pred.png), missing files in some modalities, and coexisting original and crop files.
Live Updates
The view automatically updates when files change:
- New images appear as soon as VS Code's watcher reports them (directory comparisons; a file list — including a folder opened as one — is enumerated once and stays as listed). Where that watcher is silent, both a new modality directory and a new file in an existing directory are picked up within a sweep (~10s)
- Deleted images are marked as removed
- Modified images reload automatically
Designed for filesystems where VS Code's own watcher is unreliable. Any path the extension can reach
as a real file — local disk, Google Drive and FUSE mounts, and SSH/WSL/container workspaces, where
the extension runs next to the files — gets two extra fallbacks: a Node watcher and a periodic
existence sweep. Virtual filesystems get only VS Code's watcher, so updates there are as reliable as
it is.
PNG, JPG, JPEG, GIF, BMP, WebP, TIFF (.tiff, .tif), PPMX
Settings
| Setting |
Default |
Description |
imageCompare.thumbnailSize |
100 |
Resolution carousel thumbnails are decoded and cached at (longest side, 2x this value) — not their on-screen size, which follows the carousel width divided by the modality count |
imageCompare.prefetchCount |
3 |
Tuples to preload ahead/behind (each preloads every modality) |
imageCompare.maxConcurrentReads |
0 (auto) |
How many image reads/decodes run at once. Auto sizes from the CPUs actually available and caps at the extension host's libuv thread pool (4) + 2 — a wider pool only queues work ahead of the image you are looking at. Applies on the next window reload |
imageCompare.keepZoomOnTupleChange |
false |
Keep zoom/pan when switching tuples; off means a new tuple resets the view. Zoom always persists across modality switches |
imageCompare.cacheMaxAgeDays |
7 |
Thumbnail cache lifetime, counted from last use (a cache you keep opening never expires) |
imageCompare.debug |
false |
Enable debug logging (webview console + Extension Host output) |
Development & Testing
Contributing? The project ships a full testing bed:
npm install
npm run compile          # build dist/ (extension + webview bundle)
npm run test:unit        # fast pure-logic tests (Vitest)
npm run test:webview     # webview UX tests (Playwright, real bundle)
npm run test:integration # runs inside a real headless VS Code
npm run test:dashboard   # → test/dashboard/dashboard.html (per-feature coverage)
npm run test:demos       # → test/demos/gallery/index.html (a captioned clip of each feature)
- docs/testing.md — the 3-layer test strategy and how the
out-of-process webview harness works.
- Feature coverage dashboard — live at toshas.github.io/ImageCompare_vscode/dashboard, regenerated on every main push (locally:
npm run test:dashboard)
shows which features are tested, lit from real test results.
- Feature demo gallery — live at toshas.github.io/ImageCompare_vscode/gallery, regenerated on every main push (locally:
npm run test:demos; per-PR: the demo-gallery CI artifact) — short captioned
clips of each interaction.
All three layers run automatically in CI on Windows, Linux, and macOS for every
push and pull request — nothing to run by hand, no machine-specific setup.
Found a bug? Fix it the testbed way
Every fix follows one short loop, so nothing silently regresses:
- Describe the bug in plain words (e.g. "when I shrink the window the labels
collapse over the thumbnails").
- Reproduce it with a failing test at the smallest layer that shows it
(unit → integration → webview).
- Fix the code until that test passes.
- Document it (one line in docs/testing.md) — CI then guards it on all three OSes.
This is packaged as the fix-issue agent skill (.claude/skills/fix-issue/): open the
repo in Claude Code and type /fix-issue <describe the bug>, and it writes the failing
test, the fix, and the docs for you. Full walkthrough in docs/testing.md.
Feedback & Issues
Found a bug or have a feature request? Open an issue on GitHub
License
MIT

