


Mentor Studio Code
An AI-mentor workflow extension for VS Code that wires Mentor into CLAUDE.md and AGENTS.md entrypoints. Track your understanding, spot your weak points, and keep learning in your own projects.
How It Works: Mentor Studio Code does not include or run an AI model by itself. Instead, it writes Mentor instructions into the entrypoint files used by your AI tool: CLAUDE.md for Claude Code, or AGENTS.md for tools that read AGENTS.md.
Note: If you plan to use Claude Code, see Anthropic's official documentation for setup, requirements, and current availability. "Claude" and "Claude Code" are trademarks of Anthropic.
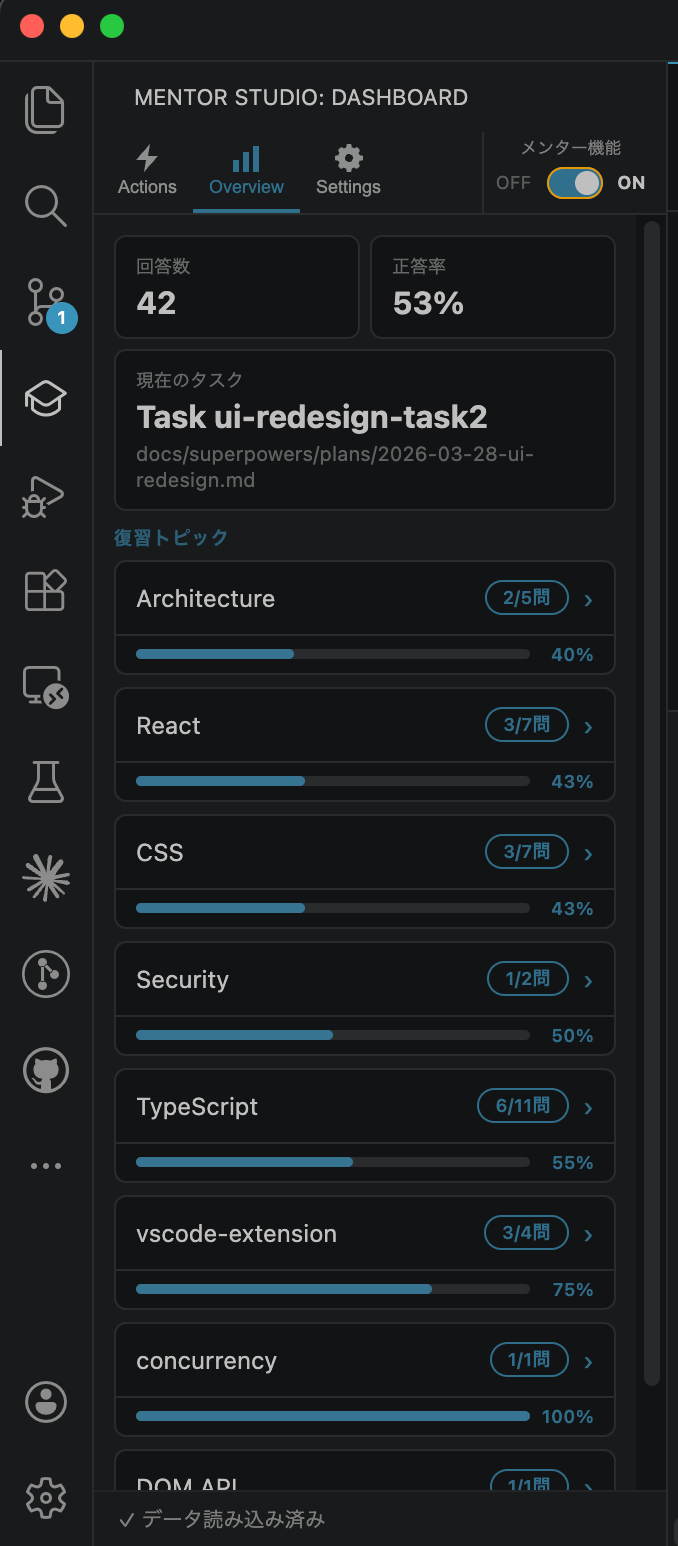
Screenshot
The dashboard displays your mentor session progress.
Prerequisites
Installation
Install from the VS Code Marketplace, or search for "Mentor Studio Code" in the Extensions tab.
Setup
- Open the project you want to build with AI Mentor in VS Code
- Click the Mentor Studio Code icon in the Activity Bar and press the Setup button
- You can also click Run Setup in the notification, or open Command Palette (
Cmd+Shift+P / Ctrl+Shift+P) → Mentor Studio Code: Setup Mentor
- The
.mentor/ directory is created with config, rules, skills, and data files
- Choose which entrypoint files should use Mentor:
CLAUDE.md and/or AGENTS.md
- If you enable
CLAUDE.md, choose where to add the mentor reference — project-wide CLAUDE.md or your personal settings
- If you enable
AGENTS.md, Setup writes a managed Mentor block to project AGENTS.md
- The dashboard updates immediately, and Mentor is ready to use
You can later change entrypoint wiring from Settings → Entrypoint Files Using Mentor. Re-running Setup refreshes Mentor templates and keeps existing entrypoint wiring. When you change CLAUDE.md or AGENTS.md from Settings, the extension shows a confirmation dialog before it writes to those files. If no entrypoint file is enabled, the Settings tab shows a warning and Mentor cannot be turned on until CLAUDE.md or AGENTS.md is configured.
Data Location
Mentor stores its learning history DB in your OS user-data directory (outside the workspace) so it doesn't conflict with git pull / checkout / rebase. <workspaceId> is <sanitized-repositoryName>-<UUID> (e.g. mentor-studio-code-550e8400-e29b-41d4-a716-446655440000) so the directory is identifiable in your file manager:
- macOS:
~/Library/Application Support/MentorStudioCode/<workspaceId>/data.db
- Linux:
~/.local/share/mentor-studio-code/<workspaceId>/data.db
- Windows:
%APPDATA%\MentorStudioCode\<workspaceId>\data.db
The exact path is shown in the sidebar's Data Location section. Use the "Open folder" button there to reveal the directory in your OS file manager — copy data.db to back up, or overwrite it (with VSCode closed) to restore.
Upgrading from earlier versions
If you used Mentor Studio Code v0.6.5 or earlier, run Setup once after upgrading to v0.6.6 or later. The extension detects the legacy .mentor/data.db and surfaces a prompt in the sidebar (and a toast) inviting you to run Setup. Setup performs the v3 migration — it copies your DB to the OS user-data directory, leaves a .mentor/data.db.migrated-YYYY-MM-DD backup in the workspace, and then re-enables the dashboard. New installations skip this step and proceed straight through Setup as usual.
If you previously committed .mentor/data.db to git, Setup also offers a one-click untrack and stages .mentor/.gitignore so a single git commit finalizes the cleanup.
Backup / restore: copy data.db directly from the path shown in the sidebar's Data Location section. To restore, overwrite the same path with your saved copy and restart VSCode. Built-in Export/Import commands are planned for a future release.
Usage
Click the Mentor Studio Code icon in the Activity Bar to open the dashboard. The dashboard is a single sidebar with three tabs.
The Mentor ON/OFF toggle in the navigation bar lets you enable or disable the mentor feature. The setting is read at the start of each session, so changes take effect from the next session.
Actions
Each button copies a prompt to your clipboard. Paste it into your AI tool to start the corresponding mentor session, such as Claude Code or any agent tool already reading your configured entrypoint file.
| Button |
When to use |
| Start task |
Starting the next task |
| Review implementation |
Asking for a code review after coding |
| Start review |
Reviewing what you've learned so far |
| Start Comprehension check |
Testing your understanding with a quiz |
Overview
Shows your current task, correct answer rate, per-topic progress, and unresolved knowledge gaps. You can also manage topics here — add new topics, edit labels, and merge duplicates.
Settings
| Setting |
Description |
| Entrypoint Files Using Mentor |
Enable CLAUDE.md and/or AGENTS.md, and choose whether CLAUDE.md uses project or personal wiring |
| Profile |
Register or update your learner profile |
| Plan |
Shows the active plan (Change / Detach) and the next queued plan on a single card |
| Plan Panel |
Open the Plan Panel to manage plans (add from file, grouped by status, badge dropdown for status changes) |
| Spec file |
Link the spec file your mentor session references |
| Language |
Switch between Japanese and English |
You can also open the Plan Panel via Mentor Studio Code: Open Plan Panel from the Command Palette, or right-click a markdown file — either in the Explorer or on its editor tab — and choose Add to Mentor Plan to register it. Use Add to Mentor Spec on the same context menu to set the clicked file as the active spec.
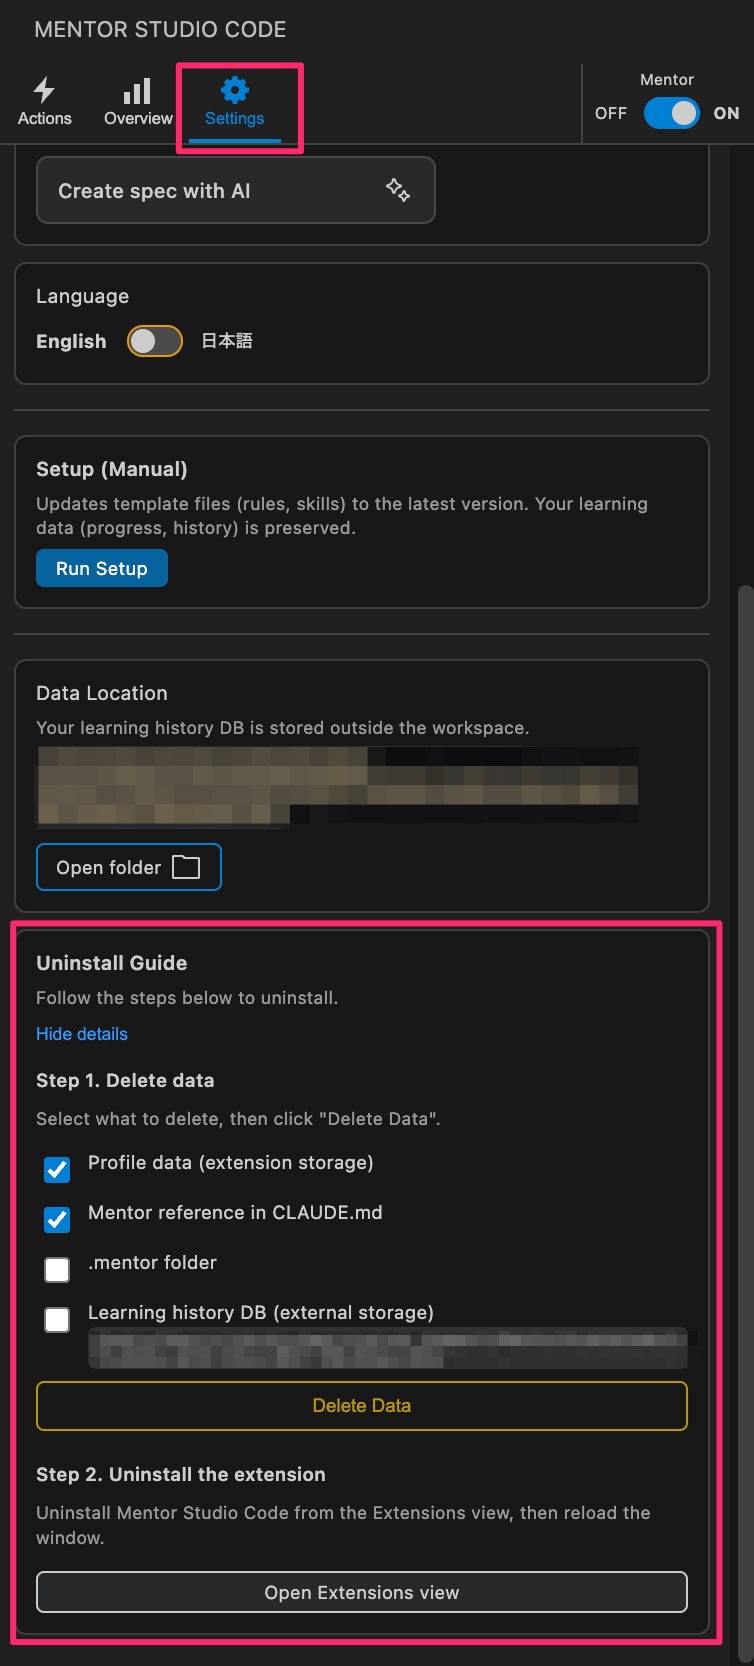
Uninstall
This extension creates files and references outside the extension itself (.mentor/ folder, AI entrypoint files such as CLAUDE.md / AGENTS.md, learner profile in VS Code storage). Simply uninstalling from the Extensions tab will leave these behind. Follow the steps below to clean up before uninstalling.
Steps
- Open the Settings tab in the Mentor Studio Code sidebar
- Scroll down to the Uninstall Guide section and expand it
- Select what to delete:
- Learner Profile — your profile stored in VS Code (checked by default)
- Mentor references in AI entrypoint files — removes Mentor wiring from supported AI entrypoint files: the
@.mentor/rules/MENTOR_RULES.md line in Claude entrypoints and the managed Mentor block in AGENTS.md (checked by default)
- .mentor Folder — all config, rules, and skills inside the workspace (unchecked by default — check this if you want a full removal)
- Learning history DB (external storage) — the DB stored in your OS user-data directory (unchecked by default — check this to also remove your learning history)
- Click the Delete Data button and confirm
- Now uninstall the extension from VS Code as usual
Tip: If you already uninstalled without cleaning up, reinstall the extension, run the cleanup above, then uninstall again.
License
MIT
This extension bundles third-party code; see THIRD_PARTY_NOTICES for attributions.
Mentor Studio Code(日本語)
CLAUDE.md や AGENTS.md のエントリポイントに接続して使う、AIメンターワークフロー向けの VSCode 拡張。自分のプロジェクトの中で、理解度の確認・弱点の可視化・復習ができます。
仕組み: Mentor Studio Code 自体には AI モデルやチャット機能は含まれていません。代わりに、利用する AI ツールのエントリポイントに Mentor 用の指示を書き込みます。CLAUDE.md は Claude Code 向け、AGENTS.md は AGENTS.md を読むツール向けです。
注: Claude Code を使う場合は、セットアップ・動作要件・最新の提供状況について Anthropic公式ドキュメント をご確認ください。「Claude」「Claude Code」は Anthropic の商標です。
前提条件
インストール
VS Code Marketplace からインストールするか、拡張機能タブで「Mentor Studio Code」と検索してください。
セットアップ
- AIメンターと一緒に開発したいプロジェクトを VS Code で開く
- アクティビティバーの Mentor Studio Code アイコンをクリックし、Setup ボタンを押す
- 通知の Setup を実行 を押すか、コマンドパレット(
Cmd+Shift+P / Ctrl+Shift+P)→ Mentor Studio Code: Setup Mentor からも実行できます
.mentor/ ディレクトリに設定・ルール・スキル・データファイルが生成される- Mentor を使うエントリポイントファイルとして
CLAUDE.md と AGENTS.md から利用したいものを選ぶ
CLAUDE.md を有効にした場合は、メンター参照の追加先を選択する — プロジェクト共通の CLAUDE.md または個人設定AGENTS.md を有効にした場合は、プロジェクトの AGENTS.md に管理対象の Mentor ブロックが追加される- ダッシュボードがすぐに更新され、そのまま Mentor を使い始められる
あとから Settings → Entrypoint Files Using Mentor で変更できます。Setup を再実行すると Mentor テンプレートを更新し、既存のエントリポイント設定は維持されます。Settings から CLAUDE.md / AGENTS.md を変更する場合は、実際にファイルを書き換える前に確認ダイアログが表示されます。どのエントリポイントファイルも有効になっていない場合は Settings タブに警告が表示され、その状態では Mentor を有効化できません。
データの場所
Mentor は学習履歴 DB を OS のユーザーデータディレクトリ(ワークスペース外)に保存します。これにより git pull / checkout / rebase と衝突しません。<workspaceId> は <sanitized-repositoryName>-<UUID> 形式(例: mentor-studio-code-550e8400-e29b-41d4-a716-446655440000)で、ファイルマネージャ上でどのワークスペースのデータか識別できます。
- macOS:
~/Library/Application Support/MentorStudioCode/<workspaceId>/data.db
- Linux:
~/.local/share/mentor-studio-code/<workspaceId>/data.db
- Windows:
%APPDATA%\MentorStudioCode\<workspaceId>\data.db
正確なパスはサイドバーの データの場所 セクションで確認できます。同セクションの「フォルダを開く」ボタンで OS のファイルマネージャを開き、data.db をコピーすればバックアップ、上書きすれば(VSCode を閉じた状態で)リストアになります。
過去に .mentor/data.db を git に commit していた場合、Setup 完了後にワンクリックで untrack できる通知が表示されます。.mentor/.gitignore も自動でステージされるため、その後の git commit 1 回でクリーンアップが完了します。
バックアップ・リストア: サイドバーに表示されているパスから data.db を直接コピーして保管。リストアは保管した .db ファイルを同じパスへ上書きして VSCode を再起動してください。Export/Import コマンドは将来のリリースで追加予定です。
使い方
アクティビティバーの Mentor Studio Code アイコンをクリックするとダッシュボードが開きます。ダッシュボードは1つのサイドバーに3つのタブで構成されています。
ナビゲーションバーの右端にある メンター機能 の ON/OFF トグルで、メンター機能を切り替えられます。設定はセッション開始時に読み込まれるため、切り替え後は新しいセッションから反映されます。
Actions
各ボタンを押すとプロンプトがクリップボードにコピーされます。Claude Code や、設定済みのエントリポイントファイルを読む AI ツールに貼り付けて、対応するメンターセッションを開始します。
| ボタン |
いつ使う? |
| タスクを始める |
次のタスクを始めるとき |
| 実装をレビューする |
コードを書いた後、レビューを受けるとき |
| 復習を始める |
これまでの学習内容を復習するとき |
| 理解度チェックを始める |
クイズ形式で理解度をチェックするとき |
Overview
現在のタスク・正答率・トピック別進捗・未解決の理解ギャップを確認できます。トピックの追加・ラベル編集・マージもここから行えます。
Settings
| 設定項目 |
内容 |
| Mentor機能を利用するエントリポイントファイル |
CLAUDE.md / AGENTS.md の有効化と、CLAUDE.md の設定先(プロジェクト / 個人)の切り替え |
| Profile |
学習者プロフィールの登録・更新 |
| Plan |
アクティブなプラン(変更・外す)と次の queued プランを1つのカードに集約して表示 |
| Plan Panel |
プランパネルを開いてプラン管理(ファイルから追加・6ステータスグループ表示・バッジボタンでステータス変更) |
| Spec file |
メンターセッションで参照する仕様ファイルを紐付ける |
| Language |
日本語・英語を切り替える |
Plan Panel はコマンドパレットから Mentor Studio Code: Open Plan Panel でも開けます。エクスプローラーまたはエディタのタブで Markdown ファイルを右クリックし Add to Mentor Plan を選ぶと、そのファイルをプランとして登録できます。同じコンテキストメニューの Add to Mentor Spec を選ぶと、そのファイルがアクティブなスペックとして設定されます。
アンインストール
この拡張機能は、拡張機能本体の外にもファイルや参照を作成します(.mentor/ フォルダ、CLAUDE.md / AGENTS.md などの AI エントリポイント、VS Code ストレージ内の学習者プロフィール)。拡張機能タブから通常のアンインストールを行うだけでは、これらが残ったままになります。以下の手順でクリーンアップしてからアンインストールしてください。
手順
- サイドバーの Mentor Studio Code から Settings タブを開く
- 下部の Uninstall Guide セクションを展開する
- 削除対象を選択する:
- Learner Profile — VS Code に保存された学習者プロフィール(デフォルトでチェック済み)
- AI ツールのエントリポイント内のメンター参照 — Claude のエントリポイントに追加された
@.mentor/rules/MENTOR_RULES.md の行と、AGENTS.md の管理対象 Mentor ブロックを削除(デフォルトでチェック済み)
- .mentor Folder — ワークスペース内の設定・ルール・スキル(デフォルトではチェックなし — 完全削除したい場合はチェック)
- 学習履歴 DB(外部ストレージ) — OS のユーザーデータディレクトリに保存された DB(デフォルトではチェックなし — 学習履歴も削除したい場合はチェック)
- データ消去 ボタンをクリックして確認する
- 通常どおり VS Code から拡張機能をアンインストールする
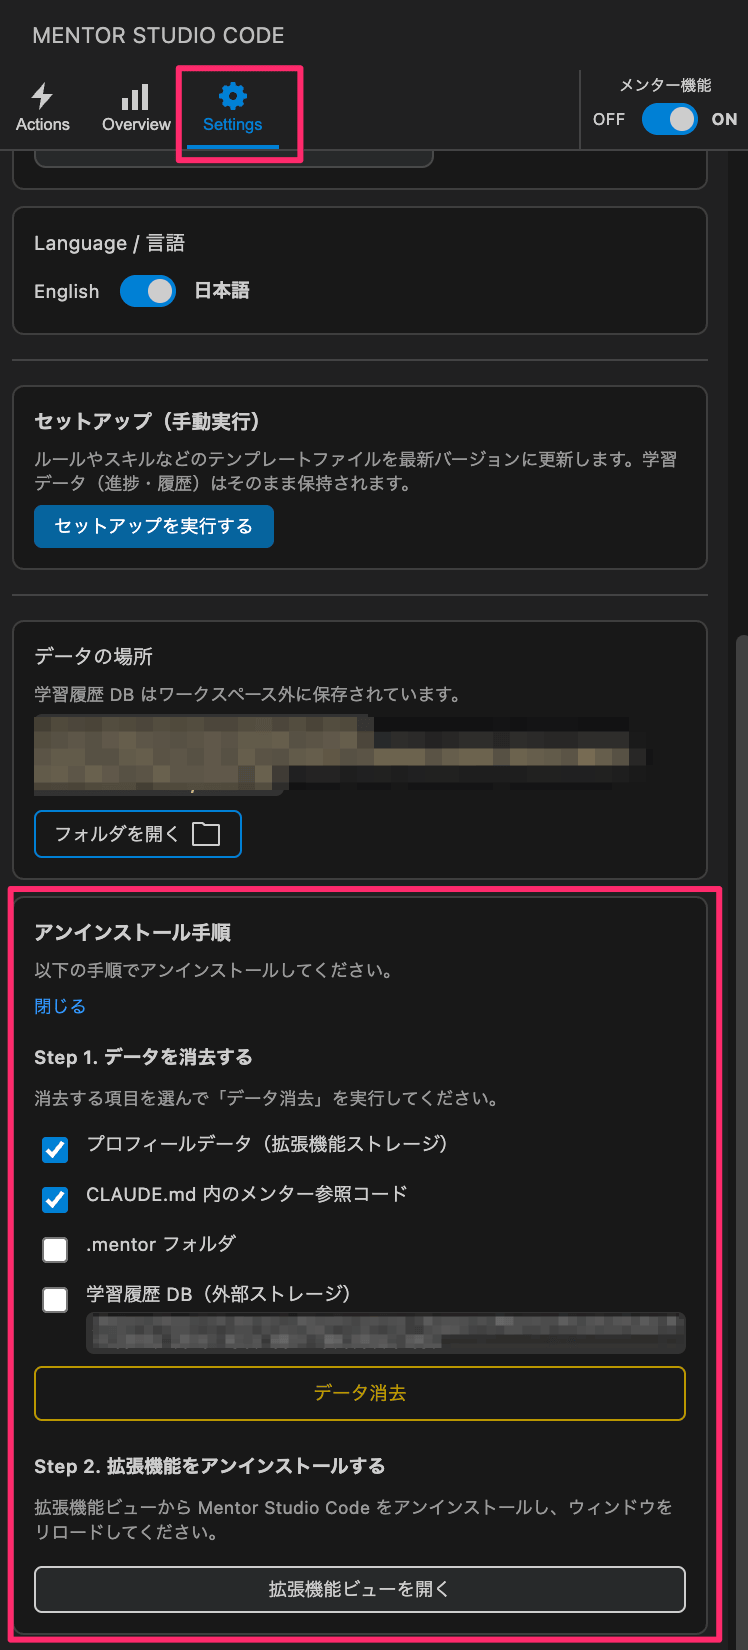
ヒント: クリーンアップせずにアンインストールしてしまった場合は、再インストールしてから上記の手順を実行し、その後もう一度アンインストールしてください。
ライセンス
MIT
この拡張機能にはサードパーティのコードが含まれています。帰属表示は THIRD_PARTY_NOTICES を参照してください。