
WhisperX Assistant: Your Voice-Driven Coding Companion
Experience the futuristic Matrix-style control center for managing your AI models and voice transcription.
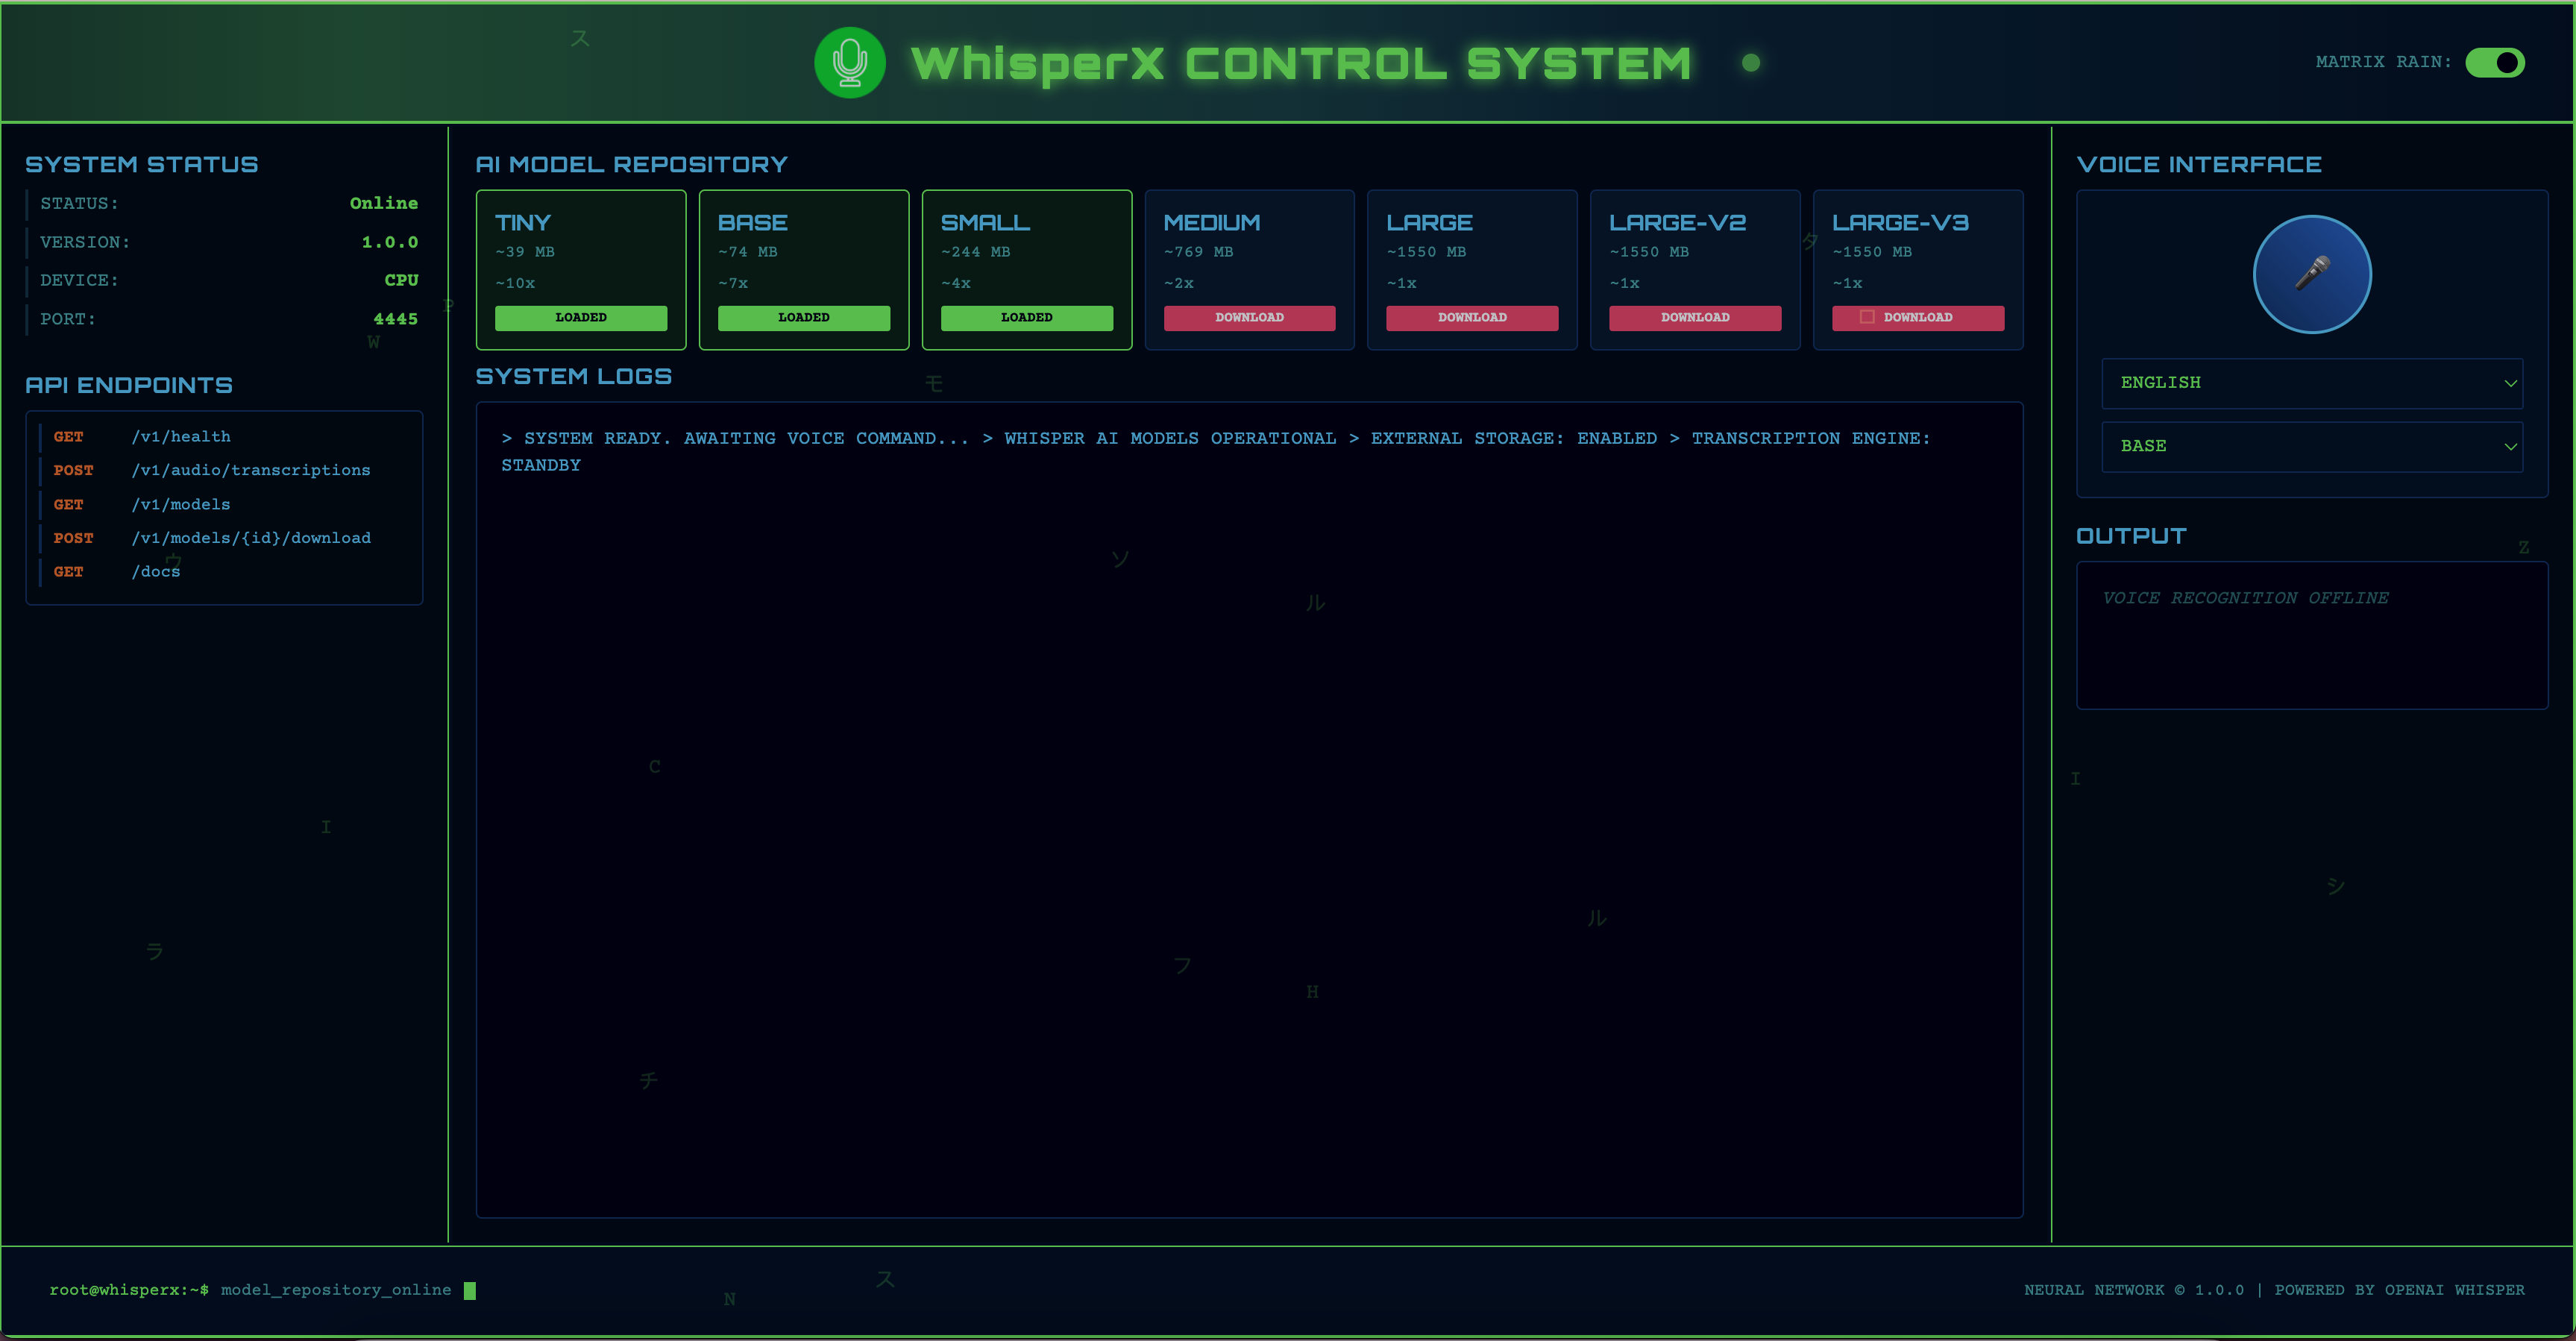
🚀 To experience this control center: Clone this repository from GitHub and build the Docker image locally. The web-based control center provides an interactive dashboard for model management, real-time transcription, and system monitoring.
📂 GitHub Repository: https://github.com/mwhesse/whisperx-assistant-vscode
Quick Setup:
git clone https://github.com/mwhesse/whisperx-assistant-vscode.git
cd whisperx-assistant-vscode
docker compose --profile external up
Then visit http://localhost:4445 to access the control center.


WhisperX Assistant is an extension for Visual Studio Code that transcribes your spoken words into text within the VSCode & Cursor editor. This hands-free approach to coding allows you to focus on your ideas instead of your typing.
✨ Features:
- Cross-platform audio recording with SoX (default) or custom recording commands
- Multiple API options: Local Docker, OpenAI, or Groq
- Configurable recording tools (ffmpeg, arecord, etc.) for advanced users
- Optimized for integration with AI coding assistants like Cursor
WhisperX Assistant can also be integrated with other powerful AI tools, such as Chat GPT-4 or Cursor, to create a dynamic, AI-driven development environment.
Powered by OpenAI Whisper
By default, WhisperX Assistant utilizes Whisper AI on your local machine, offering a free voice transcription service. For this, the base model of Whisper is used, balancing accuracy and performance. In the future, we will support other models.
There is also the option to use the OpenAI API or Groq API to transcribe your audio for remote transcription. Note: This requires an API key.
For more details about Whisper, visit the Whisper OpenAI GitHub page.
Getting Started: Installation Instructions
To install and setup WhisperX Assistant, follow these steps:
Install a recording tool: WhisperX Assistant uses SoX by default for microphone recording, but you can also configure a custom recording command using alternatives like ffmpeg.
Option A: SoX (Default - Recommended)
Option B: Custom Recording Command (Alternative)
Linux users experiencing audio cutoff issues with SoX can use ffmpeg instead:
- Ubuntu/Debian:
sudo apt install ffmpeg
- MacOS:
brew install ffmpeg
- Windows:
choco install ffmpeg
After installation, configure the custom recording command in VS Code settings (see Custom Recording Commands section below).
Install Docker to enable the local Whisper model or use the OpenAI API or Groq API for remote transcription.
Install the WhisperX Assistant extension into Visual Studio Code or Cursor.
How to Use WhisperX Assistant
- Initialization: Upon loading Visual Studio Code, the extension verifies the correct installation of SoX (or your custom recording command if configured). If any issues are detected, an error message will be displayed.
Once initialization is complete, a microphone icon will appear in the bottom right status bar.

- Starting the Recording: Activate the extension by clicking on the quote icon or using the shortcut
Command+M (for Mac) or Control+M (for Windows). You can record for as long as you like, but remember, the longer the recording, the longer the transcription process. The recording time will be displayed in the status bar.

- Stopping the Recording: Stop the recording using the same shortcut (
Command+M or Control+M). The extension icon in the status bar will change to a loading icon, and a progress message will be displayed, indicating that the transcription is underway.

- Transcription: Once the transcription is complete, the text will be saved to the clipboard. This allows you to use the transcription in any program, not just within Visual Studio Code. If an editor is active, the transcription will be pasted there automatically.

Tip: A good microphone will improve transcription accuracy, although it is not a requirement.
Tip: For an optimal experience, consider using the Cursor.so application to directly call the Chat GPT-4 API for code instructions. This allows you to use your voice to instruct GPT to refactor your code, write unit tests, and implement various improvements.
Custom Recording Commands
WhisperX Assistant uses SoX by default, but you can configure a custom recording command if you prefer alternatives like ffmpeg or need to work around platform-specific issues.
When to Use Custom Recording Commands
- Linux users experiencing audio cutoff: Some Linux distributions have issues with SoX cutting off the last few seconds of recordings
- Advanced users: Want to use specific audio settings or recording tools
- Specific microphone requirements: Need to target a particular audio device
Configuration
- Open VS Code settings (
Cmd/Ctrl + ,)
- Search for "WhisperX Assistant"
- Find "Custom Recording Command"
- Enter your command with the
$AUDIO_FILE placeholder
Important: Your command MUST include $AUDIO_FILE where the output file should be saved.
macOS (ffmpeg)
ffmpeg -f avfoundation -i :1 -ac 1 -ar 16000 -sample_fmt s16 $AUDIO_FILE
Note: Replace :1 with the appropriate device number from ffmpeg -f avfoundation -list_devices true -i ""
Linux (ffmpeg with PulseAudio)
ffmpeg -f pulse -i default -ac 1 -ar 16000 -sample_fmt s16 $AUDIO_FILE
Linux (ffmpeg with ALSA)
ffmpeg -f alsa -i default -ac 1 -ar 16000 -sample_fmt s16 $AUDIO_FILE
Windows (ffmpeg)
ffmpeg -f dshow -i audio="Microphone" -ac 1 -ar 16000 -sample_fmt s16 $AUDIO_FILE
Linux with arecord:
arecord -f S16_LE -c 1 -r 16000 $AUDIO_FILE
Any platform with custom settings:
sox -t pulseaudio default -c 1 -r 16000 $AUDIO_FILE gain -3
Troubleshooting Custom Commands
- Command validation error: Ensure your command includes
$AUDIO_FILE
- No audio recorded: Check your audio device permissions and microphone access
- Command not found: Verify the recording tool (ffmpeg, arecord, etc.) is installed and in your PATH
- Still experiencing cutoffs: Try adjusting buffer settings or switching recording tools
Finding Your Audio Device
macOS (ffmpeg):
ffmpeg -f avfoundation -list_devices true -i ""
Linux (PulseAudio):
pactl list sources short
Linux (ALSA):
arecord -l
Windows (ffmpeg):
ffmpeg -list_devices true -f dshow -i dummy
Using WhisperX Assistant with Cursor.so
To enhance your development experience with Cursor.so and WhisperX Assistant, follow these simple steps:
- Start the recording: Press
Command+M (Mac) or Control+M (Windows).
- Speak your instructions clearly.
- Stop the recording: Press
Command+M (Mac) or Control+M (Windows).
Note: This initiates the transcription process.
- Open the Cursor dialog: Press
Command+K or Command+L.
Important: Do this before the transcription completes.
- The transcribed text will automatically populate the Cursor dialog. Here, you can edit the text or add files/docs, then press
Enter to execute the GPT query.
By integrating Cursor.so with WhisperX Assistant, you can provide extensive instructions without the need for typing, significantly enhancing your development workflow.
WhisperX Assistant has been tested and supports:
- macOS: Full support with SoX (default) and ffmpeg (custom)
- Windows: Full support with SoX (default) and ffmpeg (custom)
- Linux: Full support with SoX (default) and ffmpeg (custom) - Note: Some distributions may experience audio cutoff issues with SoX, for which ffmpeg is recommended
If you encounter any platform-specific issues, please consider using the custom recording command feature or report the issue on our GitHub repository.
Local Development with Faster Whisper
This extension supports using a local Faster Whisper model through Docker. This provides fast transcription locally and doesn't require an API key.
Quick Start with Docker
To get started with local transcription, use our Docker image:
docker run -d -p 4445:4445 --name whisperx-assistant mwhesse/whisperx-assistant:latest
Then configure VSCode:
- Open VSCode settings (File > Preferences > Settings)
- Search for "WhisperX Assistant"
- Set "Api Provider" to "localhost"
- Set "Api Key" to any non-empty string (e.g., "localhost-dummy-key")
That's it! You can now use the extension with your local Whisper server.
External Model Storage
By default, models are downloaded and stored inside the Docker container, which means they're lost when the container is recreated. To persist models outside the container, you can use external storage.
Benefits of External Model Storage
- Persistence: Models survive container restarts and updates
- Performance: Avoid re-downloading models on container recreation
- Storage Management: Better control over where models are stored
- Sharing: Share models between multiple container instances
Quick Setup for External Storage
Basic external storage setup:
# Create a directory for models on your host
mkdir -p ~/.whisperx-models

# Run with external storage enabled
docker run -d -p 4445:4445 \
  -e ENABLE_EXTERNAL_STORAGE=true \
  -v ~/.whisperx-models:/app/models \
  --name whisperx-assistant \
  mwhesse/whisperx-assistant:latest
Custom cache directory:
# Create a custom directory for models
mkdir -p /path/to/your/models

# Run with custom external storage location
docker run -d -p 4445:4445 \
  -e ENABLE_EXTERNAL_STORAGE=true \
  -e MODELS_CACHE_DIR=/app/models \
  -v /path/to/your/models:/app/models \
  --name whisperx-assistant \
  mwhesse/whisperx-assistant:latest
Using Docker Compose
For easier management, use the provided docker-compose.yml file:
# External storage (recommended)
docker compose --profile external up -d

# Custom storage location
HOME=/path/to/your/home docker compose --profile custom up -d

# GPU-enabled with external storage
docker compose --profile gpu up -d

# Development mode with external storage
docker compose --profile dev up -d
Environment Variables for Model Storage
ENABLE_EXTERNAL_STORAGE: Enable/disable external storage (default: false)MODELS_CACHE_DIR: Custom cache directory path inside container (default: /app/models)MODELS_VOLUME_PATH: Volume mount path inside container (default: /app/models)HF_HOME: HuggingFace cache directory (auto-configured when external storage is enabled)
Docker Configuration Options
Memory Limits
If you're experiencing memory issues, you can limit the container's memory:
docker run -d -p 4445:4445 --memory=4g --name whisperx-assistant mwhesse/whisperx-assistant:latest
GPU Support
If you have a CUDA-capable GPU:
docker run -d -p 4445:4445 --gpus all --name whisperx-assistant mwhesse/whisperx-assistant:latest
Container Management
# Stop the server
docker stop whisperx-assistant

# Start the server
docker start whisperx-assistant

# Remove the container
docker rm whisperx-assistant

# View logs
docker logs whisperx-assistant

# Update to latest version
docker pull mwhesse/whisperx-assistant:latest
docker stop whisperx-assistant
docker rm whisperx-assistant
docker run -d -p 4445:4445 mwhesse/whisperx-assistant:latest
Troubleshooting
Check if the server is running:
curl http://localhost:4445/v1/health
Common Issues:
Server Issues:
- First startup delay: The model is downloaded on first use, which may take a few minutes
- Memory issues: Try using the
--memory=4g flag as shown above
- Port conflicts: If port 4445 is in use, you can map to a different port:
bash docker run -d -p 5000:4445 mwhesse/whisperx-assistant:latest
Then update the custom endpoint in VSCode settings to http://localhost:5000
Model Storage Issues:
- Models not persisting: Ensure you're using the
-v flag to mount a host directory when external storage is enabled
- Permission errors: Make sure the mounted directory has proper permissions:
mkdir -p ~/.whisperx-models
chmod 755 ~/.whisperx-models
- Models not found after restart: Check that the volume mount path is correct and the directory exists
- Storage location confusion: Verify environment variables are set correctly:
docker exec whisperx-assistant env | grep -E "(ENABLE_EXTERNAL_STORAGE|MODELS_CACHE_DIR|HF_HOME)"
- Disk space issues: Large models require significant space (up to 3GB for large models). Check available space:
df -h ~/.whisperx-models
- Multiple model locations: If models appear in different locations, check the priority order in logs:
docker logs whisperx-assistant | grep -i "cache directory"
Debugging Model Storage:
# Check what models are detected as downloaded
curl http://localhost:4445/v1/models/downloaded

# Check model storage configuration
docker exec whisperx-assistant env | grep -E "(ENABLE_|MODELS_|HF_)"

# List files in external storage
ls -la ~/.whisperx-models/

# Check container logs for storage-related messages
docker logs whisperx-assistant | grep -i "storage\|cache\|model"
Migrating Existing Models:
If you have models in the container and want to move them to external storage:
# Copy models from running container to host
docker cp whisperx-assistant:/root/.cache/huggingface ~/.whisperx-models/

# Restart container with external storage
docker stop whisperx-assistant
docker rm whisperx-assistant
docker run -d -p 4445:4445 \
  -e ENABLE_EXTERNAL_STORAGE=true \
  -v ~/.whisperx-models:/app/models \
  --name whisperx-assistant \
  mwhesse/whisperx-assistant:latest
Advanced: Building from Source
If you want to customize the server, you can build from our Dockerfile:
- Get the Dockerfile from our repository
- Build the image:
docker build -t whisperx-assistant-local .
docker run -d -p 4445:4445 whisperx-assistant-local
Running the Python App Outside Docker
The WhisperX Assistant API is now available as a standalone Python application that can be run outside of Docker. This is useful for development, testing, or when you prefer not to use Docker.
Python App Structure
The Python application is located in the python-app/ directory with the following structure:
python-app/
├── main.py                    # FastAPI application entry point
├── config.py                  # Configuration management
├── transcription_service.py   # Transcription service logic
├── run.py                     # Convenience script to run the app
├── requirements.txt           # Production dependencies
├── test_requirements.txt      # Test dependencies
├── pytest.ini               # Pytest configuration
├── .env.example              # Environment variables example
├── .gitignore               # Git ignore rules
├── README.md                # Detailed Python app documentation
└── tests/                   # Test suite
    ├── __init__.py
    ├── test_main.py
    └── test_transcription_service.py
Quick Start (Python App)
Prerequisites:
- Python 3.10 or higher
- FFmpeg installed on your system
Setup:
cd python-app
python -m venv venv
source venv/bin/activate  # On Windows: venv\Scripts\activate
pip install -r requirements.txt
Run the application:
python run.py
Or use the convenience script with options:
python run.py --model small --port 8000 --install-deps
Test the application:
pip install -r test_requirements.txt
pytest
Configuration Options
The Python app can be configured using environment variables or command-line arguments:
--model: Whisper model size (tiny, base, small, medium, large)--device: Device for inference (cpu, cuda)--host: Host to bind to (default: 0.0.0.0)--port: Port to bind to (default: 4445)--install-deps: Automatically install dependencies
For more detailed information about running and configuring the Python application, see the python-app/README.md file.
Benefits of Running Outside Docker
- Development: Easier debugging and code modification
- Testing: Run comprehensive test suites
- Performance: Direct access to system resources
- Customization: Easy configuration and model selection
- Integration: Better integration with development tools
Docker Commands Quick Reference
Build the Docker image:
docker build -t whisperx-assistant .
Run the container:
docker run -d -p 4445:4445 --name whisperx-assistant whisperx-assistant
Stop/Start/Remove container:
docker stop whisperx-assistant
docker start whisperx-assistant
docker rm whisperx-assistant
View logs:
docker logs whisperx-assistant
Multiple API Options
Whisper Assistant offers three ways to transcribe your audio:
- Local Docker Server (Default): Run Whisper locally using our Docker container for privacy and no remote API costs
- OpenAI Cloud API: A powerful cloud option using OpenAI's Whisper-1 model for fast, accurate transcription (requires API key)
- Groq Cloud API: A powerful cloud option using Groq's Whisper Large v3 Turbo model for fast, accurate transcription (requires API key)
Configuring the API Provider
- Open VSCode settings (File > Preferences > Settings)
- Search for "Whisper Assistant"
- Set "Api Provider" to one of:
localhost (default)openaigroq
- Enter your API key:
- For localhost: Any non-empty string (e.g., "localhost-dummy-key")
- For OpenAI: Get your key from OpenAI's console
- For Groq: Get your key from GROQ's console
When using localhost (default), you can customize the endpoint URL in settings if you're running the Docker container on a different port or host.
Attribution
Microphone icons created by kliwir art - Flaticon