Flutter Architecture Generator Riverpod
vsce package --out my-extension.vsix
A VS Code extension to generate modular Flutter features (application, domain, infrastructure, shared, etc.) with offline support.
Enjoy fast architecture scaffolding 🚀
Table of Contents
Overview
The Name Mobile Application is a cross-platform mobile application developed using Flutter. It is designed to provide users with a seamless and engaging experience across both Android and iOS platforms. The application leverages the power of Flutter's rich UI components and Dart's performance to deliver a high-quality user experience.
Usage
1. Install the Extension
- Open Visual Studio Code.
- Go to the Extensions view by clicking on the Extensions icon in the Activity Bar on the side of the window.
- Search for "Flutter Architecture Generator Riverpod" and click on the Install button.
- Alternatively, you can install it from the Visual Studio Code Marketplace.
2. Setup the Extension
- Open the Seettings in Visual Studio Code.
- Search for "Flutter Architecture Generator Riverpod".
- Configure the following settings:
- Flutter SDK Path: Set the path to your Flutter SDK.
3. Commands
- Create Flutter App: This command creates a new Flutter application.
- Create Feature Structure: This command generates a modular feature structure for your Flutter application.
- Build Runner: This command runs the build runner to generate code based on the generated files.
4. Create Flutter App
- Press
Ctrl + Shift + P (Windows/Linux) or Cmd + Shift + P (macOS) to open the Command Palette.
- Type
Create Flutter App and select the command to create a new Flutter project.
- Choose a project type (e.g., Flutter Application) and follow the prompts to create a new project.
- Open the newly created project in Visual Studio Code.
5. Create Feature Structure
- Press
Ctrl + Shift + P (Windows/Linux) or Cmd + Shift + P (macOS) to open the Command Palette.
- Type
Create Feature Structure and select the command to create a new feature structure.
This will prompt you to enter the name of the feature you want to create. The generator will create a new directory with the specified name and generate the necessary files and folders for the feature.
The generated structure will include:
- application/
- domain/
- infrastructure/
- shared/
- presentation/
- Then add the Route to the app_router.dart file.
Select options for:
- Offline support :
- If you want to add offline support, select the option to include it. This will generate the necessary files and folders for offline support.
- New structure :
- If you want to use the new structure, select the option to include it. This will generate the necessary files and folders for the new structure.
Requirements
- Flutter installed and configured on your system.
- knowledge about Flutter Doc
- knowledge about Reiverpod state management Doc
Technologies Used
The Name Mobile Application is built using a combination of technologies to ensure a robust and efficient solution. The primary technologies used in the development of this application include:
Project Structure
This document provides an overview of the project structure, detailing the purpose and content of each directory and its subdirectories. This structure is typical for a Flutter or cross-platform mobile application that targets both Android and iOS platforms, and includes various assets, configurations, and modules.
app_name/
    │
    ├── /android
    │   │
    │   └───> android files configration
    │
    ├── /assets
    │   │
    │   ├─── /fonts/
    │   │
    │   ├─── /images/
    │   │
    │   ├─── /icons/
    │   │
    │   └─── /i18n/
    │
    ├── /keystore
    │   │
    │   └──/upload
    │       │
    │       │─── upload_certificate.pem
    │       │
    │       └─── upload-keystore.jks
    │
    ├── /ios
    │   │
    │   └───> IOS files configration
    │
    ├── /lib
    │   │
    │   ├─── /core/
    │   │     │
    │   │     │─── /config/
    │   │     │
    │   │     │─── /utils/
    │   │     │
    │   │     │─── /widgets/
    │   │     │
    │   │     └─── /presentation/
    │   │           │
    │   │           ├─── /managers/
    │   │           │
    │   │           │─── /routes/
    │   │           │    │
    │   │           │    └─── app_router.dart
    │   │           │
    │   │           │
    │   │           └─── theme.dart
    │   │
    │   ├─── /theme/
    │   │     │
    │   │     │─── application.dart
    │   │     └─── theme.dart
    │   │
    │   │─── /gen
    │   │     │
    │   │     │─── assets.gen.dart
    │   │     └─── fonts.gen.dart
    │   │
    │   │
    │   │─── /auth/
    │   │
    │   │─── /...modules
    │   │
    │   └─── main.dart
    │
    │
    └──────>
Module Structure
    ├── /lib
    │   │
    │   └ /module/
    │      │
    │      │
    │      │───/application  #go to application explain for more details
    │      │    │
    │      │    │─── module_notifier.dart
    │      │    │
    │      │    └─── module_states.dart
    │      │
    │      │───/domain/  #go to domain explain for more details
    │      │    │
    │      │    └─── module_domain.dart
    │      │
    │      │───/infrastructure/  #go to infrastructure explain for more details
    │      │    │
    │      │    │─── /dtos/
    │      │    │
    │      │    │─── /remote/
    │      │    │
    │      │    │─── /local/
    │      │    │
    │      │    └─── /repository/
    │      │
    │      │───/presentation/  #go to presentation explain for more details
    │      │    │
    │      │    ├─── /widgets/
    │      │    │
    │      │    └─── module_page.dart
    │      │
    │      └──/shared/ #go to shared explain for more details
    │             │
    │             └─── /module_providers.dart
    └──────>
How Module Works
This structured approach helps in understanding how each layer interacts and how data flows through the module, from the user interface down to the core logic and back. Each layer has a distinct role, contributing to a modular and maintainable codebase.
To understand how each element of a module functions, we’ll explore two use cases: one starting from the top of the structure and the other from the bottom. This approach helps us understand how the elements interact in both directions. For this example, we’ll retrieve some data from an API, beginning with the user interface, or what we call the “presentation” layer.
1 Presentation Layer
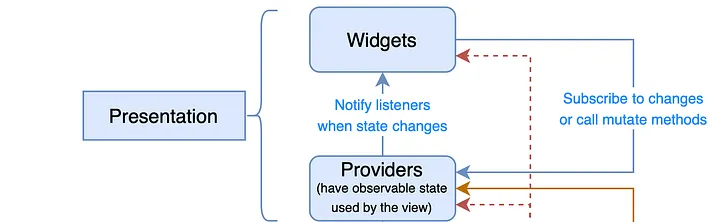
The presentation layer typically contains the main screens of a module, such as profile_page.dart or settings_page.dart. These files are named after the module and end with Page to assist in routing within the application (e.g., ProfilePage, SettingsPage). At the top of these files, you’ll find the @RoutePage() annotation, which further aids in routing.
2 Application Layer
The application layer plays a central role in managing the state within the module. This directory typically contains two essential files: a notifier and a state file, usually prefixed with the module’s name (e.g., profile_notifier.dart, settings_states.dart).
Notifier:
The notifier contains functions that trigger state changes in response to external inputs, such as API calls or local storage operations. For example, if you need to fetch data from an API, the notifier would include the function to initiate this process.
States:
The state file defines the various states and listeners that can be used to manage actions within the module. For instance, when retrieving data from an API, you might have a loading state to display a loading indicator to the user, and another state to display the data once it’s been retrieved.
3 Infrastructure Layer
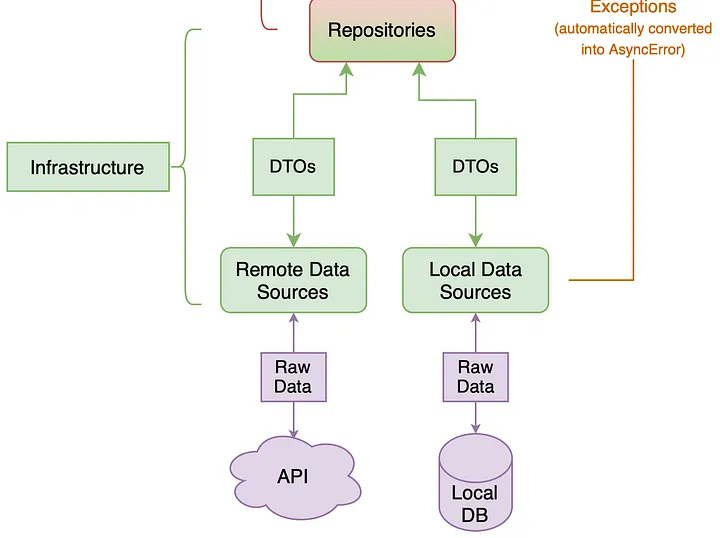
The infrastructure layer is the core logic of the module. It typically includes the repository, remote and local data sources, DTOs, and possibly ISAR objects.
Repository:
The repository is central to the module’s logic, containing and injecting elements from other modules or data sources (both remote and local). It includes functions that are called by the module’s notifier, such as GetUserInfo.
Remote:
The remote data source handles all interactions with external HTTP requests or APIs, containing the functions needed for these operations within the module.
Local:
The local data source manages data stored on the device, such as in a local database.
Dto:
DTOs are simple objects used to transfer data between the remote/local data sources and the domain layer of the application.
Isar:
ISAR objects are also used to transfer data, particularly from local data sources.
4 Domain Layer
The domain model is a conceptual model of the domain that incorporates both behavior and data.
5 Shared Layer
The shared layer includes the injection providers for notifiers, repositories, and data sources (both remote and local). This ensures that these elements are available for use across the entire application.
4 How It Works
1.	Directory Structure Setup: The script first checks if the lib directory exists two levels up from the script’s location. If not, it will exit with an error message.
2.	Feature Directory Creation: If the feature directory does not exist, it creates the directory and proceeds with generating the subdirectories (application, domain, etc.) and their associated files.
3.	Directory and File Generation: Based on the provided arguments (--only, --remove, and --offline), the script selectively generates the required directories and files using the corresponding file generators.
4.	Build Runner Execution: After generating the files, the script runs the Flutter build_runner command to ensure all generated files are up to date.
5. Run and by the end of generation Run  flutter pub run build_runner build --delete-conflicting-outputs
5 Notes
•	The script assumes that the lib directory is located two levels up from the script’s location. If this is not the case, adjust the mobile_app_path variable accordingly.
•	The script automatically runs the Flutter build_runner command after generating the feature files to ensure all generated files are up to date.
License
This project is licensed under the MIT License - see the LICENSE file for details.
This README.md file now includes all the essential sections, such as detailed usage instructions, examples, and an explanation of how the script works. You can directly use this file in your project.
