Moonraker 3D Printer MonitorMonitor your Klipper/Moonraker 3D printer directly in VS Code — temperatures, progress, live toolhead position, and printer controls in the sidebar. Installation Launch VS Code Quick Open ( Ctrl+P), paste the following command, and press enter.Copied to clipboard |
|


| Feature | Description |
|---|---|
| 🔐 Authentication / API token | Connect to Moonraker instances secured with an API key or trusted clients config |
| 📷 Webcam snapshot | Display a periodically refreshed camera image in the sidebar so you can see your print at a glance |
| 🎛️ Klipper macro buttons | Auto-discover and expose your custom Klipper macros as one-click sidebar buttons |
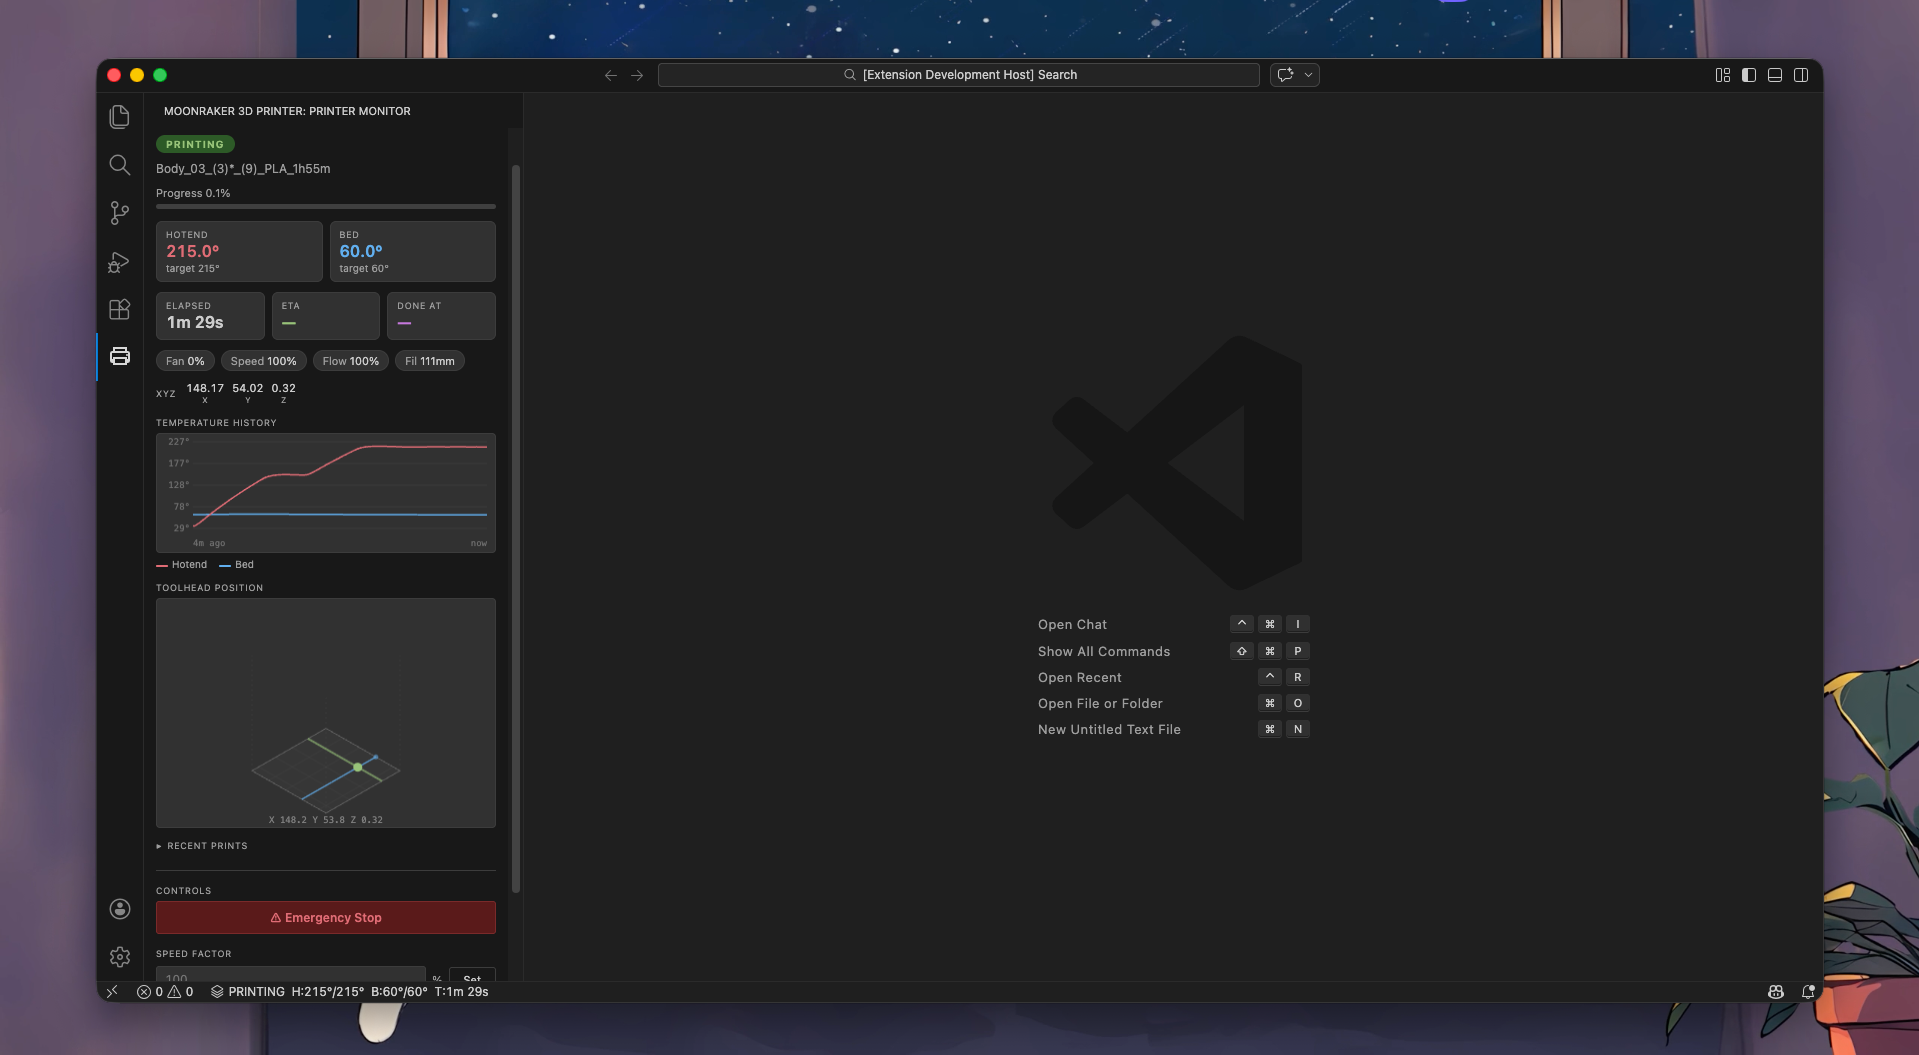
| 🖨️ Multi-printer support | Monitor and switch between multiple printers from a single VS Code sidebar |
| ▶️ Print queue & quick-start | Browse files already on the printer and start or queue a print without opening the web UI |
🧪 Experimental Features
⚠️ Use at your own risk. Experimental features send commands directly to your printer. Enabled via
moonraker.experimental.enabled.
🛑 Emergency Stop
A big red Emergency Stop button. Sends /printer/emergency_stop immediately. Requires confirmation — no accidental taps.
🏠 Home All Axes (G28)
Homes all axes with a single click. Available when the printer is idle (not while printing).
🔥 Heat Bed & Extruder
Set temperatures directly from the sidebar:
- Heat (
M140/M104) — set target and continue - Heat & Wait (
M190/M109) — set target and block until reached
⚡ Speed Factor & Fan Speed
Adjust print speed (50–150%) and fan speed (0–100%) while printing. Changes take effect immediately via M220 and M106.
🎯 Live Toolhead Position
An isometric 3D visualization of the print bed updates in real time at up to 60 fps with smooth interpolation between position samples. Accurately represents your printer's mechanics — the bed position on X, the gantry on Y and Z — rendered as separate moving elements. Configurable for any bed size.
📦 Installation
Via VS Code Marketplace (recommended)
Search for "Moonraker 3D Printer Monitor" in the Extensions panel, or install directly:
ext install mfoxx.vscode-moonraker
Via VSIX (manual install)
Download the latest .vsix from Releases, then:
code --install-extension vscode-moonraker-x.x.x.vsix
🚀 Quick Start
- Install the extension
- Open Settings (
Ctrl+,/Cmd+,) and search formoonraker - Set
moonraker.apiUrlto your printer's IP — e.g.http://192.168.1.100 - The extension auto-connects on startup — look for the 🖨️ icon in the activity bar
That's it. No config files, no setup scripts.
⚙️ Configuration
| Setting | Default | Description |
|---|---|---|
moonraker.apiUrl |
http://localhost |
Moonraker API base URL (no port) |
moonraker.port |
7125 |
Moonraker API port |
moonraker.pollingInterval |
2000 |
Status poll interval in ms |
moonraker.temperatureHistorySize |
120 |
Number of points in the temperature chart |
moonraker.chamberSensorName |
(empty) | Klipper temperature_sensor name for chamber monitoring |
moonraker.webUiUrl |
(empty) | URL of your Mainsail/Fluidd instance |
moonraker.webUiLabel |
Open Web UI |
Label on the Web UI sidebar button |
moonraker.notifications.enabled |
true |
Enable/disable state-change notifications |
moonraker.statusBar.showStatus |
true |
Show printer state in status bar |
moonraker.statusBar.showHotendTemp |
true |
Show hotend temp in status bar |
moonraker.statusBar.showBedTemp |
true |
Show bed temp in status bar |
moonraker.statusBar.showFileName |
true |
Show current filename in status bar |
moonraker.statusBar.showETA |
true |
Show ETA in status bar |
moonraker.statusBar.showTotalTime |
true |
Show elapsed time in status bar |
moonraker.experimental.enabled |
false |
Enable experimental printer controls |
moonraker.experimental.positionVisualization |
false |
Enable the 3D toolhead position view |
moonraker.bedWidth |
235 |
Bed width in mm (for position visualization) |
moonraker.bedHeight |
235 |
Bed height in mm (for position visualization) |
moonraker.positionPollingInterval |
100 |
Position poll interval in ms (min 50) |
🤝 Contributing
Contributions are very welcome! Whether it's a bug report, a feature request, or a pull request — all are appreciated.
Reporting Bugs / Requesting Features
Please open an issue and include:
- Your Moonraker/Klipper version
- Your printer configuration (if relevant)
- Steps to reproduce the problem
- What you expected vs. what happened
Submitting a Pull Request
- Fork the repo and create a branch from
main - Install dependencies —
npm install - Make your changes in
src/ - Compile —
npm run compile(ornpm run watchfor live recompile) - Run tests —
npm test - Open a PR with a clear description of what changed and why
Development Setup
git clone https://github.com/mfoxx/vscode-moonraker.git
cd vscode-moonraker
npm install

# Watch mode (recompiles on save)
npm run watch

# Then press F5 in VS Code to launch an Extension Development Host
Project Structure
src/
├── extension.ts        # Entry point, command registration, event wiring
├── moonrakerClient.ts  # Moonraker HTTP polling, event emitter
├── sidebarProvider.ts  # Webview sidebar (HTML/CSS/JS)
├── statusBar.ts        # Status bar items
└── test/               # Jest unit tests
💖 Support
If this extension saves you time or makes your workflow better, consider buying me a coffee! It keeps the project maintained and new features coming.
📄 License
MIT — free to use, modify, and distribute.
Made with ❤️ for the Klipper community