Skip to content
| Marketplace
Sign in
Visual Studio Code>Other>ASISTNew to Visual Studio Code? Get it now.
ASIST

ASIST

Certinia

certinia.com
|
37 installs
| (0) | Free
ASIST (Automated Security Issue Scanning Tool) is a vulnerability scanner for Force.com projects
Installation
Launch VS Code Quick Open (Ctrl+P), paste the following command, and press enter.
Copied to clipboard
More Info

ASIST Extension

License: BSD-3-Clause VSCode Extension

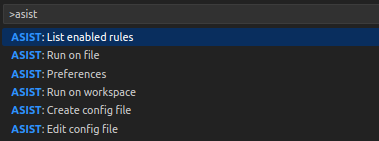
Using the VSCode extension is by far the easiest way to get started with ASIST. When a file is opened or saved, ASIST will scan it to identify vulnerabilities.

Just like a linter, once the scan is complete, ASIST will annotate your code with the findings and the rule description. Findings can also be found in the "Problems" tab.

Workspace scans are also supported, making it easy to run ASIST on an entire project and address all your issues on the fly!

📦 Installation

The extension is available on the Visual Studio Code Marketplace.

⚡ Extension commands

ASIST commands can be run in VSCode by pressing Ctrl+Shift+P and typing ASIST to get the list of available commands. Note that some commands will print results to the "Output" tab in VSCode (select ASIST in the channel dropdown).

ASIST Extension commands

  • Run on file: Runs a scan on the current opened file.
  • Run on workspace: Runs a scan on the current project workspace.
  • List enabled rules: Outputs a list of all the current enabled rules.
  • Create config file: Creates a configuration file template if it doesn't exist.
  • Edit config file: Opens the configuration file with custom rules, if it exists.
  • Preferences: Opens the extension settings.

🔕 Marking false positives

When using the ASIST Extension, hover over an occurrence and click on Quick fix... option and select Mark False Positive. This will add the placeholder asist-ignore-begin and asist-ignore-end comments around the affected line, and fill in the relevant rule ID.

🛠️ Configuration file

Refer to the main README.md for details on how to configure ASIST. For the VSCode extension to pick up your config file automatically, the file must to be named either .asist.yaml or .asist.json, and must be located at the root of the workspace.

You can create a configuration file using the Create config file command, which produces a self-documented template.

By default, ASIST looks for a config file in the root of the VSCode workspace, but if you like, you can specify a specific config file path (relative to the workspace) in the extension preferences instead -- this can be useful when working with monorepos.

👾 Use a custom binary

This extension is shipped with prebuilt ASIST binaries, but if you need to specify a specific ASIST scanner location (which is very useful for developing new features!), here's how:

  1. Open the ASIST Extension settings
  2. Navigate to the Workspace tab
  3. Enable the Custom Binary Enabled setting
  4. Provide the path to your ASIST binary in Custom Binary Path

Developer guide

Refer DEVELOPING.md

Contributors

A big thank you to everyone who has contributed to ASIST!

sdoylecertinia
Shaun
Pragati
Pragati
Govardhan
Govardhan
Hemant
Hemant
Abhishek
Abhishek
Dheeraj
Dheeraj
Shivam
Shivam
Anant
Anant
Saijal
Saijal
Pawan
Pawan
Nikhil
Nikhil
Manoj
Manoj
Hal
Hal
Matthew
Matthew
  • Contact us
  • Jobs
  • Privacy
  • Manage cookies
  • Terms of use
  • Trademarks
© 2025 Microsoft