EffectfulJS DebuggerVSCode debugger for JavaScript/TypeScript. Besides the typical debugger's features it offers:
This works by instrumenting JavaScript/TypeScript code and injecting necessary debugging API calls into it. It is implemented using EffectfulJS.
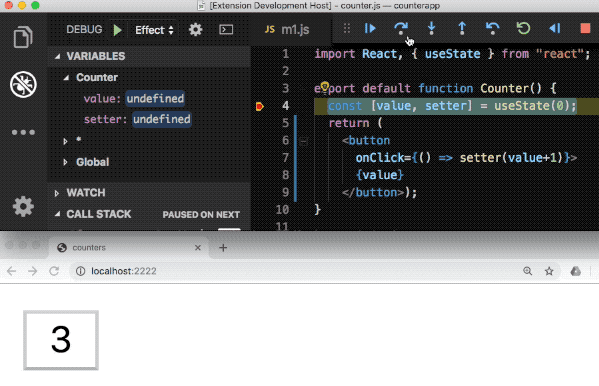
There are more demos in Slides. CaveatsThe debugger requires runtime monkey patching and it isn't fully and properly done yet. So in big projects, it is quite unlikely everything works effortlessly (this, however, reduces debugging efforts). Performance is obviously worse comparing to not instrumented code, especially when time-traveling is enabled. Some libraries may depend on functions sources, this won't work here, it tries to keep at least parameters names though. UsageInstall through VS Code Marketplace. Marketplace: Effectful Debugger Or start VS Code Quick Open (Ctrl-P/Command-P), and enter: Next create By default it adds NodeJS debugging configuration, to add browser's debugger, press "Add Configuration..." button in the left bottom corner of Here is an example from Or running some package.json script: After configured, start debugging (F5). The first run takes more time because it needs to install its runtime. The common parameters in the configurations:
The debugger requires all the sources (including third parties from node_modules) to be transpiled. The configuration may be tricky but there are a few zero-config options available. NodeJSFor debugging NodeJS applications written in JavaScript or TypeScript. To enable this specify field Other specific parameters:
This runs Browser and NextJSUnfortunately, I had to remove zero-config for nextjs and browser. Simply I don't have time to cope with all the breaking changes in webpack 5 and related libraries. Maybe I'll return it in some future. I'd appreciate any help with this. Meanwhile you still can use the debugger with nextjs and browser but with adding simple configuration like described in the next version. Custom configurationIf Zero config options aren't enough it is possible to configure everything manually. For example, Jest carefully prevents Custom configuration can be used to improve modules loading performance. When NodeJS zero-config is used it transpile modules only when they are loaded, this may be annoying, so instead, we can have babel in a watch mode running separately, and loading already transpiled modules. The code should be transpiled with babel's plugin is "@effectful/debugger/transform". The plugin's order is a bit tricky, it doesn't support many modern JavaScript features so it should be run after other plugins implementing these features. It also needs some modern features to be kept because otherwise some necessary information will be lost:
Other modern JS features should be trasnpiled. For example, for now, it supports only CommonJS modules, and it doesn't support rest/spread for objects and arrays. There are a few preset with a few such plugins, along with the debugger's plugin, already applied:
Another tricky thing is to make it work properly not only your sources should be transpile but all the dependencies (from node_modules), for the dependencies compilation pass If it isn't possible to transpile, because, say, it is a native module, it is still possible to use the debugger, but this requires more hacking with its API. If The port number along with a few other options can be changed in require("@effectful/debugger/config"). It should be loaded and the options should be changed before the runtime is loaded, for example using some specific not-transpiled module. To pause long-running scripts it uses Using There is also a webpack loader @effectful/debugger/loader which can be used to load the debugger's runtime into browsers. You may want to have a separate index file just for debugging. It's enough to have the prefix only in the first import, the rest of the imports will be processed by the loader. RuntimeThe transpiled code calls debugger API functions. This API is installed separately from the plugin into the plugins directory. This may be inconvenient, but you can install it manually as dev dependency into your project. APIThe debugger's API can be accessed by The whole application state is stored in The state can be accessed via "Debug Console" in VSCode, or from some dev scripts. This way may be used to mock functions or even a part of the functions or run some custom debugging scenarios. Persistent stateWe can capture and restore the whole application state. Not everything is serializable by default, but everything can be made serializable by providing special handlers. Among the not serializable by default values, there are sockets, sessions auth tokens, native modules states. If there are no serialization handlers provided, they are serialized into values that are ignored in the restoring state. This is fine if we don't mean to resurrect the program and only want to replay the time-traveling trace. By default it uses @effectful/serialization library, but any other can be used instead because all we need to store is But any program still can be resurrected with additional efforts. We need to provide handlers which are either reconnect the socket, re-authenticate, restore the native modules states, etc. This way, we can even restore the whole state of multitier applications. This can be done by specifying @effectful/serialization descriptor, either in code: Or externally because it is easy to hot-mock functions and state, lie it for example done in "react" special import for storing So to make react state to be fully serializable just add "runtime" in Check @effectful/serialization for more details. The state's saving is done by calling For example for storing stage in localStorage: This can be run from VSCode debug console or some script. The reverse is done by DOM is also serializable, for now, only events added with There is an optional parameter to set serialization options from @effectful/serialization. For Each Time travelingIf If the custom configuration is used the The time-traveling trace is stored in For example, to disable traveling through the trace and just make the program to run from the current point, run There are a lot of more advanced usages, for example, comparing different runs of the same code, for example, failed test run with some last successful run. The journal object is stored and restored by By default, it tracks only local variables, properties, and DOM changes. If something is changed in something external (e.g. DB, file, native module, etc) it won't be tracked and changed, though, we'll still be able to travel through the program except resetting won't work for DBs. External states may be still tracked using special handlers. For example, when we change DB we just call Hot-swapping/Fast restartingThe debugger will load new sources when their file is saved. but will try to keep the old application state. For now, the state merging isn't very efficient - variables are saved by their positions and the current execution position may be shifted into a wrong location. This should be improved in some future version. Anyway, for small changes, this is works well enough. There is also an option to restart the process from some point after some heavy loading. This is especially useful when debugging node. We can skip long-running operations of process restart and modules loading. To specify the way the debugger handles file changes set To make it restart faster set To restart from some later location (for example, after some heavy initialization), we can run something like this snippet in code (or even in a conditional breakpoint). This snippet calls Add Data breakpointsData breakpoints require time traveling to work. It can be disabled if not needed with Interoperating with runtime/native modulesThe debugger requires all third party libraries to be transpiled. This is possible only for JavaScript, so it isn't possible for runtime and native node modules or WebAssembly. The compilation isn't always required, it is needed if not instrumented modules call JS functions and we want to trace through them. Even if the native third party still calls functions synchronously and we cannot polyfill its type-traveling trace will still be collected. So we'll be able to walk through it after. DOM event handler is one of the examples of calling JS code from a native part (a browser). They are roughly monkey patched now in this library, but still, when we stop on breakpoint there, it will release the main JS thread, so DOM runtime thinks the event execution is finished and proceed with event propagation even if after the breakpoint there is Calling JS asynchronously works fine and doesn't need a wrapper. Only synchronous code may not work because it needs thread blocking. For example, it cannot stop inside the event handler called by Even now, even if our program's logic heavily depends on the propagation of events it's still possible to use time-traveling, and debug after the event handling is finished. Just set Many native modules have alternative pure JavaScript implementation. Typically, they are used to run NodeJS modules in a web browser using tools such as webpack or browserify. They can be used for debugging purposes. By default, the debugger replaces NodeJs A Debugging NodeJS streamsAs described before, the debugger cannot stop inside a callback called by native or not transpiled modules. Fortunately, pure JavaScript alternatives are offering at least part of it. Here's an example for NodeJS streams. There is their pure implementation in readable-stream. So, to make applications extensively using NodeJS streams, install the module (save for development only), and add the following option into the FirefoxFor preventing Spectre attack Firefox disabled Implicit callsStepping into JavaScript Proxies/setters and getters are supported only in code compiled with time-traveling enabled. If time-traveling isn't needed it can be disabled with following in "launch.json": Stepping into casts and other functions called implicitly by runtime synchronously isn't supported yet. EvalFunction constructors, eval expression, and "vm" node module are supported. However Not yet done
LICENSEDistributed under the terms of The MIT License (MIT). |