Promptscape
Prompt engineering and rapid concept validation: by your code, with your code.
Read the Docs 📖
Rate and review on Visual Studio Marketplace 💟
Get help from the team 🆘
Open an issue on Github
Features
- Save, persist, and reuse system prompts for comparative testing
- Test on models from Ollama, OpenAI, DeepSeek, and Azure AI
- Test and tune your inferencing parameters in VSCode
- Rapid prototyping with clean UI built with Material 3
- Setup quick repeatable demos with Promptscape Scenarios
- Automate your demos and tests with Promptscape Runbooks
Improved model management experience
As of Version 1.0, providers defined in the extension settings have been replaced with separately defined model configurations. This means that:
- You will have to add at least one model to the workspace (See the Getting Started secion for instructions)
- You can now add, remove, and activate any number of models, allowing you to quickly swap between models during testing with just one click
Overview
Promptscape was developed to bring real-time feedback on your prompts directly into your development environment in VSCode. Using Promptscape, you can chat with your models natively from your IDE, rapidly test out new prompts, metaprompts, and parameters directly from your code, save prompts and scenarios for comparative and regression testing, and use intelligent, dynamic template interpolation to inject variables and prompt atoms into your prompts to simulate RAG.
Promptscape is a new project, and will continue to grow and evolve, based on user input.
Installation
Install promptscape from the Visual Studio Marketplace, using the link below.
Install Promptscape
Getting Started
To start using Promptscape, you will need to set up at least one AI model provider. Follow these steps:
- Start model creation: On the Promptscape Explorer 'Available Models' view, click 'ADD', or find and enter the command
Promptscape: Create a new Model.
- Select a provider: Follow the prompts in VSCode to choose an available provider (Azure, Ollama, OpenAI)
- Complete model setup: Follow the rest of the prompts to add your model. If it's created successfully, you will see it in the Available Models view of the Explorer. (Note - keys for Azure and OpenAI models are securely saved to VSCode's Secret Store)
- Select your model: You must set an active model to use the Studio. To do this, click on the appropriate entry in the Explorer, under Available Models. Or, you can use the
Promptscape: Set Model command to activate a model - you'll be prompted to select one. Additionally, there's a status bar item that shows the currently selected model (bottom left of VSCode) - clicking this will open the model selection input as well.
Launch the Studio
The Promptscape Studio is a prompt library, chat client, and experimentation workbench all rolled into one. You can launch the Studio in two ways:
- Use the command Promptscape: Open Studio
- Use the Status Bar Button on the bottom status bar of the VSCode window:
Persisting Prompts & Variables
There are two ways to persist prompts using Promptscape
- Commit to source control (as prompt files)
- Save in the VS Code storage, using the Studio.
All runbooks and scenarios must be persisted in your workspace files, and can be conveniently imported for use in Studio.
Prompt Files Quickstart
While you can create and save prompts in the VSCode storage, it's often more convenient to pull prompts straight from source code.
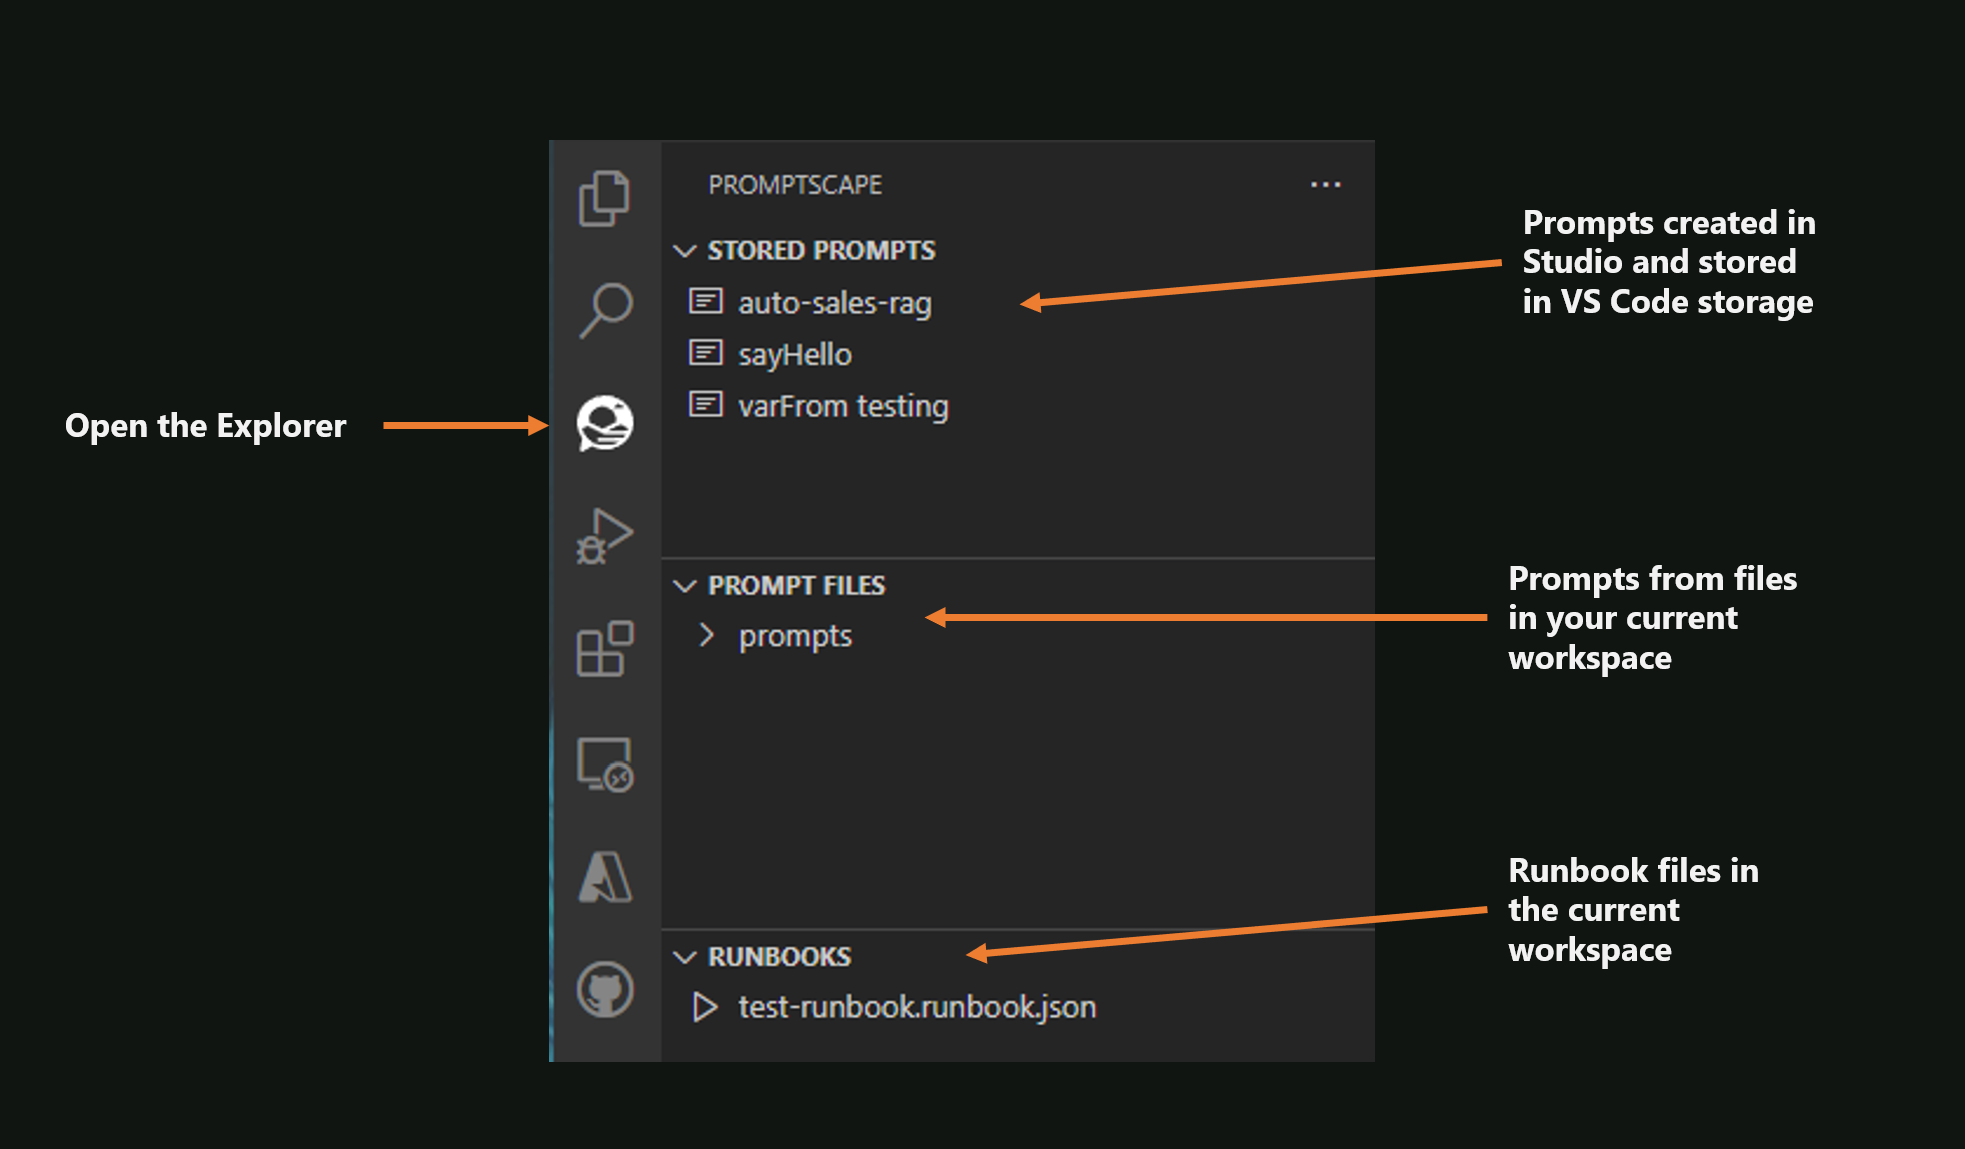
Prompt files are json files, which follow the naming convention '*.prompt.json'. All files with this naming convention will be shown in the Prompt Files treeview in the extension Sidebar.
Use this example prompt file to start:
{
    "name": "sayHello",
    "systemMessage": "Say {word} in {language}!",
    "variables": {
        "word": "hello",
        "language": "spanish"
    }
}
Variables can be excluded if your prompt does not require them.
NOTE: Prompts opened from files in your workspace will be saved to the VS Code Storage if 'Save Prompt' is selected from the Studio. To edit the prompt in the file, edit the JSON file itself and then reload the Studio.
Once created and saved, both prompts from files and prompts from storage can be opened in a single click from the Sidebar treeview:
Functionality & Guide

- System Prompt Input: Input your system prompt (aka system message, aka metaprompt). To add variables, use curly braces to surround your variable name. If auto-parsing is enabled, variables will be automatically added to the variable list below (#2)
- Auto-parse Variable toggle: if you want to insert variables into your prompt, turn this switch on. Any values wrapped in curly braces will be recognized as variables, and will be replaced with the values those variables are given in the Variable Editor.
- Prompt Editor Button Cluster: The
Save button will allow you to save a prompt to the extension's storage. Next time you launch the Studio, you'll be able to find it and reload it by clicking the Load A Prompt button (#6). Use the Start Fresh button to clear the system prompt and variables, and reset Prompt Editor.
- Variable Editor: Use the variable editor to assign values to variables in your System Prompt templates. Variables do not have a size limit. As soon as a value is added to a variable input, that value will be included in the template when you continue to chat using the active System Prompt.
- Model Parameters: This is where you can edit the parameters that the model will use during inferencing. Support for additional parameters (stopwords, json mode) is under active development.
- Load Prompt Button: Click this button to select and load a System Prompt that was previously saved from the Studio.
- Export Scenario: Use this button to export your current scenario (System Prompt, Messages, or Both) to a JSON file in your local VSCode workspace. Exported scenarios can be imported again using the Import button (#9).
- Chat Window Controls: Close or Maximize the chat window.
- Import a Scenario: Scenarios represent the full state of a conversation, including the System Prompt, and any Assistant or User messages currently in the chat. They are saved in JSON format (the normal format for a GPT-4 Chat Completion Prompt). Use this button to import JSON scenario files from your codebase or local workspace, to rehydrate conversations for regression testing and comparative testing across providers. Note: If you import a Scenario that does not have a system message, then only the chat history will be imported.
- Clear Chat Button: This button clears all messages from the current chat.
- Start Conversation Button: There are two ways to start a conversation. One is to simply start chatting with your model, and the other is to use the
Ask Assistant to Start button to have the Assistant take the first action.
- Chat Input: This is the chat input that you will use to chat with your model. The Send button sends your message to the chat.
Scenarios
Scenarios in Promptscape accelerate testing by allowing you to start a chat from a pre-existing combination of System Prompt and message history. They should be saved as JSON files, that contain a list of messages with keys {role: string, content: string} (the standard GPT-4 prompt format).
Here is an example scenario:
[
  {
    "role": "system",
    "content" : "You are a system that asks riddles about the subject provided by the user. Let the user know if they answered correctly."
  },
  {
    "role" : "user",
    "content" : "Ask me a riddle about pianos."
  },
  {
    "role" : "assistant",
    "content" : "Sure, here's a riddle about pianos for you: 'I have 88 keys but I can't open a single door. What am I?'"
  }
]
Importing Scenarios
Import scenarios using the Import Scenario button on the top of the Chat Window.
Importing the scenario shown above will allow you to continue an existing conversation, to test future behavior without having to work through a fresh conversation.
Scenarios are excellent ways to test specific outcomes during active engineering on your System Prompt.
If you import a scenario with no system prompt, then the existing system prompt will be kept in the Studio.
Exporting Scenarios
You can export Scenarios using the Export Scenario button to commit them to source control, either for consumption by your apps or for use during future testing. You encounter three options during export:
- System Message: exports only the system message. Ideal for generating stable prompt templates for use in your applications.
- Chat Messages: exports only the chat history. The next time you import this scenario, it will import only the chat messages, leaving your current scenario's System Prompt unchanged.
- Full Scenario (System Message & Chat Messages): Exports the full scenario. Importing this scenario will restore your workspace to the same state (with the exception of variable values.)
Runbooks
Runbooks are executable scripts that you can use to automate your testing in Promptscape. Runbooks are defined in JSON. A runbook file should contain a single JSON object, with three keys:
- name: a name to identify the runbook scenario.
- description: a description of the runbook or its goals.
- steps: a list of runbook steps. Each runbook step contains a user input, and an optional array of associated variables, which will be injected into the prompt if that prompt accepts variables.
Note: For the extension to collect runbooks into the treeview, runbook file names should follow the naming convention "*.runbook.json".
Runbooks are a powerful tool to quickly test scripts and scenarios, while dynamically changing the values associated with the variables in your prompts for each message.
Use the variables to simulate RAG pipeline content or content that your app or GPT will inject into your prompt dynamically at runtime.
Consider this example:
{
    "name": "Hello",
    "description": "A sample runbook.",
    "steps": [
        {
            "utterance": "Hello, it's me.",
            "variables": {
                "varFrom" : "the other side"
            }
        },
        {
            "utterance": "Who called today?",
            "variables": {
                "varFrom" : "upstairs"
            }
        }

    ]
}
This sample runbook "Hello" has two steps. It also assumes that the prompt expects a value to be provided for a variable named varFrom. When the first message is sent, this variable's value will be "the other side". For the second message, this value will change to "upstairs".
If your prompt has variables, each runbook step must supply a value for every variable. The extension will throw a prompt interpolation error if the variables are not completely fulfilled.
Loading & Using Runbooks from the Explorer
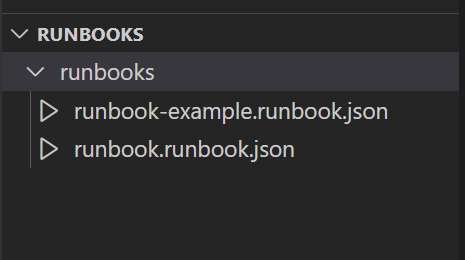
The fastest way to load runbooks from your workspace is to use the Promptscape Explorer. Runbooks named using the pattern "*.runbook.json" will appear in the "Runbooks" treeview in the Promptscape sidebar. Simply click on one to open it.
Loading Runbooks from the Studio
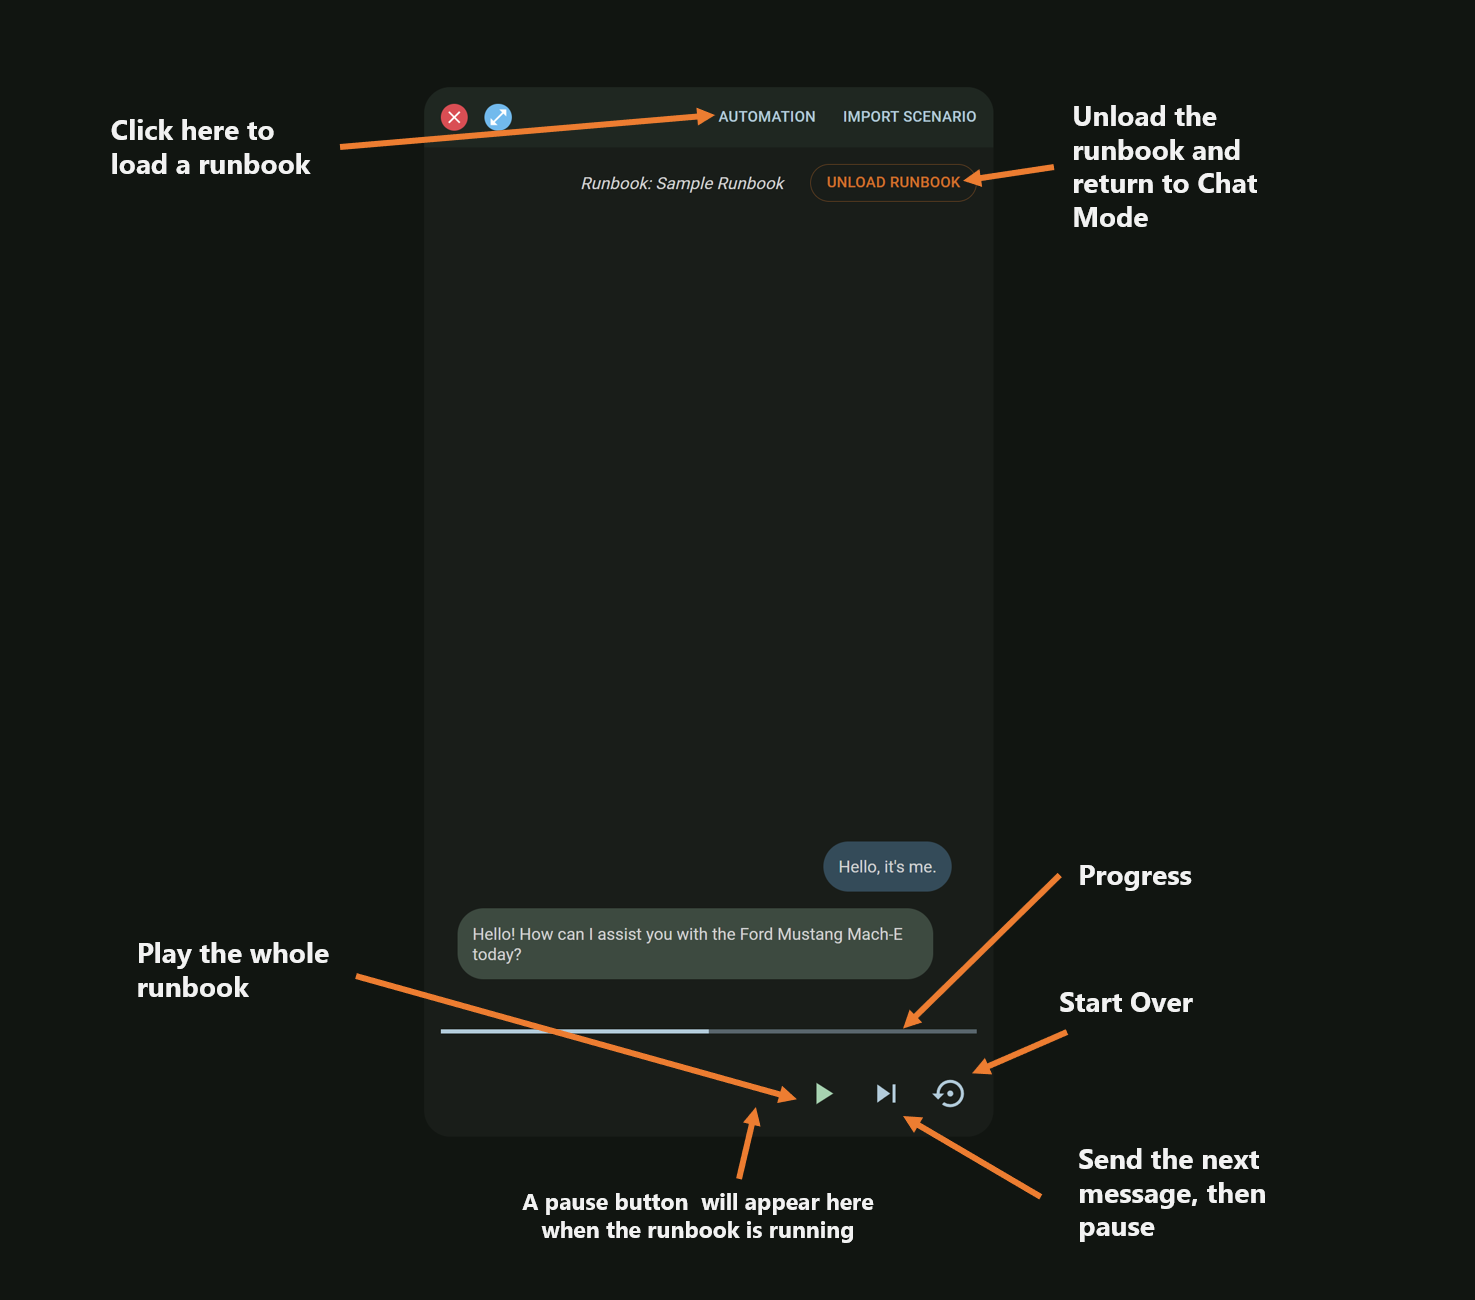
You can also load runbooks that are not in the current workspace. To do this, open the Studio and find the "Automation" button in the Chat window (it is at the top). Click this, and then select the option "Load Runbook". This will open File Explorer in your active workspace. Select your file.
Playing Runbooks
Once loaded, you can use the controls in the Runbook Player to execute the runbook:
You can also import runbooks from the current workspace in a single click by selecting a runbook in the Explorer (shown above).
Commands
The following extension commands are available in the VSCode Command Palette (Ctrl+Shift+P):
Promptscape: Open Studio: Opens the prompt engineering studio in a new tab in VSCode.
Promptscape: Import Scenario: Opens a filedialog to select a JSON Scenario file to open in the studio.
Promptscape: Go to Settings: A shortcut to open the Promptscape Settings.
Promptscape: Load Runbook: Opens a filedialog to select a Runbook file to open in the studio.
Promptscape: Create a new Model: Create a new model for use in the Studio
Promptscape: Delete Model: Delete an existing model
Promptscape: Set Model: Choose a model to set as the Current Active model.
License
Copyright 2024 Dwayne Thomson
All Rights Reserved.
Unless required by applicable law or agreed to in writing, this software is distributed on an "AS IS" BASIS,
WITHOUT WARRANTIES OR CONDITIONS OF ANY KIND, either express or implied.