EARS Specs 👂


A VS Code extension for authoring EARS requirements — clear, testable specifications written in the Easy Approach to Requirements Syntax. It provides syntax highlighting, snippets for every EARS pattern, and a sidebar that classifies and organises requirements automatically.
The aim is consistent, reviewable specifications with zero manual bookkeeping: write a requirement, and the extension recognises its type, colours its structure, and files it in the right place.
Install
Install once from the Marketplace; it updates automatically thereafter. Supported on Windows, macOS and Linux.
From inside VS Code
- Open the Extensions view — Ctrl+Shift+X (Cmd+Shift+X on macOS).
- Search for EARS Specs by davidcockson (the 👂 icon).
- Select Install.
From the command line
code --install-extension davidcockson.ears-specs
VSCodium, Cursor and Gitpod resolve the same identifier via Open VSX — see Other ways to install.
Verify
Create a file ending in .ears.md, open it, and enter:
[DRAFT] When <user logs in>, the system shall <check the password>.
The keywords are highlighted and the 👂 EARS icon appears in the Activity Bar.
Using it
Snippets
Type a prefix and press Tab to expand the pattern; press Tab again to move between the <placeholders>.
| Prefix |
Expands to |
EARS pattern |
e-ubiq |
The <system> shall <response> |
Ubiquitous (always active) |
e-state |
While <state>, the <system> shall <response> |
State-driven |
e-event |
When <trigger>, the <system> shall <response> |
Event-driven |
e-opt |
Where <feature>, the <system> shall <response> |
Option-driven |
e-err |
If <problem>, then the <system> shall <response> |
Unwanted behaviour |
e-draft |
[DRAFT] |
Mark as under discussion |
e-stable |
[STABLE] |
Mark as agreed |
If Tab does not expand, press Ctrl+Space to select the snippet from the list.
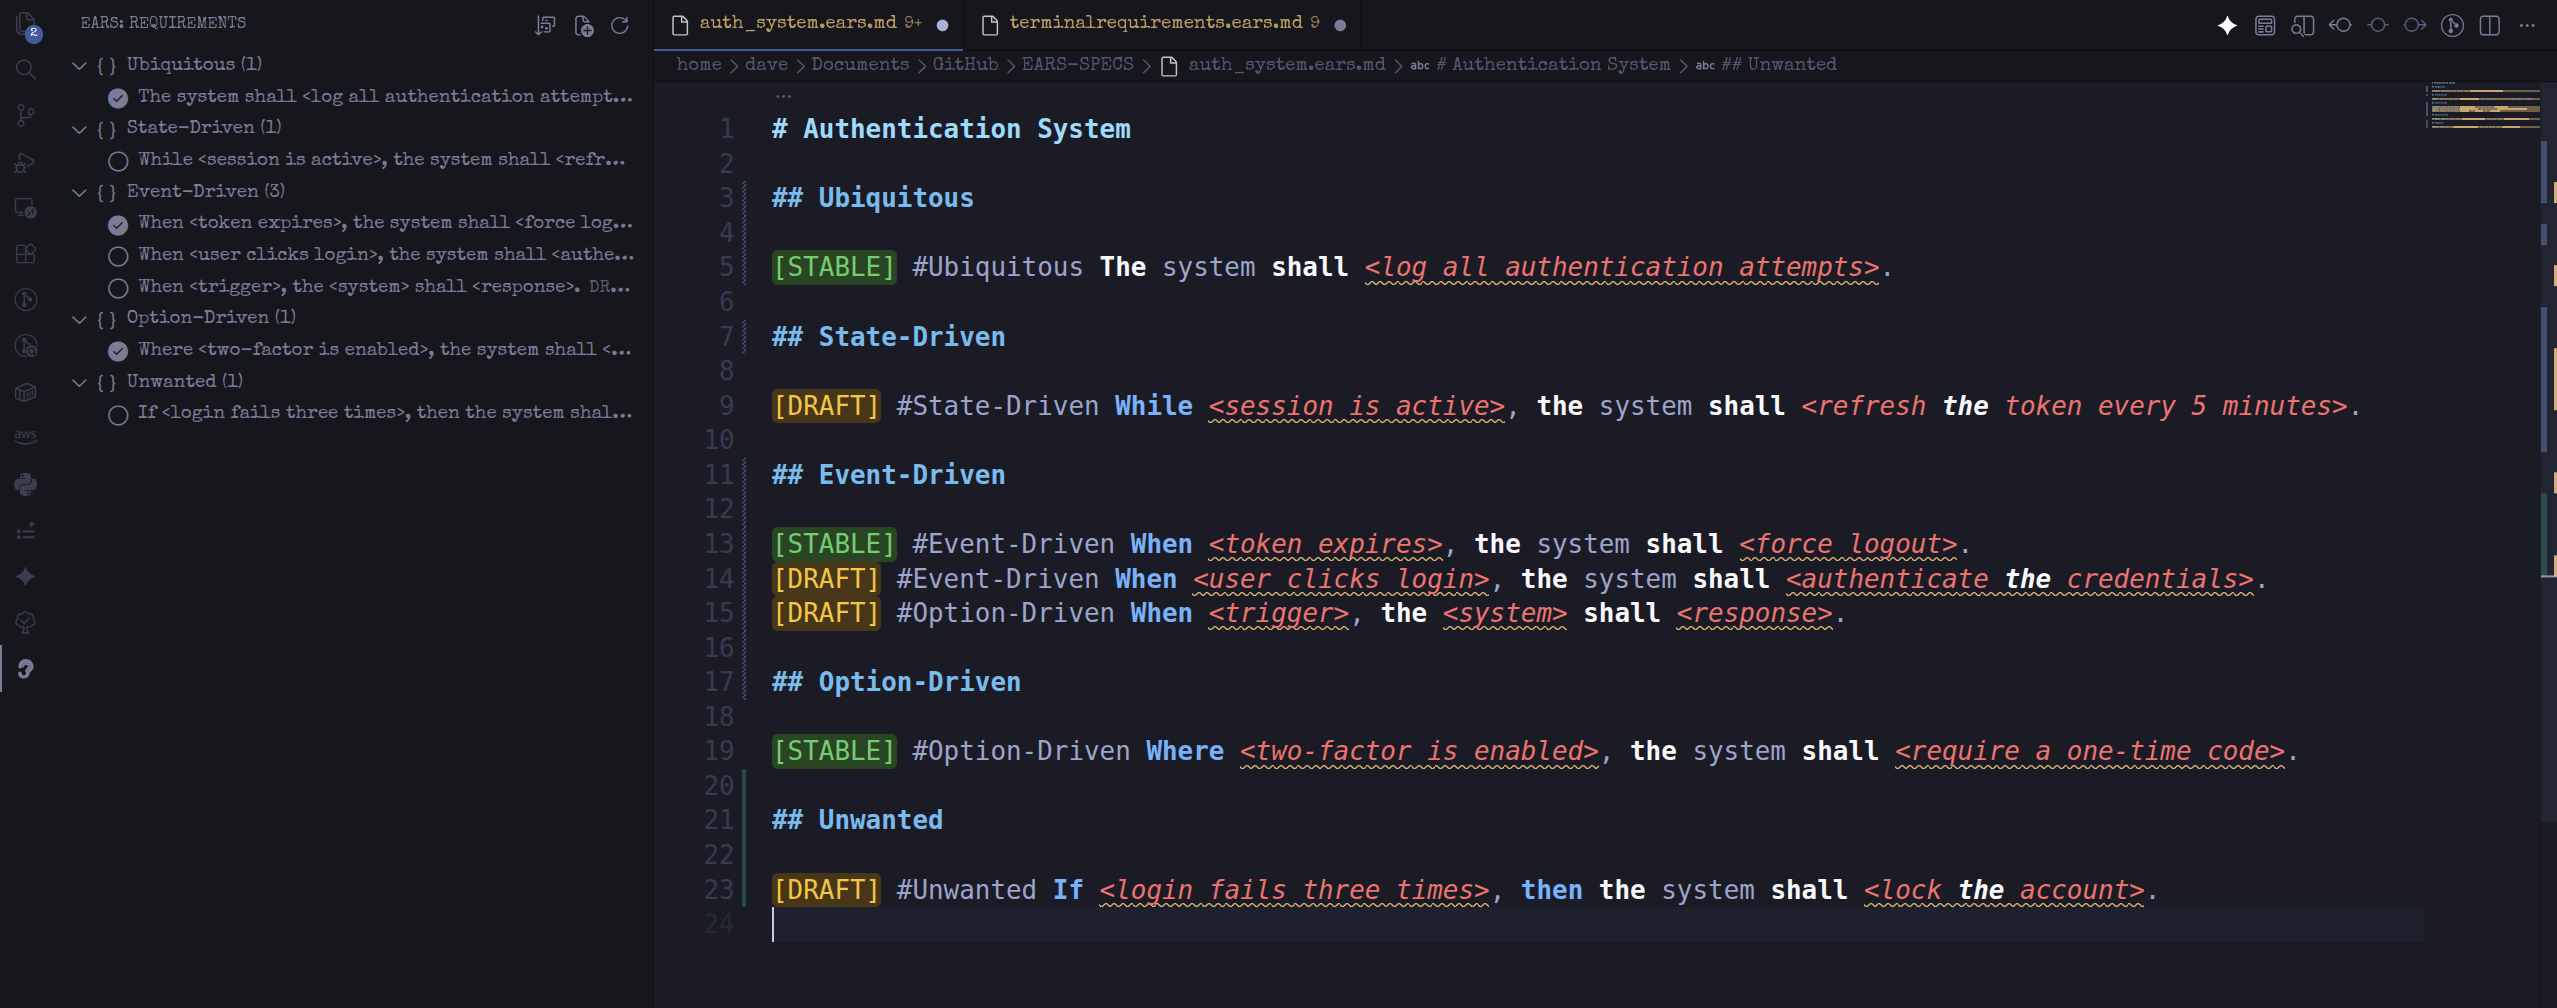
Open the EARS view from the Activity Bar (👂). It lists every requirement in the active file, grouped by EARS pattern. A filled marker indicates STABLE (agreed); a hollow marker indicates DRAFT (under discussion). Select any entry to jump to its line.
Commands
Open the Command Palette — Ctrl+Shift+P (Cmd+Shift+P on macOS) — and run:
| Command |
Description |
| EARS: Organize Document |
Rewrites the file into one section per EARS pattern, STABLE before DRAFT. Run it once a draft is complete. |
| EARS: New Spec File |
Scaffolds a templated .ears.md. Requires an open folder (File → Open Folder). |
| EARS: Refresh Outline |
Rebuilds the sidebar if it falls out of sync. |
How it works
EARS in brief
EARS — the Easy Approach to Requirements Syntax — constrains every requirement to one of five sentence patterns, removing the ambiguity of free-form prose. Each pattern is identified by its leading keyword:
| # |
Pattern |
Template |
Example |
| 1 |
Ubiquitous |
The <system> shall <response> |
The system shall log all logins. |
| 2 |
State-driven |
While <state>, the <system> shall <response> |
While the session is active, the system shall refresh the token. |
| 3 |
Event-driven |
When <trigger>, the <system> shall <response> |
When the user clicks login, the system shall check the password. |
| 4 |
Option-driven |
Where <feature>, the <system> shall <response> |
Where two-factor is enabled, the system shall require a code. |
| 5 |
Unwanted behaviour |
If <problem>, then the <system> shall <response> |
If login fails three times, then the system shall lock the account. |
What the extension adds
- Scoped to
.ears.md — features activate only for these files, so they never interfere with your other Markdown.
- Syntax highlighting — keywords (When / While / Where / If / then), the backbone (The / shall),
<placeholders>, and [DRAFT] / [STABLE] badges are coloured using VS Code decorations. No additional extension required.
- Automatic classification — each requirement's pattern is inferred from its leading keyword, so the sidebar groups everything with no manual tagging.
- One-command organisation — Organize Document rewrites the file into ordered sections by pattern and status.
- Status tracking —
[DRAFT] and [STABLE] markers record whether a requirement is still under discussion or agreed.
The result is a spec-driven workflow: draft freely, and the extension keeps requirements classified, consistent and reviewable, with agreed and open items visible at a glance.
Other ways to install
The Marketplace install above suits most users. These are alternatives.
VSCodium, Cursor, Gitpod (Open VSX)
These editors resolve extensions from the Open VSX Registry. Search for EARS Specs in the Extensions view, or run:
code --install-extension davidcockson.ears-specs
Manual .vsix (offline or air-gapped)
- Download the latest
.vsix from the Releases page.
- In VS Code: Extensions view →
... menu → Install from VSIX… → select the file.
macOS: if code reports command not found, run Shell Command: Install 'code' command in PATH from the Command Palette, then retry.
Build from source
git clone https://github.com/davidcockson-compliance/EARS-SPECS.git
cd EARS-SPECS
code .          # press F5 to launch an Extension Development Host
Package an installable build:
npm install -g @vscode/vsce
vsce package    # produces ears-specs-x.y.z.vsix
Pushing a git tag such as v0.2.2 builds the .vsix and publishes a GitHub Release automatically (see .github/workflows/release.yml).
License
MIT