SMILES Hover



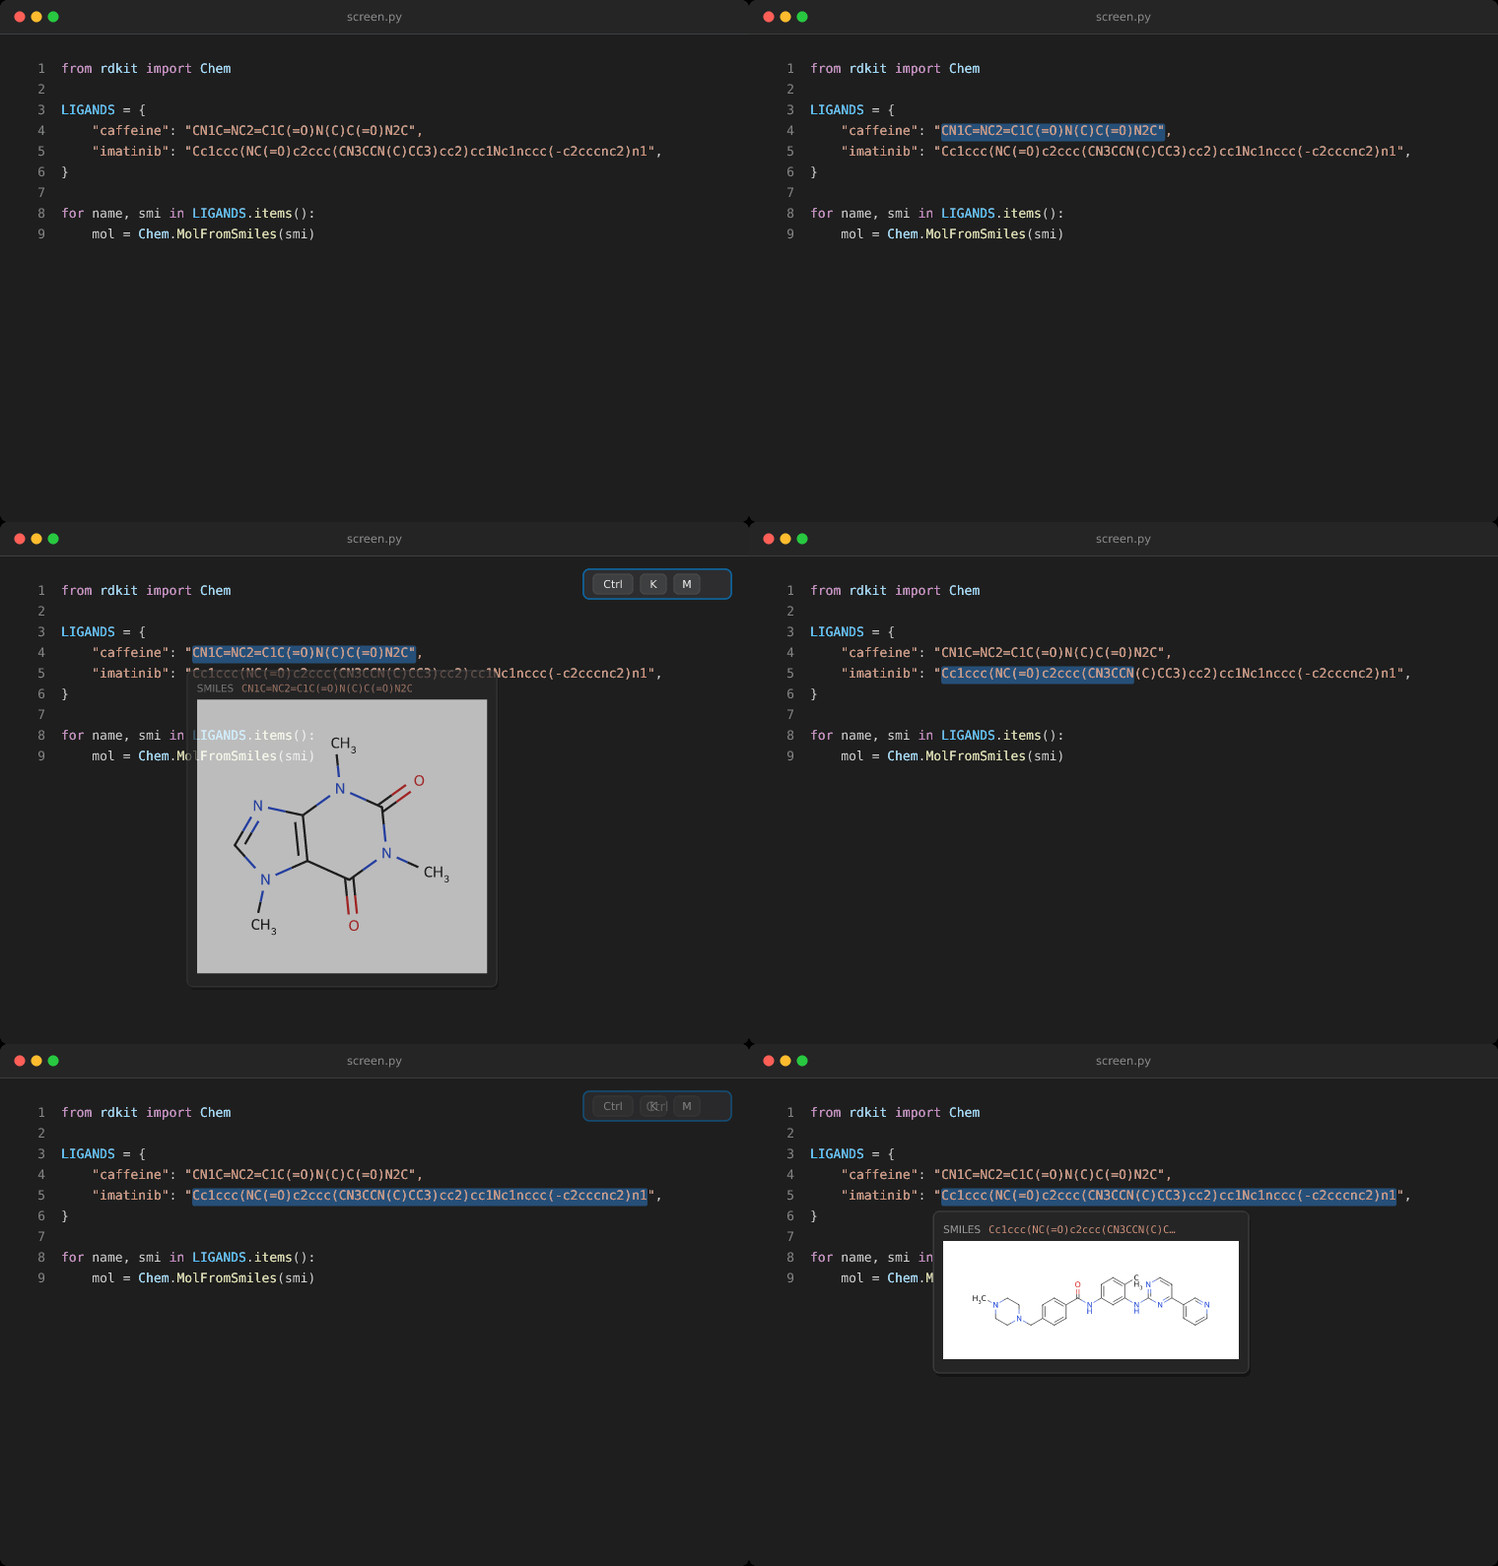
Hover a SMILES string anywhere — Python, JS, JSON, CSV, Markdown, plain text,
read-only tabs like tool or command output, and Jupyter notebooks down to their
cell output — and see the 2D structure rendered with RDKit in ChemDraw
style. Reaction SMILES are drawn whole, arrow and all.
Molecules on screen are found and drawn before you reach for them; anything
that isn't chemistry is silently ignored.
No Python, no pip install, no configuration. RDKit ships inside the
extension as WebAssembly.
Install
VS Code
Open the Extensions view (Ctrl+Shift+X / Cmd+Shift+X), search for
SMILES Hover, and click Install.
Or from a terminal:
code --install-extension adrianm0.smiles-hover
Or open the
Marketplace page
and click Install.
That's everything — there's nothing else to set up. Open a file with molecules
in it and hover one.
Cursor, VSCodium, Windsurf
These can't reach the Microsoft Marketplace, so install the file directly:
- Download
smiles-hover-<version>.vsix from the
latest release.
- In the editor: Command Palette (
Ctrl+Shift+P) →
Extensions: Install from VSIX… → pick the downloaded file.
Or from a terminal, using whichever CLI your editor installs
(cursor, codium, windsurf):
cursor --install-extension ~/Downloads/smiles-hover-<version>.vsix
The extension only uses stable VS Code API, so it should work on any current
fork — though it's only been tested on VS Code.
Remote SSH, WSL, and containers
Install it on the remote side, where your files are. In the Extensions
view, an extension installed only locally shows an Install in SSH: … (or
Install in WSL, Install in Container) button — click that. From a
terminal, run the install command in the remote session.
Usage
Just hover. Everything on screen is scanned as you scroll and type, and every
molecule found is drawn ahead of time, so the structure is already waiting. A
SMILES column comes alive the moment it scrolls into view.
What counts as a molecule. Only tokens RDKit parses, so prose, identifiers
and paths never hover. The ambiguous cases are short uppercase strings — CNN,
ISC, CSS, SNP are all valid molecules and none are meant as one — so how
short a token may be depends on where it sits:
- Declared — after a
smiles: key, alone on its line, or in a file whose
header row names a SMILES column. Any length.
- A field — a quoted string or a CSV/TSV cell. Needs structure (a ring,
branch, bracket atom or bond) or
smilesHover.autoDetectMinLength
characters, default 4. CCCC and CC(=O)O pass; ISC doesn't.
- Prose — running text or an expression. Needs both, or eight-plus
characters of pure chain.
A line that names SMILES vouches for its values, so Chem.MolFromSmiles("CCO")
and smiles = ["CCO", "CCN"] are drawn even though CCO is short. Lower
autoDetectMinLength to 3 if you write bare CCO in prose. Anything
detection skips is still one selection and Ctrl+K M away.
Reactions. A token in reactants>agents>products form is one molecule as
far as hovering goes: CCO.CC(=O)O>[H+]>CCOC(C)=O.O draws every component,
with + between them, the agents above the arrow, and the arrow between the
two sides. Exactly two > separators are required — RXNSMILES says so, and it
keeps cin>>x and if (n>c) out. Components are drawn smaller than a lone
molecule so the row still fits the hover; anything RDKit won't draw, such as
[H+], is written above the arrow as text, where a chemist would put it.
Anywhere text is. Hovering works in every editor tab, whatever opened it:
files, diffs, the Output panel, a notebook output expanded into its own editor,
and the read-only tabs that agent and command output lands in. The integrated
terminal is not an editor and has no hover — copy the string out and use
Ctrl+K M.
Jupyter notebooks work in cell sources and in cell output — see
below.
Rendering by hand. For a SMILES buried inside a longer string, select it
and press Ctrl+K M (Cmd+K M on macOS), or right-click → SMILES Hover:
Show Molecule for Selection. That molecule stays hoverable at every
occurrence of its string for 15 minutes (smilesHover.retentionMinutes).
Selections are cleaned first — quotes, trailing commas, escapes like \n — so
grabbing a value out of a JSONL dump works. A selection that isn't a molecule
just reports in the status bar.
Command Palette → SMILES Hover: Toggle Automatic Detection turns scanning
off.
The first render loads the WASM module (~200 ms); everything after is a few
milliseconds, and results are cached per (smiles, size, preset). Command
Palette → SMILES Hover: Clear Cache to reset.
Jupyter notebooks
Notebooks work in two places: cell sources, and cell output.
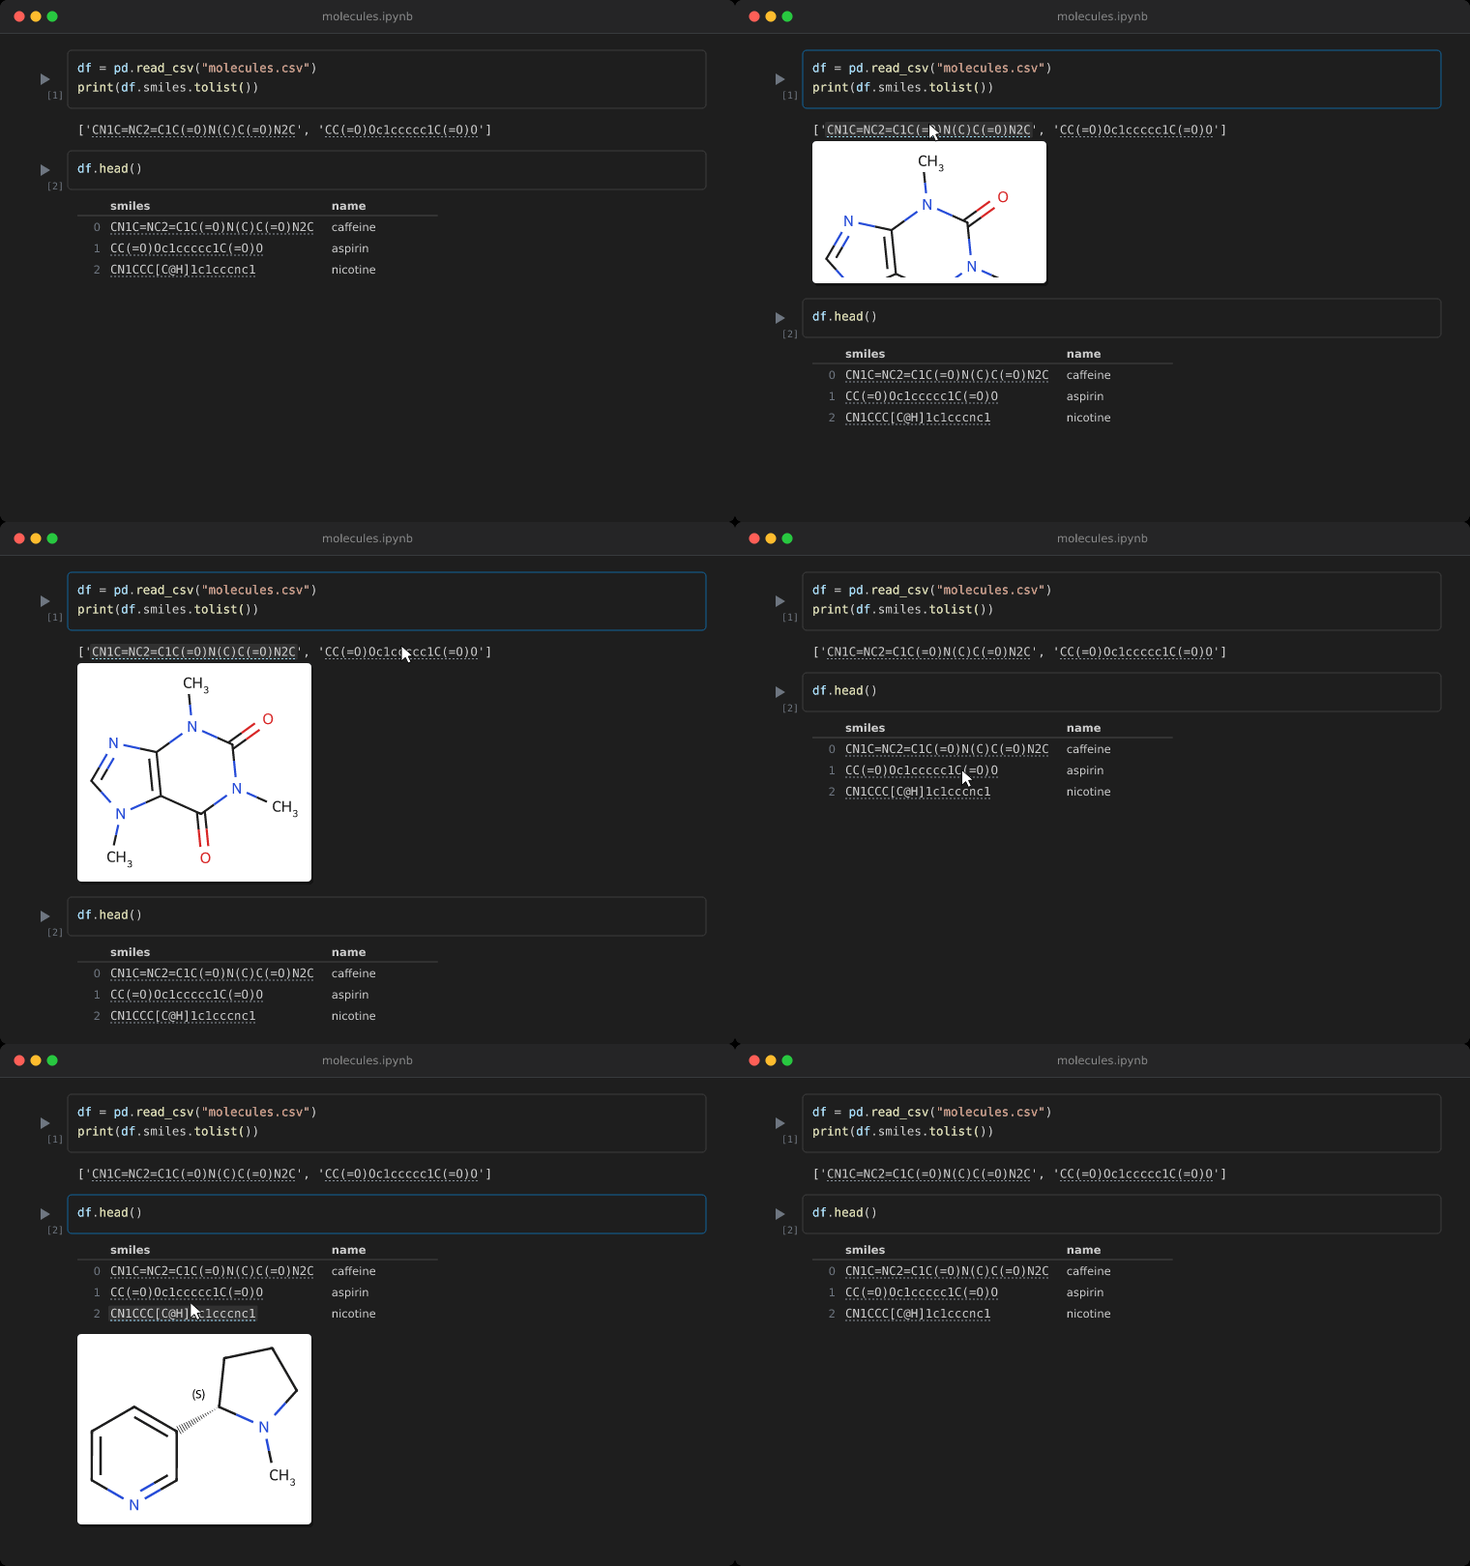
Sources — code and markdown — behave exactly like a file. Every visible
cell is scanned, and each is its own document, so editing one cell doesn't
disturb the molecules in another.
Output is DOM in a webview, where no hover provider reaches, so a notebook
renderer handles it. Anything the built-in renderer draws is covered, whatever
produced it:
| Output |
Example |
| stdout |
print(smi) |
| a repr |
a list or dict of SMILES, a Series |
| HTML |
df.head(), anything with _repr_html_ |
| the cell's result |
a bare smi on the last line |
Molecules there get a dotted underline; hovering one shows the structure. In a
DataFrame, a smiles column header vouches for every cell beneath it, so a
table of short entries like CCO comes alive whole — the same rule as a CSV's
header row, applied to what df.head() printed.
The picture appears in the output, right after the molecule you hovered,
which grows the output and pushes the cells below down. That's deliberate: VS
Code paints cell editors over the output webview, so a picture floating above
an output would be hidden by the next cell. Putting it at the token rather than
at the end of the output is what keeps it on screen when the output is a long
print or one that scrolls. Nothing before the token moves, so the token can't
slide out from under the cursor, and in a table the picture stays in its cell.
Output is read a line at a time, so a printed column of SMILES — where each
line holds nothing but a molecule — comes alive the same way a smiles column
in a DataFrame does.
Detection and rendering stay in the extension host — the webview sends tokens
and gets back verdicts and pictures — so RDKit's 7 MB is never loaded into the
notebook.
Not covered: output drawn by a third-party renderer, which lives in its own
frame — a plotly figure, an ipywidget, or Draw.MolToImage (already a
picture). Interactive Window input and output work the same as a notebook's.
Configuration
| Setting |
Default |
Description |
smilesHover.autoDetect |
true |
Find and draw molecules on screen automatically. |
smilesHover.autoDetectMinLength |
4 |
Shortest bare token considered a molecule. |
smilesHover.maxPrerender |
40 |
Molecules drawn ahead per screenful. |
smilesHover.autoSize |
true |
Size the canvas to the molecule (see below). |
smilesHover.maxHoverWidth |
460 |
Max displayed width inside the hover, px. |
smilesHover.maxHoverHeight |
240 |
Max displayed height inside the hover, px. |
smilesHover.imageWidth |
500 |
Base render width in px. |
smilesHover.imageHeight |
350 |
Base render height in px. |
smilesHover.colorPreset |
chemdraw |
chemdraw, bright, or mono atom palette. |
smilesHover.retentionMinutes |
15 |
How long a hand-render stays hoverable, minutes. |
With autoSize on (the default), the canvas is sized from the molecule's own
2D layout at a fixed scale — a bond is always the same number of pixels — so
every structure is drawn at one scale with one line weight, the way a page of
chemistry looks. Ethanol comes out small and imatinib comes out wide, both
legible. Molecules past the maximum canvas shrink to fit.
imageWidth/imageHeight scale that whole drawing up or down. Turn autoSize
off to pin every render to exactly those dimensions.
Render size and displayed size are separate. VS Code's hover has a limited
height — roughly a quarter of the editor's — and clips content that overflows
rather than scaling it, which would cut the bottom off a large molecule. So the
image is scaled down to fit maxHoverWidth × maxHoverHeight on display while
the underlying canvas stays large. It's vector, so nothing gets blurry, and the
big canvas is what stops atom labels colliding on dense structures. If you work
in a tall editor, raising maxHoverHeight gets you bigger structures.
Color presets:
- chemdraw — muted, publication-friendly colors on white.
- bright — vivid CPK-like (saturated red O, blue N, yellow S).
- mono — pure black on white, no atom coloring.
How it works
- src/scan.ts splits each visible line into SMILES-shaped
tokens and drops what can't be chemistry, by grammar then by context.
src/detect.ts puts the survivors past RDKit and draws the
ones that parse, debounced against scrolling and typing. Nothing is stored
per document — the caches are keyed by the string itself, so edits need no
invalidation. Hand-picked selections are cleaned instead
(src/smiles.ts).
- src/renderer.ts hands it to RDKit's MinimalLib WASM build,
using CoordGen for ChemDraw-like 2D geometry and draw options that
approximate RDKit's ACS 1996 preset — bumped above the ACS print defaults
for bond width and font size, which are calibrated for paper and read as
spidery on screen. A reaction is drawn a component at a time and composed
here, each structure a nested
<svg>: MinimalLib's own get_rxn drawing
comes out grey whatever the palette, and its arrow has nan coordinates in
this build, so nothing points anywhere. Composing keeps reactions in the
same style, colours and line weight as everything else.
- The SVG is base64-encoded into a
data: URI and embedded in the hover
markdown. No temp files, no subprocess.
- Cell output is the exception: no hover provider reaches into a webview, so
src/output-renderer.ts runs there and watches the
output DOM — the built-in renderer only offers hooks for HTML and
JavaScript, and watching covers every output instead. It imports the same
src/scan.ts and asks the host for verdicts and pictures
(src/output-messaging.ts); RDKit's 7 MB stays out
of the webview.
The background is always white, so molecules read the same in light and dark
themes.
Development
npm install
npm run compile   # vendors RDKit's WASM into vendor/, then runs tsc
npm test          # unit tests for detection, selection cleaning, token matching
Press F5 in VS Code to launch an Extension Development Host.
To build a .vsix locally:
npm run package
The README demos are generated, not screen-recorded —
scripts/make-demo.js and
scripts/make-notebook-demo.js composite real
renderer output into a mock window and encode the GIF, so they can't drift from
what the extension actually draws. Regenerate both with npm run demo.
Pushing a v* tag builds the .vsix, attaches it to a GitHub Release, and
publishes to the Marketplace — see
.github/workflows/release.yml.
Limitations
- No InChI, and no reaction SMARTS: query atoms like
[#6] aren't molecules.
Plain reaction SMILES are drawn.
- The integrated terminal isn't a document, so nothing hovers there. Editor
tabs holding command output do.
- Notebook output rendered by a third-party renderer — a plotly or ipywidget
view — draws into its own frame and isn't reached. Everything the built-in
renderer draws is.
- Auto-detection is conservative with short featureless tokens, because
CNN,
ISC and CSS are valid molecules and much more often not meant as ones.
Put them under a smiles column header, on a line of their own, after a
smiles: key, or lower autoDetectMinLength.
- A selection you render by hand and RDKit rejects reports quietly in the
status bar; a molecule that parses but fails to draw still raises a
notification.
- The
.vsix is ~7 MB, nearly all of it the RDKit WASM binary.
License
MIT — see LICENSE. Bundles
RDKit (BSD-3-Clause) via
@rdkit/rdkit; notice in
THIRD-PARTY-NOTICES.md.

