Vector Test Unit for Visual Studio Code
This extension supports you in creating and editing Vector test units in YAML format (*.vtestunit.yaml).
It interacts with the CAPL extension, the Python extension, and the C# extension and provides them with type libraries which are necessary to write test implementations.
It provides editing support for test unit configuration files with file endings vtestunit.yaml and vtesttree.yaml.
This includes syntax highlighting, code completion, and validation.
Depending on your use case, this extension can also assist you in building, running, and debugging the test unit.
Prerequisites
The Vector Test Unit extension requires a Vector toolset to be installed.
The Vector toolset comes with any CANoe or CANoe Server Edition.
At least version 18 of the Vector toolset is required.
For full CAPL editing support, we recommend version 19 or higher.
The currently selected Vector toolset is shown in the configuration view of the CANoe sidebar.
By default, the latest installed version is used.
To select a specific version, click on the Toolset entry in the configuration view or use the command Select Vector toolset to open the toolset selection view.
The Vector Simulation and Test Environment extension is installed automatically as a dependency.
For editing the actual test implementations, please install the CAPL extension, the Python extension, and the C# extension.
Usage
The Vector Test Unit extension supports two different workflows.
The DevOps workflow is tailored towards the Server Editions of CANoe.
The CANoe workflow is for editing test units in YAML format in CANoe editions with a GUI.
All test units in the current workspace are discovered by their description files *.vtestunit.yaml.
Click on the Test Unit entry in the configuration view of the CANoe sidebar to create a new test unit or to select one as your active test unit.
Alternatively, use the command Select test unit.
The name of the currently active test unit is shown within the Test Unit entry in the configuration view.
The quick start view of the CANoe sidebar offers helpful shortcuts for common tasks like creating files, working with samples, and accessing help.
For an explanation of the concepts, terms, and file formats, please refer to the help of your Vector toolset by clicking on the Open Help entry in the quick start view.
Editing description files
The extension provides editing support for the description files *.vtestunit.yaml and *.vtesttree.yaml.
This includes syntax highlighting, code completion, and validation.
Editing test implementations
This extension enables test-specific CAPL features for test files referenced in the active test unit's description file, as well as any CAPL files they include.
For editing tests written in C# or Python, this extension will enable you to ...
- use built-in symbols, functions, and namespaces from the Vector toolset
- use symbols, functions, and namespaces from CAPL libraries (refer to the CANoe help to see which features are supported in each language)
In case of C# tests the extension additionally enables you to use the .NET assemblies referenced in the test unit description file.
In case of Python the packages referenced in the test unit description file should be resolved by default by the Pylance extension.
The C# and Python language support is updated at startup and when changing the active test unit.
If you want to update it manually, e.g. when you have just written a CAPL function that you now want to use in a C# or Python test file, you can do so using the commands Generate .NET type libraries or Generate Python type libraries respectively.
As of CANoe Server Edition 20 (DevOps workflow), changes to exported CAPL functions are considered automatically in C# and Python test files.
DevOps workflow
In the DevOps workflow, the environment must be described in an environment description file (venvironment.yaml).
Please refer to the Vector Simulation and Test Environment extension and the Vector toolset help for more details.
Test units cannot be edited if there is no environment description file in your workspace.
Building a test unit
Before a test unit can be executed it must be built.
The extension provides a build task that can be executed using the commands Build test unit and Tasks: Run Build Task.
By default, the latter can be called with the keybinding Ctrl + Shift + B.
The build task can also be customized via a tasks.json file.
This is useful if you want to pass additional arguments to test-unit-make.
For example, a build task with increased verbosity might look as follows:
{
"type": "vtestunit",
"label": "Vector Test Unit: Build test unit",
"group": {
"kind": "build",
"isDefault": true
},
"problemMatcher": [],
"args": ["--verbosity-level=3"]
}
Running a test unit
This extension provides a Test Explorer for executing the whole test unit or individual tests.
It gives a visual representation of the test tree and directly shows the status of each test tree element.
If your test unit uses variants, you can select a variant value in the bottom of the Test Explorer.
The resulting test report can be opened by clicking on the link in the test run output.
Test runs can be customized via a vector-test-unit-run launch configuration.
You can pass additional arguments like e.g., --verbosity-level to the CLI of your CANoe Server Edition.
You can also specify tasks to be run before or after a test run via the preLaunchTask and postDebugTask properties.
This can be useful e.g., for starting your system under test before each test run and stopping it afterwards.
A minimal launch configuration can be generated via the Run and Debug menu or, if a .vscode/launch.json file already exists in the workspace, via IntelliSense.
To execute the test unit on external hardware devices such as VN8900, VT6000, or RT Rack, you must connect to a remote Vector Tool Platform (VTP).
To configure the connection, specify the IP address of the target device in your .vscode/launch.json file by passing the --remote-vtp argument to the CANoe Server Edition CLI:
{
"type": "vector-test-unit-run",
"name": "Run the active Vector test unit",
"request": "launch",
"args": ["--remote-vtp=IP_ADDRESS"]
}
Replace IP_ADDRESS with the IP address of the device running the VTP (for example, 192.168.0.10).
Debugging a test unit and simulation
To enable debugging for CAPL and C#, you first need to build debug symbols.
Click on Build Mode in the dropdown menu of the Environment/Test Unit entry in the configuration view of the CANoe sidebar and choose Debug.
Alternatively, you can build debug symbols via the following commands:
Set build mode of environment and test units (Release / Debug): Allows you to specify whether you want to build both test units and the simulation in Release or Debug mode.
Set build mode of test units (Release/Debug): Configures the build mode for the test units.
Set build mode of environment (Release/Debug): Configures the build mode for the simulation environment.
Note that debug symbols can impact the performance.
You can choose to debug only the test unit or the simulation without affecting the performance of the other.
Breakpoints
Simply click next to the line number in your CAPL or C# program to set a breakpoint.
Via the checkbox in the Run and Debug sidebar you can control if you want the simulation to automatically pause when a test unit breakpoint is hit.
Otherwise the simulation keeps running while the test unit is paused.
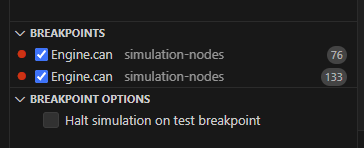
Known limitations
- The simulation cannot be halted when external hardware is part of your setup.
However, test unit breakpoints will still work as expected.
- Currently, diagnostic symbols and ethernet service signals cannot be inspected in the variables view.
A workaround is to assign the value of interest to a helper variable for easier inspection during debugging.
- Debugging is not supported for encrypted CAPL files (e.g, .canencr).
- Debugging C# models and test implementations requires .NET 8 or higher.
- Debugging support for test units and simulations written in Python is not yet available but will be introduced in future releases.
CANoe workflow
This extension supports editing test units in YAML format from CANoe directly in Visual Studio Code.
To compile and run your tests, please use the Test Configuration window in CANoe.
Click the Open Test Design button in the Test Configuration window to edit your test unit in Visual Studio Code.
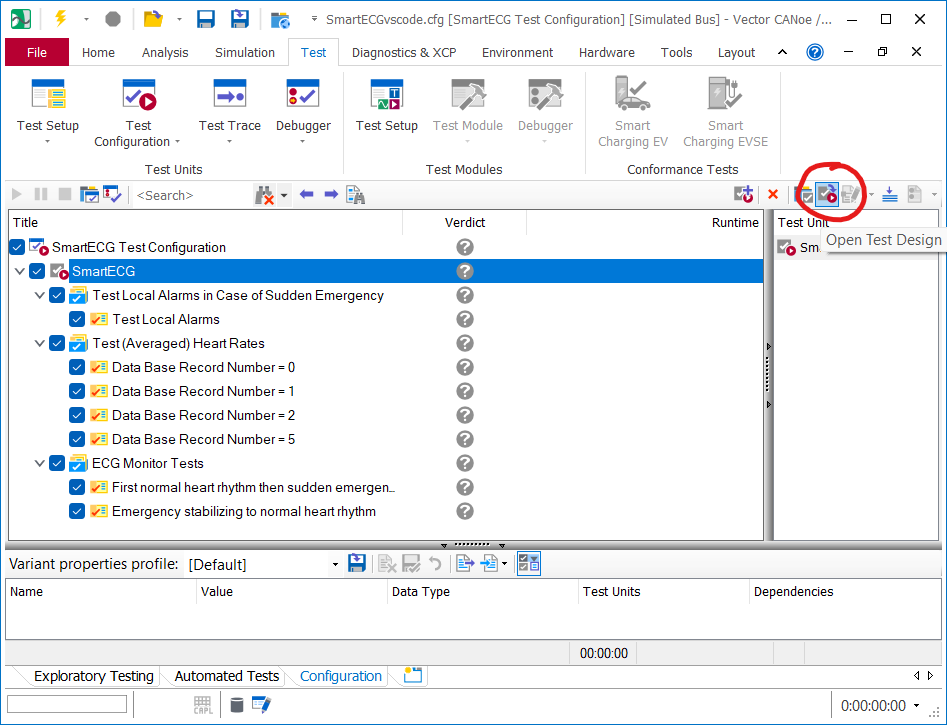
The environment from your CANoe configuration (e.g., system variables and distributed objects) will be available in your test implementations.
Example
Please refer to the documentation installed with your Vector toolset for details on how to implement test units.
This chapter just provides a short example to facilitate getting started with writing test units for CANoe.
A test unit is described using a YAML file with file ending vtestunit.yaml:
version: 3.0.0
# optional section which contains information about the test unit
test-unit-information:
description: This is an example
# list of all artifacts that belong to the test unit
sequential-tests:
- source-file-path: test.can
- source-file-path: test.vtesttree.yaml
- capl-library-path: custom.dll
A test execution tree specifies in which order test cases and test sequences are executed.
It is described using a YAML file with file ending vtesttree.yaml.
It must be referenced as a source file in the vtestunit.yaml file.
Test fixtures can be used to structure the test execution tree.
Here is an example:
version: 2.5.0
test-tree:
- capl-test-case: MyTestCase
title: My Test Case Title
- capl-test-sequence: MyTestSequence
- test-fixture: MyTestFixture
elements:
- capl-test-case: MyParameterizedTestCase
description: This is a parameterized test case
params: [1, 2]
The actual test implementation in test.can may look like follows:
export testcase MyTestCase() {
// TODO
}
export testcase MyParameterizedTestCase(int param1, int param2) {
// TODO
}
export testsequence MyTestSequence() {
// TODO
}
FAQ
I have just created a vtestunit.yaml or vtesttree.yaml file in my workspace but the extension does not activate. What can I do?
This extension takes .gitignore into account when finding available description files. Ensure that vtestunit.yaml or vtesttree.yaml are not excluded by .gitignore.
My C# test is not validated and there is no IntelliSense. What can I do?
- Make sure that the C# file is listed as a source file in the test unit description file.
- Make sure that the correct test unit is selected via the command
Select test unit.
- Make sure that the C# extension is installed.
- Make sure that the generated C# solution
ActiveVectorSolution.sln is loaded.
Depending on the configuration of your C# extension, this can be done via one of the commands OmniSharp: Select Project or .NET: Open Solution.
- Make sure that a .NET SDK is installed on your system. It is required by the C# extension. We recommend .NET SDK version 10.0.
- Have a look into the output of the C# extension and see if it gives any hints.
C# IntelliSense is not recognizing changes in my environment. What can I do?
In case of any troubles with C# IntelliSense, we recommend configuring the C# extension to use the OmniSharp Language Server instead of the default one.
You can do this by enabling the following two workspace settings:
dotnet.preferCSharpExtension
dotnet.server.useOmniSharp
Please note that this will disable the C# Dev Kit in your workspace.
When starting a test run, Windows shows the message Do you want to allow public and private networks to access this app?.
What shall I do?
The Vector Test Unit extension runs a HTTP server on localhost during test execution.
Windows asks if this server shall be accessible from outside.
As this is not necessary, you may accept or decline as you wish.
Keep in mind though that the decision may affect other VS Code extensions, too.