Trunk Check VSCode Extension


💡Tip
🎉 New: Trunk Flaky Tests detects, quarantines, and eliminates
flaky tests.
Trunk Code Quality runs 100+ tools to format, lint,
static-analyze, and security-check dozens of languages and config formats. It will autodetect the
best tools to run for your repo, then run them and provide results inline in VSCode.
Just install one extension instead of dozens. The tools run and their versions are stored in a
.trunk/trunk.yaml config in your repo.
Trunk Code Quality is free for individual use, free for open source projects, and has a free
tier for team use in private repos. (See pricing)
Standout Features
- does everything from formatting, to linting, to security checking, to optimizing images
- config-as-code (
.trunk/trunk.yaml)
- caching
- pre-existing issue detection
- a daemon & language server
- githooks management
- CLI available (
curl https://get.trunk.io -fsSL | bash)
(CLI install docs)
- a web app for repo stats
See docs for full usage and features.
Don't install a dozen different linter and formatting plugins. Just use Trunk Code Quality. Level up
your code quality and consistency today.
We integrate new linters every release. Stop by on Slack and let us know what you'd like next! All
tool integrations are open source here
Enable the following tools via:
trunk check enable <linter>
| Technology |
Linters |
| All |
[codespell], [cspell], [git-diff-check], [gitleaks], [pre-commit-hooks] |
| Ansible |
[ansible-lint] |
| Apex |
[pmd] |
| Bash |
[shellcheck], [shfmt] |
| Bazel, Starlark |
[buildifier] |
| C# |
[dotnet-format] |
| C, C++ |
[clang-format], [clang-tidy], [cmake-format], [iwyu], [pragma-once] |
| CircleCI Config |
[circleci] |
| Cloudformation |
[cfnlint], [checkov] |
| CSS, SCSS |
[prettier], [stylelint] |
| Cue |
[cue-fmt] |
| Dart |
[dart] |
| Docker |
[checkov], [hadolint] |
| Dotenv |
[dotenv-linter] |
| GitHub |
[actionlint] |
| Go |
[gofmt], [gofumpt], [goimports], [gokart], [golangci-lint], [golines], [semgrep] |
| GraphQL |
[graphql-schema-linter], [prettier] |
| HAML |
[haml-lint] |
| HTML Templates |
[djlint] |
| Java |
[google-java-format], [pmd], [semgrep] |
| JavaScript |
[biome], [deno], [eslint], [prettier], [rome], [semgrep] |
| JSON |
[deno], [eslint], [prettier], [semgrep] |
| json |
[biome] |
| jsx |
[biome] |
| Kotlin |
[detekt], [ktlint] |
| Kubernetes |
[kube-linter] |
| Lua |
[stylua] |
| Markdown |
[deno], [markdown-link-check], [markdown-table-prettify], [markdownlint], [prettier], [remark-lint] |
| Nix |
[nixpkgs-fmt] |
| package.json |
[sort-package-json] |
| Perl |
[perlcritic], [perltidy] |
| PHP |
[php-cs-fixer], [phpstan] |
| PNG |
[oxipng] |
| PowerShell |
[psscriptanalyzer] |
| Prisma |
[prisma] |
| prose |
[vale] |
| Protobuf |
[buf], [clang-format], [clang-tidy] |
| Python |
[autopep8], [bandit], [black], [flake8], [isort], [mypy], [pylint], [pyright], [ruff], [semgrep], [sourcery], [yapf] |
| Rego |
[opa], [regal] |
| Renovate |
[renovate] |
| Ruby |
[brakeman], [rubocop], [rufo], [semgrep], [standardrb] |
| Rust |
[clippy], [rustfmt] |
| Scala |
[scalafmt] |
| Security |
[checkov], [dustilock], [nancy], [osv-scanner], [terrascan], [tfsec], [trivy], [trufflehog] |
| SQL |
[sql-formatter], [sqlfluff], [sqlfmt] |
| SVG |
[svgo] |
| Swift |
[stringslint], [swiftformat], [swiftlint] |
| Terraform |
[checkov], [terraform], [terrascan], [tflint], [tfsec], [tofu] |
| Terragrunt |
[terragrunt] |
| Terrascan |
[terrascan] |
| Textproto |
[txtpbfmt] |
| TOML |
[taplo] |
| TypeScript |
[biome], [deno], [eslint], [prettier], [rome], [semgrep] |
| YAML |
[prettier], [semgrep], [yamllint] |
The up-to-date list of supported linters can always be found
here.
Module inspection, deep checking, and setting variables are not currently supported.
How it works
Trunk Code Quality downloads everything it needs to run on demand and caches it in ~/.cache/trunk.
We run linters in parallel, in the background, and function as a
language server to show results inline in
VSCode via the Trunk VSCode Extension.
Features
Initialization
Trunk Code Quality manages all configuration as code in your repo's .trunk/trunk.yaml file. When
you first start the Trunk CLI, it scans your repo for which linters and formatters apply to the
files you have and sets up an initial .trunk/trunk.yaml file for you to use. See the
docs for more details. You can customize from there by editing
.trunk/trunk.yaml or by running trunk check enable <linter> and trunk check disable <linter>.
Trunk will automatically initialize in 'single player mode', which gitignores your .trunk
directory in the repo, but if you're ready to run Trunk Code Quality on CI or have your teammates
all share a configuration, you can find a 'Share' button in the Trunk VSCode side panel which will
un-gitignore .trunk. You can then commit it and merge it into your repo for others to use.
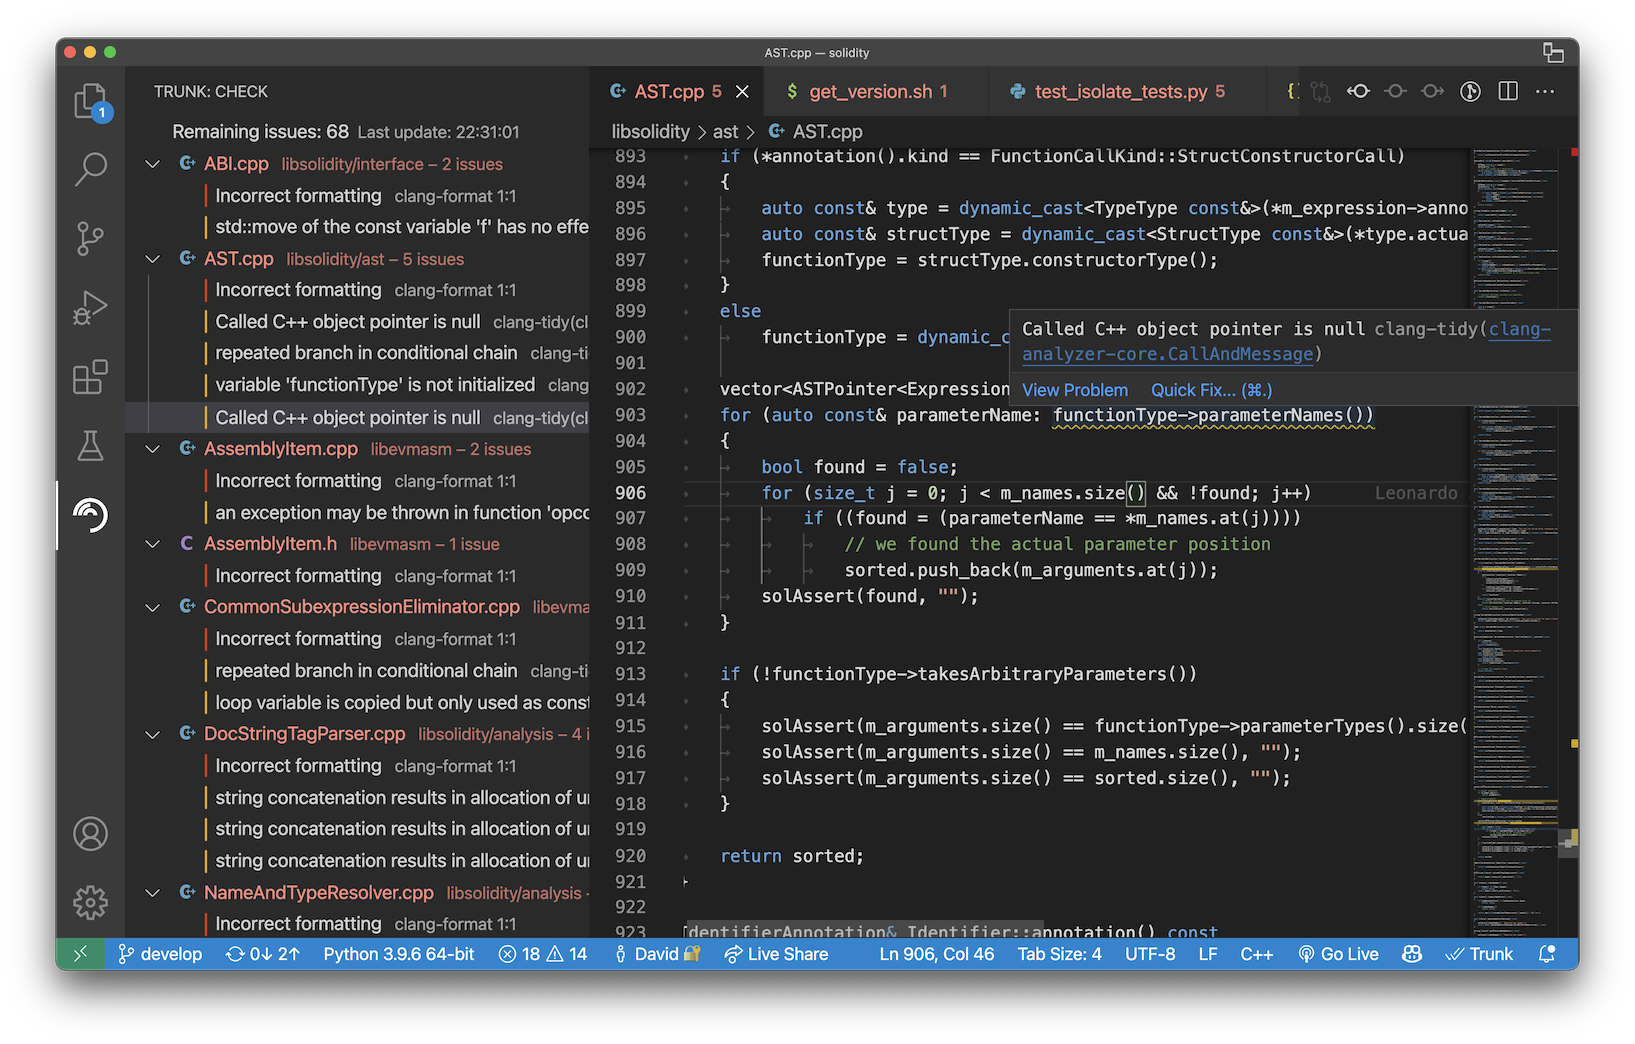
Trunk Side Panel
You'll see the Trunk icon on the sidebar, which you can use to open the side panel to view issues.
By default, issues are populated for every file you open and any modified files.
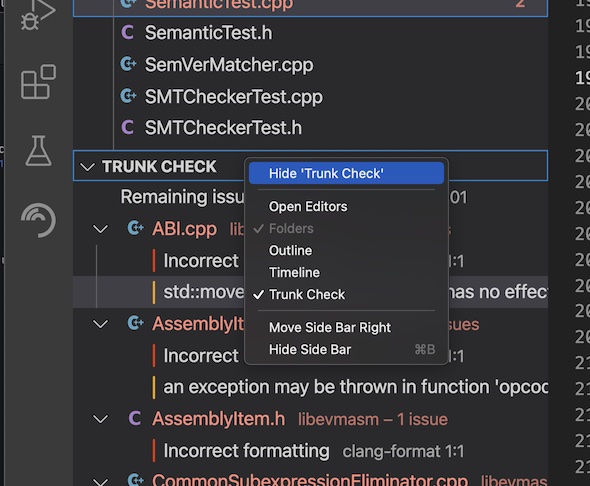
Trunk also shows Trunk Code Quality Issues in a panel in the File Explorer, but you can hide it if
you wish:
Ever hit one of these problems?
- A formatter plugin doesn't actually install the formatter for you.
- Devs on your team all get slightly different formatting results because you're running different
versions of the formatters as VSCode plugins.
- Your formatting doesn't match what your CI lint job is expecting because you're running a
different version of a formatter locally.
- Your team primarily uses VSCode with a committed workspace config w/ formatters, but some people
don't use it, leaving your codebase inconsistent.
That's what formatting via Trunk Code Quality solves. Everyone on your team only has to install one
plugin, they're guaranteed to get the same results and run the same version of each
formatter/linter, and guaranteed to get the same results as your CI lint job (use the
Trunk GitHub Action!).
Configuration
None required! But, if you have multiple VSCode plugins installed which act as formatters, you can
choose which filetypes to set Trunk as the default formatter for by right-clicking and selecting
'Format Document With...'
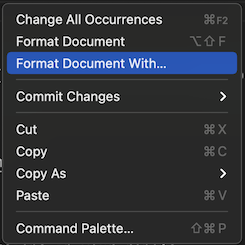
Then 'Configure Default Formatter' and select 'Trunk'

Or, you can configure which formatter to prefer by editing your json settings (either user settings
or workspace settings) with:
"[markdown]": {
  "editor.defaultFormatter": "trunk.io"
},
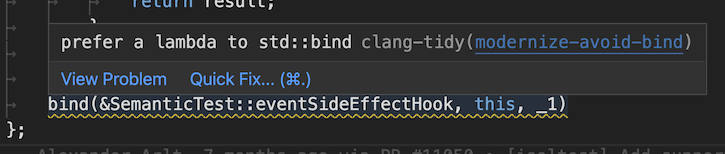
Issue code documentation links
For many linters we support links to their docs per issue in the tooltips for each issue:
Ignoring Issues
Trunk supports a special syntax to ignore issues from any linter. See below for the format of
trunk-ignore comments.
- Install Trunk CLI →
curl https://get.trunk.io -fsSL | bash (docs)
- Locally check your changes for issues →
trunk check (docs)
- Locally format your changes →
trunk fmt (docs)
- Protect lint and format issues from leaking into main →
Trunk GitHub Action
Prereqs
None! Trunk manages linters and formatters for you via pinned versions in your repo's
.trunk/trunk.yaml file. You don't need to install any linters or configure the extension in any
way. We cache linters, formatters, and runtimes in ~/.cache/trunk. Using a linter distributed as a
Go module, but don't have Go installed on your machine? Don't worry about it. We handle it all 😉.
How versioning works
After you trunk init, trunk.yaml will contain a pinned version of Trunk for your repo. When you
run trunk, it will automatically detect which version you should be running for a particular repo
and, if needed, download it, then run it. The Trunk VSCode extension works the same way: regardless
of what repo you're in, the version of trunk used is the pinned version in your trunk.yaml file.
Config-as-code 👍.
This means that everyone working in a repo, using the trunk CLI, the VSCode extension, or when
running on CI, all get the same results because they're running the same version of trunk and
the same versions of all the linters/formatters. No more "doesn't happen on my machine". When you
want to upgrade to a newer version, just run trunk upgrade and commit the updated trunk.yaml.
Suppressing Issues
Sometimes we want to deliberately tell a linter that, yes, I know what I'm doing, and yes, in any
other situation, I should not do this, but in this specific case, it's okay. Maybe there's a
stand-in private key you're using for a test stack, or fixing the lint issue will actually make your
code less readable: whatever it is, you now need to figure out how to suppress a given lint issue.
trunk provides a simple, standardized mechanism to do this, saving you from having to look up the
linter-specific syntax for doing so:
struct FooBar {
  // trunk-ignore(clang-tidy/modernize-use-nullptr): this is a load-bearing NULL, see ISSUE-832
  void *ptr = NULL;
};
This tells trunk that the clang-tidy linter found a modernize-use-nullptr issue on the
highlighted line and that trunk should suppress this linter issue.
Comments are obviously not required:
struct FooBar {
  // trunk-ignore(clang-tidy/modernize-use-nullptr)
  void *ptr = NULL;
};
You can also omit the name of the check to simply tell trunk that all issues from a given linter
on a specific line should be suppressed:
struct FooBar {
  // trunk-ignore(clang-tidy)
  void *ptr = NULL;
};
trunk-ignore directives can also be placed at the end of the line on which they're suppressing
lint issues:
struct FooBar {
  void *ptr1 = NULL;  // trunk-ignore(clang-tidy/modernize-use-nullptr)
  void *ptr2 = NULL;  // trunk-ignore(clang-tidy)
};
If you need to suppress issues from multiple linters, trunk-ignore supports that too:
struct FooBar {
  // trunk-ignore(clang-tidy): ISSUE-914 explains why the `void *` type is needed
  // trunk-ignore(gitleaks,my-custom-linter/do-not-hardcode-passwords): see ISSUE-915
  void *super_secret_password = (void *)("915dr~S$Pzqod~oR*CrQ$/SQ@hbtQBked:CL@z!y]");
};
Suppressing all issues in a file:
// trunk-ignore-all(clang-tidy)
struct FooBar {
  void *ptr1 = NULL;
  void *ptr2 = NULL;
};
Suppressing all issues in block of code:
struct FooBar {
  // trunk-ignore-begin(clang-tidy)
  void *ptr1 = NULL;
  void *ptr2 = NULL;
  // trunk-ignore-end(clang-tidy)
};
Notice that a trunk-ignore directive applies not to the next line, but the next non-trunk-ignore
line (this only works for preceding directives, not trailing directives), and that you can use a
single directive for suppressing multiple checks.
Specification
The syntax of a trunk-ignore directive is as follows:
<trunk-ignore>      ::= "trunk-ignore(" <check-ids> ")" <optional-comment>
<check-ids>         ::= <check-id> <optional-check-id>
<optional-check-id> ::= "," <check-id>
<check-id>          ::= <linter-id> <optional-rule-id>
<optional-rule-id>  ::= "/" <rule-id>
<optional-comment>  ::= ": " <comment>
Configuration
trunk.inlineDecorators: boolean – allows to disable inline decorators for diagnostics.trunk.inlineDecoratorsForAllExtensions: boolean – allows to render inline decorators only for
diagnosticstrunk.showPreexistingIssues: boolean - allows to show/hide pre-existing issues.trunk.showBelowThresholdIssues: boolean - allows to show/hide below-threshold issues
Advanced
trunk.autoInit: boolean - sets whether to auto-initialize trunk in non-trunk repositories
trunk.trunkPath: string - absolute or workspace-relative path to Trunk
trunk.languageServerArguments: array: - allows appending arguments to start the trunk LSP. By
default, the argument list is just ["lsp-proxy"]. It is unlikely this is needed, unless to
submit a debug report, in which case you might set it to be
["--log-level=debug", "--log-file=/tmp/lsp-log.txt].
trunk.numJobs - sets the number of hardware threads trunk will use when running linters. By
default, this is set to half of the number of hardware threads on your machine. You can also tune
this by specifying the --jobs flag as part of the trunk.languageServerArguments setting.
NOTE: You must be on Trunk CLI version 1.10.0 or greater to use this setting.
You can also set this by specifying the default lsp-proxy arguments in your trunk.yaml or
user.yaml file:
cli:
  options:
    - commands: [lsp-proxy]
      args: --jobs=4
trunk.addToolsToPath: a boolean setting controlling whether to add the repo's .trunk/tools to
the PATH environment variable. By default, this is set to true.
Multi-root workspace support
The Trunk extension supports
multi-root workspaces, although
it does not currently run trunk simultaneously in multiple repositories.
The default behavior for the extension is to run in the first listed trunk-initialized folder. If
none are trunk-initialized, the extension will initialize and run in the first git-initialized
folder.
This behavior can be overridden with the trunk.workspaceFolderName setting, which will run the
trunk extension in the workspace folder with the matching name.
Feature Requests & Bug Reports
Looking for another feature? Submit a request here
Hit a bug? 🐛 Let us know on Slack!
Feedback
Join the Trunk Community Slack. ❤️
