OpenTips


As you code, OpenTips looks at your work-in-progress and provides tips based on the code you are writing. It's like having a helpful colleague who points out potential improvements and best practices as you write code.
Tips are displayed in a dedicated panel in the editor, and they are also highlighted within the code itself.
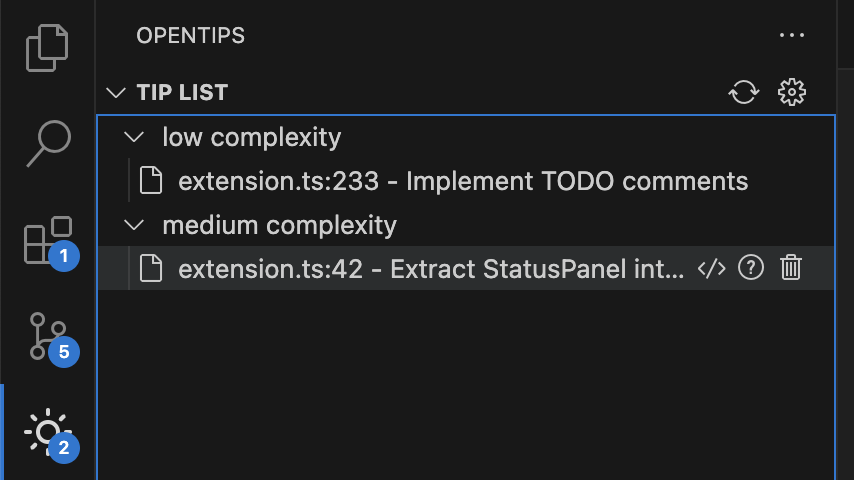
For each tip, you can choose to:
</> Apply: Change your code in the way suggested by the tip.? Explain: Learn more about the tip and how it can help, without making a code change yet.🗑️ Dismiss: Ignore the tip suggestion.
Table of Contents
Tip Actions
Apply Tip
Requires GitHub Copilot
Click on the code icon </>, or Apply link in the popup, to apply the tip to your code. This will open a GitHub Copilot Chat that's pre-filled with information about the tip. You can then send the message to apply the tip to your code.
Explain Tip
Requires GitHub Copilot or Anthropic API Key
Click on the question mark icon ?, or Explain link in the popup, to get a detailed explanation of the tip. There will be a slight delay while the explanation is fetched, then it will be opened in a new text editor document for you to read.
Dismiss Tip
Click on the trash can icon 🗑️, or Dismiss link to remove the tip from the list. You can do this when the tip has been applied, or if you are not interested in the tip.
Features
Diff inspection
Requires Git
OpenTips looks at the differences between your working branch and the main branch (which should be
named main, master, or develop).
Auto-hiding
If you change your code in a way that makes a tip no longer relevant, the tip will be automatically hidden. You can also manually dismiss tips that you are not interested in.
Prioritization and diversity
Tips are continually updated and improved to provide a diverse set of suggestions. This also helps to prevent OpenTips from overwhelming you with too many tips at once!
Installation Status
The STATUS view shows the installation status of the extension. This view will be displayed when the extension is first installed, and it will show the progress of the installation process.
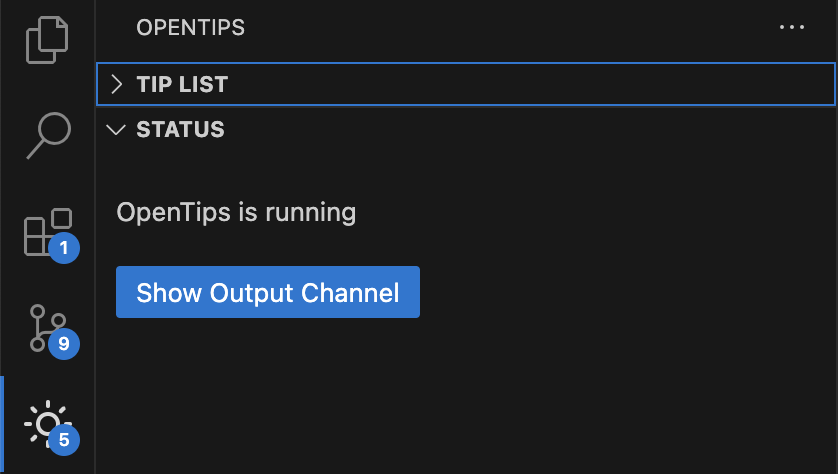
If OpenTips is not fully running and configured, you can use the information provided in this view to complete the setup process. The Output view can be used for troubleshooting and to report details that can help diagnose any issues.
Configuration
Language Model Provider
OpenTips uses a large-language model (LLM) to provide tips. You can choose between the two following ways of providing an LLM to OpenTips:
- GitHub Copilot: If you have GitHub Copilot installed, OpenTips will use it as the language model provider. This is an easy way to use OpenTips, as you don't need to provide any additional configuration.
- Anthropic API Key: If you don't have GitHub Copilot installed, you can provide an API key for the Anthropic API. This will allow OpenTips to use the Anthropic API as the language model provider.
opentips Python Service
OpenTips is complemented by a Python backend that enhances its functionality, allowing for advanced processing and integration.
The Python service is provided as a separate package, opentips, which will be installed automatically when you first use OpenTips. This package is required for OpenTips to function correctly.
Commands
OpenTips provides several commands that you can access through the Command Palette (Ctrl+Shift+P or Cmd+Shift+P).
Once you've opened the Command Palette, start typing "OpenTips" to see the available commands:
Setup and Configuration
- OpenTips: Open Usage Walkthrough - Show the usage walkthrough and feature tour.
- OpenTips: Open Service Installation Walkthrough - Get help configuring and installing the Python backend service.
- OpenTips: Open Language Model Walkthrough - Get help configuring your preferred language model.
- OpenTips: Install opentips Python Package - Install or update the required Python backend service package. This command runs automatically on installation of the extension.
API Key Management
- OpenTips: Set Anthropic API Key - Configure your Anthropic API key for using Claude models
- OpenTips: Show Anthropic API Key Status - Check if your Anthropic API key is configured and valid
- OpenTips: Clear Anthropic API Key - Remove your stored Anthropic API key
Output
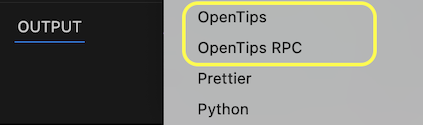
OpenTips provides output channels where you can see logs and debug information. You can access these output channels by looking for the Output tab in the bottom panel of the editor. You'll see two channels related to OpenTips:
- OpenTips: Log messages from the operation of the OpenTips extension.
- OpenTips RPC: Logs from the
opentips Python service.
If you aren't getting tips, check these output channels for messages that might help you diagnose the issue.
Installation
Install from VSCode
- Open VS Code
- Go to Extensions view (Ctrl+Shift+X or Cmd+Shift+X)
- Search for "OpenTips"
- Click Install
Install from VSCode Marketplace
🔗 Visit OpenTips on VS Code Marketplace »
Service Package
OpenTips requires a Python package called "opentips".
To complete your installation, you'll need to set up the Python environment and install the opentips package.
Install Python
You'll need to have Python 3.11 or later.
- MacOS and Linux come with Python built in.
- Windows users can install Python from the Microsoft Store: Python 3.11
Automatic installer
By default, OpenTips will automatically install the opentips package to $HOME/.opentips.
Automatic installer setting
You can disable the automated installer by changing the setting "OpenTips: Install Globally" to "false".
Do this if you want to manually manage the opentips package in a virtualenv of your project
(the virtualenv must be located in .venv or venv).
Installer command
You can initiate the automatic installer by running the command "OpenTip: Install opentips Python Package". For example, if you need to install Python, you can then run this command to complete the install of OpenTips.
Lock file
A lock file called "install.lock" protects against multiple concurrent installations.
Manual Installation
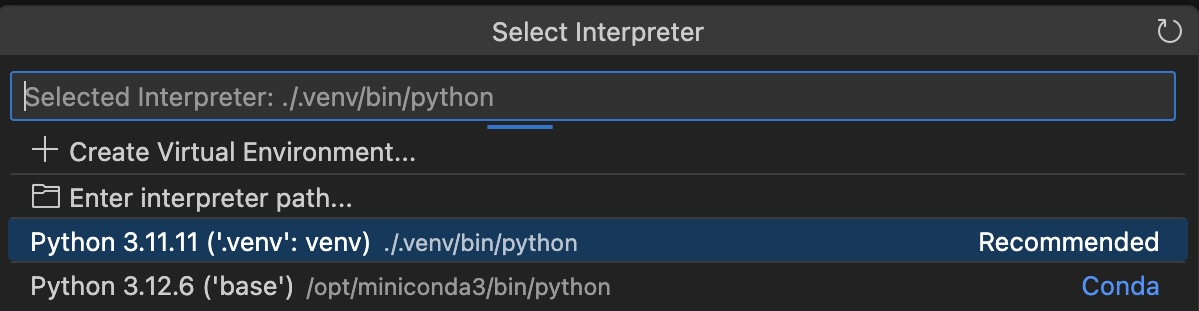
Run the Python extension command Python: Select Interpreter from the Command Palette (Ctrl+Shift+P) or (Cmd+Shift+P):

Next, select the Python interpreter and virtualenv you want to use for this project:
Once you've selected the Python interpreter, run the command Python: Create Terminal from the Command Palette (Ctrl+Shift+P) or (Cmd+Shift+P) to open a terminal with the selected Python interpreter:

From the terminal, install the opentips package using the following command:
pip install opentips
Now the OpenTips extension will detect that the package is available and it will run the RPC server in the background.
You can check the status of the server by checking the Output panel:
Build and Install from Source
# Clone the repository
git clone https://github.com/SgtAirRaid/opentips-vscode.git

# Navigate to the directory
cd opentips-vscode

# Install dependencies
yarn

# Package the extension, outputting opentips-x.y.z.vsix
yarn package
Once the packaging is complete, install the generated .vsix file:
- In VS Code, open the Extensions view (Ctrl+Shift+X or Cmd+Shift+X)
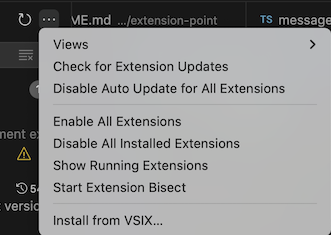
- Click the "..." menu in the top-right of the Extensions view
- Select "Install from VSIX..."
- Navigate to the packaged .vsix file in the project directory
- Click "Install"
Alternatively, you can install the .vsix from the command line:
code --install-extension opentips-x.y.z.vsix
Where x.y.z is the version number of the package.
Bugs and Feature Requests
If you encounter any bugs or have feature requests, please open an issue on the GitHub repository.
If you are reporting a bug, please include the contents of the OpenTips and OpenTips RPC output channels in your issue. See the Output section for details on how to access these logs.