A comprehensive Visual Studio Code extension for designing and customizing Microsoft Copilot agent interfaces with real-time preview, theme gallery, and export capabilities. Features 6 professional themes, comprehensive styling options, mock DirectLine testing, and one-click export to production-ready JSON/HTML code.
Screenshots
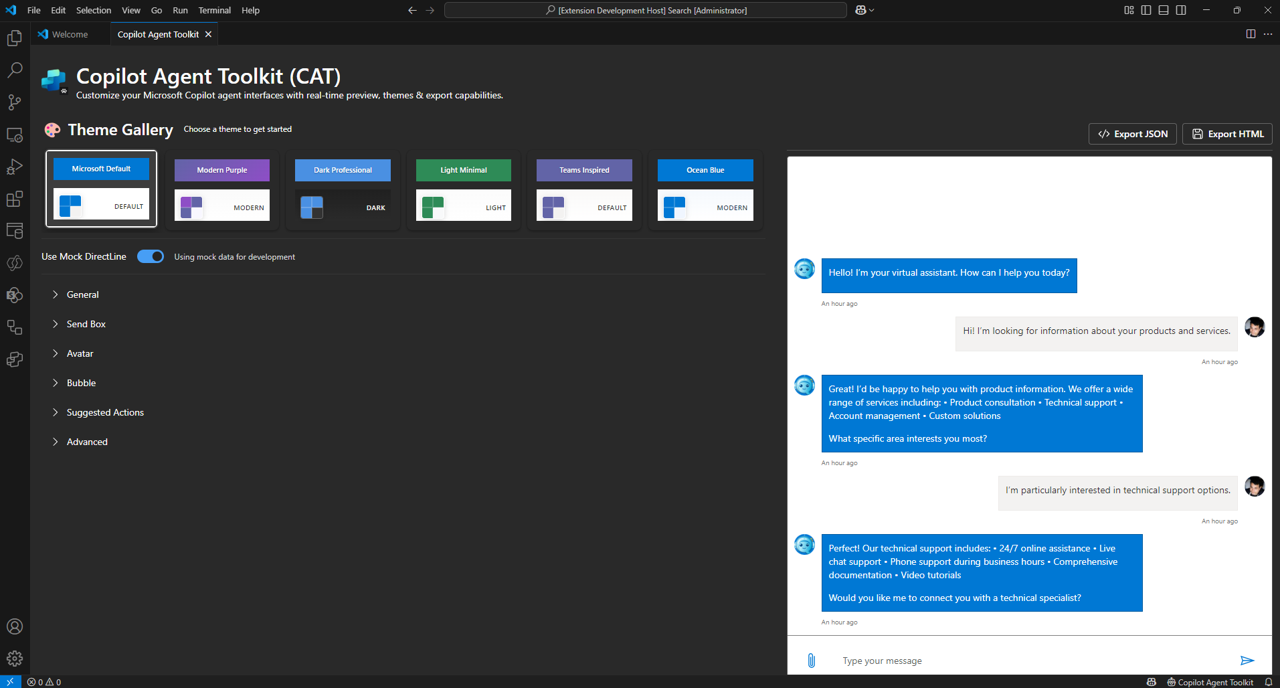
The Copilot Agent Toolkit provides a comprehensive interface featuring:
- Theme Gallery: 6 professional themes with visual preview cards
- Live WebChat Preview: Real-time Bot Framework WebChat integration
- Customization Panels: Comprehensive styling options organized in accordion panels
- Export Functionality: One-click export to production-ready JSON/HTML code
Features
Professional Theme Gallery
- 6 Professional Themes: Microsoft Default, Modern Purple, Dark Professional, Light Minimal, Teams Inspired, Ocean Blue
- Visual Preview Cards: Each theme displays gradient headers, accent color squares, and color previews
- One-Click Application: Instant theme switching with real-time WebChat preview
- Accent Color Focus: Prominent 24x24px gradient accent color squares for easy identification
Key Capabilities
- Theme Gallery: 6 professionally designed themes with visual preview cards
- Live WebChat Preview: Authentic Microsoft Bot Framework WebChat integration
- Comprehensive Customization: Full styling control organized in intuitive accordion panels
- Font Selection: Popular font families dropdown (Segoe UI, Arial, Helvetica, Times New Roman, Georgia, Verdana)
- Mock DirectLine: Test designs instantly without requiring live bot connection
- Export Ready: Generate production-ready JSON styleOptions and HTML code
- Responsive Design: Optimized layout that adapts to VS Code panel sizes
Customization Categories
- General: Accent colors, background, fonts, root height
- Send Box: Input styling, button colors, upload button toggle
- Avatar: Size controls, border radius, bot/user avatar customization
- Bubble: Message bubble styling for both user and bot messages
- Suggested Actions: Action button styling and layout options
- Advanced: Typography, padding, scrolling behavior, emoji settings
Professional Theme Gallery
Choose from 6 professionally designed themes with instant visual preview:
Microsoft Default
- Primary: #0078D4 | Accent: #106EBE
- Clean, professional Microsoft styling | Perfect for corporate environments
Modern Purple
- Primary: #6B46C1 | Accent: #8B5CF6
- Contemporary design with modern purple tones | Ideal for creative applications
Dark Professional
- Primary: #1F2937 | Accent: #3B82F6
- Sleek dark theme for professional use | Great for developer tools
Light Minimal
- Primary: #F8FAFC | Accent: #10B981
- Clean minimal design with subtle accents | Perfect for clean interfaces
Teams Inspired
- Primary: #464775 | Accent: #6264A7
- Microsoft Teams color palette | Familiar for Teams users
Ocean Blue
- Primary: #0EA5E9 | Accent: #0284C7
- Fresh ocean-inspired blues | Calming and professional
Installation
- Open VS Code
- Go to Extensions view (
Ctrl+Shift+X)
- Search for "Copilot Agent Toolkit"
- Click "Install" on the extension by RamakrishnanR
Alternative: Install directly from VS Code Marketplace
Usage
Quick Start
- Open Extension: Press
Ctrl+Shift+P → Type "Copilot Agent Toolkit" → Select "Open Copilot Agent Toolkit"
- Choose Theme: Browse the theme gallery at the top and click any theme card
- Customize: Use the configuration and customization panels below
- Export: Click "Export JSON" or "Export HTML" buttons to get production code
Interface Layout
┌─────────────────────────────────────────────────────────┐
│ 🎨 Copilot Agent Toolkit                                │
├─────────────────────────────────────────────────────────┤
│  Theme Gallery + Config      │  🤖 Live WebChat Preview │
│  ┌─────────────────────────┐ │  ┌─────────────────────────┐ │
│  │ 🎭 6 Professional Themes│ │  │ ✅ Real Bot Framework   │ │
│  │ ┌─────┐ ┌─────┐ ┌─────┐ │ │  │    WebChat Integration │ │
│  │ │🔵MS │ │🟣Mod│ │🖤Dark│ │ │  │                       │ │
│  │ │     │ │     │ │     │ │ │  │ 🤖 Bot: Hello! This   │ │
│  │ └─────┘ └─────┘ └─────┘ │ │  │     looks great!      │ │
│  │ ┌─────┐ ┌─────┐ ┌─────┐ │ │  │                       │ │
│  │ │⚪Light│ │🔷Teams│ │🌊Ocean│ │  │ 👤 User: I love the   │ │
│  │ │     │ │     │ │     │ │ │  │      real-time preview│ │
│  │ └─────┘ └─────┘ └─────┘ │ │  │                       │ │
│  └─────────────────────────┘ │  │ 🤖 Bot: Colors update │ │
│  📋 DirectLine Configuration │  │     instantly!        │ │
│  🎨 Chat Customization Panel │  └─────────────────────────┘ │
│  📤 Export JSON/HTML         │                             │
└─────────────────────────────────────────────────────────┘
Key Interface Sections
- Top: Theme Gallery with 6 professional theme cards
- Middle: DirectLine configuration (Mock vs Real connection)
- Bottom Left: Comprehensive chat customization options
- Bottom: Export buttons for JSON and HTML
- Right Panel: Live Bot Framework WebChat preview with real-time updates
Bot Framework WebChat JSON
The extension generates complete styleOptions for Microsoft Bot Framework WebChat:
{
  "accent": "#106EBE",
  "backgroundColor": "#FFFFFF",
  "botMessageBackground": "#F3F2F1",
  "userMessageBackground": "#0078D4",
  "primaryFont": "Segoe UI",
  "rootHeight": "100%",
  "hideUploadButton": true,
  "bubbleBackground": "#F3F2F1",
  "bubbleFromUserBackground": "#0078D4",
  "bubbleFromUserTextColor": "#FFFFFF",
  "sendBoxBackground": "#FFFFFF",
  "sendBoxButtonColor": "#0078D4",
  "sendBoxButtonColorOnFocus": "#106EBE",
  "sendBoxButtonColorOnHover": "#106EBE"
}
Production HTML
Complete HTML file with DirectLine integration:
- Bot Framework WebChat CDN integration
- DirectLine token endpoint configuration
- Production-ready styling
- Responsive design
Connecting to Your Copilot Studio Agent
The extension exports HTML with a placeholder token endpoint. Follow these steps to connect your exported interface to your actual Copilot Studio agent:
⚠️ Authentication Note: This method works for non-authenticated chatbots only. For enterprise/authenticated bots requiring user login, additional authentication setup is needed.
📖 Additional Reference: For more details on customizing Copilot Studio canvases, see the official Microsoft Learn documentation.
Step 1: Export Your Custom Design
- Design your interface in the Copilot Agent Toolkit
- Click "Export HTML" to download your styled chat interface
- Save the file (e.g.,
my-custom-chat.html)
Step 2: Get Your Copilot Studio Token Endpoint
- Open Copilot Studio (https://copilotstudio.microsoft.com)
- Select your Copilot from the list
- Navigate to Channels (in the main navigation menu)
- Create or select a channel:
- For websites: Choose "Custom website"
- For mobile apps: Choose "Mobile app"
- Copy the Token Endpoint URL
- Look for:
Token endpoint
- Format:
https://xxxxx.directline.botframework.com/v3/directline/tokens/generate
Step 3: Update the Exported HTML
- Open your exported HTML file in any text editor
- Find this line (around line 15-20):
const tokenEndpoint = '{INJECT_TOKENENDPOINT}';
- Replace the placeholder with your actual endpoint:
const tokenEndpoint = 'https://xxxxx.directline.botframework.com/v3/directline/tokens/generate';
Step 4: Test Your Connection
- Open the HTML file in a web browser
- Type a message in the chat interface
- Verify the connection:
- ✅ Success: Your Copilot responds with real answers
- ❌ Error: Check the browser console for connection issues
Step 5: Deploy to Your Website
- Upload the HTML file to your web server
- Include it in your website:
<!-- Embed as iframe -->
<iframe src="my-custom-chat.html" width="400" height="600"></iframe>

<!-- Or include the chat div directly -->
<div id="webchat" style="height: 600px; width: 400px;"></div>
Troubleshooting Common Issues
| Issue |
Solution |
| "Token endpoint not configured" |
Verify you replaced {INJECT_TOKENENDPOINT} with actual endpoint |
| CORS errors in browser console |
Ensure your domain is added to allowed origins in Copilot Studio |
| "Failed to fetch token" |
Check that the token endpoint URL is correct and accessible |
| Bot not responding |
Verify your Copilot is published and the channel is active |
Production Considerations
- Security: Token endpoints should only be used from trusted domains
- Performance: Consider caching tokens for better performance
- Monitoring: Monitor usage through Copilot Studio analytics
- Updates: Regenerate exports when you update themes or styling
Support
For questions or support, please open an issue on the GitHub repository.