Skip to content
| Marketplace
Sign in
Visual Studio Code>Other>RepoDog: Your Coding Service DogNew to Visual Studio Code? Get it now.
RepoDog: Your Coding Service Dog

RepoDog: Your Coding Service Dog

Denis Kazakov

|
487 installs
| (0) | Free
Use GPT3.5, or GPT4 with your codebase context inside the IDE for AI assistance. RepoDog helps add the right context to your questions (current file context, repository context), so you don't need to endlessly copy-paste code into ChatGPT.
Installation
Launch VS Code Quick Open (Ctrl+P), paste the following command, and press enter.
Copied to clipboard
More Info

ChatGPT and GPT4 extension for VSCode

This Visual Studio Code extension allows you to use the ChatGPT API to generate code or natural language responses from OpenAI's ChatGPT or GPT4 to your questions, right within the editor.

Supercharge your productivity with AI assistance for code generation, question answering, refactoring, bug detection, and more. 🚀✨

This particular extension in particular helps manage codebase context very explicitely. For language model to be helpful it needs to know what you're working on. If you had the experience of pasting your code into ChatGPT, RepoDog will do that automatically behind the scenes. You can easily add current file and/or relevant snippets from your repository as context to a GPT request.

Links:

  • Visual Studio Marketplace
  • Built on top of: timkmecl's chatgpt-vscode

Refactoring selected code using chatGPT

Features

  • 💡 Ask questions or use code snippets from the editor to query ChatGPT via an input box in the sidebar
  • 💬 Ask follow-up questions to the response (conversation context is maintained)
  • 📝 Insert code snippets from the AI's response into the active editor by clicking on them
  • 📖 Add context to question from current file and/or entire repository. This helps the model understand your question/request better in the context of your codebase.
  • 🖱️ Right click on a code selection and run one of the context menu shortcuts
    • automatically write documentation for your code
    • explain the selected code
    • refactor or optimize it
    • find problems with it
  • 💻 View ChatGPT's responses in a panel next to the editor
  • 🚀 See the response as it is being generated in real time
  • Paste-on-click to copy the generated code into your repository.
  • Quickly switch models from GPT 3.5 to GPT 4 if you want a more robust model.

Setup

Getting API key:

To use this extension, you will need an API key from OpenAI. To obtain one, follow these steps:
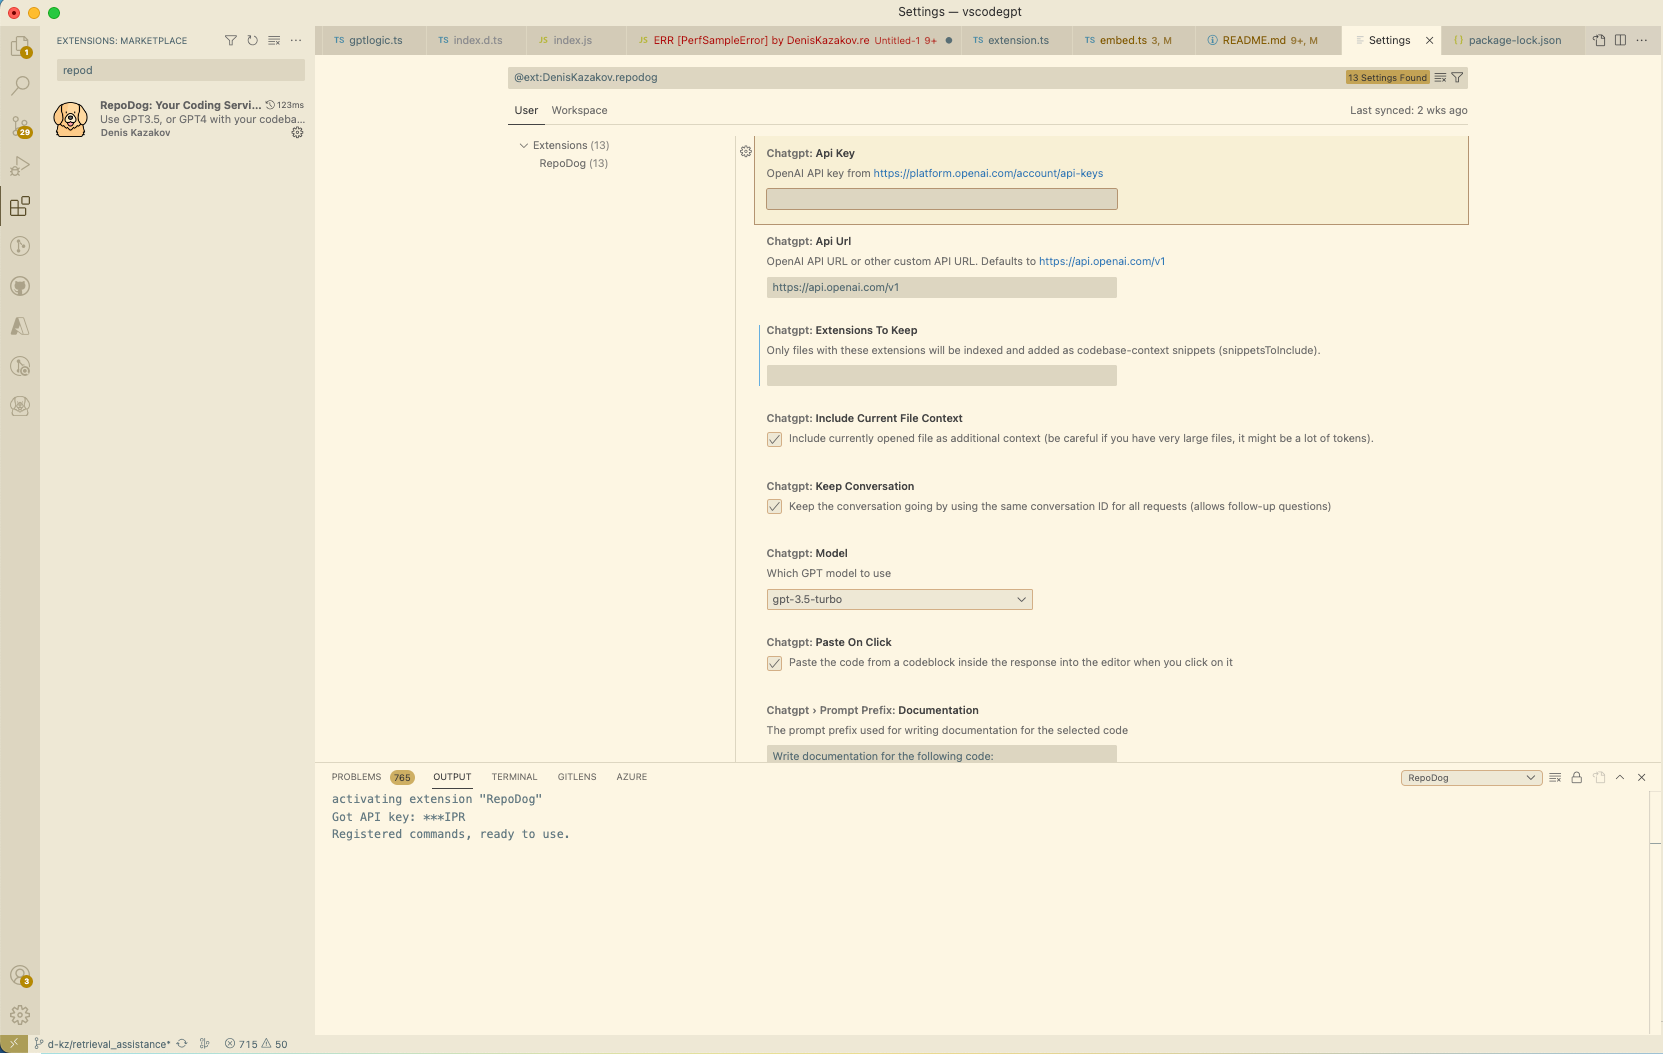
  1. Go to OpenAI's website. If you don't have an account, you will need to create one or sign up using your Google or Microsoft account.
  2. Click on the Create new secret key button and copy it.

Paste API key in RepoDog settings:

After installing the extensions from VSCode marketplace.

  1. Paste the key into the API Key field in the extension settings (Code -> Settings -> Extensions -> (right click RepoDog extension) -> Extensions Settings).
  2. In the RepoDog section, enter your API key in the top field Paste your OpenAI API key here

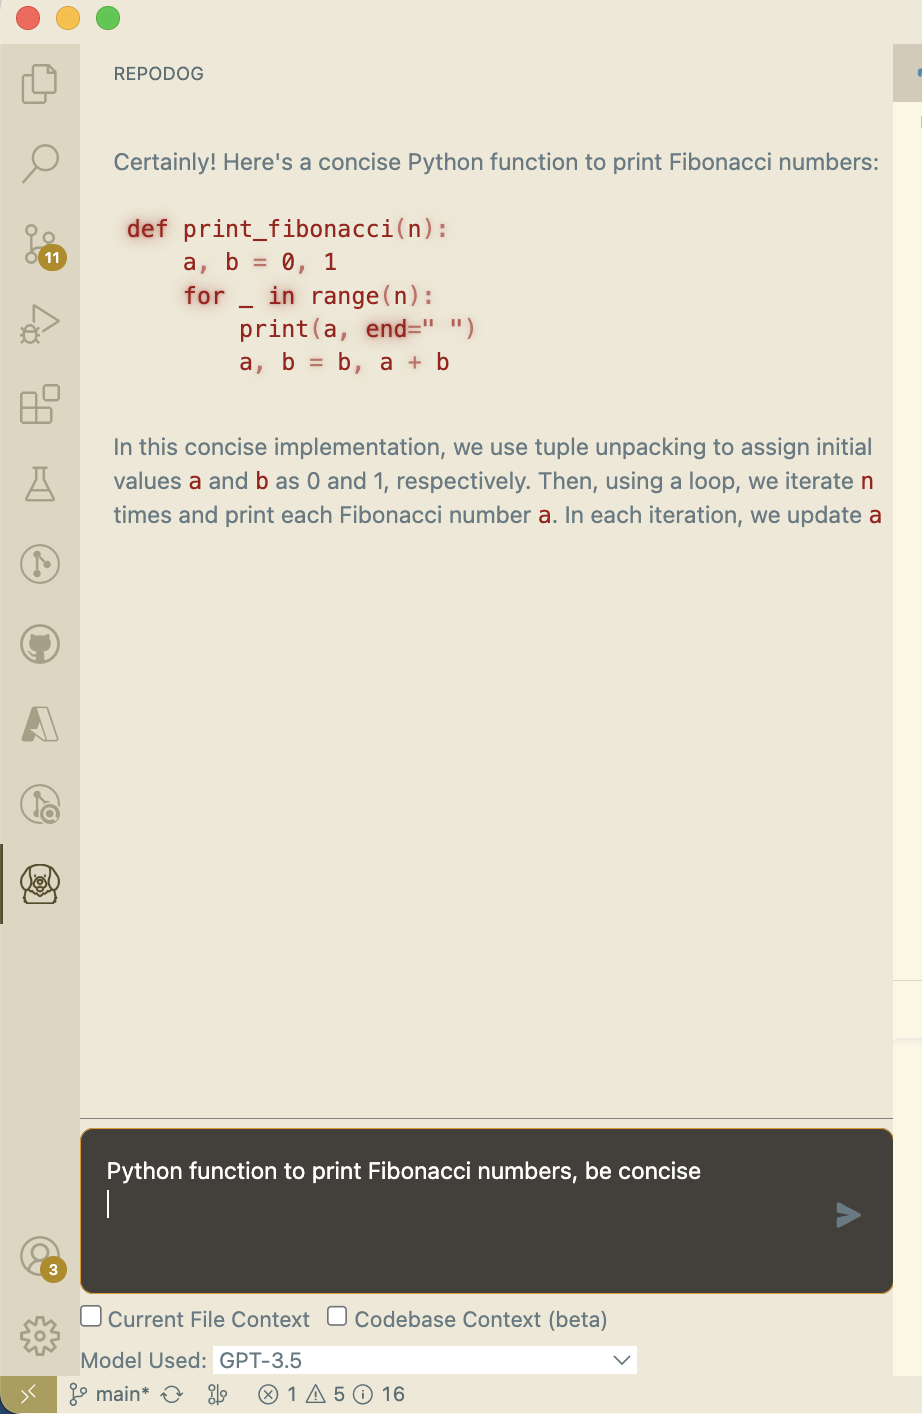
After completing these steps, the extension should be ready to use. If it's not loading, try restarting VSCode.

Building & Running (relevant to developers only)

To build the extension from source, clone the repository and run npm install to install the dependencies. You have to change some code in chatgpt module because VSCode runtime does not support fetch. Open node_modules/chatgpt/dist/index.js and add the following code at the top of the file:

import fetch from 'node-fetch'

Then remove the following lines (around line 20):

// src/fetch.ts
var fetch = globalThis.fetch;

You also need to replace the following part near the top of the file:

// src/tokenizer.ts
import { encoding_for_model } from "@dqbd/tiktoken";
var tokenizer = encoding_for_model("text-davinci-003");
function encode(input) {
  return tokenizer.encode(input);
}

with

// src/tokenizer.ts
import GPT3TokenizerImport from "gpt3-tokenizer";
var GPT3Tokenizer = typeof GPT3TokenizerImport === "function" ? GPT3TokenizerImport : GPT3TokenizerImport.default;
var tokenizer = new GPT3Tokenizer({ type: "gpt3" });
function encode(input) {
  return tokenizer.encode(input).bpe;
}

due to the fact that the @dqbd/tiktoken module is causing problems with the VSCode runtime. Delete node_modules/@dqbd/tiktoken directory as well. If you know how to fix this, please let me know.

In file node_modules/chatgpt/build/index.d.ts, change line 1 to

import * as Keyv from 'keyv';

and line 4 to

type FetchFn = any;

Features & Settings

Basic Request

You can open the side panel and ask any request to GPT model. Adding file and codebase context

Adding Context

To add currently opened file as context to your GPT request/question, simply check the checkmark in lower left cornet of the extension tab.
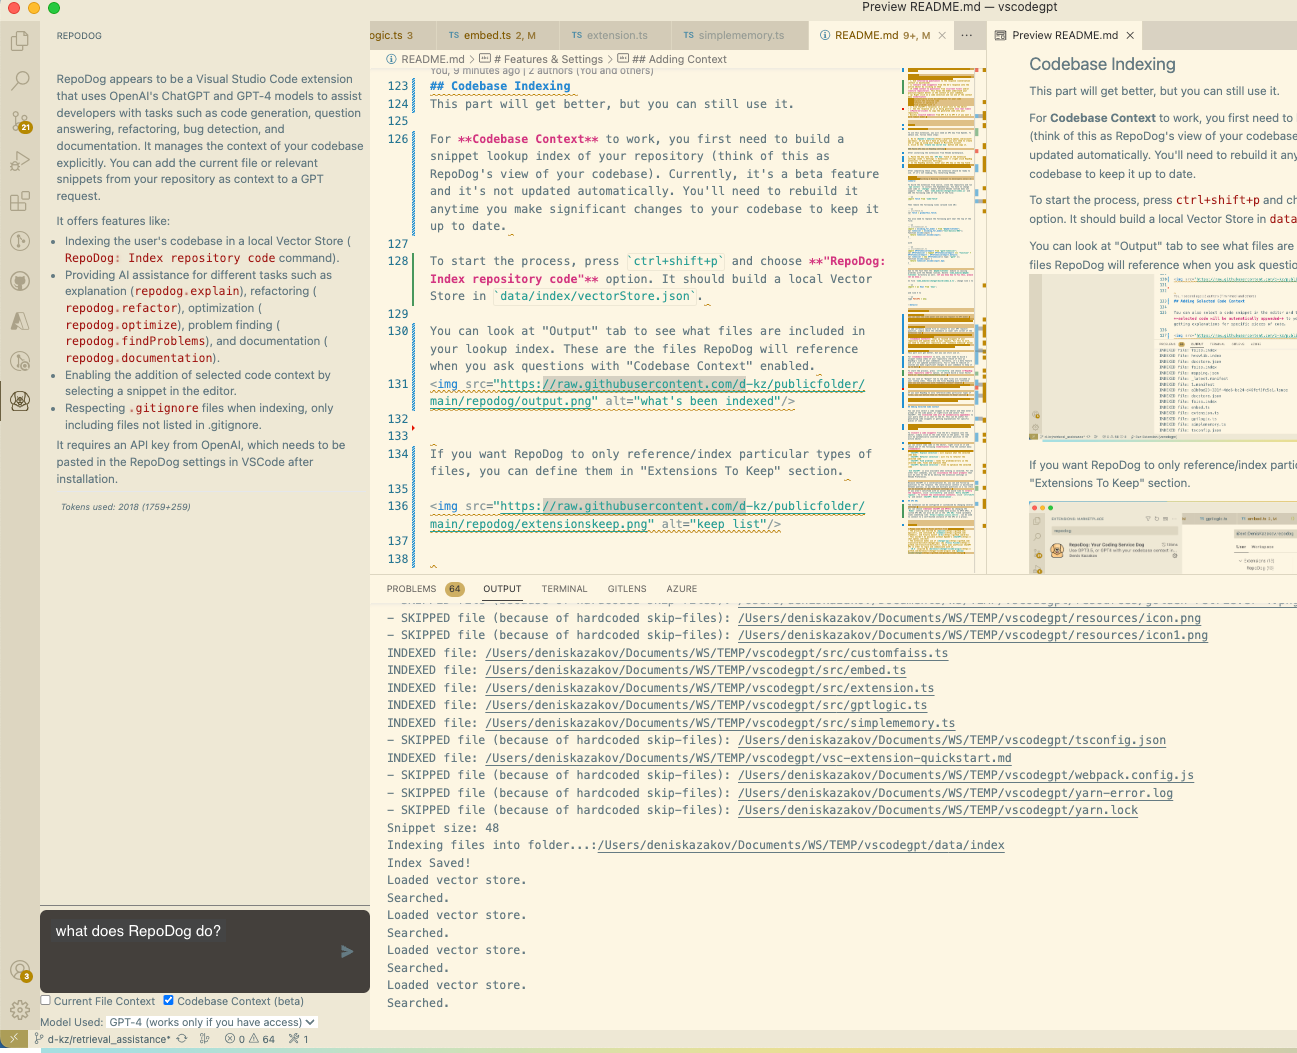
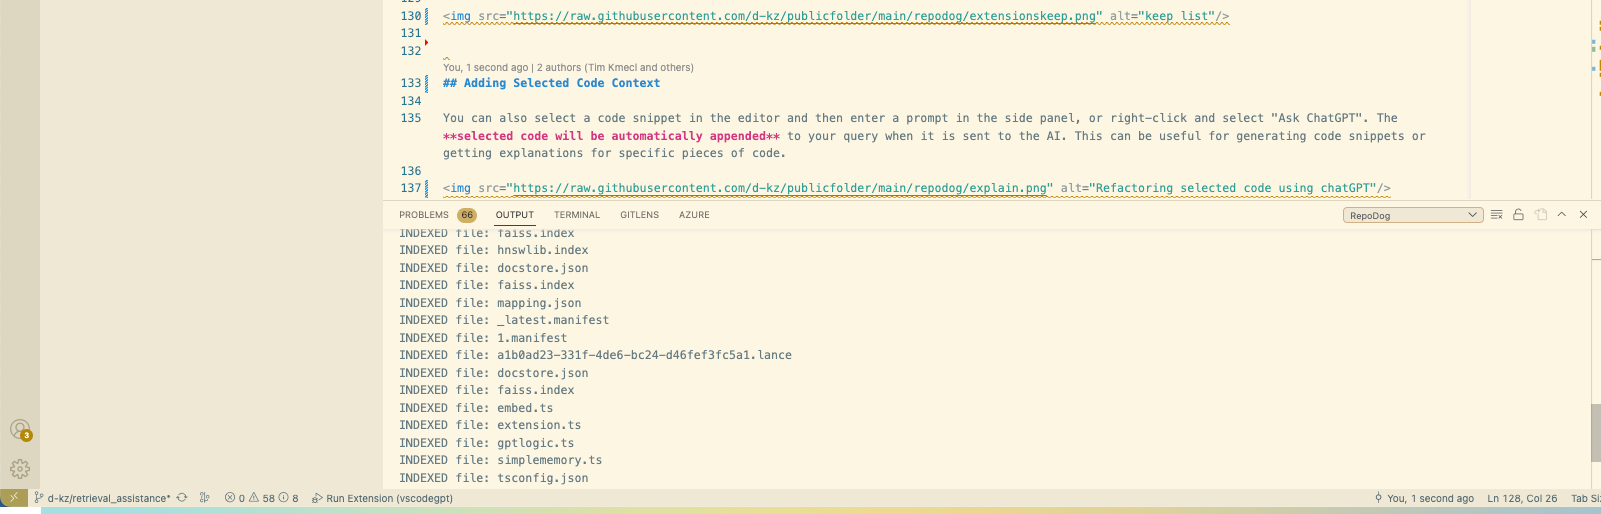
  • Current File Context: appends as much of the current file as fits into the request.
  • Codebase Context: looks up related snippets of your repository and appends them to your request. For this to work, you need to index your repository (see "Cobedase Indexing" below)
Codebase context

Codebase Indexing

This part will get better, but you can still use it.

For Codebase Context to work, you first need to build a snippet lookup index of your repository (think of this as RepoDog's view of your codebase). Currently, it's a beta feature and it's not updated automatically. You'll need to rebuild it anytime you make significant changes to your codebase to keep it up to date.

To start the process, press ctrl+shift+p and choose "RepoDog: Index repository code" option. It should build a local Vector Store in .repodog/index/vectorStore.json.

You can look at "Output" tab to see what files are included in your lookup index. These are the files RepoDog will reference when you ask questions with "Codebase Context" enabled. what's been indexed

If you want RepoDog to only reference/index particular types of files, you can define them in "Extensions To Keep" section.
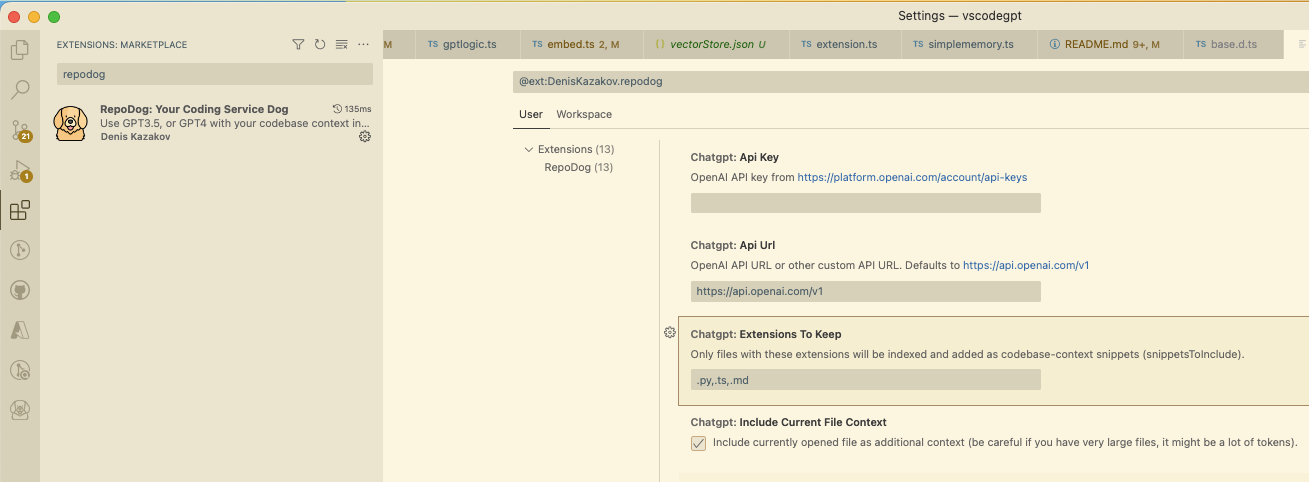
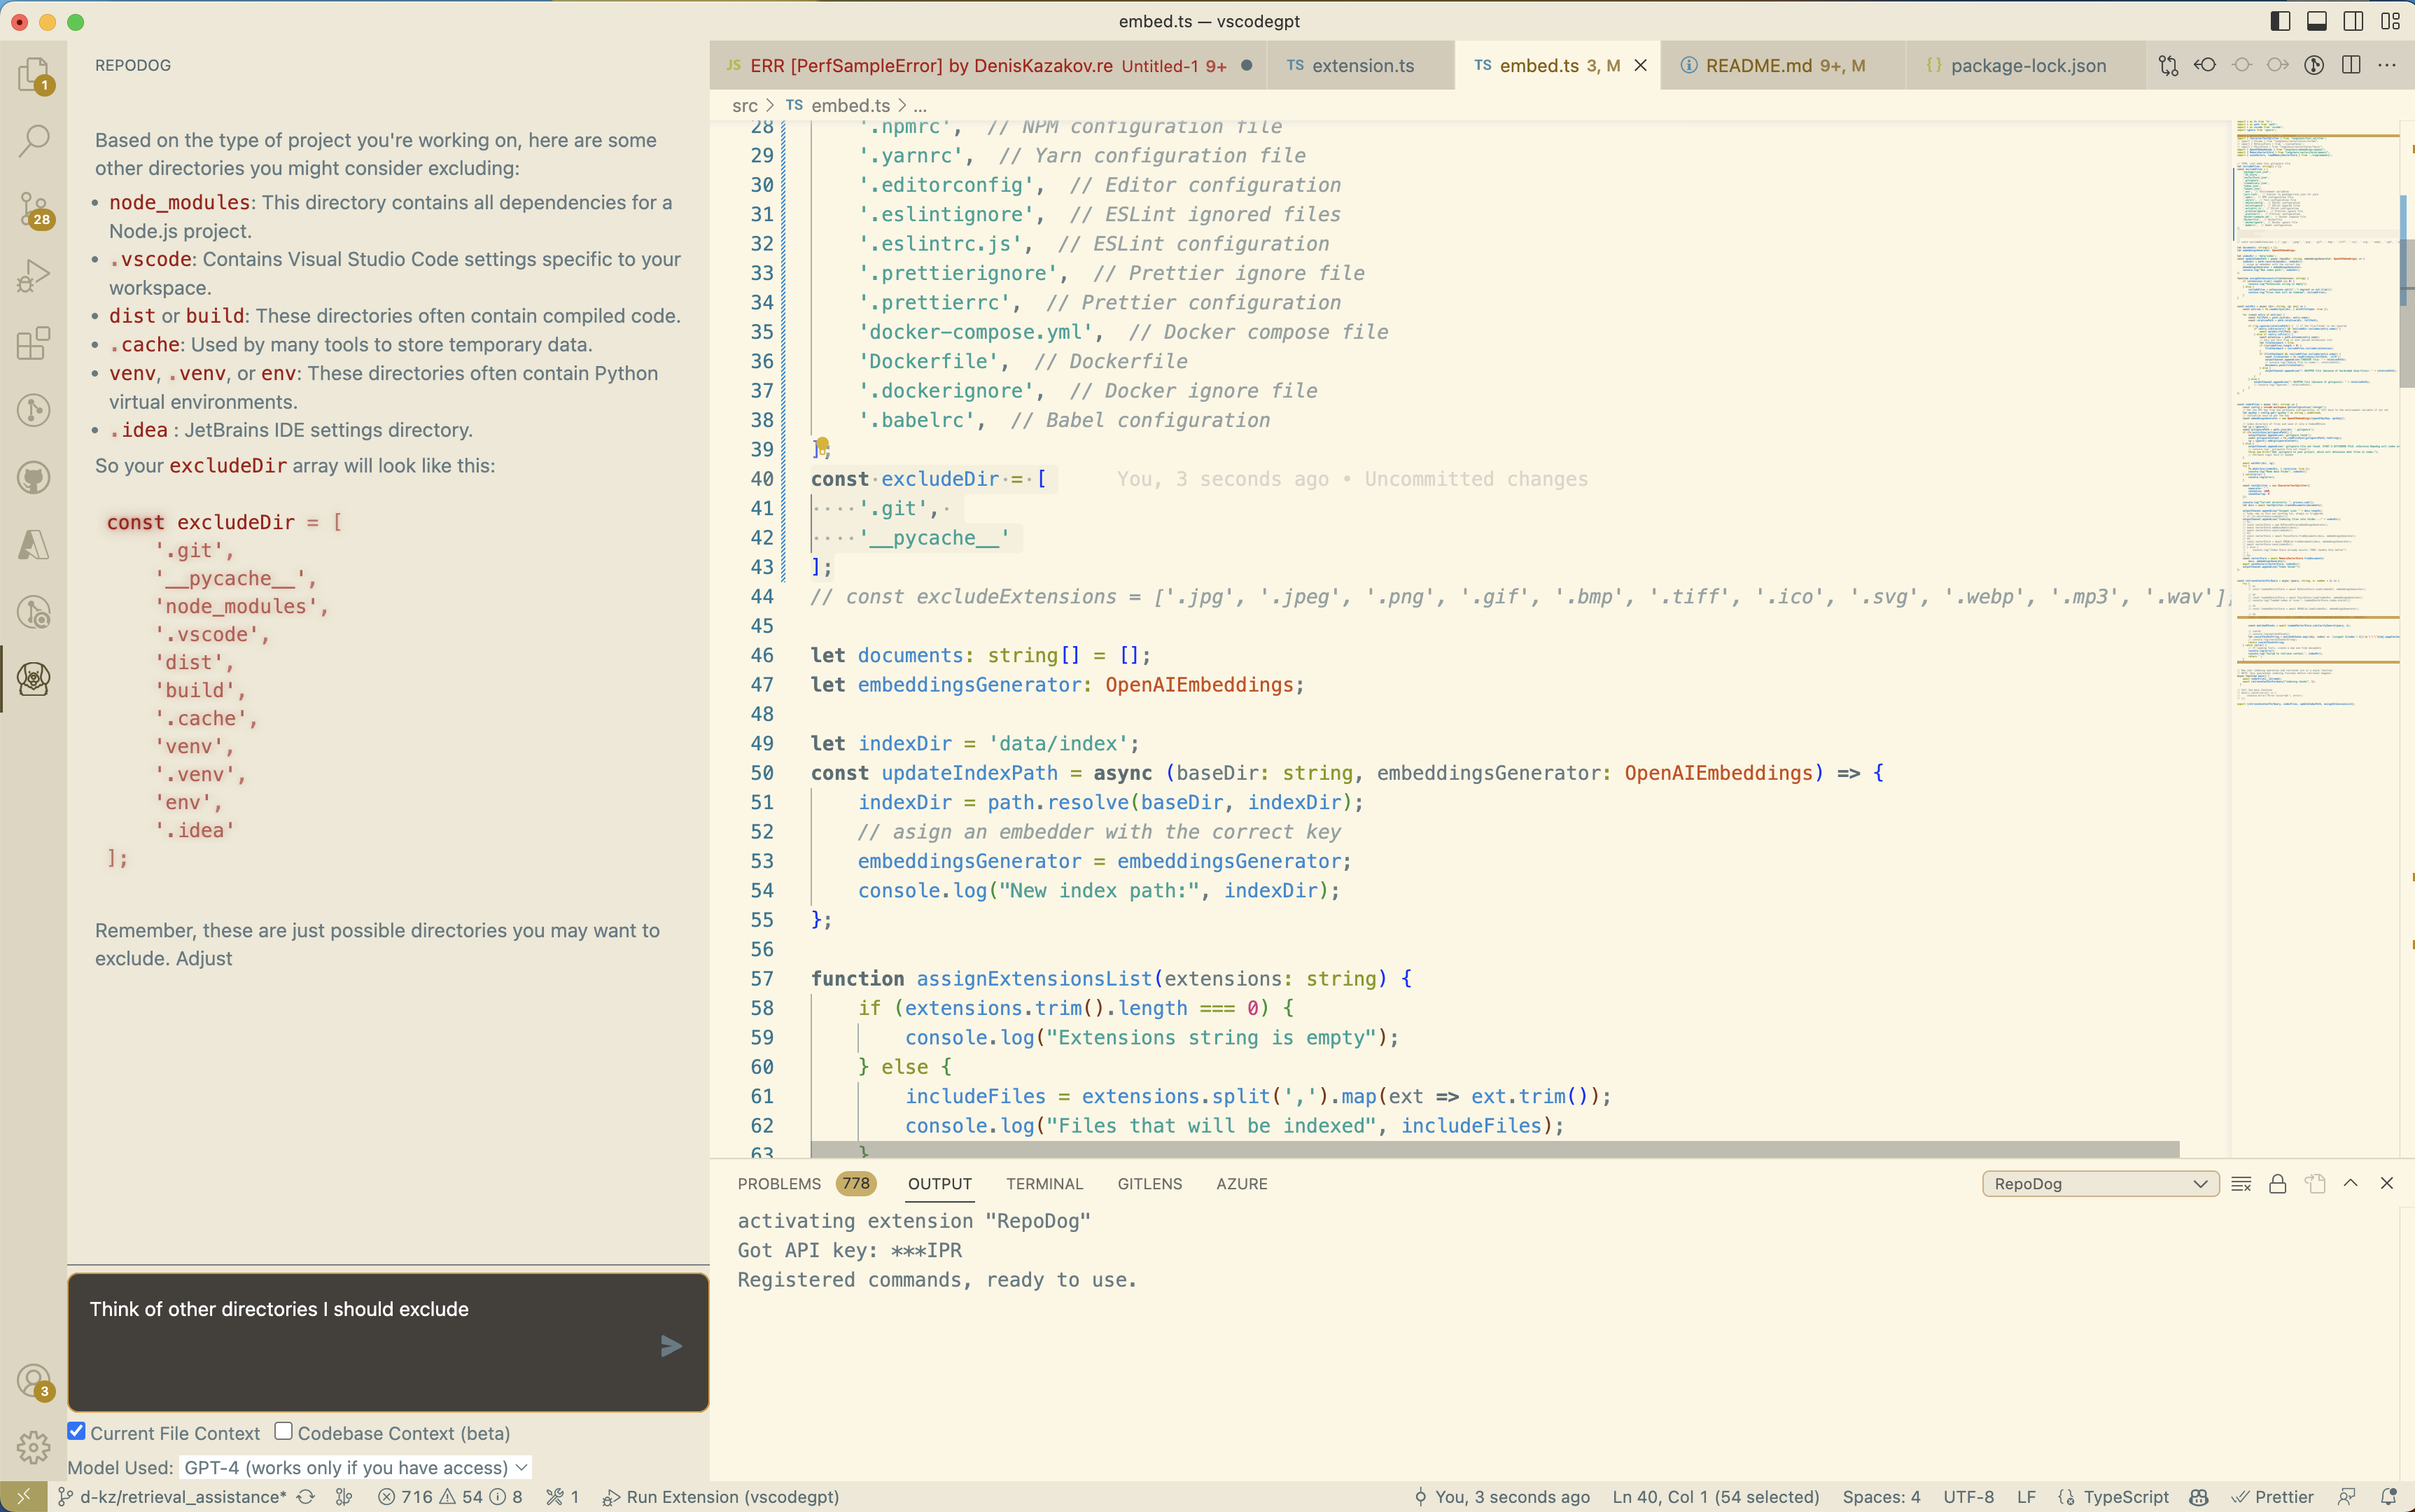
keep list

Adding Selected Code Context

You can also select a code snippet in the editor and then enter a prompt in the side panel, or right-click and select "Ask ChatGPT". The selected code will be automatically appended to your query when it is sent to the AI. This can be useful for generating code snippets or getting explanations for specific pieces of code.

Refactoring selected code using chatGPT

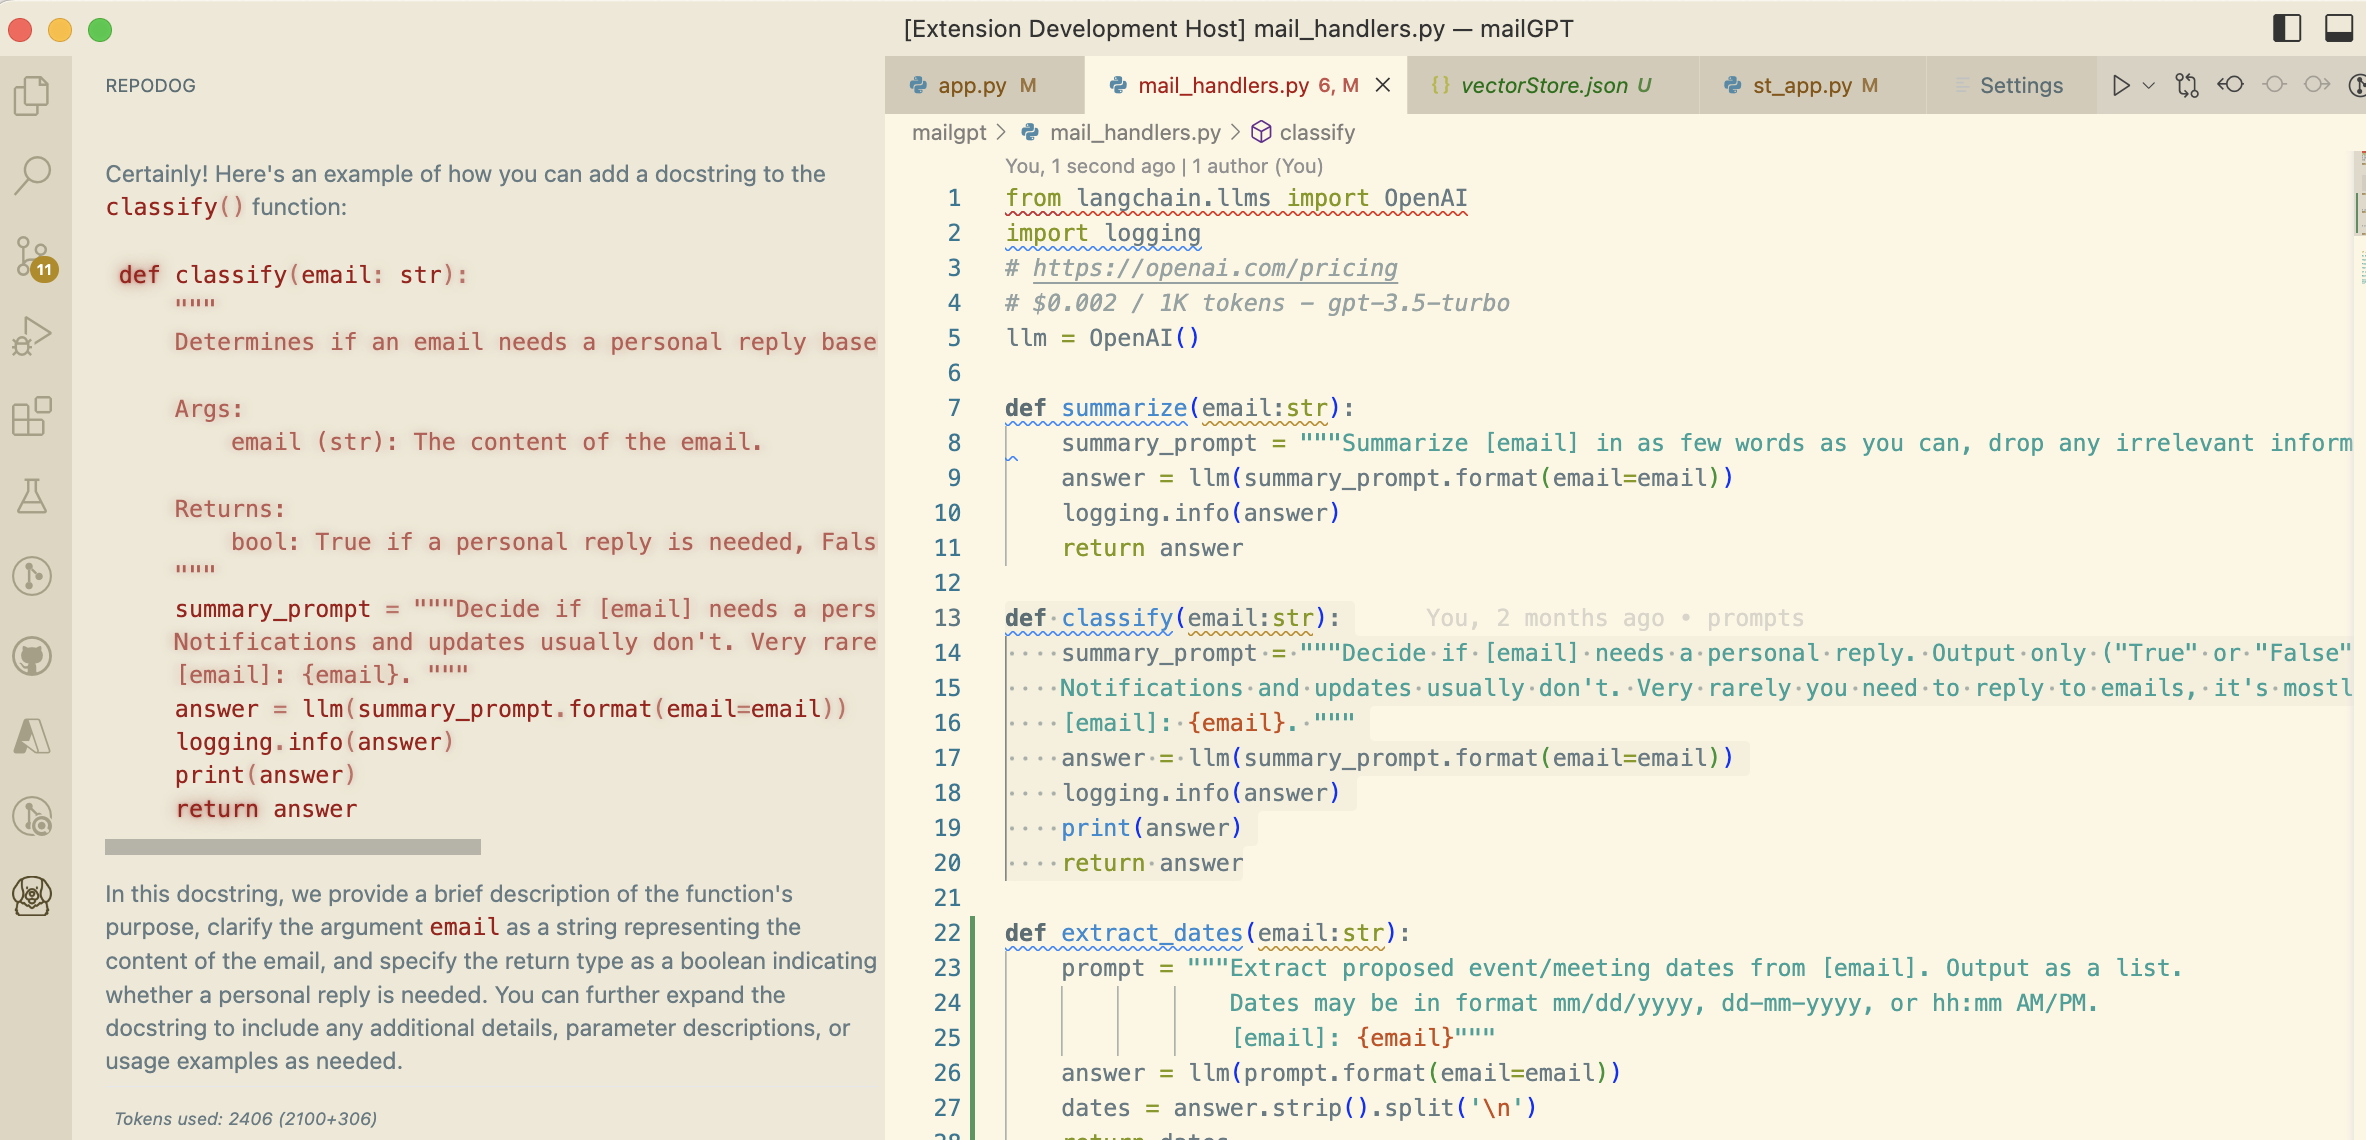
To insert a code snippet from the AI's response into the editor, simply click on the code block in the panel. The code will be automatically inserted at the cursor position in the active editor.

Commands & Shortcuts

You can select some code in the editor, right click on it and choose one of the following shortcuts from the context menu: Commands:

  • Ask ChatGPT: will provide a prompt for you to enter any query
  • ChatGPT: Explain selection: will explain what the selected code does
  • ChatGPT: Refactor selection: will try to refactor the selected code
  • ChatGPT: Find problems: looks for problems/errors in the selected code, fixes and explains them
  • ChatGPT: Optimize selection: tries to optimize the selected code

Ask ChatGPT is also available when nothing is selected. For the other four commands, you can customize the exact prompt that will be sent to the AI by editing the extension settings in VSCode Preferences.

Because ChatGPT is a conversational AI, you can ask follow-up questions to the response. The conversation context is maintained between queries, so you can ask multiple questions in a row (this can be disabled in the extension settings.). If you aren't satisfied with an answer and would like to retry the request, click ctrl+shift+p and select Retry ChatGPT request. To reset the conversation context, click ctrl+shift+p and select ChatGPT: Reset Conversation.

API URL

The extension can be configured or customized by changing several settings. You can choose between ChatGPT and GPT4 by changing the Model setting (only if you already have access to GPT4 API). A custom API URL can also be set in the API URL field (probably looks something like https://openai.xxxxxx.net/v1, can be used to connect to a self-hosted instance of the API or a proxy).

Credits

  • Puppy icon made by Pixel perfect from www.flaticon.com
  • The project was started by mpociot, and continued by timkmecl, and finally myself d-kz
  • This wouldn't be possible without OpenAI's ChatGPT
  • The extension makes use of chatgpt-api (by Travis Fischer), which uses unofficial ChatGPT API in order to login and communicate with it.
  • v0.3 inspired by barnesoir/chatgpt-vscode-plugin and gencay/vscode-chatgpt
  • Contact us
  • Jobs
  • Privacy
  • Manage cookies
  • Terms of use
  • Trademarks
© 2025 Microsoft