VS Code Kingfisher
VS Code Kingfisher on VS Marketplace
Colour your VS Code title bar per workspace — without touching .vscode/settings.json. Ideal when you have multiple VS Code instances and don't want to share personal colour preferences with the whole team.
Inspired by vscode-peacock, but Peacock can only work by modifying the workspace .vscode/settings.json (issue). Teams often share that file, so personal colour preferences don't belong there.
How it works
Kingfisher's approach has a trade-off. Since we can't use workspace settings,
Kingfisher stores colours in VS Code's internal extension storage (never version-controlled) and writes to your personal user settings only. The trade-off: workbench.colorCustomizations is a global user setting, all open VS Code windows share the same colour at any moment. Kingfisher mitigates this: when a window gains focus it applies its colour, and when it loses focus it clears the colour back to your theme default.
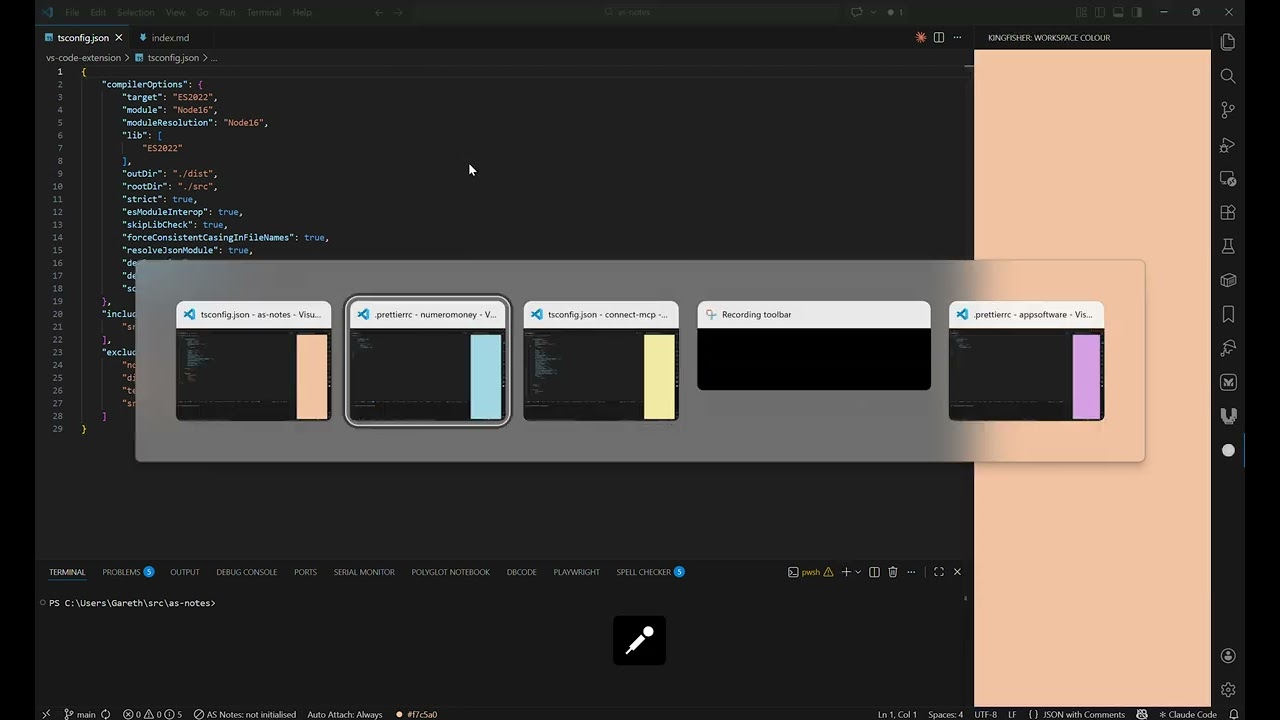
A key requirement is to be able to identify windows by colour in Alt + Tab. If the colour reverts when a window looses focus, then this doesn't work. This extension has a work-around - a sidebar panel also opens automatically on blur, showing the workspace colour as a full-height background — visible in Alt + Tab thumbnails even when the window is inactive. On refocus the sidebar closes and Explorer is restored.
Note: On refocus Kingfisher always restores the Explorer sidebar — VS Code's API does not expose which sidebar view was previously active. If you need simultaneous per-window colouring or the temporary sidebar doesn't work for you, consider vscode-peacock.
Quick Demo
Commands
| Command |
Description |
| Kingfisher: Set Title Bar Colour |
Choose from presets, use the colour picker, or enter a custom hex value (#rrggbb) |
| Kingfisher: Clear Title Bar Colour |
Restore the default theme colours for this workspace |
Open the command palette (Ctrl+Shift+P / Cmd+Shift+P) and search for "Kingfisher".
You can also click the Kingfisher indicator in the status bar to open the Set Title Bar Colour menu.
The Kingfisher sidebar panel opens automatically when a window loses focus, displaying your workspace colour for easy identification in Alt+Tab. When focus returns, the panel closes and Explorer is restored. You can also manually open it at any time by clicking the Kingfisher icon in the activity bar.
Why "Kingfisher"?
In the UK, the Common Kingfisher is iconic for its brilliant electric blue and orange, yet it’s a small, hardworking bird that stays low to the water and mind its own business. It doesn't "strut"—it just performs its task with precision.
The Vibe: It’s striking and colorful, but it represents speed and utility rather than vanity.
The Metaphor: Just as a Kingfisher dives into a specific spot, your extension "dives" into a specific workspace to apply a flash of color, then vanishes when not needed.
The Aesthetic: Kingfisher blues and oranges are naturally high-contrast, which is perfect for distinguishing between window title bars.
Kingfishers, we concede however, are just not quite as fancy.
Requirements
Moving from VS Code Peacock
If you have VS Code Peacock settings, or workbench.colorCustomizations in .vscode/settings.json, you may want to remove them to ensure that this extension works as it should.
"workbench.colorCustomizations": {
    "activityBar.activeBackground": "#0057b3",
    "activityBar.background": "#0057b3",
    "activityBar.foreground": "#e7e7e7",
    "activityBar.inactiveForeground": "#e7e7e799",
    "activityBarBadge.background": "#ff409d",
    "activityBarBadge.foreground": "#15202b",
    "commandCenter.border": "#e7e7e799",
    "sash.hoverBorder": "#0057b3",
    "statusBar.background": "#003e80",
    "statusBar.foreground": "#e7e7e7",
    "statusBarItem.hoverBackground": "#0057b3",
    "statusBarItem.remoteBackground": "#003e80",
    "statusBarItem.remoteForeground": "#e7e7e7",
    "titleBar.activeBackground": "#003e80",
    "titleBar.activeForeground": "#e7e7e7",
    "titleBar.inactiveBackground": "#003e8099",
    "titleBar.inactiveForeground": "#e7e7e799"
},
"peacock.color": "#003e80"
You may also need to clean up user settings:
- Windows:
%APPDATA%\Code\User\settings.json
- macOS:
$HOME/Library/Application Support/Code/User/settings.json
- Linux:
$HOME/.config/Code/User/settings.json
Requirements
Publishing
Releases are published to the VS Code Marketplace manually, then a GitHub Release is created automatically when a version tag is pushed.
Step 1 - bump the version
Update version in package.json and add an entry to CHANGELOG.md.
Step 2 - publish to the VS Code Marketplace
npm run build
npx @vscode/vsce package
npx @vscode/vsce login appsoftwareltd   # enter PAT token if auth expired
npx @vscode/vsce publish
Step 3 - tag and push
git add .
git commit -m "Release v0.1.8"  # change version
git tag v0.1.8                  # change version
git push origin main --tags
Pushing the tag triggers the Release workflow, which creates a GitHub Release automatically with auto-generated release notes and the VS Code Marketplace install link.
