XAP AssistantAI chat participant for writing correct XAP SDK code Installation Launch VS Code Quick Open ( Ctrl+P), paste the following command, and press enter.Copied to clipboard |
XAP AssistantYour AI coding partner for the XAP SDK — understands projects, helps write code, and deploys to PiXP, all from VS Code Chat. Quick Start
No setup, no config files — the assistant is ready to use immediately.
FeaturesChat with
|
| What you want to do | Example |
|---|---|
| Understand a project | @xap ./MyExperiment help me understand this project |
| Ask questions | @xap ./MyExperiment explain how many remote calls are in this workflow |
| Fix a bug | @xap ./MyExperiment fix the null check bug in MyPlugin.cs |
| Implement a feature | @xap ./MyExperiment Add a new caching plugin for the response path |
| Change project config | @xap ./MyExperiment please enable experiment incremental load |
| Reference ADO resources | @xap ./MyExperiment refer to https://msasg.visualstudio.com/WebXT/_git/Repo?path=/xxxx to implement a new feature, the details: ... |
| Build & deploy | @xap build and upload ./MyExperiment to pixp |
| Show help | @xap /help |
Smart Workflow
The assistant adapts its workflow to the task complexity:
- Simple changes (bug fix, config tweak, small refactor) — implements directly
- Complex features (new plugin, multi-file changes) — creates a design document for your review first, then implements after your approval
- Questions — answers using project analysis and built-in XAP SDK knowledge
- Build & deploy — builds the project and uploads experiments to PiXP
XAP SDK Expertise
The assistant understands XAP SDK conventions — plugins, workflows, schemas, build configuration, and common pitfalls. It generates XAP-aware code that follows established patterns, reducing the amount of manual correction needed.
Azure DevOps Integration
The assistant can reference Azure DevOps resources directly from your prompts:
- Refer to ADO files, commits, and pull requests by URL
- Browse and search code across ADO repositories
- Use ADO context to inform implementation decisions
Full Coding Agent
Beyond answering questions, the assistant can take action in your workspace:
- Read, edit, and create files
- Run builds, tests, and deployments
- Search code and diagnose errors
All actions are visible in the chat, so you stay in control.
Demo: A Developer's Workflow
Here's how a typical development session looks with @xap:
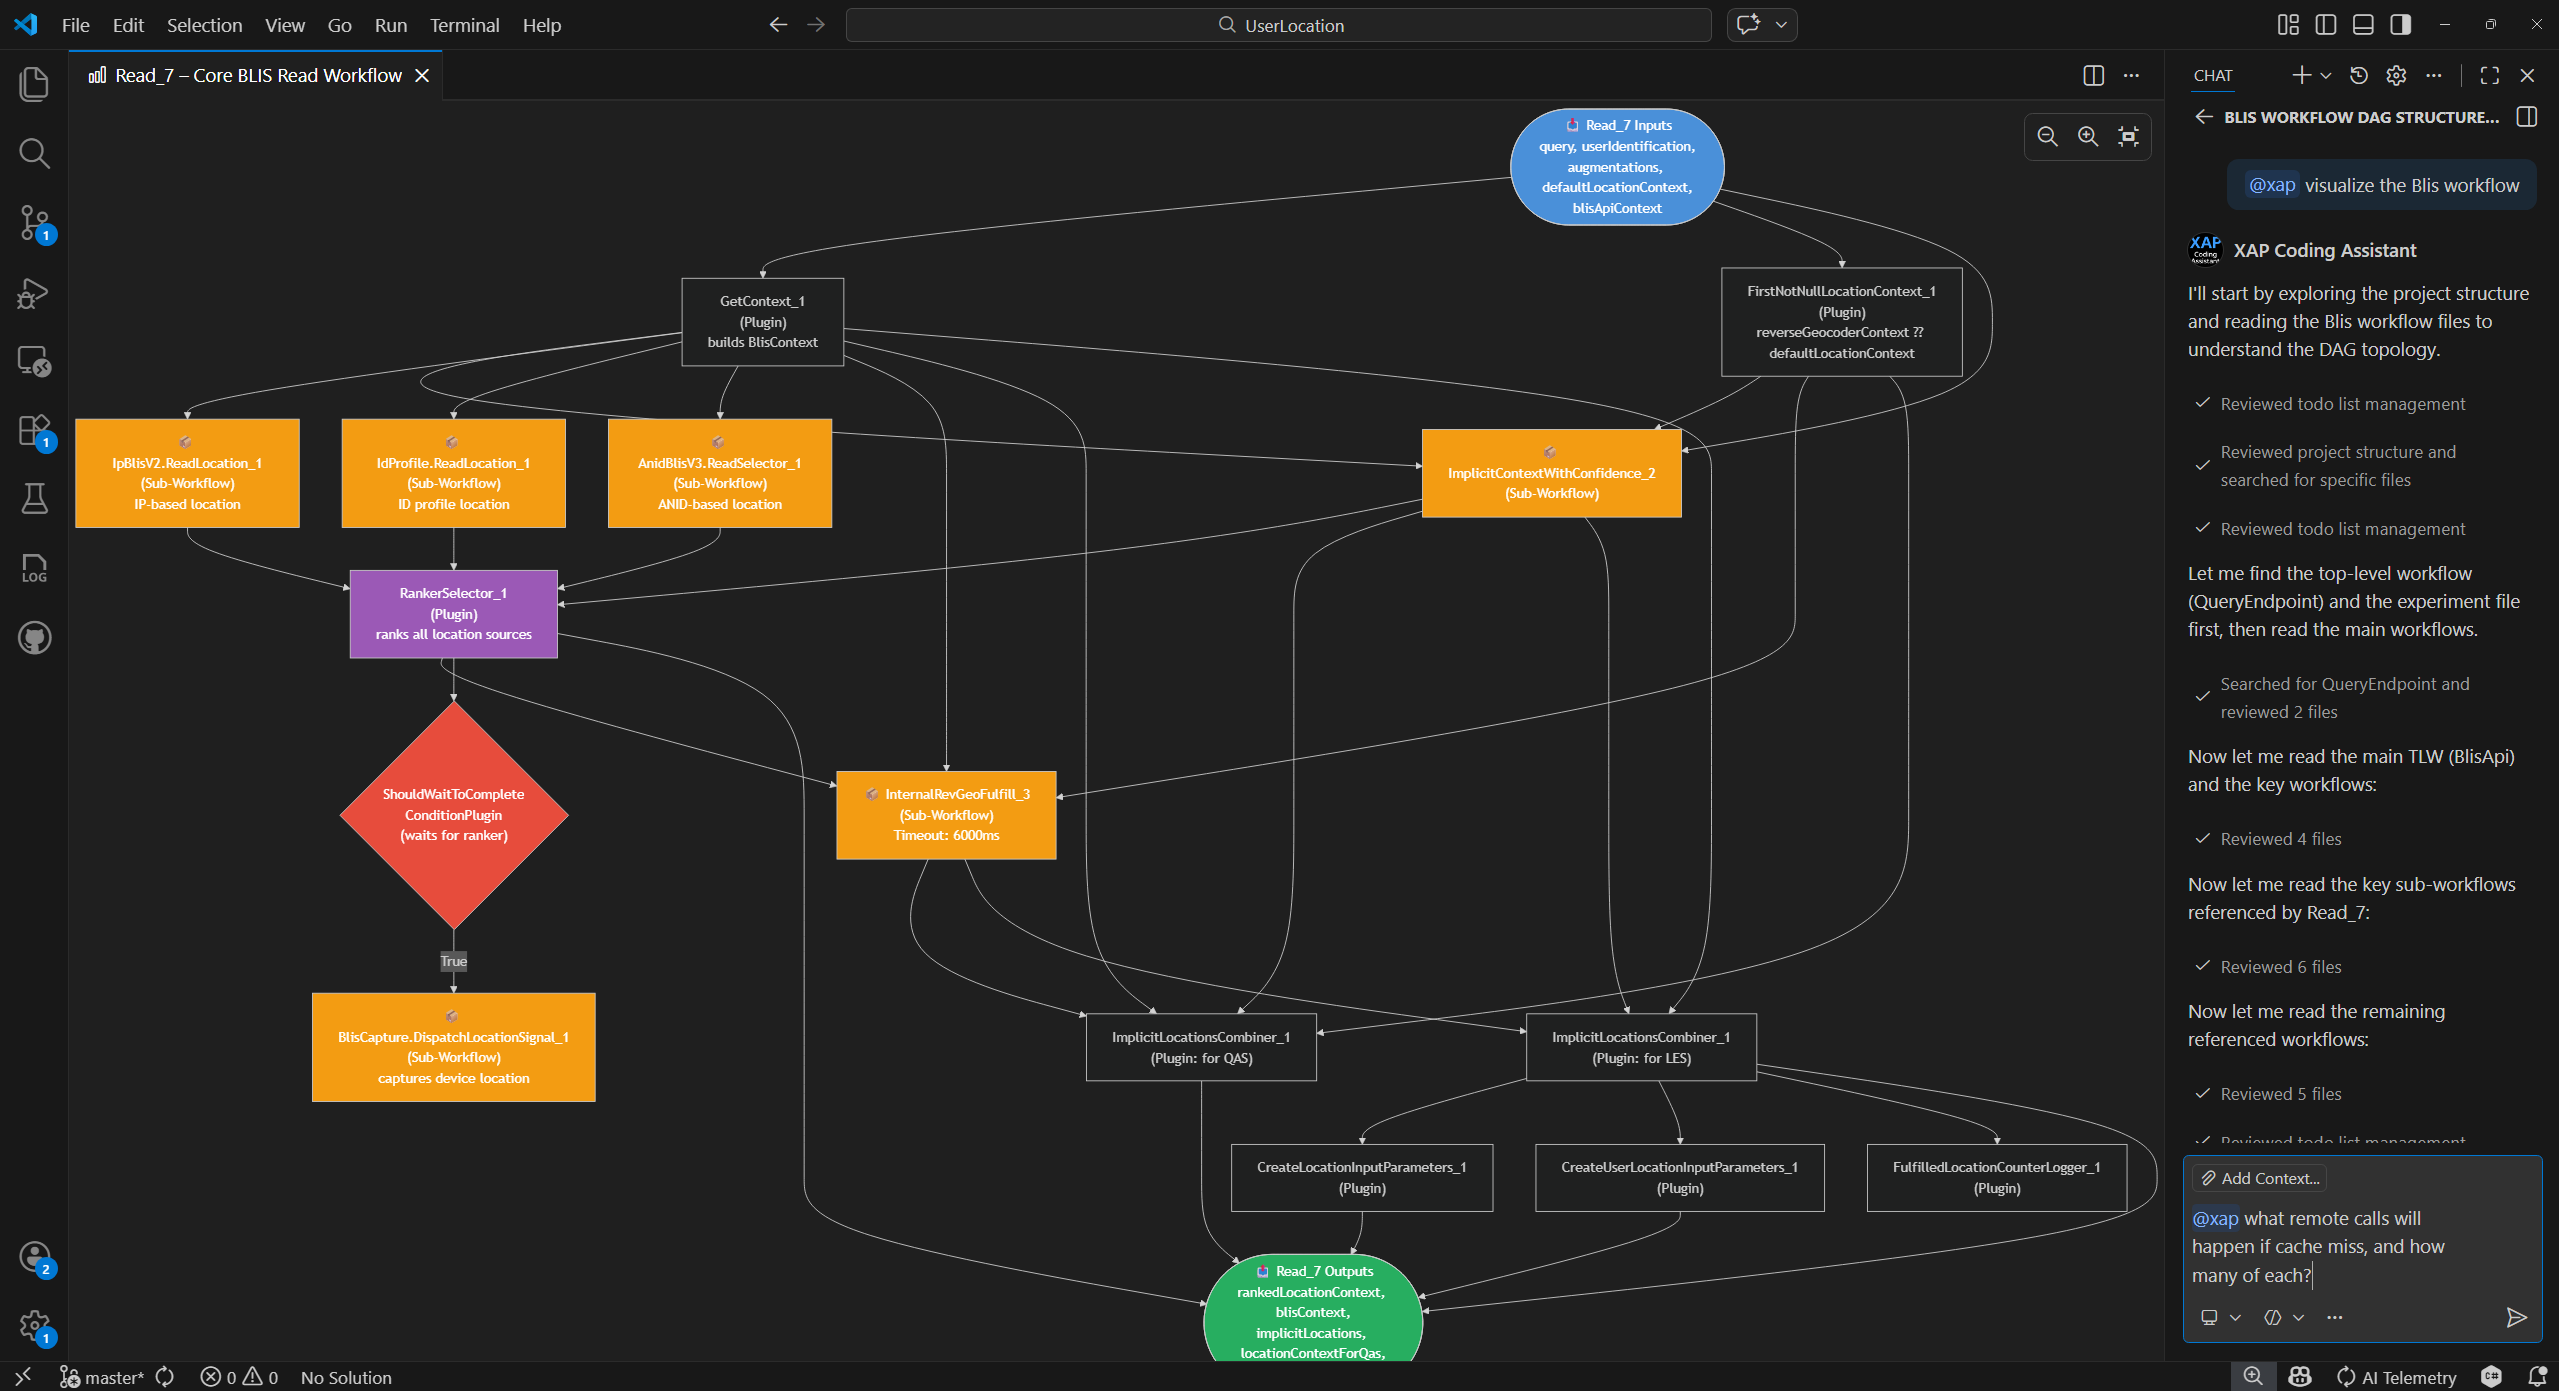
Step 1 — Understand an unfamiliar project
You've been assigned to work on the Crisp experiment — a large XAP solution you haven't seen before. Point @xap at the solution file and ask it to understand the project. The assistant reads the solution structure, experiment files, workflows, plugins, and schemas step by step:
Input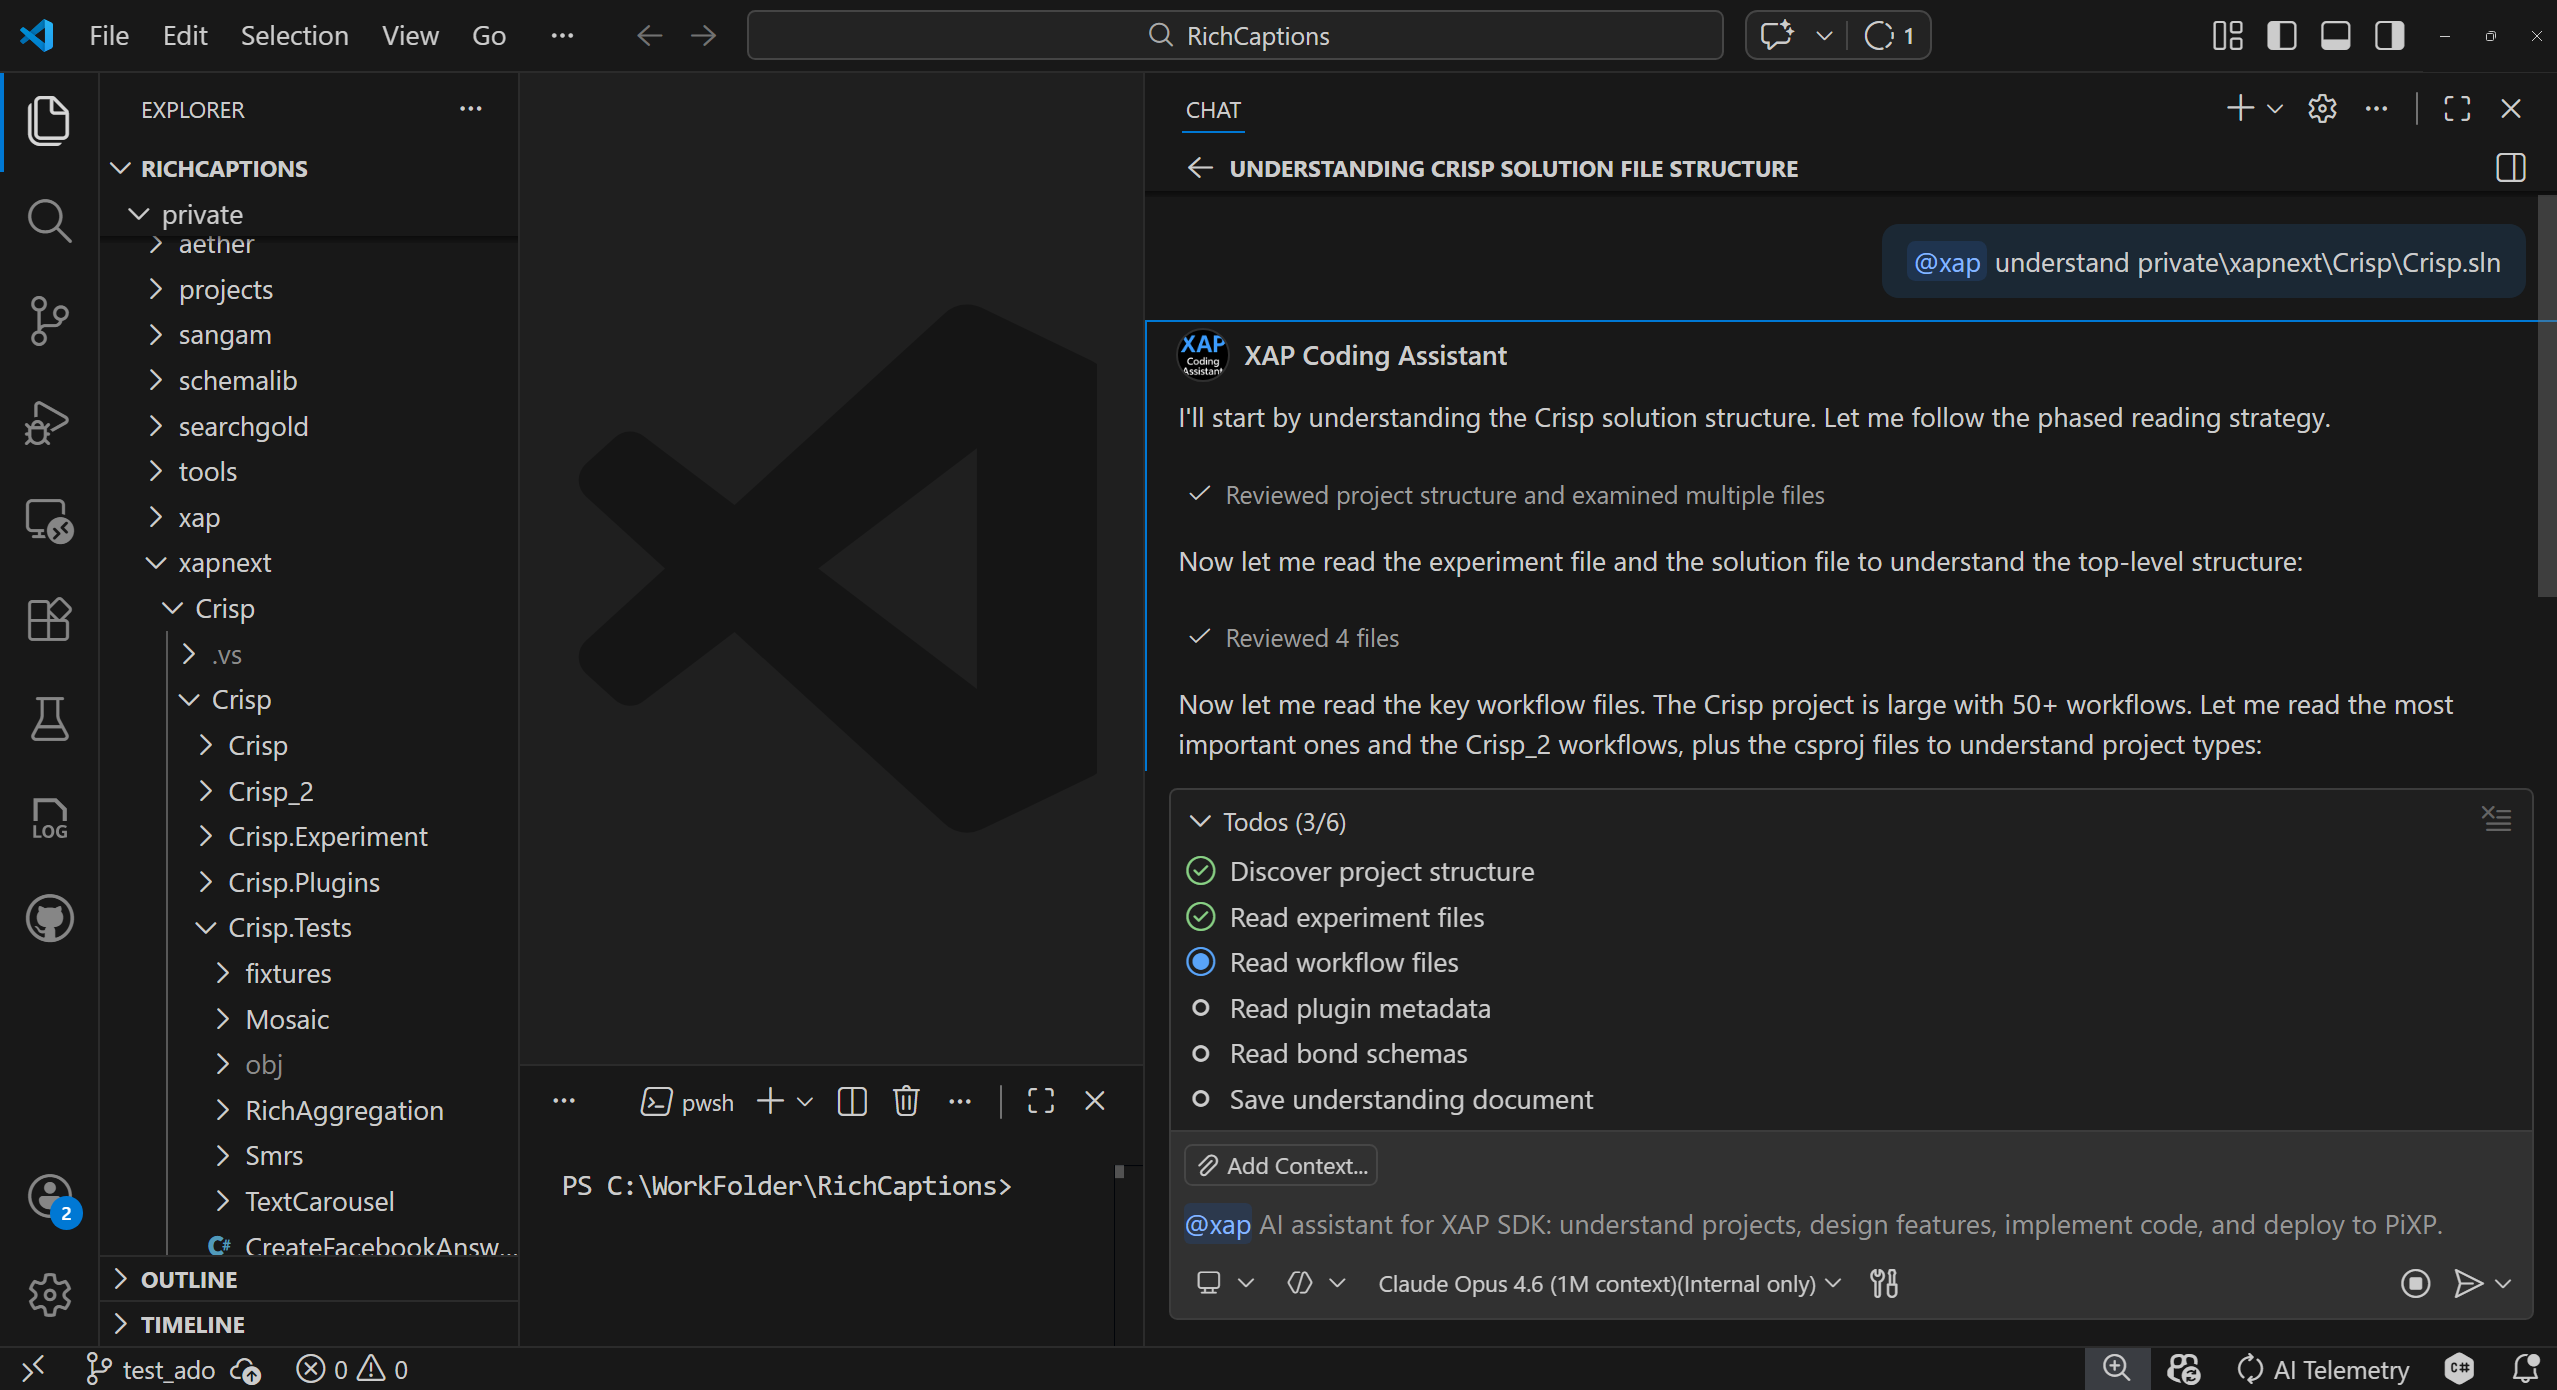 |
Output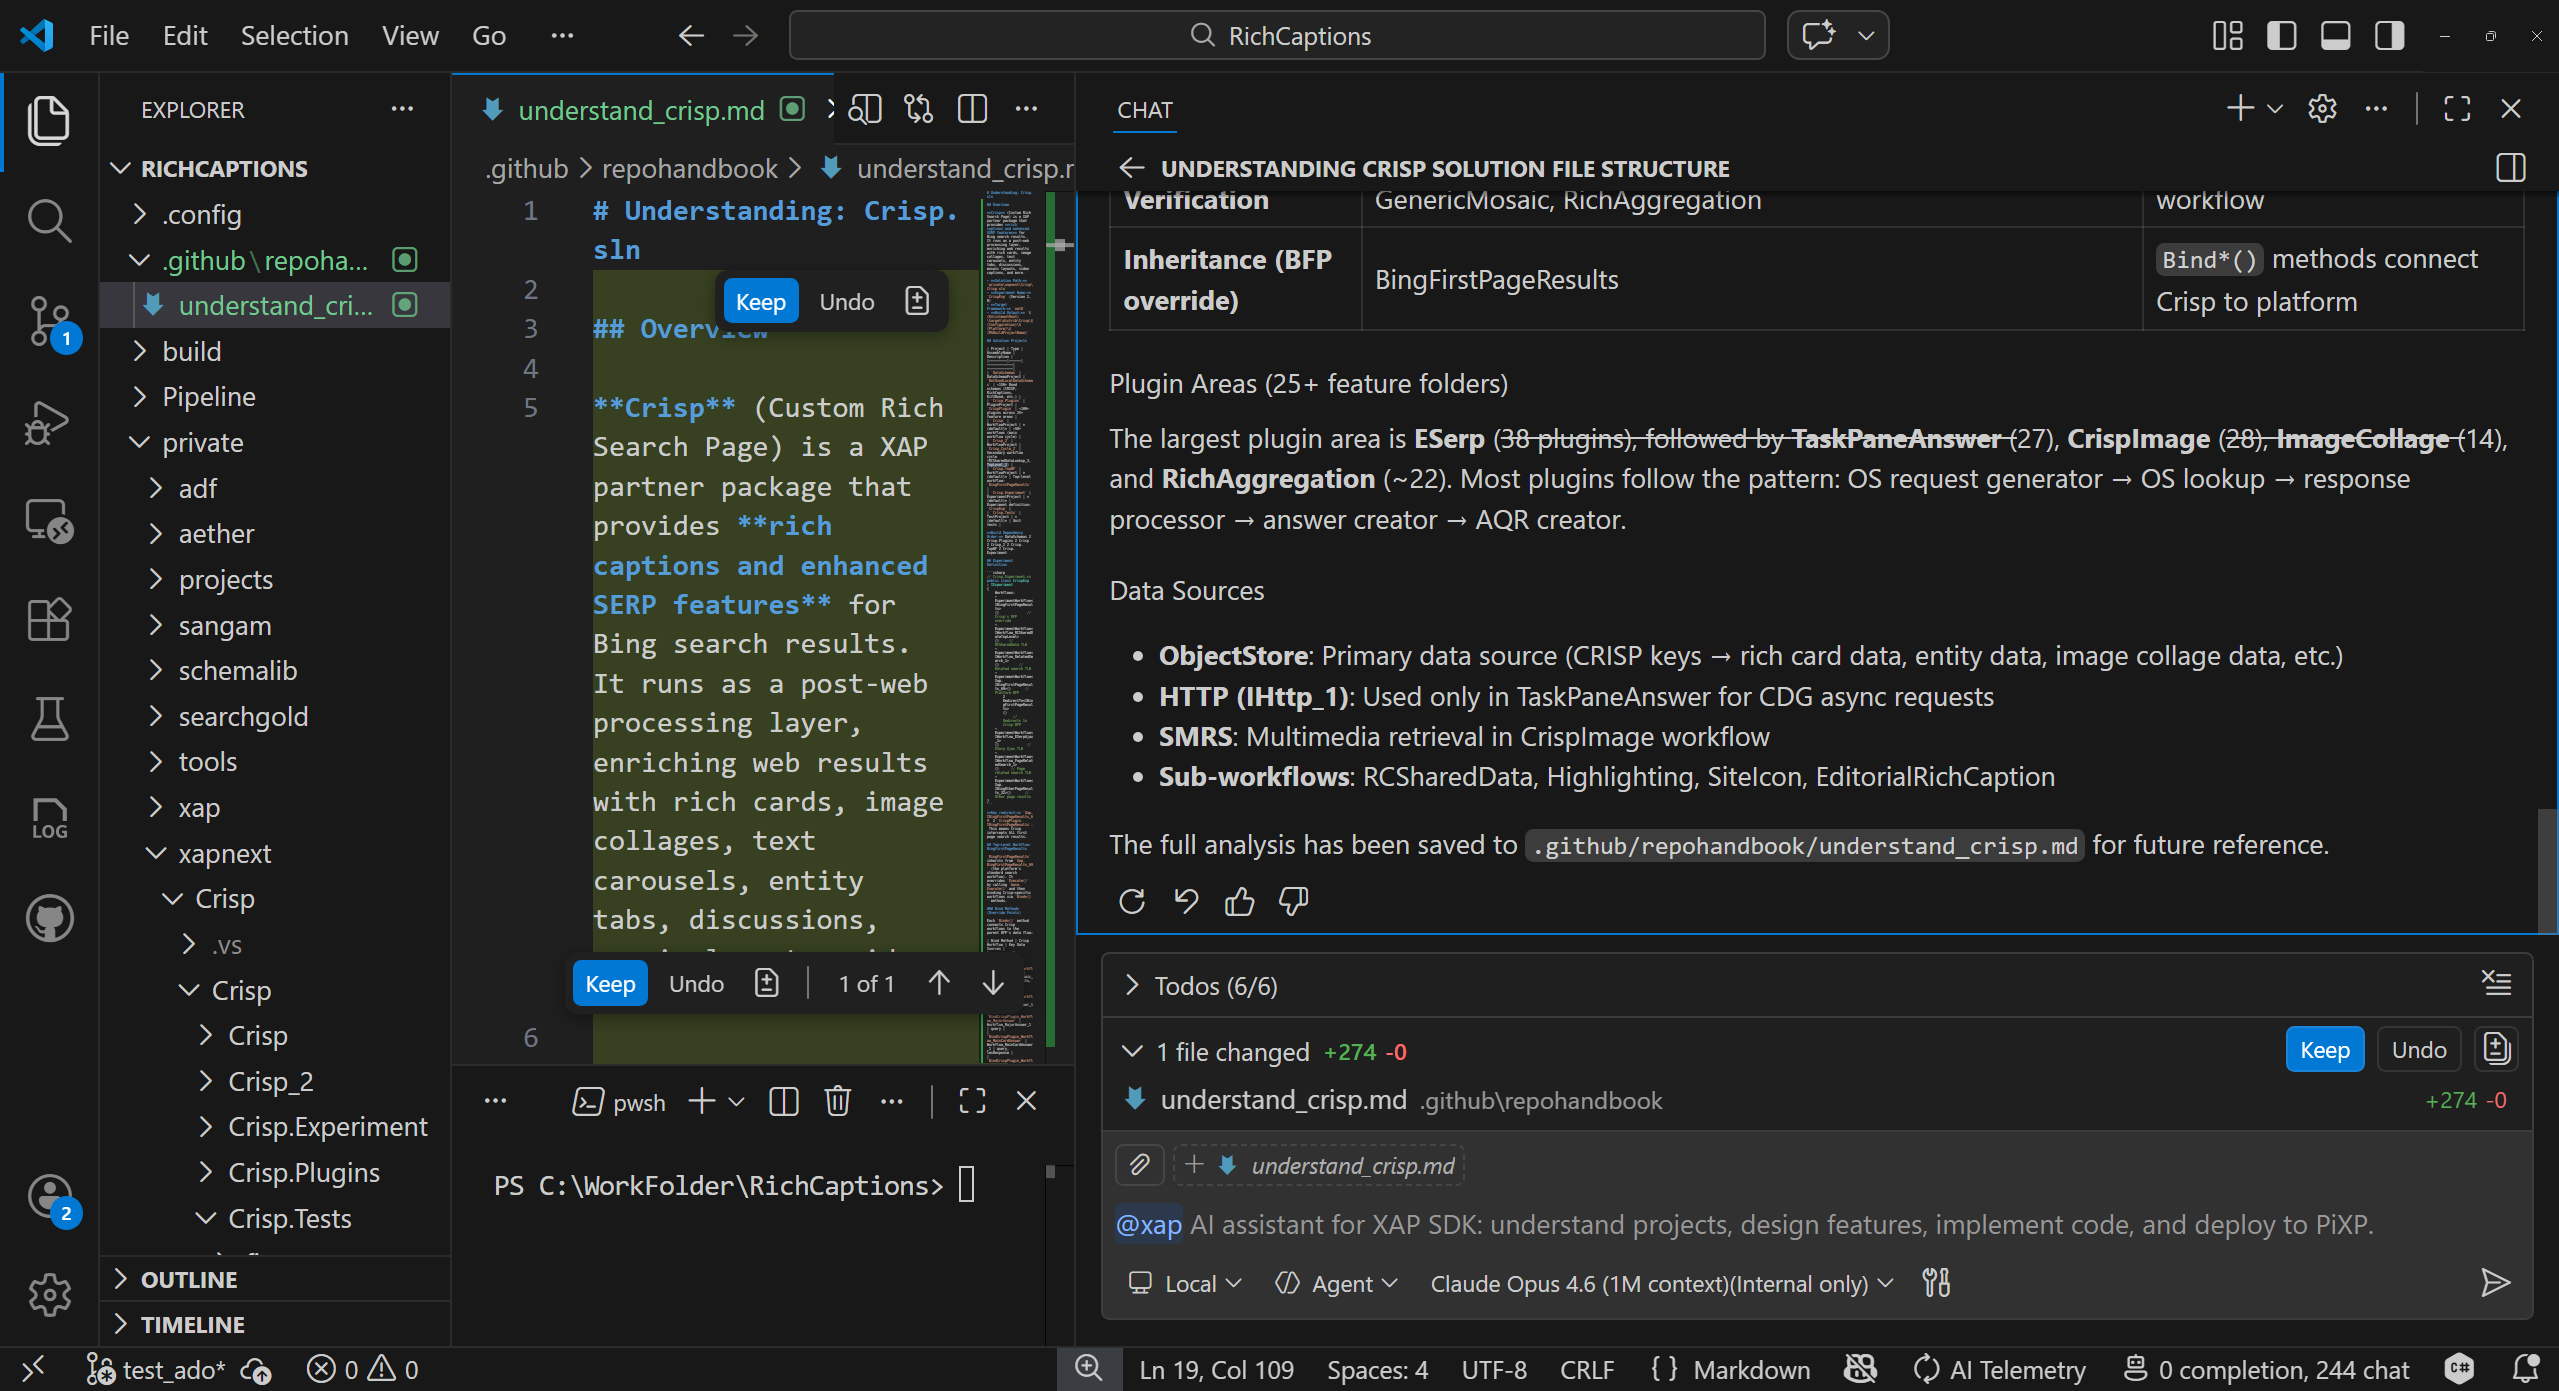 |
Step 2 — Implement a feature (design-first)
Now you need to add an Editorial Magazine feature — a new workflow with multiple plugins. You describe the requirements in detail, referencing existing schemas and an ADO commit for context. For complex changes like this, the assistant first creates a detailed design document (saved to your workspace for future reference) and presents a design summary in the chat for your review before writing any code — listing Bond schemas, plugins, configs, and workflows it plans to create:
Input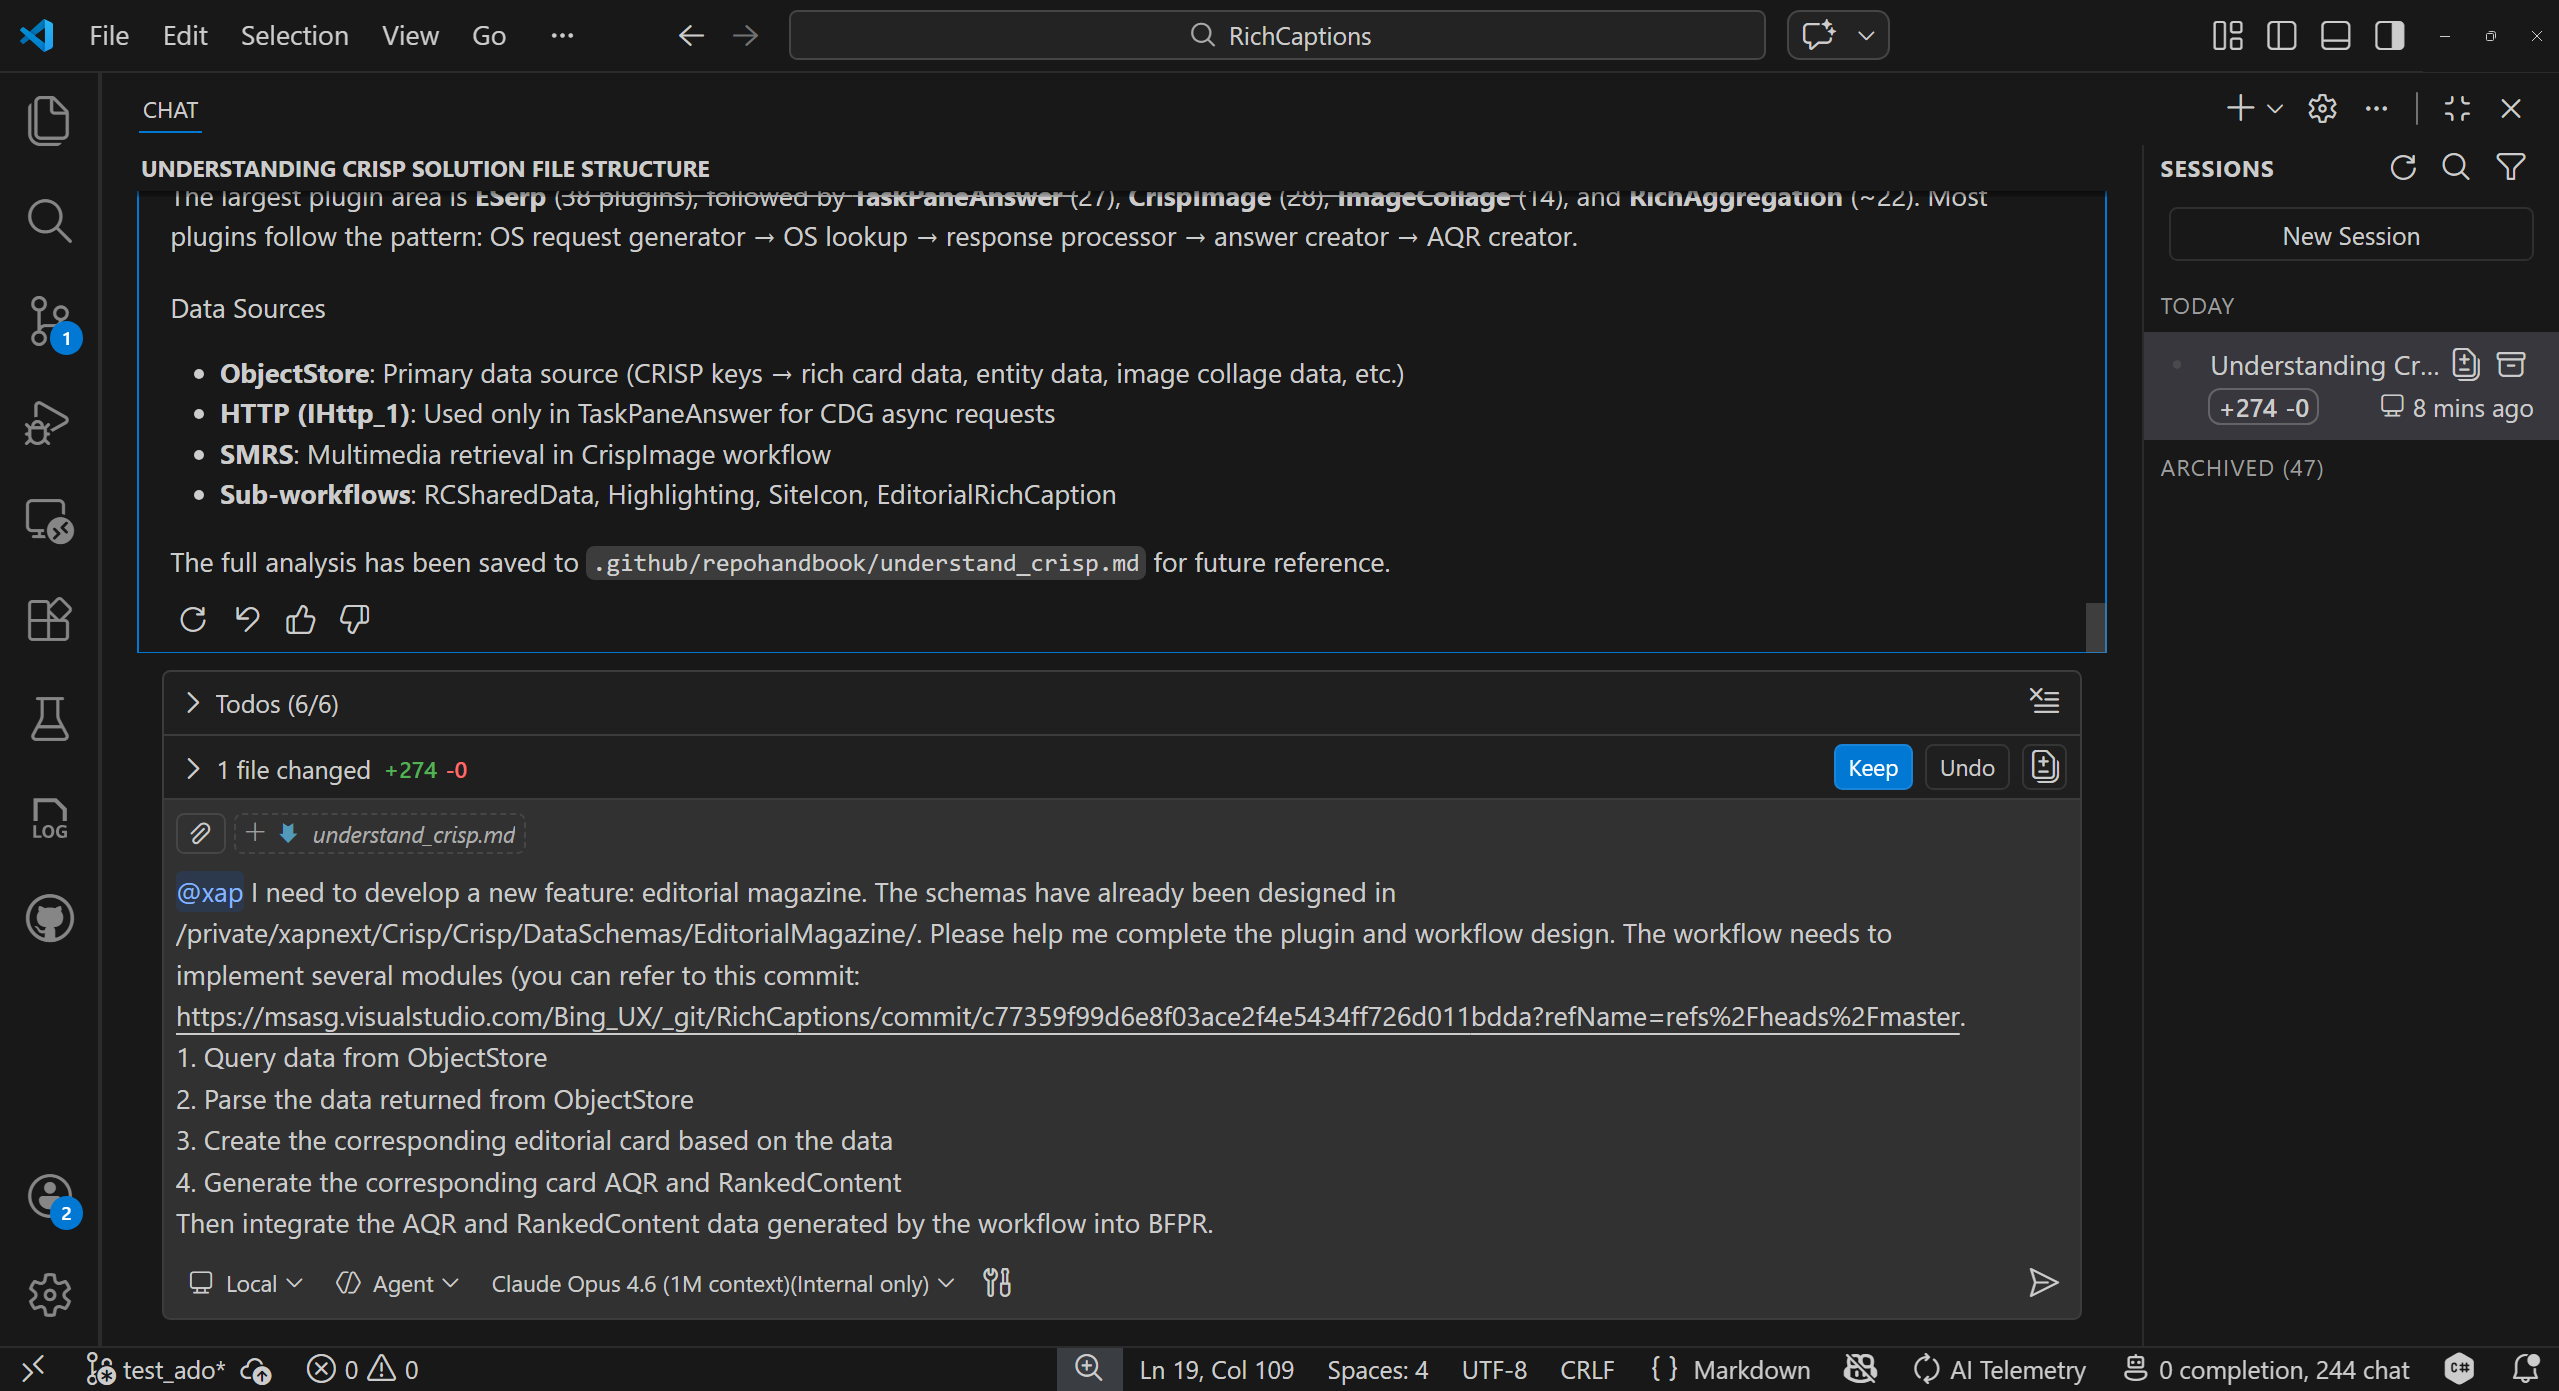 |
Output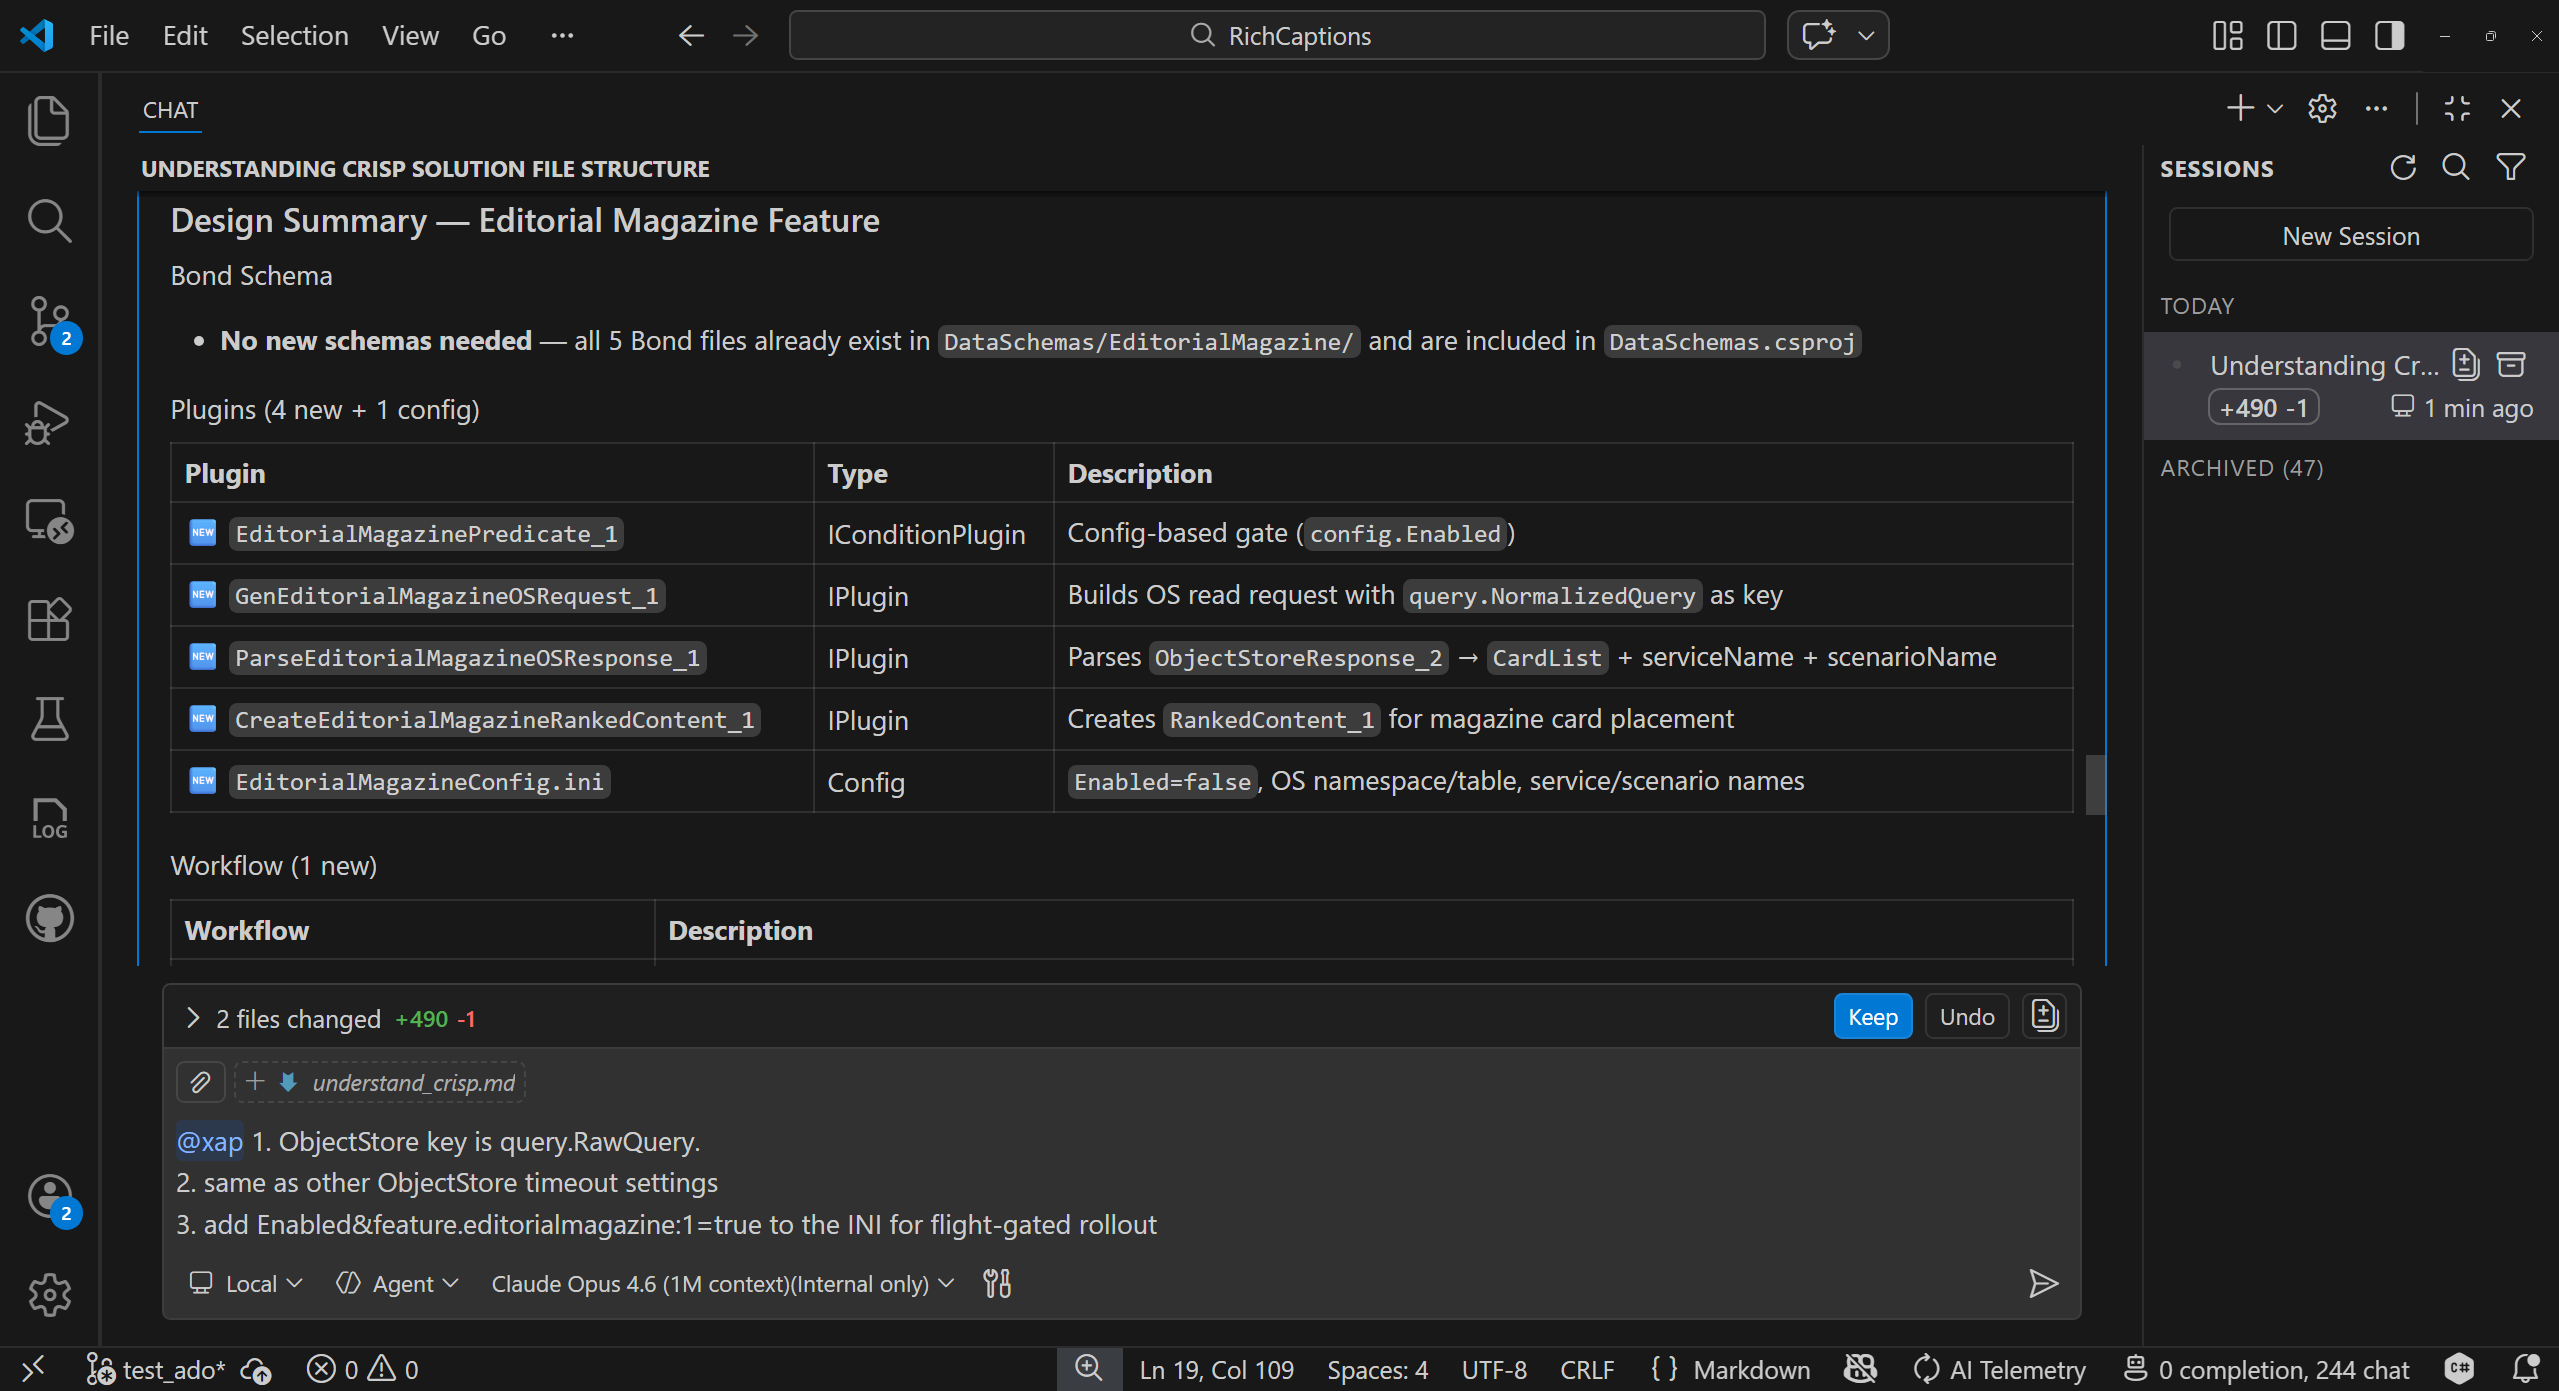 |
Step 3 — Review feedback, approve, and watch it code
The assistant incorporates your feedback (e.g., changing the ObjectStore key, adjusting timeout settings, adding a feature flag) and presents an Updated Design Summary showing exactly what changed. Once you type @xap approve, it implements everything — creating 6 new files, modifying existing ones, and running the build to verify zero errors:
Input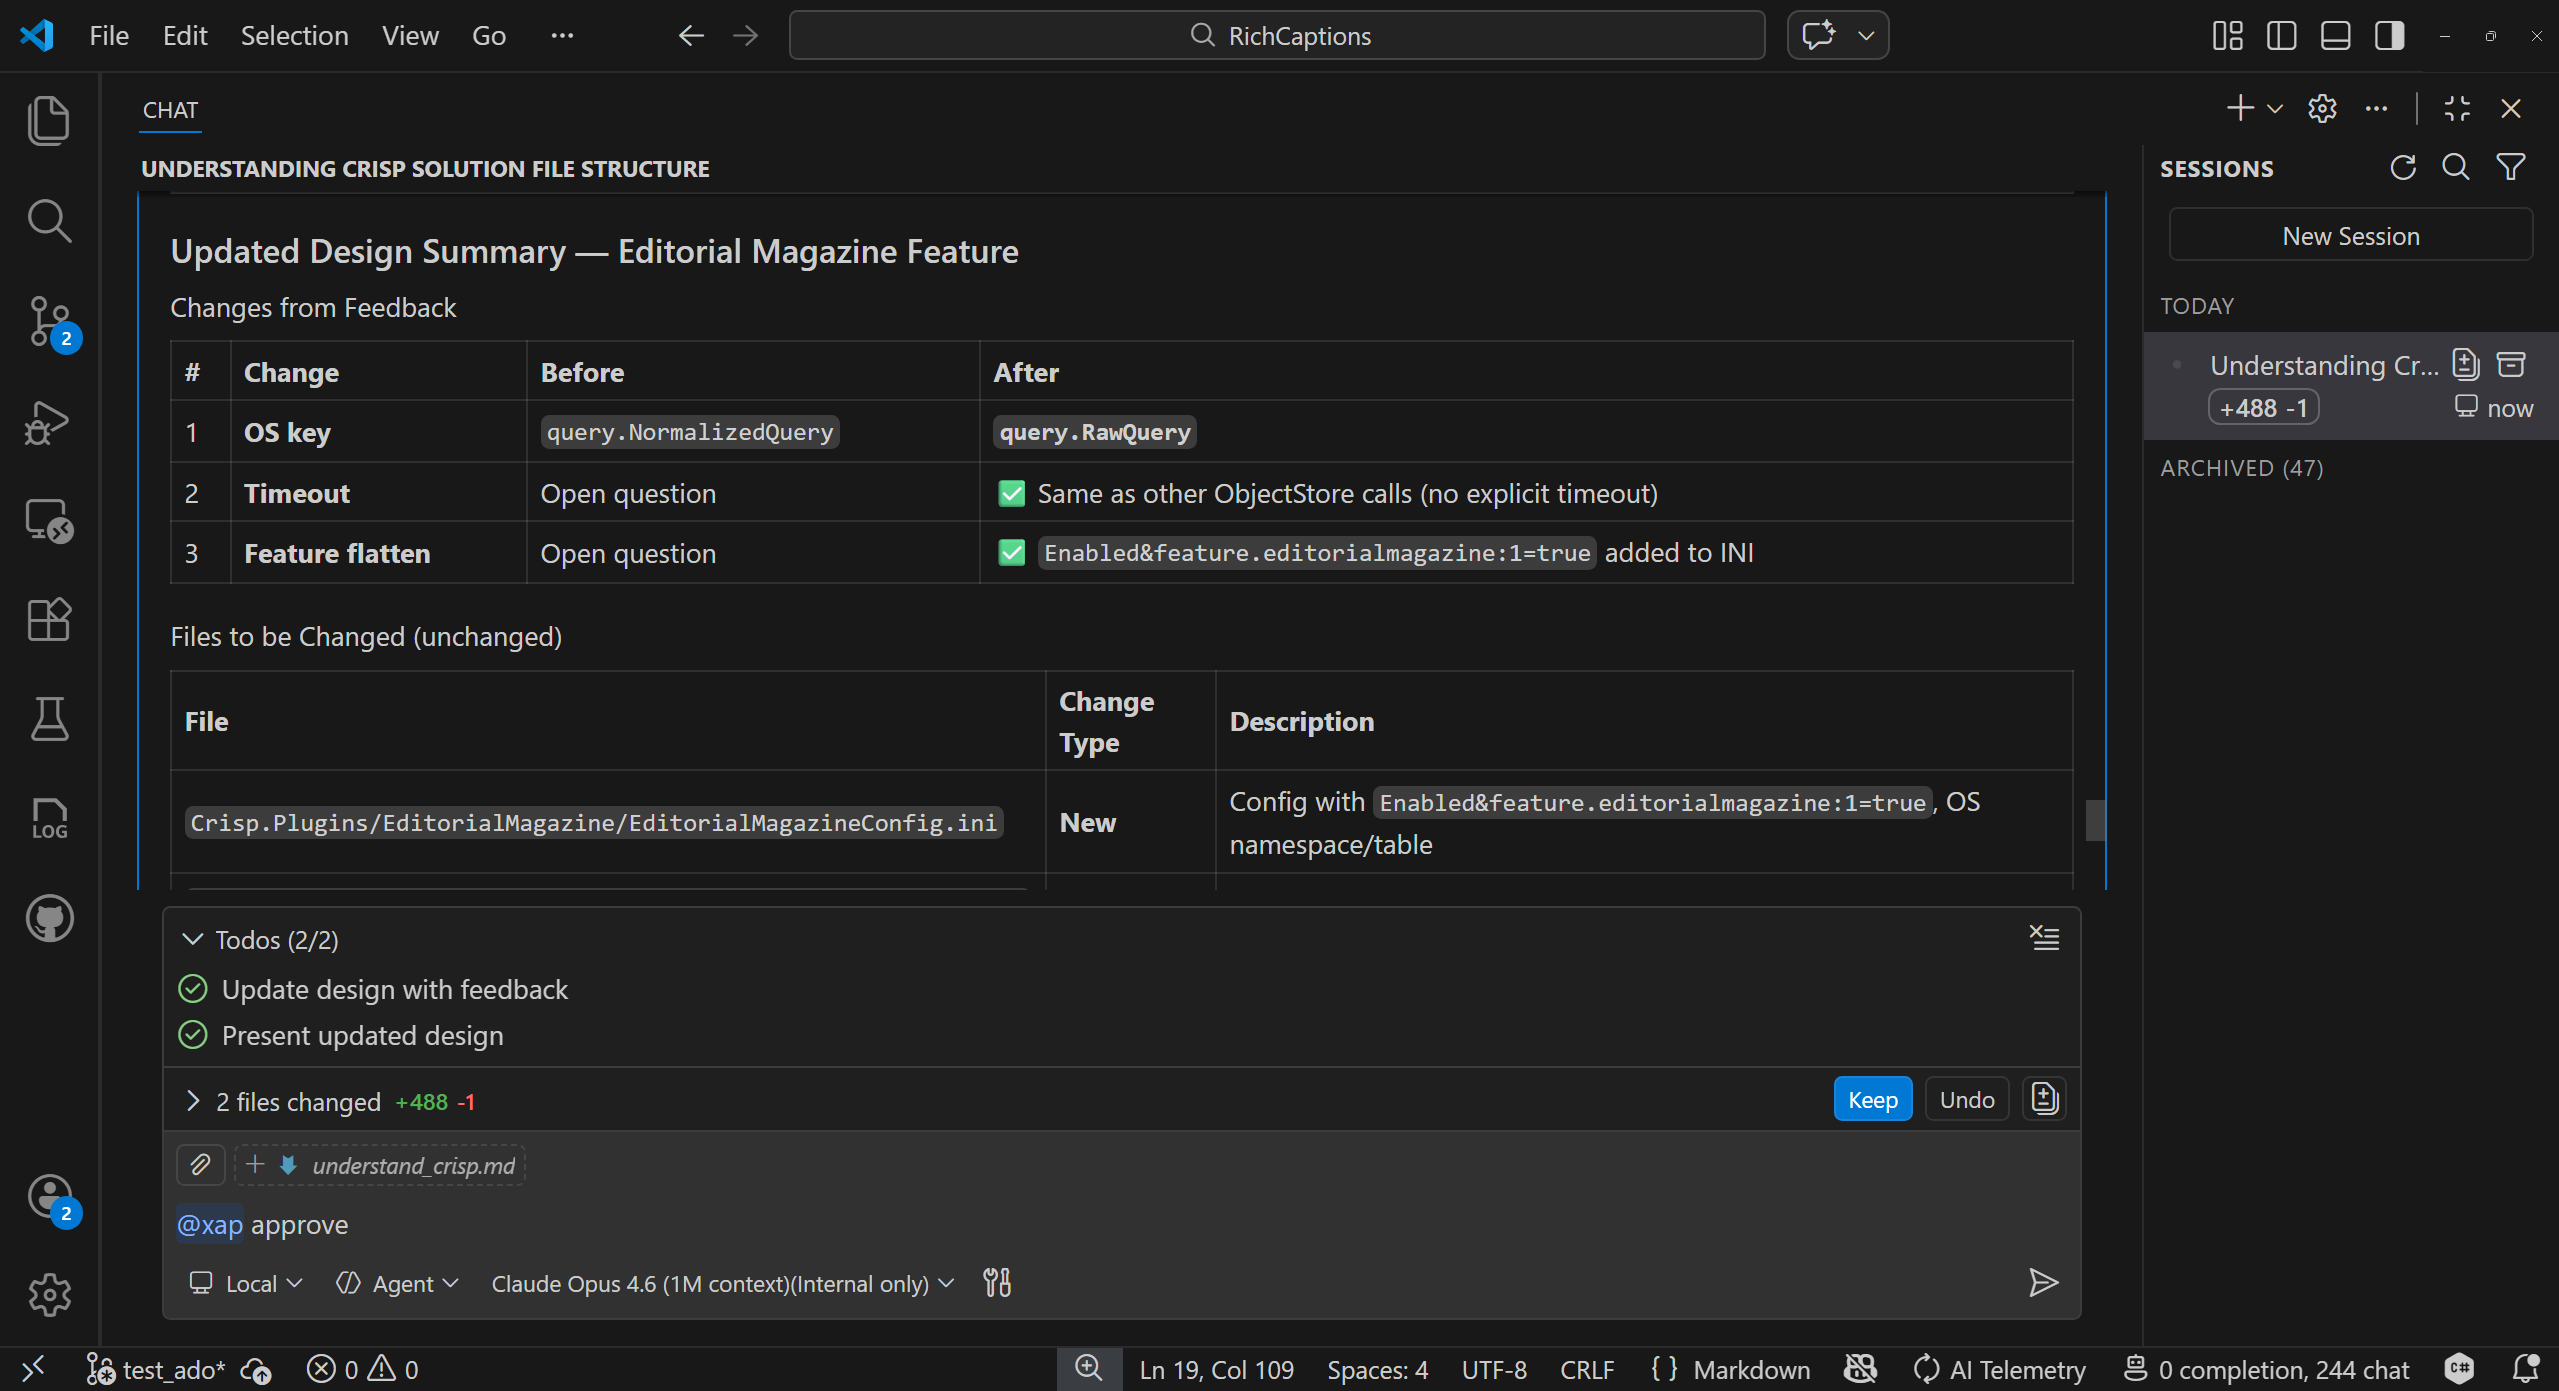 |
Output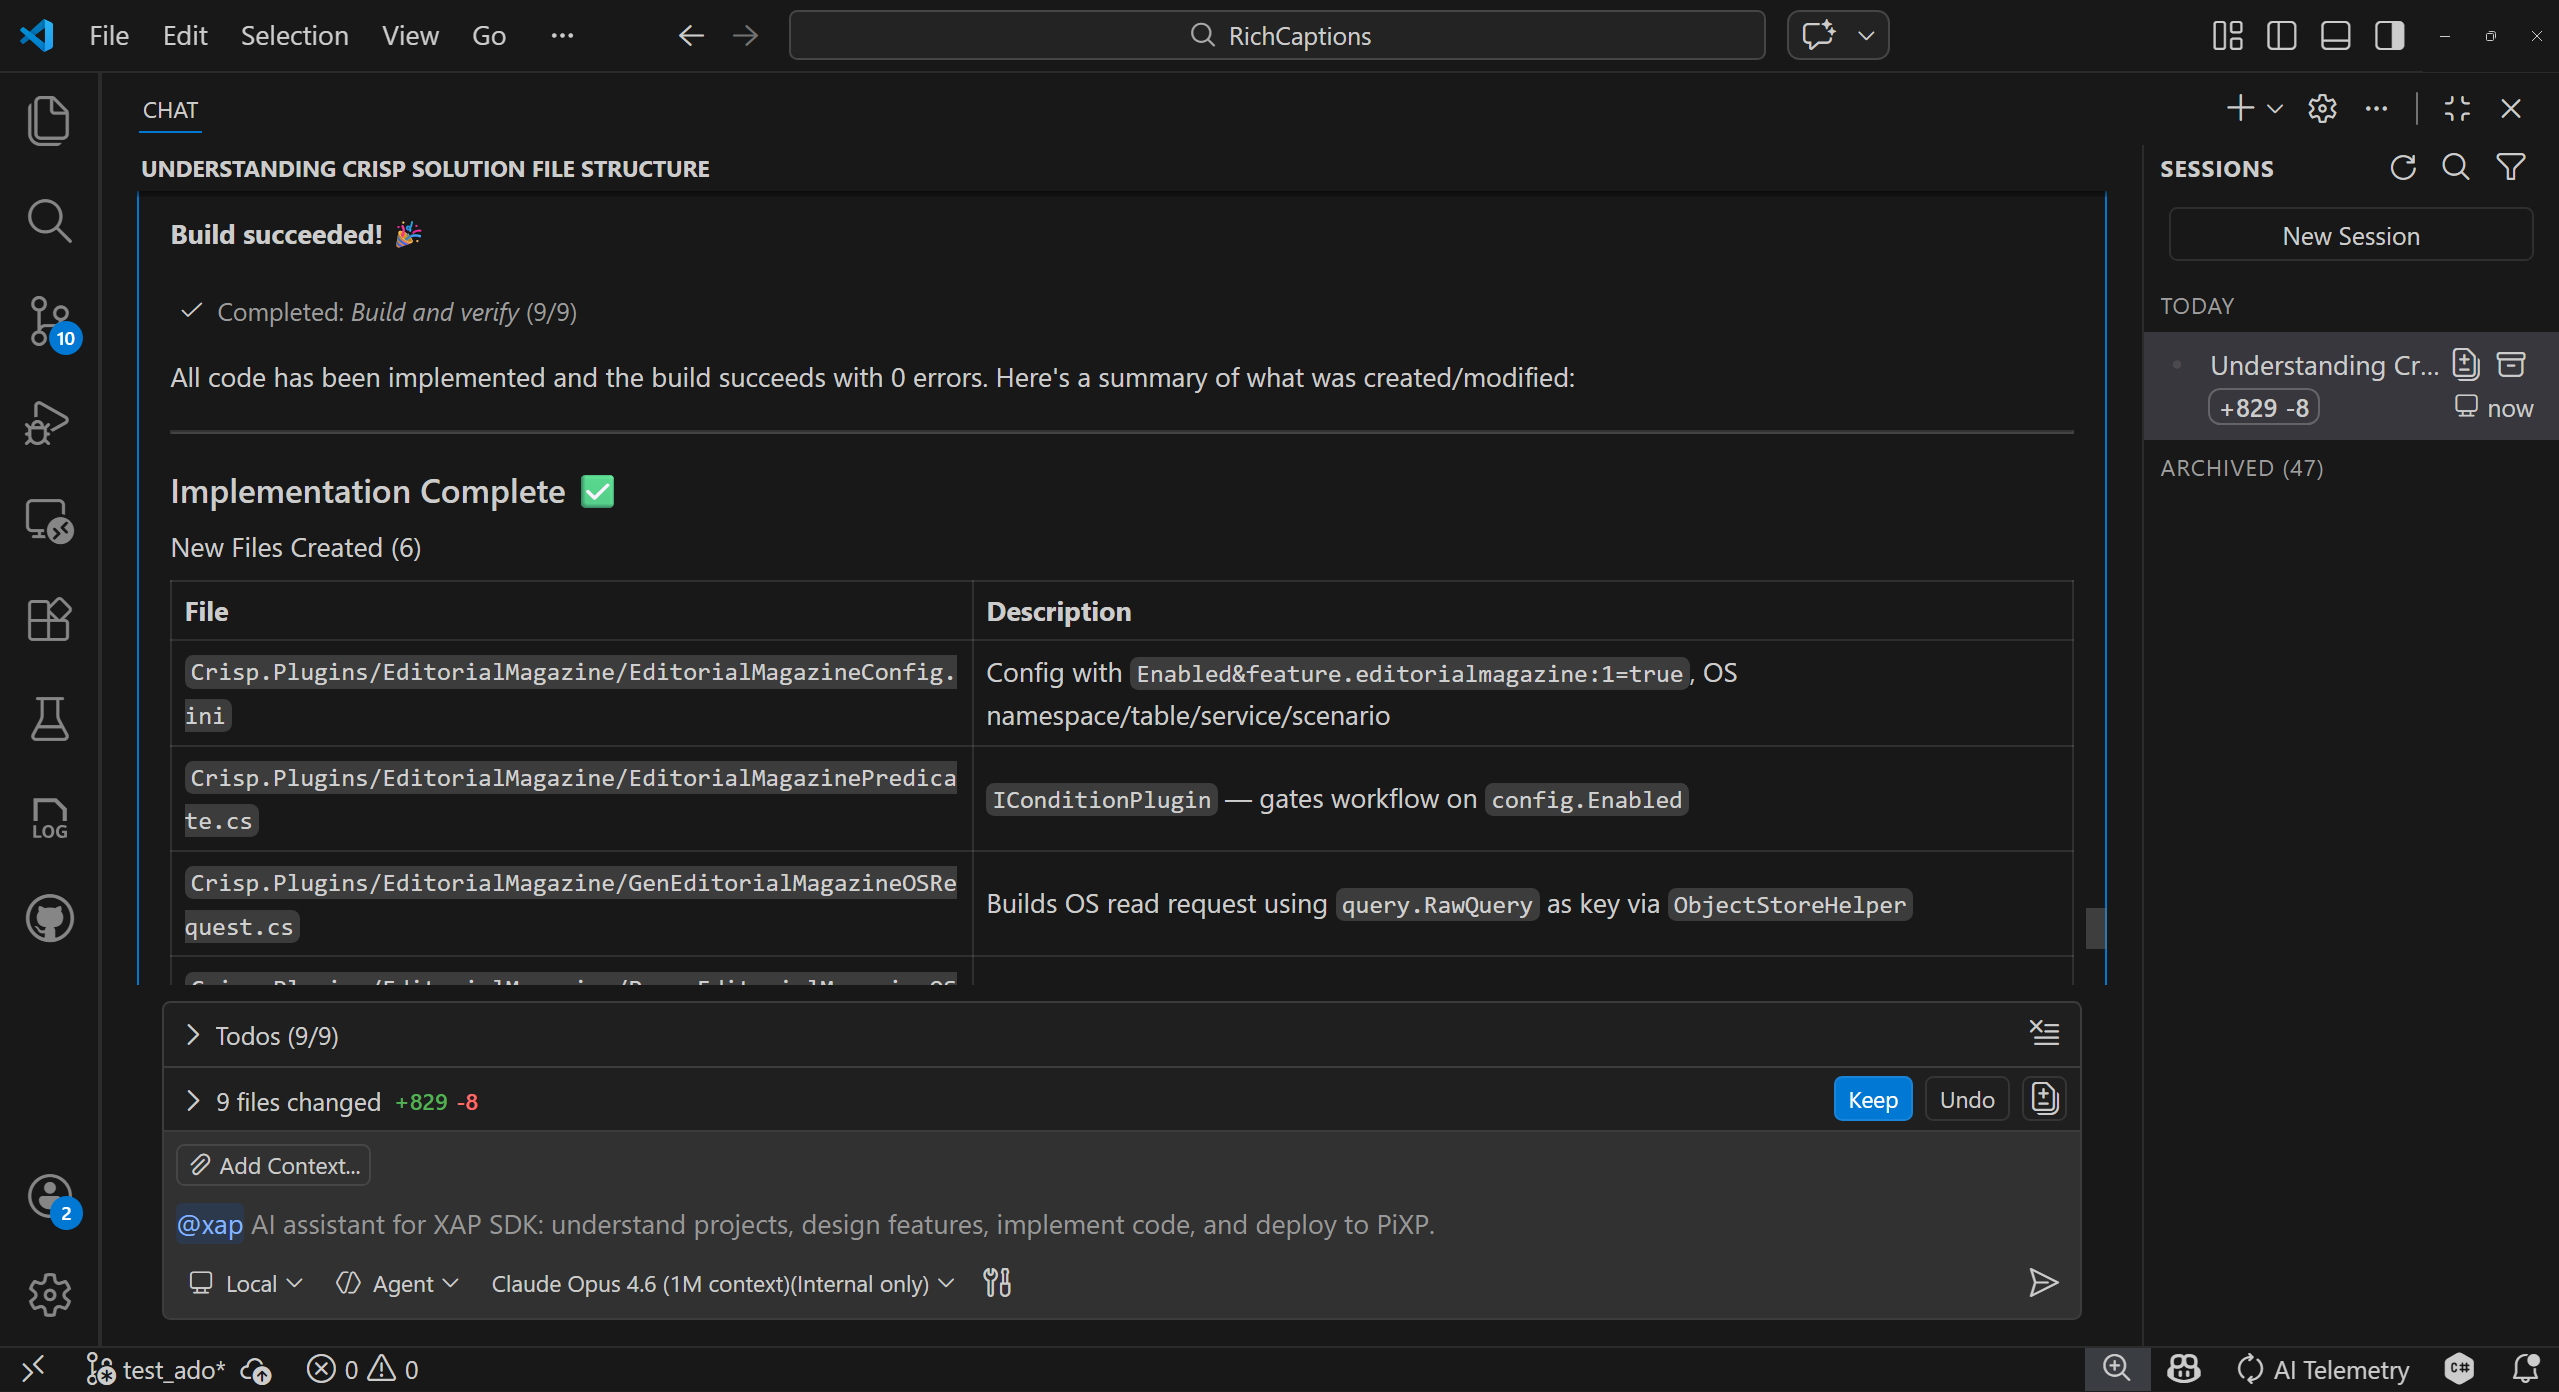 |
Step 4 — Deploy to PiXP
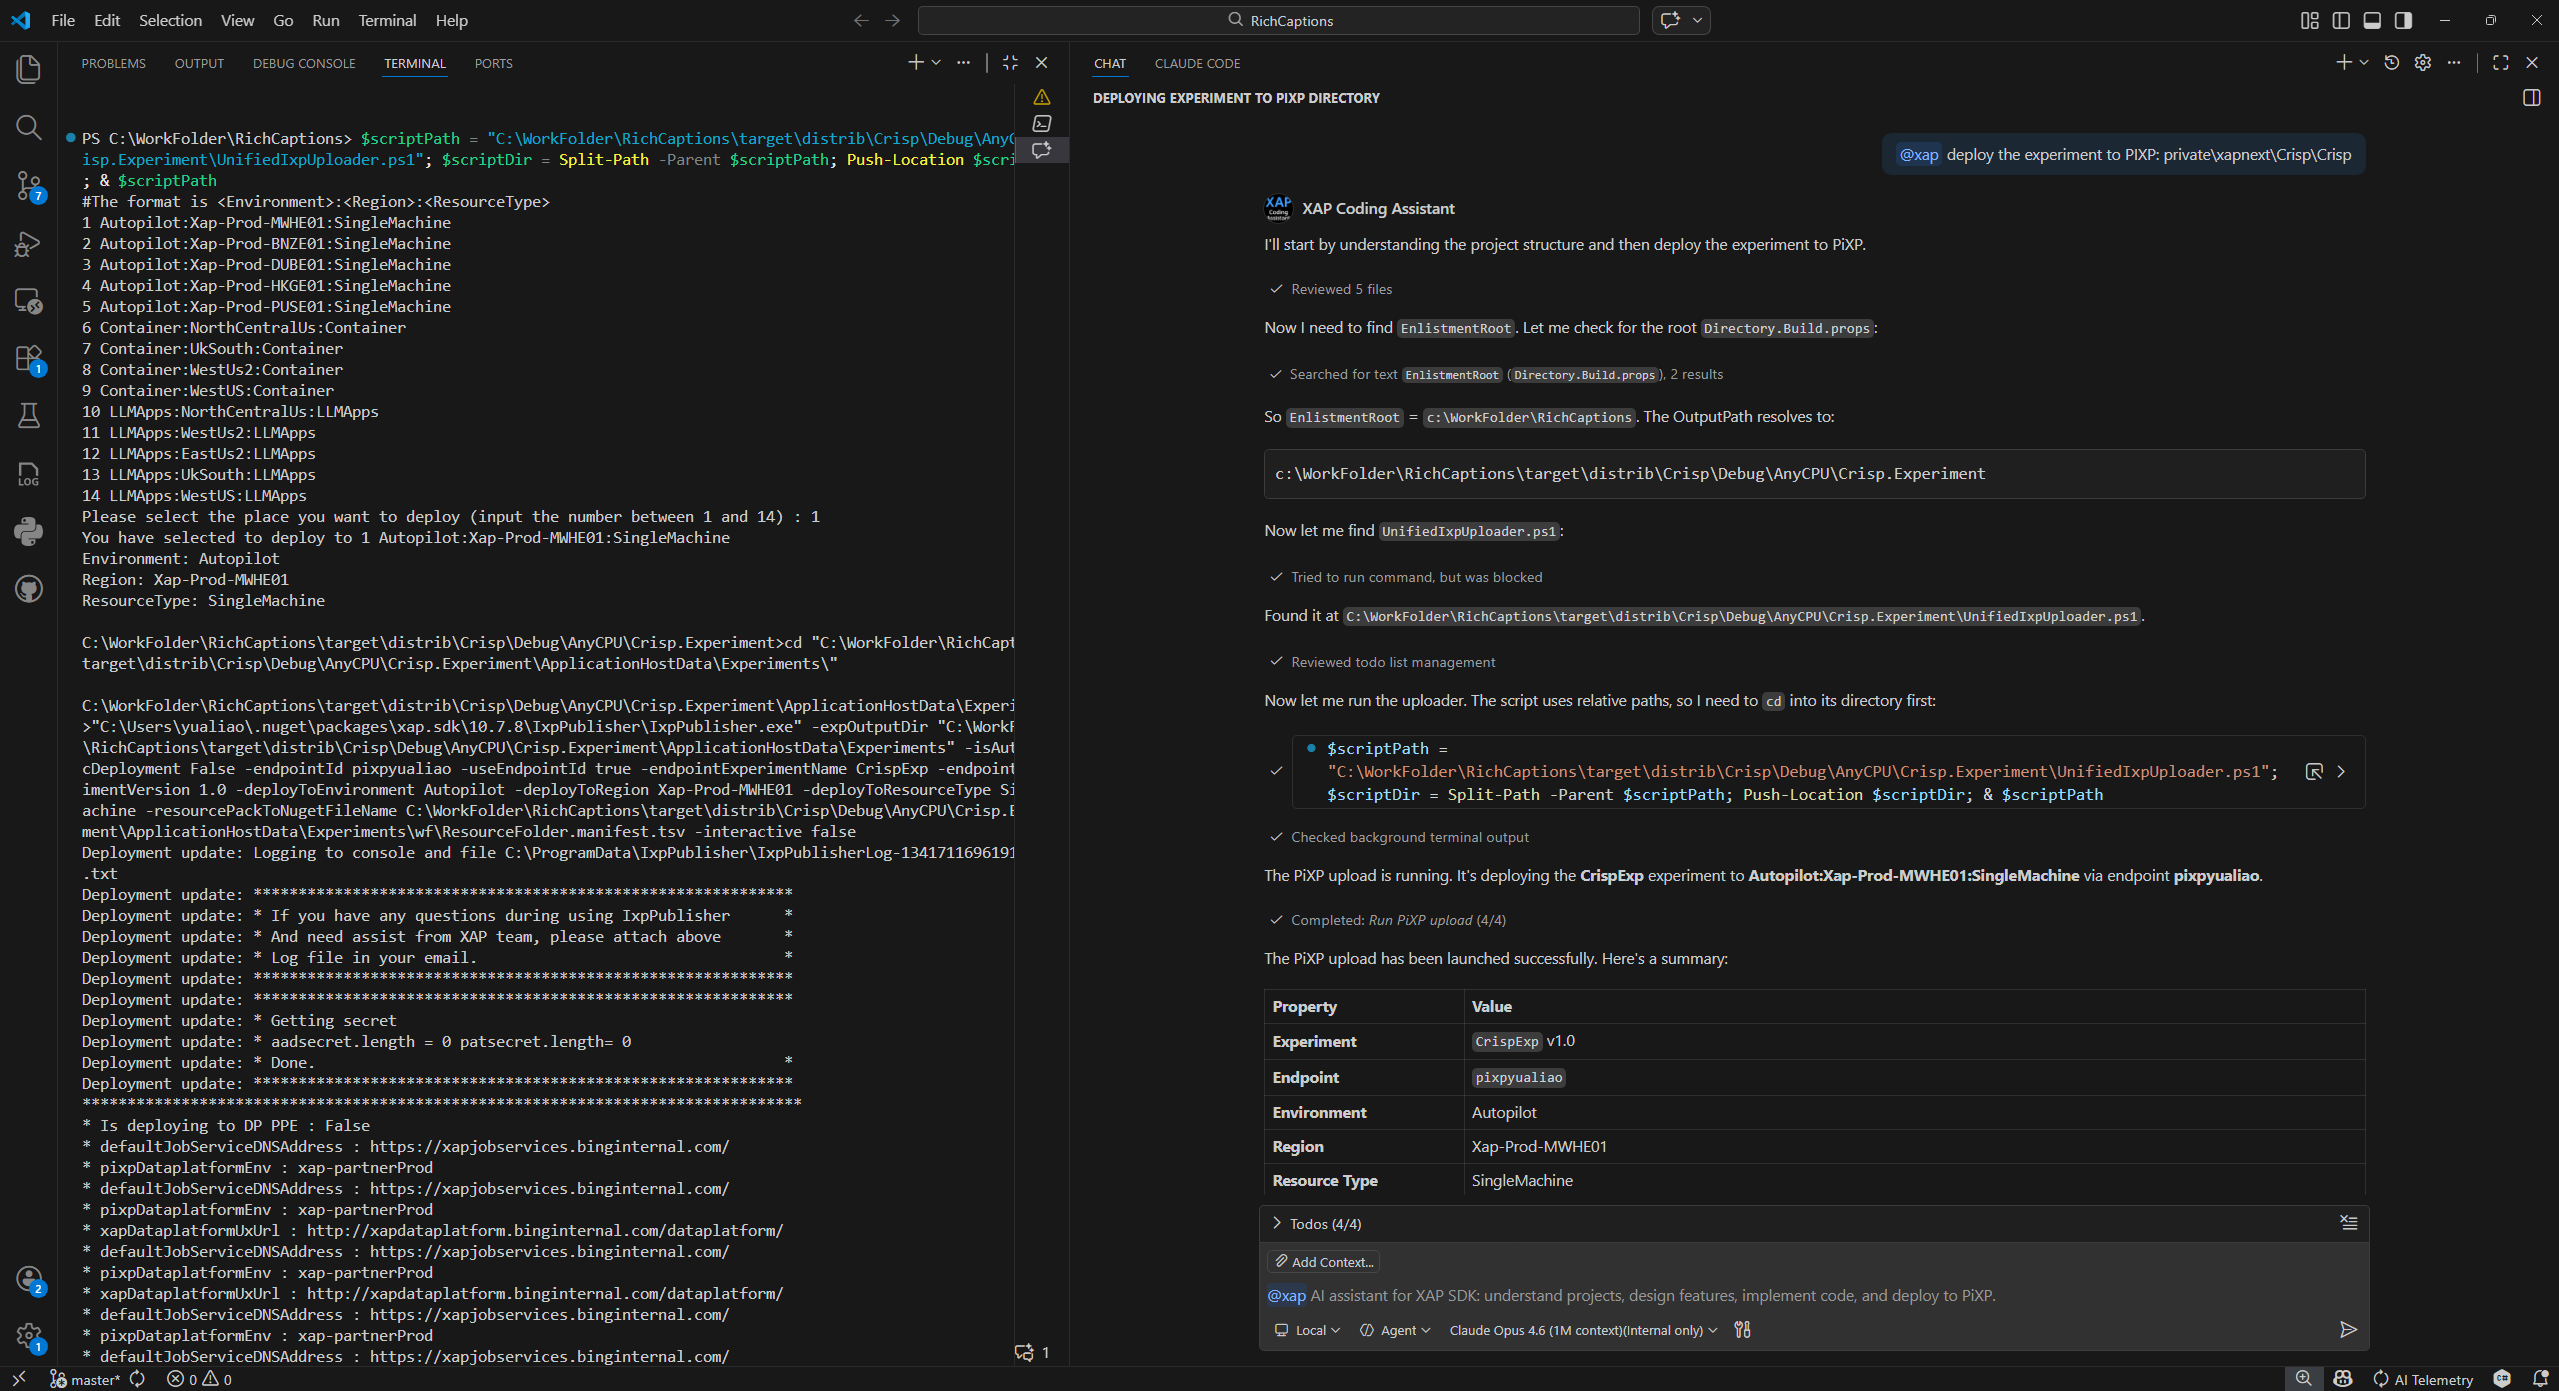
Once you're happy with the code, deploy the experiment to PiXP for testing. The assistant locates the build output, runs the PiXP uploader, lets you select a deployment region, and confirms the upload with a summary:
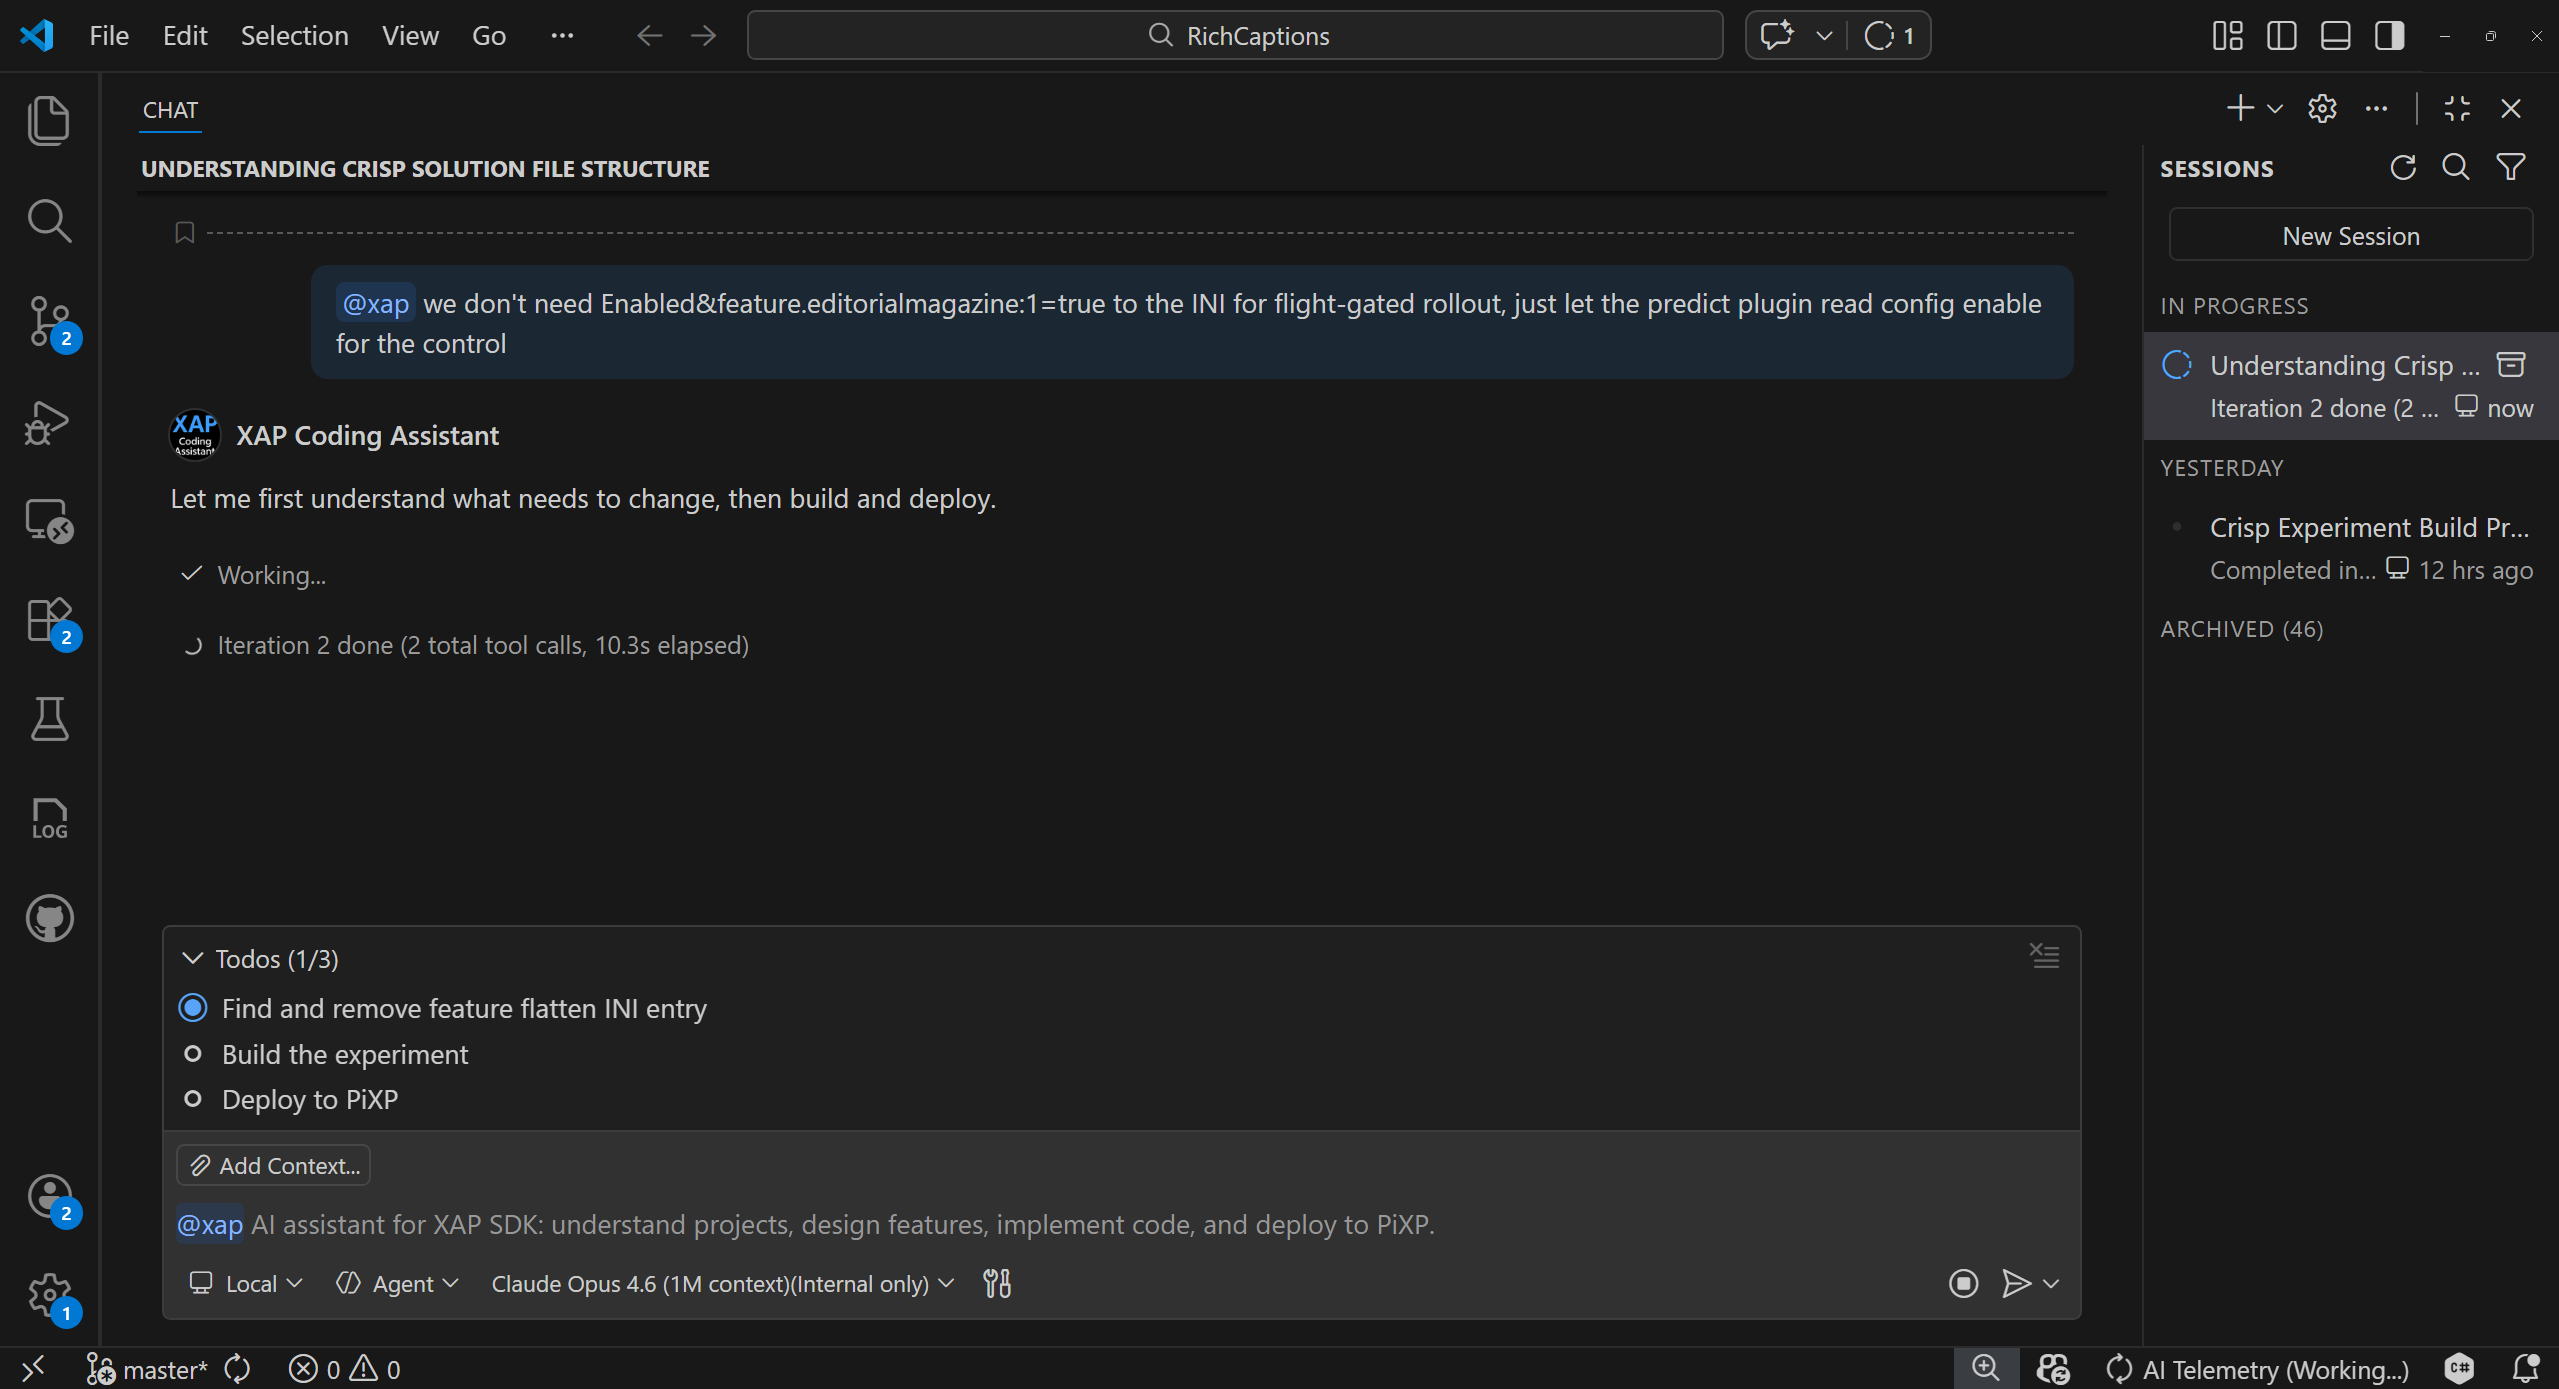
Step 5 — Fix issues and iterate
Need to change something after testing? Just describe the update. Here the developer decides to remove the feature flag from the INI and let the predicate plugin handle the gating instead. The assistant understands the change, plans the fix, and will rebuild and redeploy — all in one step:
Vision & Roadmap
XAP Assistant v1 focuses on local development — from understanding a project to deploying an experiment. It's the first step toward a unified assistant covering the entire XAP development lifecycle.
Coming in Future Releases
| Area | Planned Capabilities |
|---|---|
| Project Scaffolding | Create new XAP projects from scratch |
| Testing | Xping test generation and execution |
| End-to-End Workflows | Singlebox PiXP test workflows in chat |
| Config & Release | Config changes, validations, and release workflows |
| Production Deployment | Deployment and validation automation |
| Production Debugging | Log interpretation, anomaly detection, and workflow-aware diagnostics |
Have ideas for what should come next? Share your feedback in the Teams channel.
Slash Commands
Slash commands are optional shortcuts — use them when you want to hint at a specific workflow, or just describe what you need in plain language.
| Command | Description |
|---|---|
/read <path> |
Analyze and understand an XAP project structure |
/code <path> <requirement> |
Coding workflow (design-first for complex features) |
/pixp <action> |
Build a project and/or upload experiment to PiXP |
/qa <question> |
Answer XAP knowledge questions using the Knowledge Base and source code |
/deploy <package or build link> |
Track deployment status, diagnose pipeline failures, and provide suggestions |
/help |
Show usage examples and available commands |
Example: @xap /read private/xap/experiments/MyExperiment
Recommended Model
For the best experience, use Claude Opus 4.6 in VS Code Agent mode:
| Model | Best For |
|---|---|
| Claude Opus 4.6 (1M context) | Large projects and complex requirements — longer context memory |
Tip: The extension works with any Copilot Chat model, but Claude Opus tends to produce better results for complex XAP projects due to its larger context window and stronger reasoning.
Note: The recommended model may change as newer models become available. Check back for updates.
Requirements
| Requirement | Details |
|---|---|
| VS Code | 1.109.5 or later |
| GitHub Copilot Chat | Must be installed and active |
| XAP project workspace | The extension is designed for XAP projects — open a workspace containing a XAP solution (e.g. RichCaptions) for the best experience |
| Network | Access to Azure DevOps (msasg.visualstudio.com) for ADO integration |
Settings
Open Settings (Ctrl+,) and search for xapAssistant:
| Setting | Default | Description |
|---|---|---|
xapAssistant.debugMode |
false |
Enable verbose console output for troubleshooting |
Troubleshooting
| Issue | Solution |
|---|---|
@xap not appearing in chat |
Ensure GitHub Copilot Chat extension is installed and enabled |
| "Chat Participant API not available" | Update VS Code to 1.109.5+ and update GitHub Copilot |
| ADO integration not working | On first use, follow the browser sign-in prompt to authenticate with Azure DevOps |
| Assistant gives generic answers | Make sure your workspace is open to a XAP project root |
| Slow responses | Narrow your request scope or break complex tasks into smaller steps |
Using XAP Assistant: GitHub Copilot Chat, Claude Code, and Copilot CLI
XAP Assistant is available in three environments — GitHub Copilot Chat (GHC) within VS Code, Claude Code (CC) as a CLI tool, and GitHub Copilot CLI as a terminal tool. All three provide the same XAP SDK expertise, but their interaction models differ. This section helps you work effectively in each and switch between them smoothly.
Quick Comparison
| Aspect | GitHub Copilot Chat (GHC) | Claude Code (CC) | GitHub Copilot CLI |
|---|---|---|---|
| How to invoke | @xap <your message> |
/xap:task <your message> |
copilot --agent xap:cli (interactive) or copilot --agent xap:cli -p "..." (one-shot); /xap <your message> (in a regular copilot session) |
| Where it runs | VS Code Chat panel | VS Code extension and Terminal (CLI) | Terminal (copilot command) |
| Knowledge injection | Must prefix every message with @xap |
Invoke /xap:task once; knowledge persists across turns in the same session |
The xap:cli agent loads XAP knowledge for the entire session; in a regular copilot session, invoke /xap (or any /xap:* skill) to inject knowledge |
| Slash commands | @xap /read, @xap /code, @xap /pixp, @xap /qa, @xap /deploy, @xap /help |
/xap:task (unified entry point) |
/xap (auto-route), /xap:code, /xap:read, /xap:pixp, /xap:qa, /xap:deploy, /xap:help |
GitHub Copilot Chat (GHC) Usage
In GHC, XAP Assistant is a chat participant. You interact with it by typing @xap followed by your request in the VS Code Chat panel.
Key behavior:
- Prefix every message with
@xap— without the@xapprefix, your message goes to the default Copilot model without XAP knowledge. - Use slash commands to hint at a specific workflow:
@xap /read ./MyProject,@xap /code ./MyProject add a caching plugin,@xap /pixp build and upload,@xap /deploy MyPackage 1.2.3.
Example session:
@xap help me understand this project: ./src/MyExperiment
@xap implement a new caching plugin for the response path
@xap approve    (after reviewing the design)
@xap /pixp build and upload to pixp
@xap /deploy MyPackage 1.2.3
Claude Code (CC) Usage
In CC, XAP Assistant is a skill plugin. You invoke it with /xap:task in the Claude Code CLI.
Key behavior:
- Invoke
/xap:taskonce — the XAP SDK handbooks and guidelines are injected into the session context. Subsequent turns in the same session automatically carry forward the XAP knowledge; you don't need to repeat/xap:taskfor follow-up messages.
Example session:
/xap:task ./src/MyExperiment help me understand this project
> (follow-up) now add a new caching plugin for the response path
> (follow-up) approve
> (follow-up) build and upload to pixp
GitHub Copilot CLI Usage
In GitHub Copilot CLI, XAP Assistant ships as a plugin with a custom agent (xap:cli) plus a set of skills (/xap:code, /xap:read, /xap:pixp, /xap:qa, /xap:deploy, /xap:help) and a standalone dispatcher (/xap) that auto-routes to the right skill based on your intent.
Two ways to start a session:
- Custom agent (recommended for XAP-only work): Launch
copilotwith the XAP agent loaded:
The agent profile (XAP handbooks, behavioral rules) is loaded for the entire session, so you can speak naturally without repeating any prefix.copilot --agent xap:cli # Interactive XAP session copilot --agent xap:cli -p "..." # One-shot programmatic mode - Regular
copilotsession: Invoke/xap(auto-routes to the right skill) or any specific/xap:*skill to inject XAP knowledge for that workflow:/xap help me understand ./src/MyExperiment /xap:code add a new caching plugin /xap:pixp build and upload to pixp /xap:deploy MyPackage 1.2.3
Example session (custom agent):
$ copilot --agent xap:cli
> help me understand this project: ./src/MyExperiment
> implement a new caching plugin for the response path
> approve    (after reviewing the design)
> build and upload to pixp
Tips for Switching Between Environments
Re-inject knowledge when context degrades in CC or Copilot CLI — Both Claude Code and Copilot CLI compact conversation history when the context window fills up. If you notice the assistant's responses becoming less XAP-aware (e.g., generating non-idiomatic XAP code, forgetting project structure), invoke
/xap:task(CC) or/xap//xap:*(Copilot CLI) again with your current task to re-inject the XAP SDK handbooks.In GHC, always use
@xap— Every turn in GHC is independent. If you forget the@xapprefix, the model responds without XAP knowledge. Make it a habit to always start with@xap.Use
--agent xap:clifor long Copilot CLI sessions — When you know you'll be doing extensive XAP work, launching with--agent xap:clikeeps XAP context loaded for the entire session, so you don't need to re-inject knowledge after each compaction.Project workspace matters — In all three environments, open your XAP project workspace first. The assistant uses the workspace root to locate solution files, experiment configurations, and build outputs.
Feedback & Support
Have a question, found a bug, or want to suggest a feature?
- Report a bug or request a feature: Post in the Q&A tab on the Marketplace page
- Teams channel: Xap Partner QA
Privacy
This extension collects usage data (command usage, response times, error diagnostics) and sends it to Microsoft to help improve our products and services. Read our Privacy Statement to learn more. This extension respects the telemetry.telemetryLevel setting — you can learn more about disabling telemetry at VS Code FAQ.