Copilot Bill Saver
Works in Visual Studio Code (and VS Code Insiders) with GitHub Copilot Chat — on your machine or inside a Dev Container.
Give Copilot the bug context before it starts guessing
When a screen is broken, Copilot often has to search through your project before
it understands what you saw, where it happened, or what needs to change. That
means more back-and-forth before useful work begins.
Copilot Bill Saver turns the issue you can see into a reviewed context bundle:
the on-screen evidence, the issue category, likely files, and clear acceptance
criteria. You approve it, then hand it to Copilot Chat before the agent searches.
The result: Copilot starts with the facts of the bug and a focused place to
look, while you stay in control of what it receives.
Requirements
- Visual Studio Code 1.95+ (stable or Insiders), desktop.
- GitHub Copilot and Copilot Chat, which provide the
#billSaverContext
tool Bill Saver hands its approved bundle to.
- A local workspace or a Dev Container — both are supported and verified,
including the port forwarding a Dev Container needs for browser capture.
- For optional browser capture, your development app running locally.
Remote-SSH and GitHub Codespaces: Bill Saver runs alongside your workspace,
so describing an issue, reviewing the bundle, and handing context to Copilot
work the same as they do locally. Optional browser capture works over VS Code's
port forwarding and is verified on Remote-SSH as well as in Dev Containers. In
the browser-based Codespaces editor, browser capture is unavailable; manual
entry is unaffected.
Other editors are not supported at this time.
See The Whole Workflow
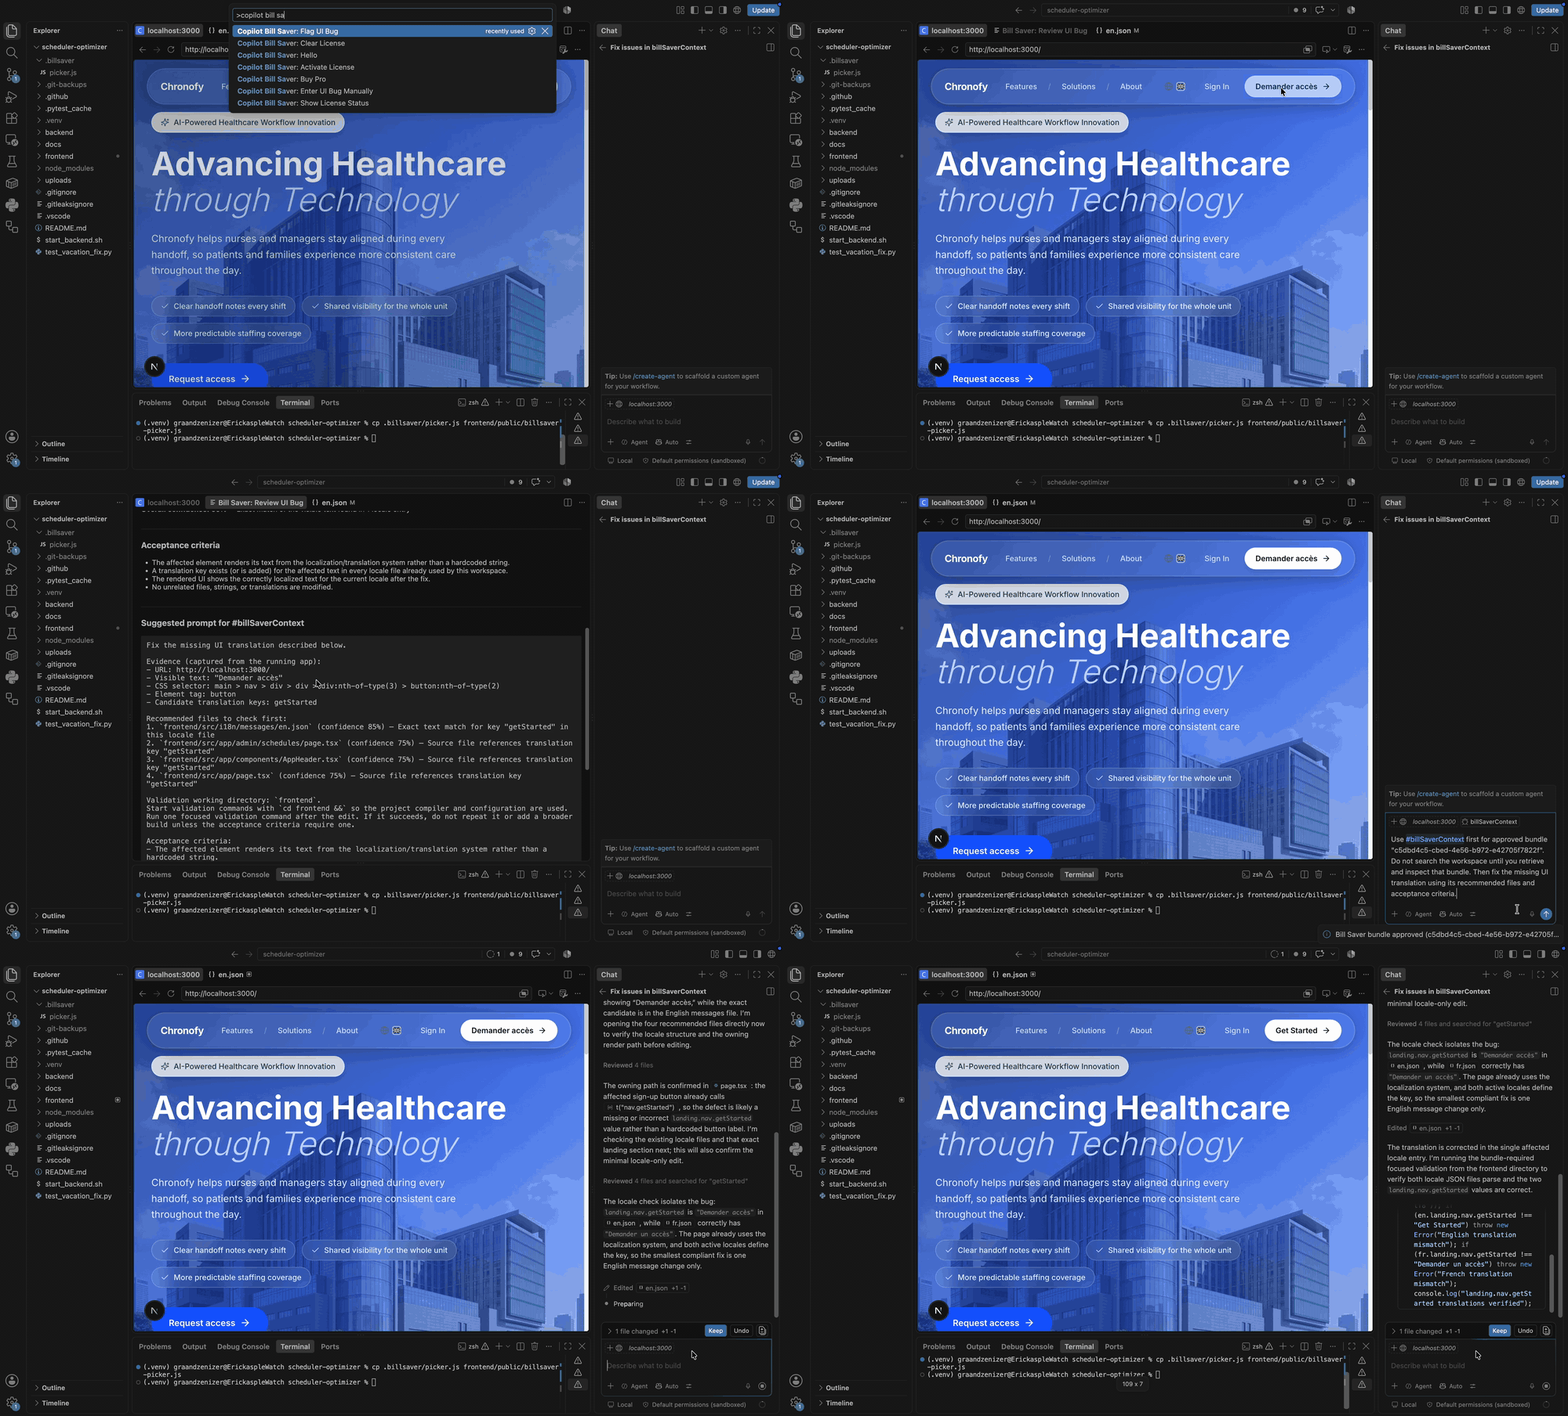
- Describe or select the problem. Start with a plain-language description,
or click the affected element in your running app.
- Review the context. Choose the issue category and check the evidence and
recommended files before anything reaches Copilot.
- Hand it to Copilot. Approve the bundle and paste the ready prompt into
Copilot Chat, so the agent can begin with a focused brief.
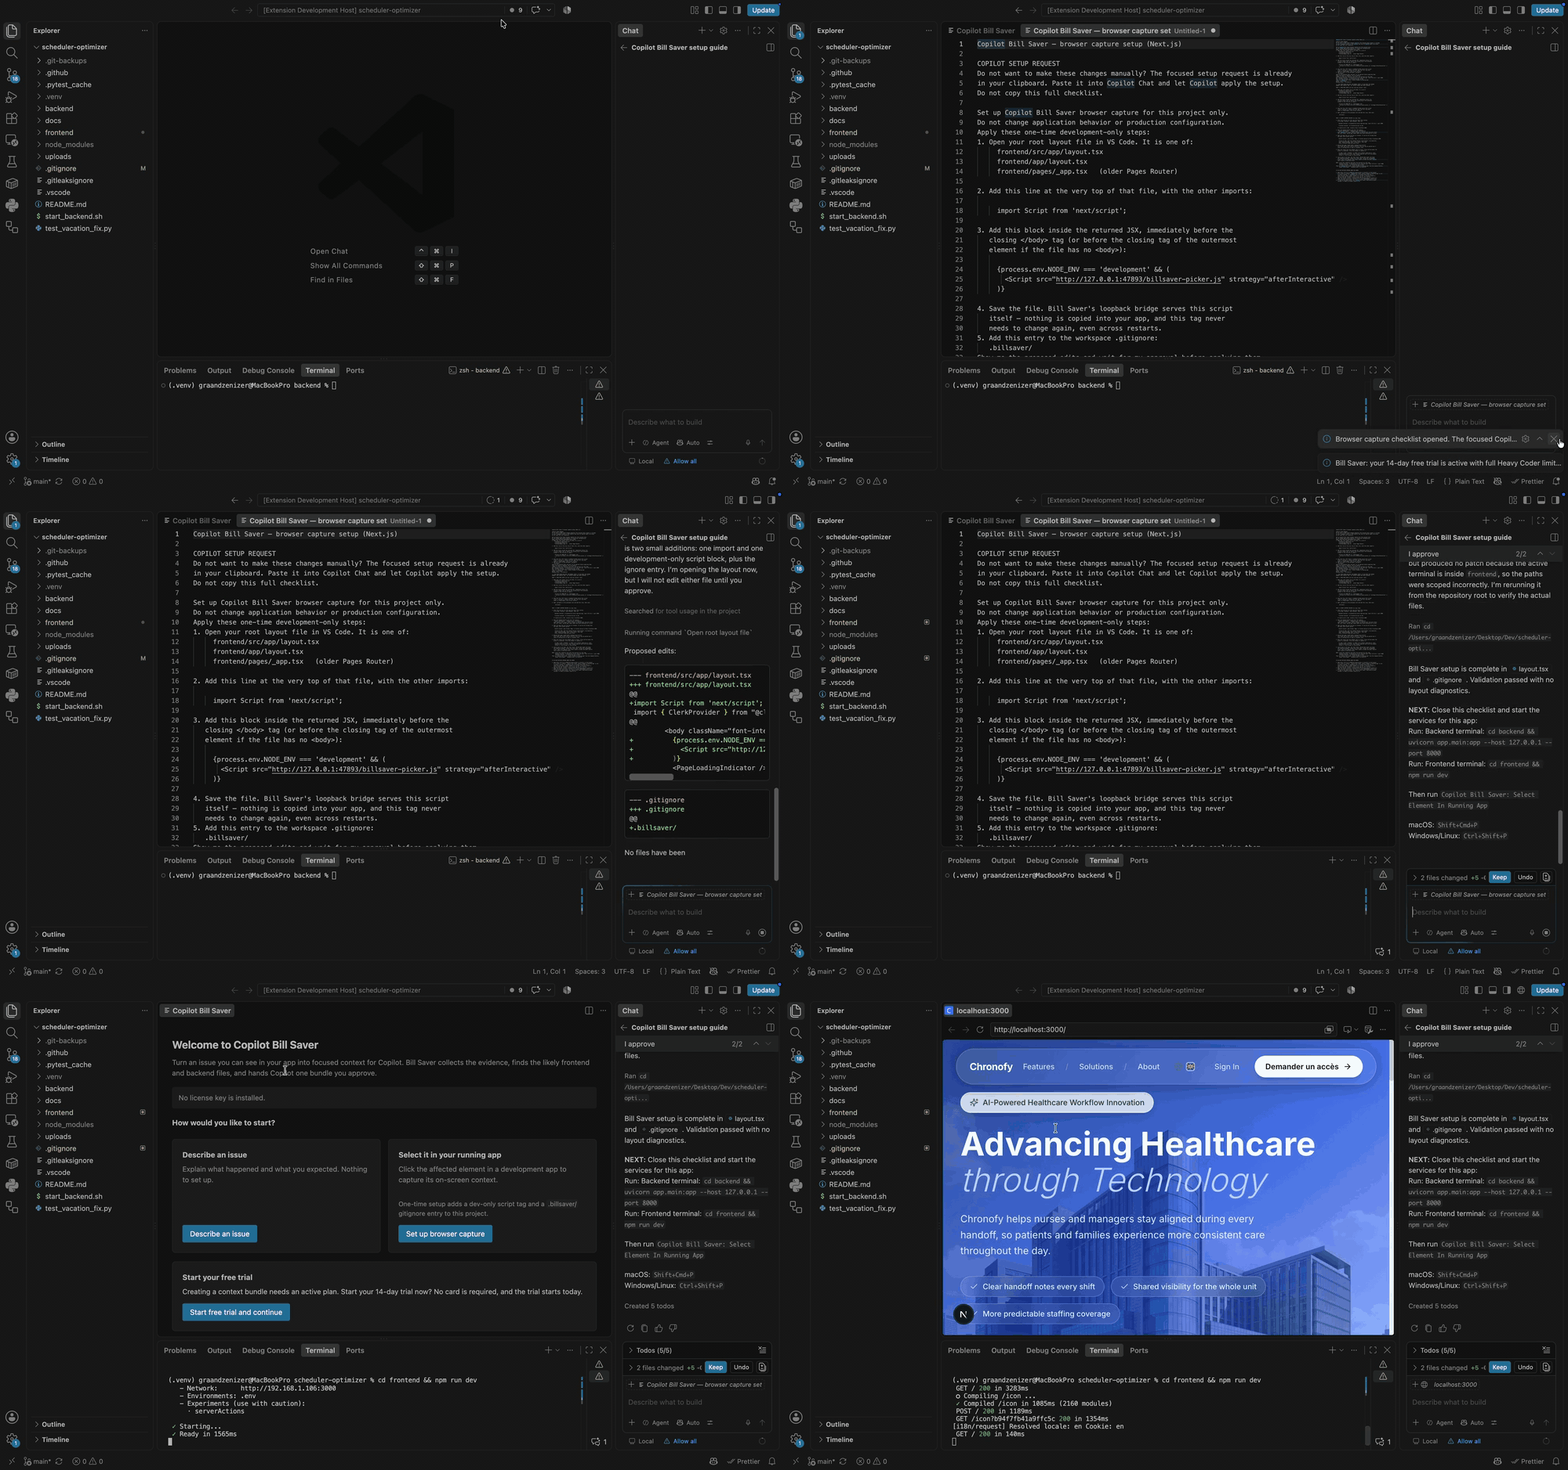
One-time browser setup
From a visible bug to a focused Copilot handoff
Bill Saver itself never calls a language model and never edits your workspace.
It only captures evidence, resolves likely files deterministically, and hands a
user-approved bundle to Copilot Agent, which does all searching, editing, and
testing.
What Bill Saver Does For You
- Starts from what you actually saw. Capture a visible label, URL, element
identifier, and selected category instead of trying to reconstruct the bug in
a long prompt.
- Points Copilot toward the likely code. Bill Saver checks your local
workspace deterministically and recommends relevant frontend, backend, or
localization files for your review. In monorepos, it can also follow bounded
workspace-local imports,
tsconfig/jsconfig path aliases, and workspace
package names into shared packages.
- Keeps you in control. Nothing is sent to Copilot until you approve the
bundle. You can edit, recapture, queue, or cancel first.
- Keeps your workspace private. Bill Saver never calls a language model or
edits your files. Native Copilot Agent performs any later searching, editing,
and testing.
Results depend on the issue, workspace, prompt, and Copilot behavior. Bill
Saver is designed to reduce unnecessary discovery and improve the handoff; it
does not guarantee a particular cost, speed, or outcome.
Prompting For Best Results
When Bill Saver copies the tool-first prompt, paste it first exactly as-is.
Then, for categories with broader intent (auth/permissions, navigation,
interactive behavior, loading/error state), add one short intent line so
Copilot optimizes for your expected outcome.
Use this add-on right after the copied prompt:
[Insert desired user outcome].
Success criteria: [Insert what should happen] and [Insert what must not happen].
Constraint: [Insert business/security/access rule, if any].
Example for auth/permissions:
Only admins should see and use the Delete Workspace action.
Success criteria: non-admins never see the action and cannot invoke it via route.
Constraint: preserve existing admin workflow and labels.
The Flow
- Install the extension and open the project you want to fix.
- A Welcome to Copilot Bill Saver screen opens on first run. You can reopen
it any time with Copilot Bill Saver: Get Started.
- Choose how to start: Describe an issue (no setup) or Select an element
in your running app. The first browser capture opens the detected stack's
one-time setup checklist: add its dev-only script tag and
.billsaver/ to
the project .gitignore, then reload the app page. Later captures skip this
checklist after the picker connects successfully.
- Choose an issue category, review the evidence and file recommendations, then
approve the bundle.
- Paste the copied prompt into Copilot Chat and press Enter.
Bill Saver starts a new installation's free trial when you begin a capture, then
opens that workflow directly. Use Copilot Bill Saver: Manage License whenever
you need to activate, inspect, or remove a license from this device.
Optional Browser Capture
Browser capture is only for people who want to click an element in a running
development app. It only works for apps that render in a browser or an
embedded Chromium view (React, Vue, Svelte, Angular, plain HTML/JS, Jinja2
templates, Electron apps, and similar) because the picker is a script injected
into that page's DOM. It cannot instrument native-only UI (native iOS/Android,
WinForms, Qt/GTK desktop apps, etc.) — for those, or if you'd rather skip
browser setup entirely, use Copilot Bill Saver: Describe An Issue instead.
Run Copilot Bill Saver: Get Started, choose Browser capture
checklist, and paste the detected stack's short checklist where you work. It
covers a single one-time setup step, and it copies a ready-to-paste Copilot
Chat request that applies that step for you.
Your picker URL
Every setup step needs one value: the URL your app must load the picker from.
Bill Saver always tells you the exact URL — use that, not an example.
Run Copilot Bill Saver: Get Started (or Select Element In Running App)
and read the Copilot Bill Saver output channel. The checklist and the
copied Copilot request are already filled in with it.
| Where you work |
Your picker URL |
| Local |
http://127.0.0.1:47893/billsaver-picker.js |
| Dev Container |
The forwarded URL Bill Saver prints, e.g. http://localhost:51893/... |
| Remote-SSH |
The forwarded URL Bill Saver prints |
| Codespaces (desktop VS Code) |
The forwarded URL Bill Saver prints |
| Codespaces (browser editor) |
Browser capture unavailable — use Describe An Issue |
Only the local case has a fixed port. In a Dev Container, on an SSH host, or in
a Codespace, Bill Saver runs next to your code while your browser runs
somewhere else, so VS Code forwards the bridge and may publish it on a
different port. The examples below use the local URL for readability;
substitute yours.
Let Copilot do the setup
The checklist copies this request automatically, but you can also paste it into
Copilot Chat yourself. Replace the URL with the one from your output channel:
Set up Copilot Bill Saver browser capture in this project, development only.
Add a dev-only script tag that loads:
  http://127.0.0.1:47893/billsaver-picker.js
Use whatever dev-only mechanism my stack already has, so the tag is never
included in a production build. Also add `.billsaver/` to .gitignore.
Show me the proposed edits and wait for my approval before applying them.
One prompt covers every stack: Copilot reads your project and picks the right
file and dev-only guard itself.
Browser Capture Reference
Each time Copilot Bill Saver: Select Element In Running App runs, it starts a loopback HTTP
bridge on 127.0.0.1, listening on a stable default port (47893, falling
back to the next free port only if that one is already taken) with a fresh
random session token every time. The bridge serves the current picker script
itself, live, at your picker URL — your app never
needs a copy of the file on disk. A copy is also written to
.billsaver/picker.js purely for troubleshooting.
Because the script is fetched fresh on every page load directly from the
bridge, the one-time <script> tag you add to your app keeps working forever,
even after restarting VS Code — there is nothing to re-copy or re-paste.
Picking an element inside a modal or dropdown
Some elements (a confirmation dialog, an open dropdown menu) only exist after
a real click, but a normal click while picking is active gets captured instead
of reaching your app. To open that UI first without triggering a capture:
- Press CapsLock. The picker steps completely out of the way: clicks,
hovers, navigation — everything works exactly as if Bill Saver weren't
running. A small on-page banner confirms picking is paused.
- On some systems (commonly macOS) one tap is enough — the CapsLock
indicator turns on and stays on, and picking stays paused until you press
CapsLock again.
- On others (commonly Windows/Linux) it behaves like a held modifier key —
picking stays paused only while the key is physically held down, and
resumes the instant you release it.
- Which one you get depends on how your OS and browser report the CapsLock
key, not on anything Bill Saver controls. If tapping it once doesn't
pause picking, hold it down instead.
- Click to open the modal or dropdown normally.
- Press CapsLock again (or release it, if yours needs holding) to resume.
The blue picker overlay returns immediately — no page reload, no restarting
the pick.
- Hover over the element that is now visible inside the opened modal/dropdown
and click it to capture it, same as any other element.
The one side effect either way: because CapsLock is also your keyboard's
caps-lock indicator at the OS level, using it here will leave that indicator
in whatever state your last press put it in — so you may end up typing in
capitals afterward until you press CapsLock once more, on its own, to turn it
back off. Shift, Ctrl/Cmd, and Alt/Option aren't used for this instead, because
browsers treat those as click modifiers — a modifier-click on a link opens a
new window/tab, and in Firefox, Alt triggers "Save Link As". CapsLock carries
no such meaning to any browser, which is why it's used here despite that one
side effect.
If the window loses focus while CapsLock is engaged (for example, you alt-tab
to another app), picking automatically resumes on its own so it can never get
stuck paused.
FastAPI + Jinja2 + vanilla JavaScript
Use this recipe when FastAPI renders Jinja2 templates. Add the script to the
template that actually renders the page you want to inspect — a page that does
not extend base.html will not pick up a tag added only to base.html.
One-time application setup (do this once, ever)
- Keep this entry in the project
.gitignore (only needed for the local
troubleshooting copy Bill Saver writes):
.billsaver/
- In the relevant Jinja2 template, add this script near the end of the
<body>, gated behind a debug/dev flag your app already exposes to
templates so it never needs to be added or removed by hand before a push:
{% if config.DEBUG %}
<script src="http://127.0.0.1:47893/billsaver-picker.js" defer></script>
{% endif %}
If your app doesn't expose a DEBUG/dev flag to Jinja yet, add one via a
context processor (for example, is_dev = os.getenv("ENV") == "development")
and use that instead of hardcoding the tag unconditionally. Bill Saver's
bridge serves this script itself — nothing is copied into static/, and this
tag never needs to change again, even across restarts.
Every capture session
- Start the FastAPI app:
source .venv/bin/activate
uvicorn main:app --reload --port 8000
- Run
Copilot Bill Saver: Select Element In Running App in VS Code. Keep the review panel
open.
- Reload
http://localhost:8000. This is what actually fetches the current
session directly from the bridge.
- If the app sets a Content Security Policy, add
http://127.0.0.1:* to
connect-src in development only. Do not add it to the production policy.
- In the browser tab showing your running app (a normal browser window, or
VS Code's own "Simple Browser: Show"), move your mouse over the broken
element on the page. A blue overlay confirms the picker is connected; click
that element to capture it. Press
Escape to cancel a pick. See
Picking an element inside a modal or dropdown
if the element only appears after a click.
Troubleshooting: no blue selector
Check these in order:
- Confirm you ran
Select Element In Running App, not only the review panel or manual-entry
command — the bridge that serves the script only runs while that command is
active.
- Open
http://127.0.0.1:47893/billsaver-picker.js directly in the browser.
If it fails to connect, the bridge is not running, or something else is
already using port 47893 — check the Bill Saver output channel for the
port it actually bound to and use that port in your script tag for this
session.
- Confirm the page source contains the script tag and that it loads with
HTTP 200:
curl -s http://localhost:8000/ | grep 'billsaver-picker.js'
curl -s -o /dev/null -w '%{http_code}\n' \
  http://127.0.0.1:47893/billsaver-picker.js
- If the browser console reports a CSP violation, add
http://127.0.0.1:* to connect-src in development only. Do not add it to
the production policy.
- Hard-refresh the development page. If the script loads but the selector is
still absent, confirm the review panel is still waiting for a pick.
Next.js app in frontend/
For a workspace containing frontend/src/app, use these one-time setup steps:
- Add this to the workspace
.gitignore (only needed for the local
troubleshooting copy Bill Saver writes):
.billsaver/
- Add the picker to
frontend/src/app/layout.tsx:
import Script from 'next/script';

// Inside the root layout body:
{
  process.env.NODE_ENV === 'development' && (
    <Script
      src="http://127.0.0.1:47893/billsaver-picker.js"
      strategy="afterInteractive"
    />
  );
}
Bill Saver's bridge serves this script itself — nothing is copied into
public/, and this tag never needs to change again.
For every capture session:
- From the workspace root, start the Next.js app from its frontend directory:
cd /path/to/your/project
cd frontend
npm run dev
- In VS Code, run
Copilot Bill Saver: Select Element In Running App. Keep the review panel
open.
- Reload the development browser page at
http://localhost:<your-app-port>.
This fetches the current session directly from the bridge — there is
nothing to copy or re-paste.
- In that browser tab, move the cursor over the untranslated element on the
page (not anywhere in VS Code). A blue overlay confirms the picker is
connected; click the element to capture it. Pressing
Escape cancels the
active pick.
- If the element is inside a modal, dropdown, or other UI that only opens
after a real click (for example, a "Delete session" confirmation dialog),
see Picking an element inside a modal or dropdown
below.
If your app defines a Content Security Policy, its development connect-src
must allow Bill Saver's loopback address:
http://127.0.0.1:*
Add this source only to the development policy; do not weaken the production
policy. If the picker script loads but no blue overlay appears, check the
browser console for a connect-src CSP violation.
If the Next.js app is at the workspace root instead of frontend/, keep the
same <Script> element in the root layout.tsx.
Vite and other bundlers
Add the same one-time script tag directly to index.html (or the equivalent
entry HTML for your dev server), gated behind whatever development-only flag
your app already has:
<script src="http://127.0.0.1:47893/billsaver-picker.js" defer></script>
The script long-polls the bridge, overlays the element under your cursor once a
pick is armed, and on click:
- prevents the click from triggering your app's normal click handling,
- captures only the bounded, allowlisted evidence described above,
- posts it to the bridge over
127.0.0.1 using the session token, and
- removes its listeners and overlay immediately.
It never reads form values, cookies, storage, or network data, and it is not
Playwright, a CDP client, or a framework adapter. Keep it development-only and
never ship the tag in a production build.
Describing An Issue Without Browser Capture
If instrumentation isn't wired up, times out, or you'd simply rather not modify
your app, choose Describe an issue: visible text, URL, translation key (if
known), target language, requested wording, and a component hint. The target
language and requested wording appear only for missing-translation issues.
Use the component hint for a component, file, test id, or route name, such as
OrderSummary or settings/save. Manually entered evidence is clearly labeled
"Manually entered" everywhere it's shown, including inside the bundle
Copilot Agent retrieves.
Using #billSaverContext
Once you approve a bundle, Bill Saver copies a prompt that names the approved
bundle, opens Copilot Chat, and shows a notification. Paste the copied prompt
and press Enter. The prompt requires #billSaverContext retrieval before any
workspace search. The tool:
- returns only bundles you've explicitly approved (never a draft),
- returns the most recently approved bundle if you don't specify an id,
- accepts an optional bundle id if you approved more than one,
- explains how to create a bundle if none has been approved yet, and
- never invokes a model, edits files, runs commands, or searches the workspace
itself — it only returns the evidence, recommended paths, reasons, and
acceptance criteria already in the approved bundle.
Everything Copilot Agent does after that — searching, editing, running
tests — is native Copilot Agent behavior, not Bill Saver.
Plans, Free Tier, And Activation
Start with the free trial:
- Install the extension and choose Describe An Issue or Select Element In
Running App. Your 14-day trial starts and continues into that workflow,
with no intervening confirmation screen or card required.
- The trial includes full Heavy Coder limits (750 context bundles per month).
- After the trial ends, every installation has 3 approved context bundles per
rolling 24 hours. The welcome screen shows the personal reset time and an
upgrade path when that cap is reached.
To buy a plan:
- Open
Copilot Bill Saver: Manage License from the Command Palette, then choose Buy Pro.
- Choose a plan (all prices USD):
- Saver — $7/month, 150 context bundles per month.
- Heavy Coder — $19/month, 750 context bundles per month.
- Business — $49/seat/month, per-seat billing and extra installations,
with a fair-use ceiling of 2,000 context bundles per seat per month.
- Complete the Stripe-hosted checkout.
- Copy the license key from the plain-text confirmation page.
- In VS Code, run
Copilot Bill Saver: Manage License, then choose
Activate or replace license key.
A context bundle is one UI issue you reviewed and approved. Drafts,
recaptures, and cancelled reviews are never counted. The post-trial allowance
resets 24 hours after that installation's first free approval; paid quotas reset
at the start of each calendar month.
The key is stored in VS Code Secret Storage and validated by the Bill Saver
license service. A paid plan raises the monthly quota and installation limit.
- Saver supports up to 2 installations.
- Heavy Coder supports up to 3 installations.
- Business supports up to 3 installations per seat.
- Every installation can start one 14-day free trial; after it expires, it falls
back to the 3-bundle rolling daily cap.
- Legacy
$17/month and $89 lifetime licenses stay valid at Heavy Coder
limits.
- Each VS Code installation receives a random identifier stored in Secret
Storage. Bill Saver sends only a hash of that identifier to the license
service; it does not use a hardware fingerprint.
- In Manage License, choose Remove license from this device to release
the current installation slot when the license service is reachable.
- A successfully validated installation can use the existing seven-day offline
grace period, never beyond a subscription's expiration.
Privacy And Security
- The bridge binds only to
127.0.0.1 on a stable default port (falling back
to the next free port only if that one is taken); it is never reachable from
another machine.
- Every request requires a cryptographically random session token generated
fresh each time the bridge starts.
- Captured evidence is limited to a strict allowlist: URL (query string and
credentials stripped), bounded visible text, a CSS selector, the tag name,
and the attributes
id, class, role, aria-label, data-testid, and a
few translation-related data-* attributes.
- Bill Saver never captures HTML, form values, passwords, cookies, storage,
network data, hidden text, or credentials.
- Free text is scanned and secret-shaped substrings (bearer tokens, JWTs, cloud
access keys, vendor API keys) are redacted before they're ever stored.
- File recommendations are validated to be workspace-relative; anything that
would escape the workspace (absolute paths,
.. traversal) is rejected.
- Approved bundles live only in memory for the current VS Code session and are
cleared when the extension deactivates. Nothing is written to disk except a
troubleshooting-only copy at
.billsaver/picker.js; the picker your app
actually loads is served live by the bridge and never touches your app's
own files.
- Bill Saver makes zero language-model calls and performs no workspace
edits. All editing is done by native Copilot Agent, which you review as
normal.
Anonymous Usage Signals
Bill Saver sends a small number of anonymous product signals so we can tell how
many installs actually start working, which the Marketplace dashboard cannot
report:
- Three events only:
activated, command_attempted, and trial_started.
- Each event is sent at most once per installation per day.
- The payload contains only a random installation identifier (hashed on the
server), the Bill Saver version, the editor version, and the editor host and
name. There are no workspace names, file paths, source code, captured
evidence, IP-derived identity, or machine identifiers.
- Nothing is sent if you turn off editor telemetry
(
telemetry.telemetryLevel set to off).
- Reporting is fire-and-forget: a failure never blocks or slows any command.
Limitations (v1)
- Bill Saver supports 13 predefined issue categories (missing UI translation,
accessibility, responsive layout, visual styling, form validation,
navigation/routing, interactive behavior, loading/error state, content/copy,
auth/permissions, data formatting, notifications/feedback, and general UI
bug). The category is always the user's explicit choice in the review panel;
Bill Saver never infers it.
- Translation resolution is local, deterministic text search (exact/normalized
key and value matching, then heuristic hints, then filename conventions).
Other categories match captured visible text and element identifiers in
bounded source content, then use deterministic path/keyword ranking. After
either resolver, Bill Saver can follow workspace-local imports into shared
packages. It does not understand build systems or execute workspace code,
and it can miss files that do not match the scanned evidence.
- Monorepo expansion is intentionally bounded: depth 2, four related files,
and twelve file reads. It supports relative imports,
tsconfig/jsconfig
paths aliases, workspace package names and subpaths, and common package
entry points. It does not read node_modules, resolve extends chains,
model framework/build-tool resolution, or reconstruct source maps.
- The bridge and its session token are per VS Code session; reopening the
window or re-running the command regenerates the token, but the port and
the one-time script tag in your app stay the same, so nothing needs
re-pasting.
- Instrumentation assumes a single primary workspace folder.
- There is no persistence across VS Code restarts: approved bundles are
in-memory only.
- This is not a substitute for source maps, Playwright, or CDP-based tooling;
it intentionally does none of that.
Model Selection
If you want automatic model tiering for everyday coding, use native Copilot
Auto model selection in VS Code. Bill Saver does not route models, and does
not claim or measure guaranteed savings for that feature.
Continuous Improvement
Bill Saver is actively maintained. We continuously refine ranking quality,
prompt guidance, and UX guardrails based on production feedback while keeping
the privacy and deterministic-resolution constraints intact. Roadmap priorities
and release behavior are tracked and enforced in our internal planning process,
and shipped progress is reflected in Marketplace release notes.
Licensed Access
New installations get a 14-day trial automatically when they start a capture.
After it expires, the commands work on the post-trial rolling daily tier. See
Plans, Free Tier, And Activation for
purchase, installation limits, slot release, and offline-grace details.
Support
Copilot Bill Saver is closed-source commercial software, so there is no public
source repository. For questions, bug reports, and feature requests, use the
Q & A tab on the extension's Visual Studio Marketplace page, or email
support@vaultdeposit.ca.
License
Copyright (c) 2026 VaultDeposit Technologies Inc. All rights reserved.
Copilot Bill Saver is proprietary, commercially licensed software. It is
licensed, not sold, and use requires an active license key. Copying,
redistribution, modification, reverse engineering, and circumventing the
activation or installation-limit mechanisms are not permitted. See the bundled
LICENSE file for the full terms.

