AI Proxy
English | 中文
A professional VS Code extension for running and managing a local OpenAI-compatible AI proxy directly inside your editor.
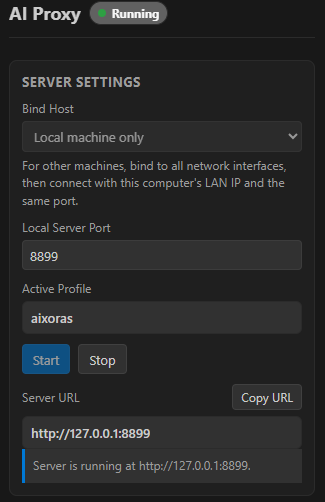
AI Proxy gives teams a lightweight control center for routing AI requests through a local proxy, switching provider profiles, controlling bind settings, and collecting request/response logs per project. The UI is available from the Activity Bar and the bottom Panel, and VS Code can also move the view between locations using the standard view drag-and-drop workflow.
Why AI Proxy
Modern AI development often requires testing multiple providers, models, API keys, and local network configurations. AI Proxy keeps that workflow inside VS Code so you can start, stop, inspect, and adjust your proxy without leaving the project you are working on.
Use it to:
- Run a local OpenAI-compatible proxy with one click.
- Switch between multiple provider profiles without editing scripts or environment files.
- Keep request logs under the active project root for easier debugging and audit trails.
- Bind locally for private development or expose the proxy to your LAN when testing from other machines.
- Package the extension as a VS Code Marketplace
.vsix or an Open VSX .vsix artifact.
Key features
Server control panel
- Start and stop the proxy from the AI Proxy view.
- Choose the bind host:
- Local machine only:
127.0.0.1.
- All network interfaces:
0.0.0.0.
- Configure the local port, default
8899.
- Configure max retained log files, default
10.
- Copy the generated local server URL.
- Lock server settings while the proxy is running to prevent accidental runtime drift.
Profile management
Create and maintain multiple proxy profiles. Each profile stores the target base URL, API key, model, and model-replacement behavior.
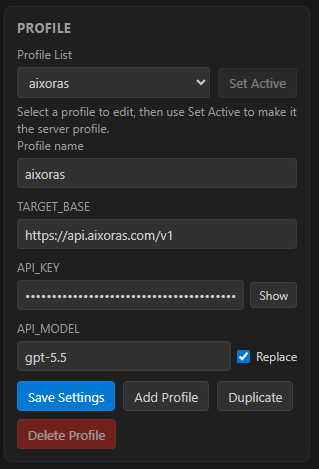
Profile settings include:
TARGET_BASE — the upstream OpenAI-compatible base URL.API_KEY — the upstream API key used by the local proxy.API_MODEL — the model value to use when model replacement is enabled.AI_MODEL_REPLACE — when enabled, the proxy replaces the request model field with the selected profile model.
The active profile is used whenever the local proxy starts. While the proxy is running, selecting another profile and clicking Use updates the target, API key, model, and model-replacement behavior for new requests without restarting the server or interrupting requests already in progress. Active profiles are protected from deletion.
Project-aware logs
AI Proxy writes logs to .ai-proxy-logs under the selected project root.
Project root behavior:
- Auto mode uses the active editor workspace when available.
- If no active editor workspace is available, it uses the first workspace folder.
- If no workspace is available, it falls back to the extension path.
- Manual mode lets you choose and remember a custom project root directory.
Log tools include:
- Open log directory.
- Open latest log.
- Clear logs.
- View extension output.
Flexible VS Code placement
AI Proxy contributes views to both:
- The Activity Bar side container.
- The bottom Panel container.
You can use the built-in VS Code view context menu or drag-and-drop support to place the control view where it best fits your workflow.
Getting started
Run in development
Open the ai-proxy folder in VS Code.
Install dependencies:
npm install
Press F5, or use the Run AI Proxy Extension launch configuration.
Open the AI Proxy view from the Activity Bar or bottom Panel.
Configure a profile and click Start.
Install from a packaged VSIX
After packaging, install the generated .vsix file with one of these options:
code --install-extension dist\vscode-marketplace\ai-proxy-vscode-0.0.1.vsix
Or use VS Code:
- Open the Extensions view.
- Select
... from the Extensions view title bar.
- Choose
Install from VSIX....
- Select the generated package.
Configuration reference
| Setting |
Default |
Description |
| Bind Host |
127.0.0.1 |
The local interface used by the proxy. Use 0.0.0.0 only when other machines need access. |
| Local server port |
8899 |
The port used by the local proxy server. |
| Max log files |
10 |
Maximum retained log files in .ai-proxy-logs. |
| Project Root Directory |
Auto |
Controls where .ai-proxy-logs is created. |
| TARGET_BASE |
https://api.aixoras.com/v1 |
Upstream OpenAI-compatible API base URL. |
| API_KEY |
empty |
Upstream API key. |
| API_MODEL |
gpt-5.5 |
Profile model used when replacement is enabled. |
| AI_PROXY_MODEL_REPLACE |
off |
Replaces request model values only when checked. |
Network access notes
Use 127.0.0.1 for private local development. This only accepts connections from the same machine.
Use 0.0.0.0 when another machine on the same network needs to connect. The Server URL field then lists every non-loopback IPv4 address reported by the machine's network interfaces, including physical, VPN, and virtual adapters. Other machines should use an address reachable from their network, for example http://192.168.1.25:8899.
These are local interface addresses. A public internet address behind NAT cannot be determined from network interfaces alone and requires an external service or router configuration. Avoid binding to all interfaces on untrusted networks unless you understand the exposure risk.
Security notes
AI Proxy stores profile configuration in VS Code extension workspace/global state. Treat API keys as sensitive data:
- Do not commit screenshots or logs containing real API keys.
- Do not publish packages with private credentials embedded in source files.
- Prefer local-only binding unless LAN access is required.
- Clear logs before sharing a workspace if logs may contain sensitive request or response data.
Package for distribution
The development packaging helper lives in dev/package-extension.js.
From the ai-proxy directory:
npm install
npm run package:vsix
npm run package:vsx
npm run package:all
Package scripts:
npm run package:vsix creates a VS Code Marketplace-ready .vsix file under dist/vscode-marketplace.npm run package:vsx creates an Open VSX-ready .vsix file under dist/open-vsx.npm run package:all creates both outputs after cleaning dist.npm run check validates the extension and proxy server JavaScript syntax.
VS Code Marketplace and Open VSX both use .vsix packages. The separate output folders are provided for release clarity; Open VSX does not require a different binary package format.
Publishing notes
VS Code Marketplace
You can publish with vsce publish or manually upload the generated .vsix through the Visual Studio Marketplace publisher portal.
Open VSX
You can publish with ovsx, for example:
npx ovsx publish dist\open-vsx\ai-proxy-vscode-0.0.1.vsix -p <token>
Keep publishing tokens in a secure environment variable or secret store. Never commit tokens to the repository.
Requirements
- VS Code
1.90.0 or newer.
- Node.js available to the VS Code extension host.
- Network access to your configured upstream OpenAI-compatible API endpoint.
License
MIT
Recommended API Providers
Here is an API relay service I currently use. I am not affiliated with them; I simply use it and think it is worth recommending. It offers access to the latest models at highly competitive prices. While its stability is generally acceptable and you might encounter occasional errors, its excellent cost-effectiveness makes it something I still highly recommend.
If you decide to register, I would greatly appreciate it if you use my referral link below, which helps support my work through their referral program. After registering and signing in, you can also join the provider's WeChat group from the official website and receive free trial credits.
If you are looking for cost-effective API relay/proxy services, you can find a comparison list of prices and response times for various providers on the following website. Please note that this project is not affiliated with the website in any way; the link is provided for reference only, and we assume no liability for any risks associated with its use.
AI Proxy (中文说明)
English | 中文
一个专业的 VS Code 扩展,可直接在编辑器内运行和管理本地的 OpenAI 兼容 AI 代理。
AI Proxy 为团队提供了一个轻量的控制中心,用于将 AI 请求通过本地代理转发、切换服务商配置、管理绑定设置,以及按项目收集请求/响应日志。界面可从活动栏(Activity Bar)和底部面板(Panel)打开,您也可以用 VS Code 标准的拖放操作在不同位置之间移动该视图。
为什么选择 AI Proxy
现代 AI 开发经常需要测试多个服务商、模型、API 密钥和本地网络配置。AI Proxy 把这些工作流程都放在 VS Code 内部,让您无需离开当前项目就能启动、停止、检查和调整代理。
您可以用它来:
- 一键运行本地 OpenAI 兼容代理。
- 在多个服务商配置之间切换,无需编辑脚本或环境变量文件。
- 将请求日志保存在当前项目根目录下,便于调试和审计追踪。
- 绑定到本地进行私有开发,或在从其他机器测试时将代理暴露到局域网(LAN)。
- 将扩展打包为 VS Code Marketplace 的
.vsix 或 Open VSX 的 .vsix 产物。
主要功能
服务器控制面板
- 从 AI Proxy 视图启动和停止代理。
- 选择绑定主机:
- 仅本机:
127.0.0.1。
- 所有网络接口:
0.0.0.0。
- 配置本地端口,默认
8899。
- 配置最大保留日志文件数,默认
10。
- 复制生成的本地服务器 URL。
- 在代理运行时锁定服务器设置,防止运行期间意外改动。
配置管理
创建和维护多个代理配置。每个配置会保存目标基础 URL、API 密钥、模型以及模型替换行为。
配置项包括:
TARGET_BASE — 上游 OpenAI 兼容的基础 URL。API_KEY — 本地代理使用的上游 API 密钥。API_MODEL — 启用模型替换时使用的模型值。AI_MODEL_REPLACE — 启用后,代理会将请求中的 model 字段替换为所选配置的模型。
本地代理启动时会使用当前激活的配置。代理运行期间,选择另一个配置并点击 Use,即可为后续新请求更新目标地址、API 密钥、模型和模型替换设置,无需重启服务器,也不会中断正在处理的请求。激活的配置受到保护,不能被删除。
项目感知的日志
AI Proxy 会将日志写入所选项目根目录下的 .ai-proxy-logs。
项目根目录的行为:
- 自动模式在有活动编辑器工作区时使用该工作区。
- 如果没有活动编辑器工作区,则使用第一个工作区文件夹。
- 如果没有任何工作区,则回退到扩展路径。
- 手动模式允许您选择并记住一个自定义的项目根目录。
日志工具包括:
- 打开日志目录。
- 打开最新日志。
- 清空日志。
- 查看扩展输出。
灵活的 VS Code 布局
AI Proxy 同时向以下两处贡献视图:
您可以使用 VS Code 内置的视图右键菜单或拖放功能,把控制视图放到最适合您工作流程的位置。
快速开始
在开发模式下运行
在 VS Code 中打开 ai-proxy 文件夹。
安装依赖:
npm install
按 F5,或使用 Run AI Proxy Extension 启动配置。
从活动栏或底部面板打开 AI Proxy 视图。
配置一个 profile 并点击 Start。
从打包好的 VSIX 安装
打包完成后,用以下任一方式安装生成的 .vsix 文件:
code --install-extension dist\vscode-marketplace\ai-proxy-vscode-0.0.1.vsix
或者使用 VS Code:
- 打开扩展(Extensions)视图。
- 在扩展视图标题栏选择
...。
- 选择
Install from VSIX...。
- 选择生成的包。
配置参考
| 设置项 |
默认值 |
说明 |
| Bind Host |
127.0.0.1 |
代理使用的本地接口。仅当其他机器需要访问时才使用 0.0.0.0。 |
| Local server port |
8899 |
本地代理服务器使用的端口。 |
| Max log files |
10 |
.ai-proxy-logs 中保留的最大日志文件数。 |
| Project Root Directory |
Auto |
控制 .ai-proxy-logs 的创建位置。 |
| TARGET_BASE |
https://api.aixoras.com/v1 |
上游 OpenAI 兼容的 API 基础 URL。 |
| API_KEY |
空 |
上游 API 密钥。 |
| API_MODEL |
gpt-5.5 |
启用替换时使用的配置模型。 |
| AI_PROXY_MODEL_REPLACE |
关闭 |
仅在勾选时替换请求中的 model 值。 |
网络访问说明
私有本地开发请使用 127.0.0.1。它只接受来自同一台机器的连接。
当同一网络中的另一台机器需要连接时,使用 0.0.0.0。此时 Server URL 会列出本机网络接口报告的所有非回环 IPv4 地址,包括物理网卡、VPN 和虚拟网卡。其他机器应选择其所在网络能够访问的地址,例如 http://192.168.1.25:8899。
这些地址是本地网络接口地址。仅检查本机网卡无法确定 NAT 后面的公网地址;获取公网地址需要外部服务或路由器配置。除非您了解暴露风险,否则不要在不受信任的网络上绑定到所有接口。
安全说明
AI Proxy 将配置保存在 VS Code 扩展的工作区/全局状态中。请将 API 密钥视为敏感数据:
- 不要提交包含真实 API 密钥的截图或日志。
- 不要发布在源文件中嵌入了私有凭据的包。
- 除非需要局域网访问,否则优先使用仅本地绑定。
- 如果日志可能包含敏感的请求或响应数据,在共享工作区前请先清空日志。
打包发布
开发用的打包辅助脚本位于 dev/package-extension.js。
在 ai-proxy 目录下:
npm install
npm run package:vsix
npm run package:vsx
npm run package:all
打包脚本说明:
npm run package:vsix 在 dist/vscode-marketplace 下生成可用于 VS Code Marketplace 的 .vsix 文件。npm run package:vsx 在 dist/open-vsx 下生成可用于 Open VSX 的 .vsix 文件。npm run package:all 在清理 dist 后同时生成两种输出。npm run check 校验扩展和代理服务器的 JavaScript 语法。
VS Code Marketplace 和 Open VSX 都使用 .vsix 包。分开的输出文件夹只是为了发布时更清晰;Open VSX 并不要求不同的二进制包格式。
发布说明
VS Code Marketplace
您可以使用 vsce publish 发布,或通过 Visual Studio Marketplace 发布者门户手动上传生成的 .vsix。
Open VSX
您可以使用 ovsx 发布,例如:
npx ovsx publish dist\open-vsx\ai-proxy-vscode-0.0.1.vsix -p <token>
请将发布令牌保存在安全的环境变量或密钥存储中。切勿将令牌提交到仓库。
环境要求
- VS Code
1.90.0 或更新版本。
- VS Code 扩展宿主可用的 Node.js。
- 能够访问您配置的上游 OpenAI 兼容 API 端点的网络。
许可证
MIT
推荐的 API 服务商
如果您正在寻找高性价比的 API 中转服务,可以通过以下网站查看各大中转站的价格与响应速度对比列表。需要说明的是,本软件与该网站无任何关联,仅做推荐,不承担任何使用风险。

