Skip to content
| Marketplace
Sign in
Visual Studio Code>Programming Languages>TermMate: AI Coding Agent (Claude, Codex & Pi)New to Visual Studio Code? Get it now.
TermMate: AI Coding Agent (Claude, Codex & Pi)

TermMate: AI Coding Agent (Claude, Codex & Pi)

TermMate

|
27 installs
| (0) | Free
Agentic AI coding assistant bridging Claude Code, Codex, and Pi coding agent into VS Code for seamless automation.
Installation
Launch VS Code Quick Open (Ctrl+P), paste the following command, and press enter.
Copied to clipboard
More Info

TermMate

Agentic Coding Mate from Design to meet Code.

Visit termmate.app to explore more features.

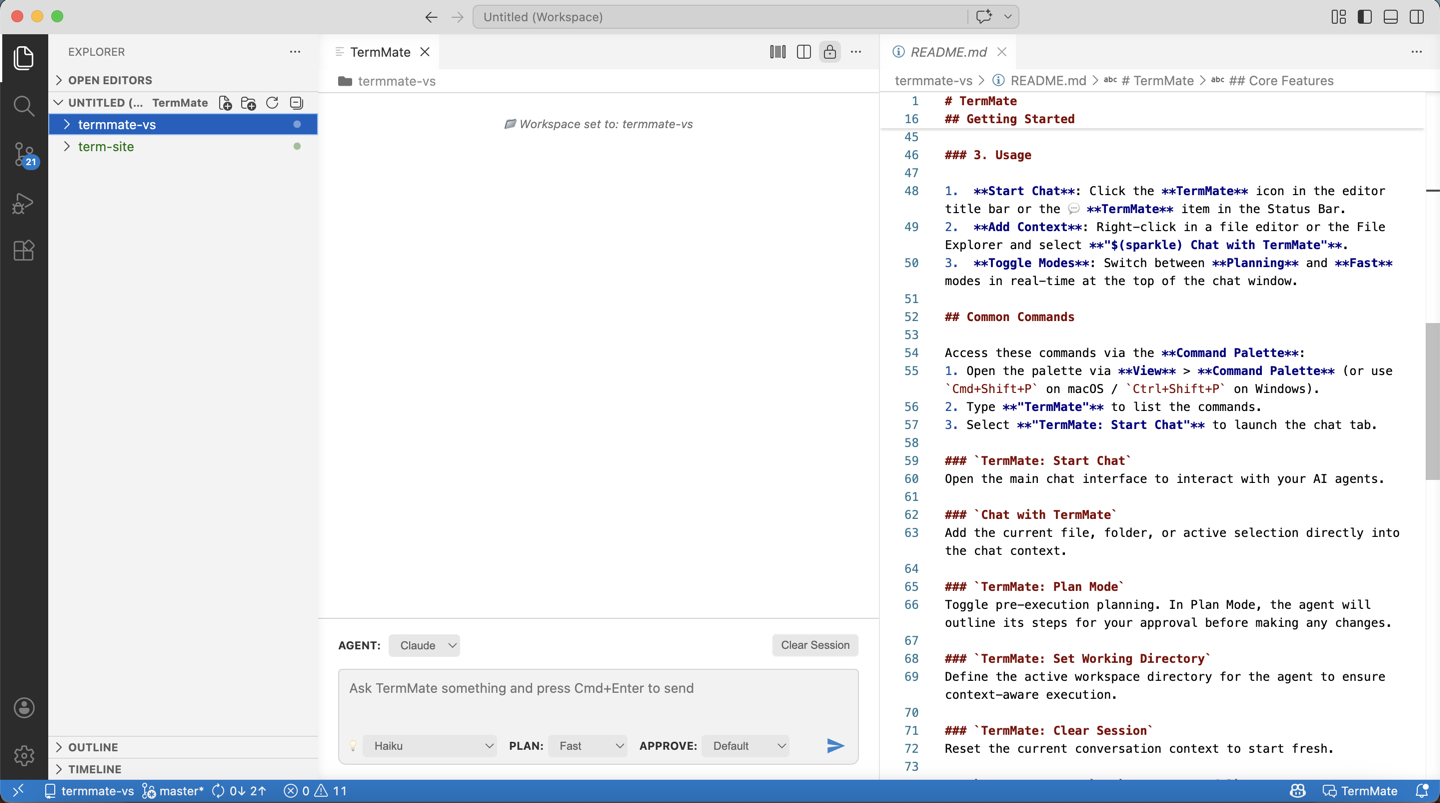
TermMate Preview

TermMate is a professional-grade AI coding agent for Visual Studio Code that supports multiple agent providers — Claude Code, OpenAI Codex, and Pi coding Agent. It builds a seamless native agentic interface directly within your editor for autonomous task execution, codebase exploration, and smart refactoring.

Core Features

  • Built on Agent: Leverages industry-standard coding agents like Claude Code, Codex, and Pi Agent for high-reliability AI assistance.
  • Context Awareness: Seamlessly inject files, folders, or specific code selections into the AI session via native VS Code context menus for grounded, project-specific assistance.
  • Resume Session: Pick up any previous conversation exactly where you left off — sessions are listed by summary and date for all three agents.
  • Rewind Conversation: Roll back to any earlier point in a conversation with a single click, restarting the agent fresh from that checkpoint without discarding the original history.
  • Smart File Mention: Type @ in the chat input for real-time suggestions of files and workspace symbols to inject as context.
  • Deep Editor Integration: A native-first experience fully integrated with VS Code's Status Bar, chat toolbar, and context menus for a frictionless development loop.

Getting Started

1. Install an Agent CLI

TermMate relies on external agent CLIs. If you already have Claude Code, Codex, or Pi Agent installed, TermMate will detect them automatically — no extra setup needed.

Otherwise, click the agent selector in the chat window and choose ⤓ Install Agent at the bottom of the dropdown to install from within VS Code.

** you can also install manually from your terminal:**

Claude Code:

curl -fsSL https://claude.ai/install.sh | bash

Codex:

curl -fsSL https://chatgpt.com/codex/install.sh | sh

Pi Agent:

curl -fsSL https://pi.dev/install.sh | sh

Note: TermMate automatically detects CLI installation paths across multiple environments, including Homebrew, npm-global, Yarn, and common local binary directories. You typically don't need to manually configure paths.

2. Authentication

Authenticate the agents via your terminal:

Claude Code:

claude /login

Codex:

codex login

Pi Agent:

pi /login

Alternatively, you can authenticate by setting API keys via environment variables in TermMate's settings — for example, authenticating Pi Agent with a Gemini API key by adding this to your settings.json:

{
    "termmate.env": {
        "GEMINI_API_KEY": "your-gemini-api-key"
    }
}

See Custom Environment Variables for details.

3. Start Chat

Click the TermMate icon in the editor title bar, the 💬 TermMate item in the Status Bar, or run TermMate: Start Chat from the Command Palette to open the chat panel. Type your message and press Cmd+Enter (macOS) or Ctrl+Enter (Windows/Linux) to send.

Chat Panel

The chat panel is the primary interface. The toolbar at the top gives you direct access to all key controls:

Agent & Model Selector

Click the agent name in the toolbar to switch between Claude, Codex, and Pi Agent, or to select a specific model. No command palette needed.

Plan Mode

Click the Plan toggle in the toolbar to switch between Fast (direct execution) and Planning (deliberative reasoning) modes. In Planning mode, the agent outlines its steps for your review before making any changes.

Approve Mode

Click the Approve control in the toolbar to set how much manual approval is required for agent tool actions:

  • Default: Prompts for your approval before each action.
  • Allow Edit: Automatically approves safe read/edit operations; still prompts for risky commands.
  • Accept All: Automatically approves all actions, including shell command execution, for maximum autonomy.

Stop

Click the Stop button in the toolbar to interrupt the agent mid-response at any time.

Resume Session

Click the $(history) button in the toolbar to browse and restore any previous session. Sessions are listed with their summary title, date, and short session ID. The currently active session is marked with ●.

Usage & Key Features

Add File or Selection as Context

Right-click in any file editor or the File Explorer and select TermMate: Chat with Agent. This opens the chat panel and inserts a reference (@filename or @filename#L1-10) into the message input. Tagged files are automatically sent as context to the active agent.

Smart File Mention

Type @ in the chat input for real-time file and symbol suggestions. Select a file to insert it as context directly in your message.

Rewind Conversation

Every user message has a ↩ button on its right side. Clicking it opens a confirmation dialog — on confirm, all messages after that point are removed and the agent restarts from that checkpoint. TermMate forks the session at the selected prompt without discarding the original history.

Set Working Directory

Right-click any folder in the File Explorer and select TermMate: Set Working Directory to set the agent's working directory for command execution and file access.

Clear and Start New conversation

Click the + icon in the editor title bar to start a fresh conversation. The previous conversation stays available in Sessions.

Shortcuts

Action macOS Windows/Linux
Send Message Cmd+Enter Ctrl+Enter
Navigate Input History Up / Down Up / Down
Mention File @ @

Configuration

Open VS Code Settings and search for termmate to configure the extension.

Agent CLI Paths

TermMate automatically detects most agent CLI installation paths. Configure manually if you use a custom installation location or automatic detection fails.

{
    "termmate.claude_command": "/path/to/your/custom/claude",
    "termmate.codex_command": "/path/to/your/custom/codex",
    "termmate.pi_command": "/path/to/your/custom/pi"
}

Custom Environment Variables

The termmate.env setting injects environment variables into the agent process at startup. This is useful for providing API keys or custom base URLs without altering your global system configuration.

For example, to route Claude through OpenRouter:

{
    "termmate.env": {
        "ANTHROPIC_BASE_URL": "https://openrouter.ai/api/v1",
        "ANTHROPIC_AUTH_TOKEN": "sk-openrouter-token",
        "ANTHROPIC_API_KEY": ""
    }
}

Support & Feedback

We value your feedback and suggestions. Please join our community to report issues or discuss new features:

  • Discussions: flashmodel/discussions

Privacy & Security

TermMate does not send your entire workspace or file contents to any external servers.

Your data is only sent to the respective LLM services under the following conditions:

  • Any text you manually type into the TermMate chat panel.
  • The contents of specific files you explicitly tag using the @filename syntax.
  • The outputs of shell commands or file contents that the agent explicitly requests.

How TermMate interacts with agents:

  • Local Execution: The core plugin logic runs entirely on your local machine via the official CLI tools (claude, codex, or pi) installed on your system.
  • No Data Collection: TermMate does not collect, store, or transmit any of your source code or usage telemetry to our servers.
  • Direct Agent Communication: Data goes directly to Anthropic or OpenAI using your own configured authentication credentials — no third-party middleman.

Copyright © 2026 TermMate. All rights reserved. Licensed under Proprietary License.

  • Contact us
  • Jobs
  • Privacy
  • Manage cookies
  • Terms of use
  • Trademarks
© 2026 Microsoft