Skip to content
| Marketplace
Sign in
Visual Studio Code>Programming Languages>SnowflakeNew to Visual Studio Code? Get it now.
Snowflake

Snowflake

Snowflake

snowflake.com
|
209,769 installs
| (51) | Free
Connect to Snowflake, write and execute sql queries, and view results without leaving VS Code.
Installation
Launch VS Code Quick Open (Ctrl+P), paste the following command, and press enter.
Copied to clipboard
More Info

Snowflake

This extension enables you to connect to Snowflake, write and execute sql queries, and view results without leaving VS Code.

Features
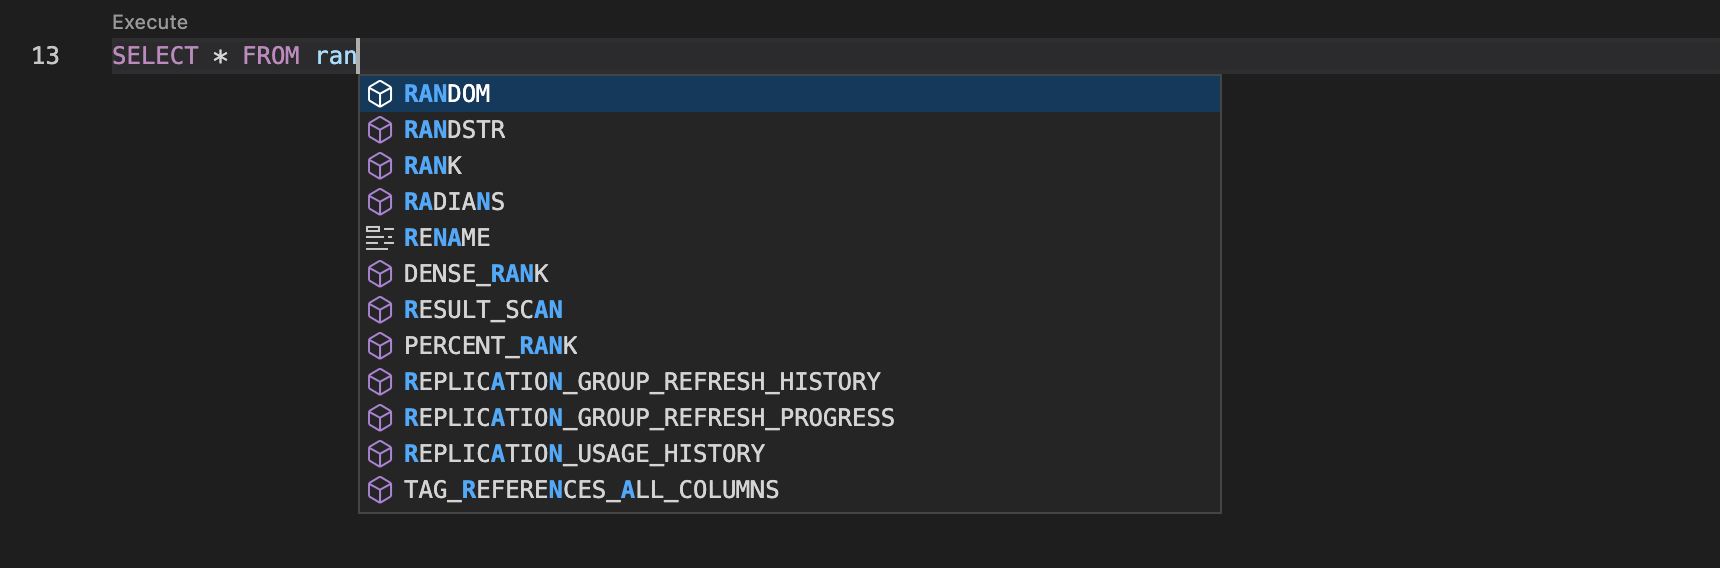
  • Snowflake SQL Intellisense

    • Autocompletion for object names, keywords, and built-in functions
    • Signature help for built-in functions
    • Documentation for keywords and built-in functions on hover
  • Accounts & Sessions

    • Connect to and quickly switch between multiple Snowflake accounts
    • View and set role, database, schema, and warehouse for the active session
    • Enable secondary roles for the active session
  • Object Explorer

    • View detailed information on items within the explorer, grouped by database kind.
    • Copy the object name to your clipboard for use in query authoring
  • Stage Operations

    • LIST stage contents
    • GET files from a stage
    • PUT files and folders to an internal stage
  • Query Execution

    • Execute single or multi-statement queries
  • Query History

    • View and sort query results
    • Export query results to a CSV file
    • View history of executed queries and their results
    • Copy previously executed queries
  • Snowpark Python Support

    • View and sort query results
    • Export query results to a CSV file
    • View history of executed queries and their results
    • Copy previously executed queries
  • Native Apps

    • Navigate to and view local and deployed objects in your Snowflake Native Apps projects
    • Run, deploy, open, and teardown projects with one click
    • Modify environment variable overrides for templating and deployment
  • Snowpark Checkpoints

    • View checkpoints in the current workspace
    • Add, run, clear and restore checkpoints
  • SnowConvert Migration Assistant

    • Resolve SnowConvert migration issues (EWIs, FDMs, PRFs) with AI-powered assistance
    • Multiple interaction methods: Issues panel, CodeLens integration, and interactive chat
    • Configurable AI model preferences with automatic fallback
    • Comprehensive explanations and suggested fixes using Snowflake Cortex AI

Intellisense

This extension provides autocomplete support for database object names, built-in functions, and Snowflake SQL keywords. Database, schema, and table name suggestions will show up as you type your query.

Typeahead suggestion

Keywords and object names display first in the list, followed by built-in functions.

Function signature typeahead

Function parameters will be highlighted as you type, and a link to the function documentation is available in the info panel.

View object details

With your cursor inside an identifier, right click and select Snowflake: View Object Details to view details for that object.

Accounts & Sessions

Sign In Execution Context

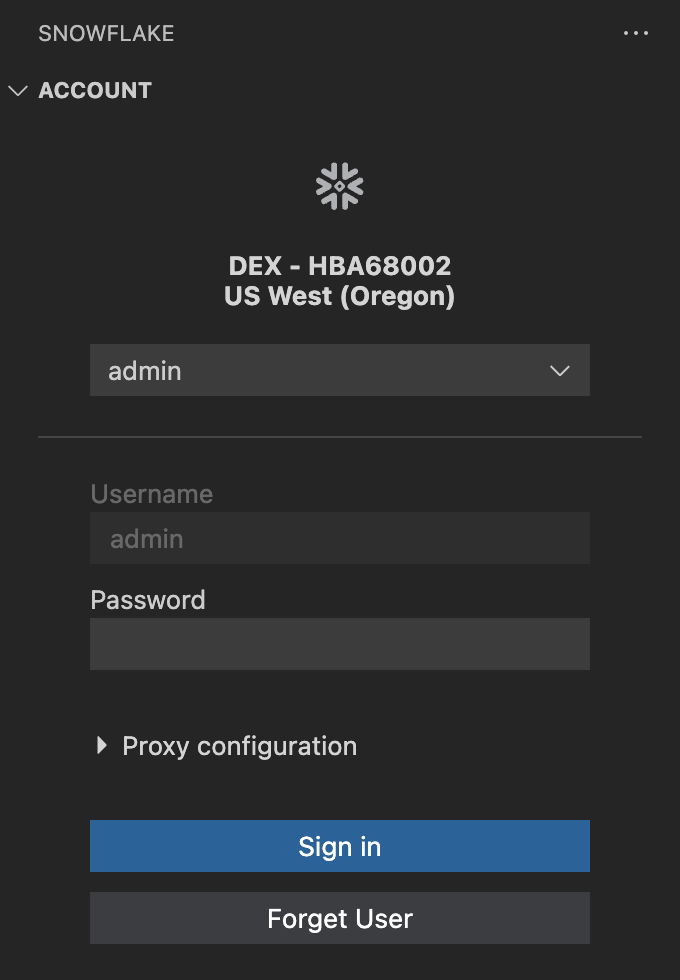
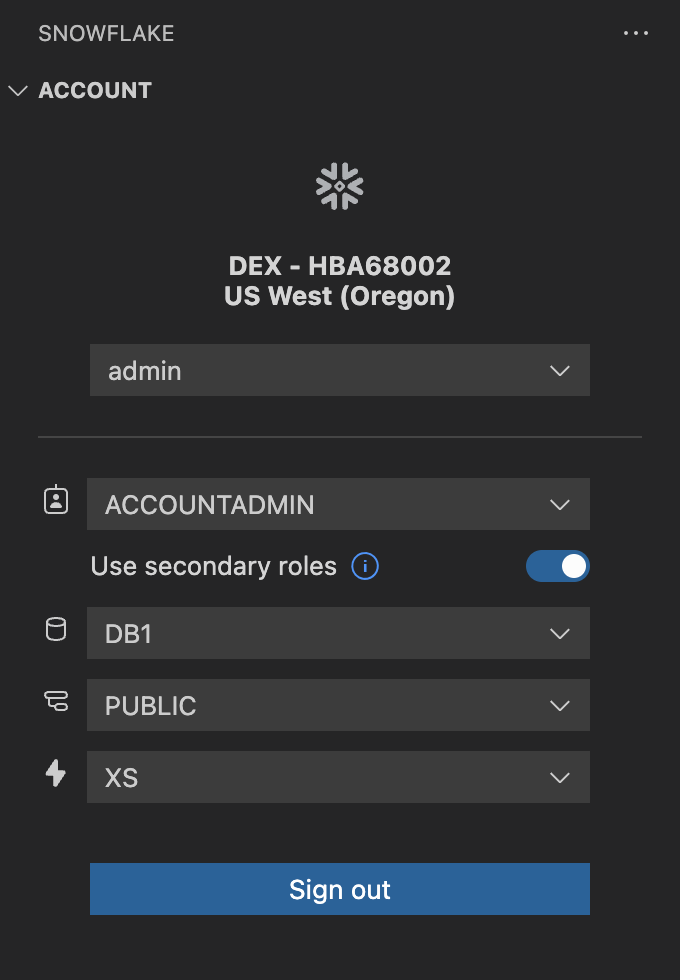
Located in the Activity Bar, the Account view lets you authenticate to Snowflake and switch between multiple accounts.

Once logged in, you'll be able to see and change your active database, schema, role, and warehouse.

Object Explorer

Object Explorer

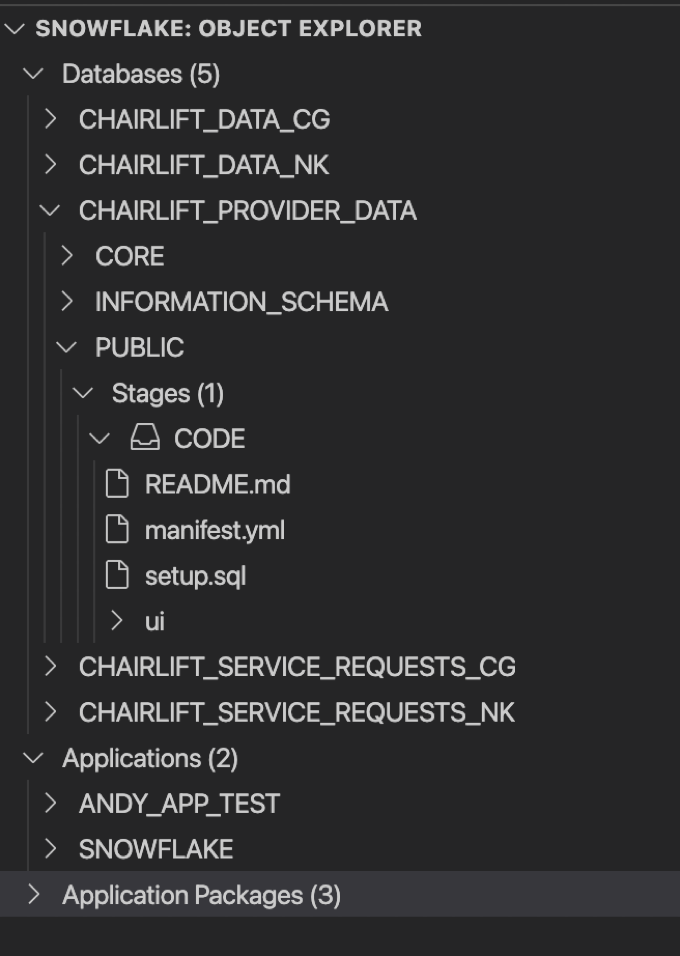
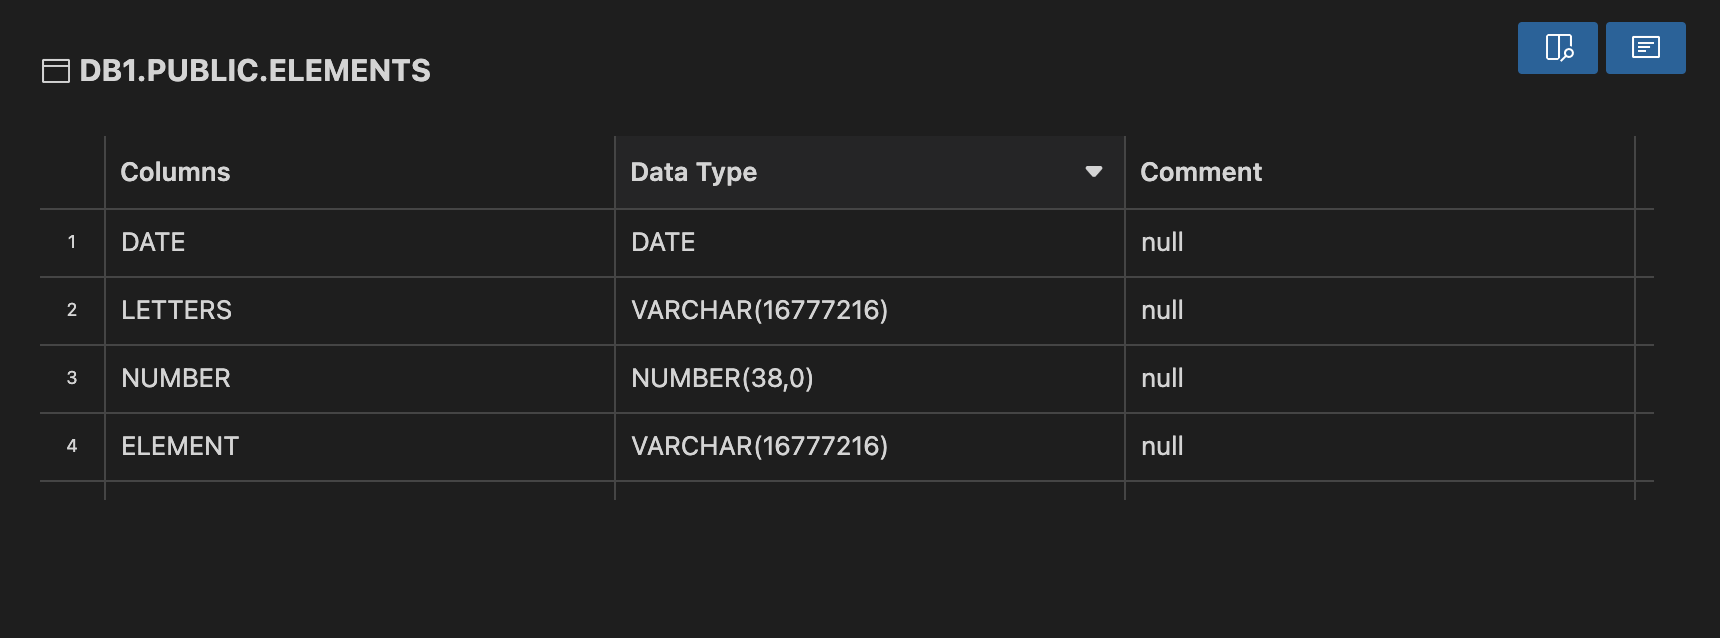
Located in the Activity Bar, the Object Explorer provides a hierarchical view of your database and application objects:

  • Schemas
  • Tables
  • Views
  • Stages
  • Pipes
  • Streams
  • Tasks
  • Functions
  • Procedures

You can copy the object name to your clipboard by clicking the inline action icon on the right of the highlighted line. Clicking on an object will open up the object details view in the Panel, displaying additional information for each object.

You can also search for database objects using the search bar at the top of the Object Explorer. To turn this feature off, go to user settings and disable Object Explorer: Search.

Stage Operations

Stage Operations

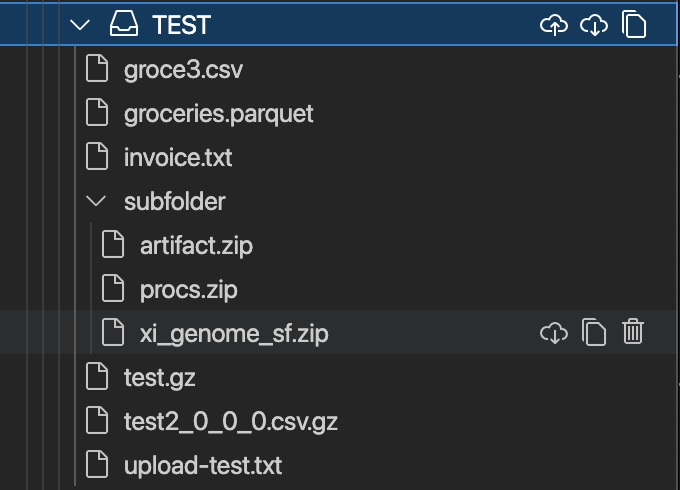
When you expand a stage within the Object Explorer, you will be able to LIST all the files contained within that stage. To GET files, use the available download buttons to download an entire stage, a directory, or a single file. If you are interacting with an internal stage, you can also use the upload button to PUT a single file, multiple files, or an entire directory into the stage.

Query Execution

Query Execution

You can use the inline "Execute" links to execute a given statement.

To execute multiple queries, select the ones you want to run and press CMD/CTRL+Enter. You can also use the "Execute All Statements" button in the upper right corner of the editor window to run all queries in the current file.

Query results will be displayed in the Panel.

Query Results

Query Results

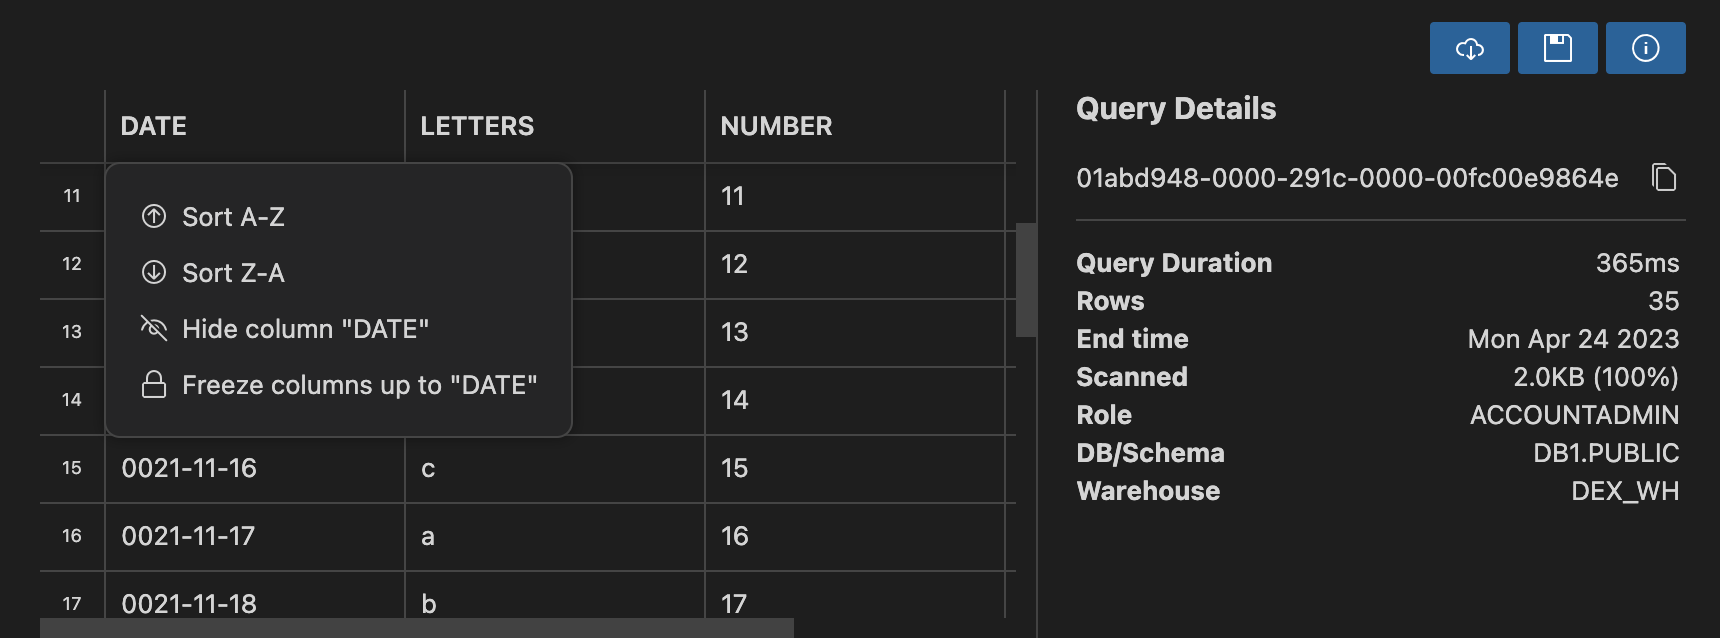
When you click on a cell in the results table, the content of that cell will be displayed to the right. If you wish to select multiple cells or entire columns, you can use SHIFT or CMD/CTRL. Additionally, you can select all columns and rows by using the checkbox located in the upper-left corner of the results grid.

Located in the upper-right corner, there are three buttons:

  • The info icon can be used to toggle the visibility of the query and cell details sidebar.
  • The save icon can be used to save the local results and is limited to the number of rows shown in the results view.
  • The download icon can be used to download the full result to disk as a CSV, provided that the results are still cached. For persisted query results of all sizes, the cache expires after 24 hours.

There are CSV Export configuration settings available under the user setting Export CSV.

Dragging a column header allows you to rearrange the column order. Right-clicking on a column header will allow you to sort, hide, or freeze that column.

Query History

Query History

View previous queries executed in the Query History view, located in the Activity Bar. Clicking on a query will bring up its results in the query results view.

Hovering over an item in the Query History view will allow you to copy the query or remove it from your local history.

To clear all queries from history, click the icon in the top right of the Query History title bar.

Snowpark Python Support

Run and debug Snowpark Python functions that take a Snowpark Session object as the sole parameter. Clicking the Snowflake: Debug option that appears over the function name will run it using your current active session from the extension. You can set breakpoints and view the console output.

Receive automatic syntax highlighting and autocompletion suggestions for SQL statements written within Python files.

SQL in Python Autocomplete

To turn off automatic syntax highlighting, disable Auto Detect Sql in Python. Manual syntax highlighting can be denoted using comments.

  • Start markers: --startsql, --beginsql, --start-sql, --begin-sql

  • End markers: --endsql, --end-sql.

Native Apps

REQUIREMENTS: To use the full feature set, v3.1.0+ of SnowCLI should be installed. Versions v2.2.0+ are supported.

The Native Apps panel and command palette provides access to the following commands:

  • Create Native App
  • Deploy a Native App
  • Focus on a Native App View
  • Open a Native App
  • Run (deploy and re-install) a Native App
  • Teardown a Native App
  • Open Environment Variables Manager

View our online documentation for these features here.

Creating a new native app

With an empty workspace, using the command palette, Snowflake: Create Native App will provide guidance for creating a new native app from a template. This is the equivalent of snow app create.

Developing a native app

When one or more snowflake.yml for a Native App is detected in the current workspace, a Native App panel will display with UI commands to run, deploy, open and teardown native apps.

  • Create new from template
  • Run (deploy and re-install)
  • Deploy
  • Open
  • Teardown

It is also possible to enable and disable debug mode from the Native App panel. Use debug mode to show application objects that are not visible to consumers. For example, these could be shared content objects or objects not granted to a specific database role.

  • App Debug Mode: On/Off

Alternatively, the user can right click this snowflake.yml and see commands in a context menu.

  • Snowflake: Run (deploy and re-install) a Native App
  • Snowflake: Deploy a Native App
  • Snowflake: Open a Native App
  • Snowflake: Teardown a Native App

The Environment Variable manager can be used to pass along environment variable overrides to SnowCLI. This is equivalent to providing the parameters --env <key>=<value> after the SnowCLI command.

Configuration

The Native App panel can be shown or hidden by toggling the User Setting Snowflake: Enable Native App Panel. Log output from SnowCLI can be toggled by checking Native App: Activate Snowflake Cli Debugging.

Snowpark Checkpoints

This extension supports the Snowpark Checkpoints framework, enhancing your experience by providing fine-grained control over the collect and validate statements in your code. The Snowpark Checkpoints framework is a testing library that helps validate your migrated Snowpark code and identify any discrepancies from the original Apache PySpark code.

Configuration

This feature can be enabled by switching the User Setting Snowflake: Snowpark Checkpoints: Enabled.

Initializing a Project

The next time a workspace is opened after enabling this feature, the initialization process will be triggered. If one or more checkpoints.json files are found, the checkpoints will be loaded into the workspace. If no checkpoints.json files are found, a confirmation message will ask if the workspace opened is indeed a checkpoints project. If "yes" is clicked, an empty checkpoints.json file will be created, and any checkpoints added in this workspace will be stored there.

Adding Checkpoints

Checkpoints can be added by right-clicking in the editor and selecting the Snowpark Checkpoints option in the context menu, or by manually typing them into the code.

Viewing Available Checkpoints

Checkpoints present in the workspace can be visualized using the Snowpark Checkpoints panel. The panel provides options to clear and toggle the status of checkpoints, as well as navigate to each individual checkpoint by double-clicking on it.

Running Checkpoints

Checkpoints can be run individually inline using CodeLens, or you can run all checkpoints present in either the current file or the whole workspace using the run commands available in the command palette.

Results

After executing a validation checkpoint, the results tab will be shown.

Execution timeline

Displays a timeline view of the checkpoints executions results. can be opened using the command Snowflake: Open Checkpoints Timeline

SnowConvert Migration Assistant

The SnowConvert Migration Assistant helps users resolve issues that arise when deploying SQL code converted from other platforms to Snowflake. It addresses problems that SnowConvert's automated conversion process was unable to fix automatically.

Getting Started

Enable this feature in your VS Code settings by switching on Snowflake: Snow Convert Migration Assistant: Enabled.

Enabling this feature adds a new SnowConvert Issues panel to the Snowflake extension. This panel automatically displays all folders and files within the current workspace that contain SnowConvert issues. Alternatively, you can select a specific folder, and the panel will list all issues found within that folder and the corresponding .sql files.

Understanding SnowConvert Issues

The Migration Assistant helps resolve three types of SnowConvert issues:

  • EWIs (Errors, Warnings, and Issues): Code conversion problems that SnowConvert was unable to fully resolve automatically. These indicate areas where manual intervention is needed to complete the migration.

  • FDMs (Functional Difference Messages): Warnings that highlight functional differences between the original source code and the converted Snowflake code, helping you understand behavioral changes.

  • PRFs (Performance Review Findings): Recommendations for performance optimizations in the converted code, identifying potential bottlenecks or inefficient patterns.

Using the Assistant

There are multiple ways to get AI-powered assistance for migration issues:

1. Issues Panel

  • Navigate through issues using the SnowConvert Issues panel
  • Click on any issue to focus the editor on that specific line
  • Click the sparkle icon (✨) next to any issue to get AI-powered suggestions

2. CodeLens Integration

  • When viewing SQL files with SnowConvert issues, you'll see SnowConvert AI CodeLens links directly in the editor
  • Click on these inline links to instantly get AI assistance for specific issues
  • CodeLens appears above lines that contain migration issues, providing quick access to fixes

3. Interactive Chat

  • Once you request assistance, an interactive chat interface opens
  • Get detailed explanations of migration issues
  • Receive suggested code fixes
  • Chat with the assistant to refine suggestions and ask follow-up questions

Model Preference Configuration

Configure which AI models the Migration Assistant uses by adjusting the Snowflake: Snow Convert Migration Assistant: Model Preference setting. The assistant supports multiple AI models and tries them in the order you specify. If the first model fails or is unavailable, it automatically falls back to the next model in your list.

Available models:

  • Claude 3.7 Sonnet (recommended for best quality)
  • Claude 3.5 Sonnet (high quality alternative)
  • Claude 4 Sonnet (experimental, improved quality)
  • Llama 3.1 70B (experimental)
  • Mistral Large 2 (experimental)

To configure your model preferences:

  1. Open VS Code Settings
  2. Search for Snowflake: Snow Convert Migration Assistant: Model Preference
  3. Or navigate to Extensions > Snowflake > Snowflake: Snow Convert Migration Assistant: Model Preference
  4. Reorder models to change the retry sequence, or remove models to exclude them

Important Notes

  • SnowConvert Migration Assistant uses Snowflake Cortex AI and runs completely within your Snowflake account
  • You must be signed in to your Snowflake account to generate fixes
  • This is a migration aid tool. Always review AI-generated output carefully before use
  • Contact us
  • Jobs
  • Privacy
  • Manage cookies
  • Terms of use
  • Trademarks
© 2025 Microsoft