


VS Code Aster – VS Code Extension for code_aster
This is the first release of the VS Code Aster extension. The main objective is to collect feedback on any bugs or anomalies you encounter during its usage. All input regarding features is valuable, whether it's about how commands are triggered, unexpected behaviors, or options that could be added. Your experience and suggestions greatly help improve the extension.
Description
VS Code Aster is a Visual Studio Code extension designed to simplify and speed up work with code_aster.
It offers:
- An interactive form to create or edit a
.export file
- The ability to launch simulations directly from VS Code
- Advanced features for editing
.comm files
- A fully integrated 3D Visualizer to explore your meshs
Installation
1. Installing the extension
From the market place
The VS Code Aster extension is now available on the VS Code Marketplace :
- Open VS Code then go to the Extensions tab (or press
Ctrl + Shift + X / Cmd + Shift + X).
- Search for
VS Code Aster.
- Click on Install.
From a .vsix file
WSL users will need to copy the .vsix file to the WSL file system before continuing with the installation.
cp /mnt/c/Users/[UserName]/Downloads/vs-code-aster-[version].vsix ~/
- Once you've got the
.vsix file ready, you can open VS Code and :
- Open the Command Palette (
Ctrl + Shift + P / Cmd + Shift + P).
- Search for and run
Extensions: Install from VSIX....
- Select the downloaded
.vsix file.
- Reload your VS Code window — your extension is now installed !
2. Required dependencies
This extension requires Python 3.10–3.13 and the following packages :
numpypygls==1.3.1medcoupling
Note: medcoupling has no prebuilt wheel for Python 3.14+ yet. On 3.14
the language server (completion, diagnostics, hover, formatting) still works,
but the .med mesh viewer is unavailable. Use a Python 3.10–3.13 interpreter
for full functionality.
Here are two ways to install these packages :
2.1. Use a dedicated Python virtual environment (recommended)
If you prefer to isolate your dependencies, or if pip cannot install system-wide packages, you can setup a virtual environment :
# Create a virtual environment
python3 -m venv ~/[env_name]

# Activate the venv
source ~/[env_name]/bin/activate

# Install required packages
pip install numpy pygls==1.3.1 medcoupling
Then point the extension to this environment :
- Open
File > Preferences > Settings (or press Ctrl + , / Cmd + ,).
- In the search bar, type
VS Code Aster.
- Locate
Python Executable Path.
- Set it to the absolute path of your environment’s Python executable, for example :
/home/[username]/[env_name]/bin/python
- Reload the VS Code window (
Ctrl + R / Cmd + R).
2.2. Install directly with pip
If you'd rather install the Python packages globally :
pip install numpy pygls==1.3.1 medcoupling
3. (Optional) Installing Cave
If you'd like to run simulations, you need to have cave installed on your system. You can follow the instructions on the cave GitHub repository.
You're now ready to use VS Code Aster !
Video tutorials
Features overview
1. Creating and managing .export files
The extension provides a native-looking Svelte form to create and edit .export files, plus first-class language support (syntax highlighting and a document formatter).
- New file — open the Command Palette (
Ctrl + Shift + P / Cmd + Shift + P) and run Edit export file. The tab title defaults to untitled and the form is pre-filled with a standard starter: a comm + mmed input and an rmed output (simvia.comm, simvia.mmed, simvia.rmed).
- Existing file — open a
.export file and click the blue pencil Edit export file in the editor title bar. The form is pre-filled from the file and the Save button replaces Create.
- The file name field lives-updates the tab title; the
.export extension is shown as a non-editable suffix. Path separators are supported (subdir/run.export creates subdir/ if it doesn't exist).
- The file type dropdown is filtered by direction: inputs accept
comm, mmed, nom, base, mail, libr, msh, dat; outputs accept mmed, rmed, mess, base, mail, tab, msh, dat. nom rows are locked to unit 0 (can be repeated).
- Units auto-increment within the same type family (
med: 20, 50 → next med lands at 51), ArrowUp / ArrowDown on any integer input steps the value.
- Rows can be dragged to reorder (drag handle at the left) and deleted individually with the × button. Empty rows are ignored on save.
- Inline validation shows per-field error messages; a sticky footer reports error and warning counts with click-to-scroll links:
- Blocking errors: missing filename, non-integer parameters, no
comm input (code_aster needs one).
- Warnings: duplicate units across files, no mesh (
mmed/mail/msh) set, no rmed output set, rename preview (shows the old file will be deleted).
- The panel is tab-switch safe: the in-progress form is preserved via webview state, so you can glance at another file and come back without losing your changes.
.export files now have their own TextMate grammar: P/F directives, parameter names, file types, D vs R/RC direction flags, unit numbers and # comments each get their own theme scope.Format Document (Shift+Alt+F) reorders the file into three commented sections — # Simulation parameters, # Input files, # Output files — sorts F lines by a canonical type priority, and keeps standalone # comments attached to the line they precede.- Saving/creating from the form runs the same formatter automatically, so files stay tidy across repeated edits.
2. Launching a simulation
You need to have cave installed on your system to launch simulations. Refer to the cave GitHub repository if you want to install cave.
From a .export file
- Open a
.export file.
- Click on the "play" icon
Run with code_aster in the top-right corner of the file.
It will open a terminal and execute the following command : cave run [file].export. Subsequent runs reuse the same terminal.
Diagnostics
Warnings (<A>), errors (<E>, <F>), Python tracebacks, and fatal errors from code_aster automatically appear in the VS Code Problems panel after a run — no F mess entry required in the .export file. Diagnostics are attached to the originating .comm line when possible and cleared between runs.
Personnalize alias to run code-aster
If you want to use a custom alias, you can :
- Open VS Code.
- Go to
File > Preferences > Settings (or press Ctrl + , / Cmd + ,).
- In the search bar, type
VS Code Aster.
- Find the setting
Alias For Run and change the value to the command you want to use to run code_aster.
3. Smart editing of .comm files
Syntax highlighting
- Dedicated highlighting for code_aster syntax, making
.comm files more readable
- For the best experience, use a theme that differentiates functions, variables, etc.
Hover documentation
- When hovering over a code_aster command, a tooltip displays :
- The command description
- The command arguments
- The types and default values of arguments
Command signatures
- When typing a
( after a command name, or a , after entering an argument (e.g., FORMAT="MED",), a signature is displayed
- This signature shows the parameters (depending on context — some parameters are only available under certain conditions)
Contextual auto-completion
- The extension automatically suggests :
- Command names
- Relevant arguments depending on the current command
Status Bar
- A status bar is displayed at the bottom of the window, showing the number of steps completed in the current command file, e.g.,
code_aster: 3/5 steps.
- Clicking on the status bar opens a detailed view of completed commands for each family.
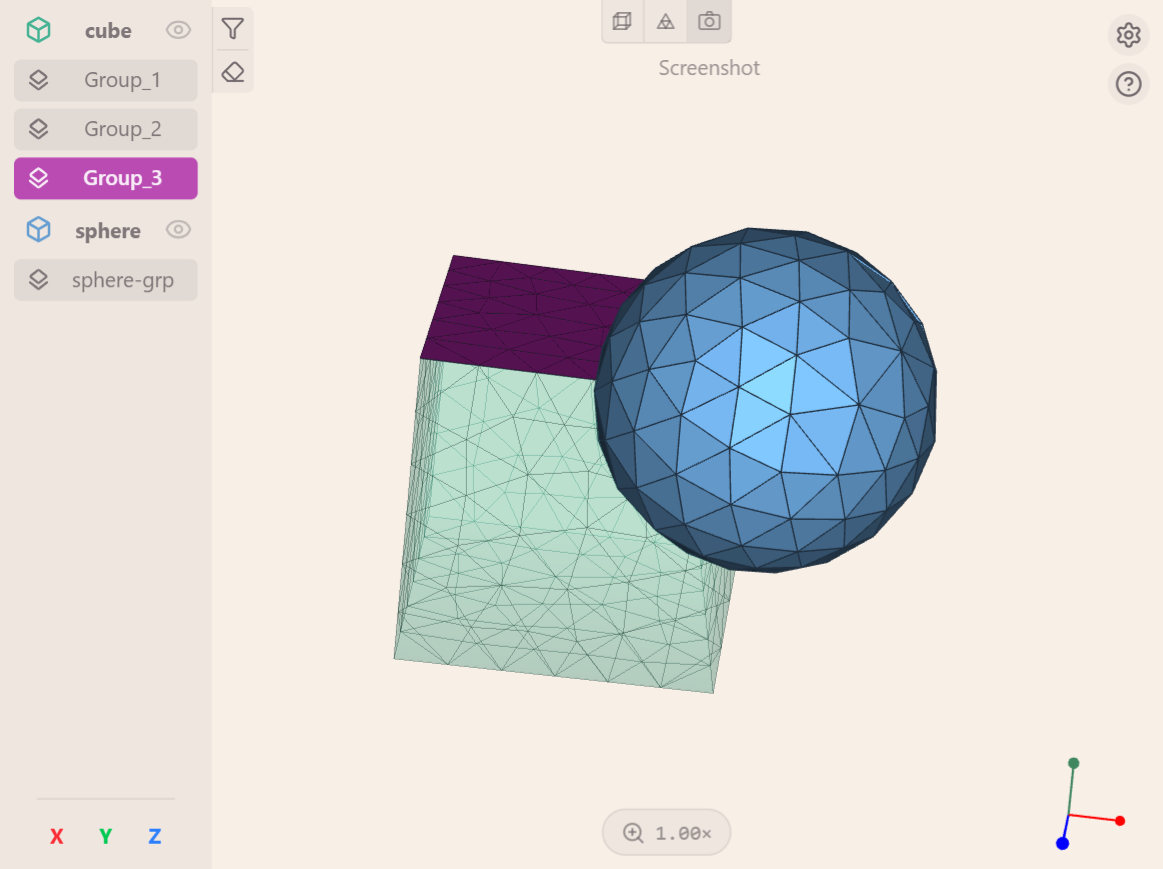
4. The visualizer — Interactive 3D result viewer
The visualizer is an integrated 3D viewer that lets you display and explore your simulation geometry and results directly in VS Code — without leaving your workspace.
It’s powered by VTK.js, and surfaces every named group from your .med mesh: volume groups (rendered as the skin of each 3D sub-domain), face groups, edge groups (1D line elements), and node groups.
Opening the visualizer
There are two ways to open the visualizer :
- From a
.comm file : click on the "eye" icon Open visualizer in the top-right corner of the file.
- From a
.med file : click any .med, .mmed, or .rmed file in the explorer — it opens directly in the viewer, no .comm file needed. Files with non-standard MED extensions (e.g. .71) are auto-detected and can be registered in one click.
Features
- Load geometry files (
.med) directly into the viewer
- Highlight volume, face, edge, and node groups using the sidebar — each kind gets its own icon
- Highlight groups quickly by selecting their names from your command file (
.comm)
- Control the camera by rotating or panning it
- Bounding box : toggle a wireframe cube with colored axes (X red, Y green, Z blue), corner dots, and dimension labels to quickly read the characteristic size of the structure
- Wireframe mode : switch between solid surface and wireframe rendering to inspect mesh density
- Auto-rotate : hands-free turntable that spins the camera around the current view-up; right-click the button to reveal a popover with a speed slider (5–180 °/s) and a reverse-direction toggle — changes there apply to the current view only, persistent defaults live in Settings → Toolbar
- Screenshot : save the current 3D view as a PNG file next to your mesh and copy it to the clipboard; right-click for a menu to capture the whole webview (toolbar + sidebar baked in)
- Record : capture a video of the view (mp4 when the runtime supports h264, webm otherwise), saved to
.vs-code-aster/recordings/; left-click to start/stop, right-click for whole-webview or without-sidebar variants. The button pulses red with an elapsed-time indicator while recording
- Per-kind settings : Settings popup exposes edge-group line thickness, edge-group depth offset (to avoid z-fighting), node-group point size, and the sidebar sort order — plus a toggle to bucket groups by kind or mix them into a single list
- Remembered toolbar defaults : every toolbar button (bounding box, wireframe, auto-rotate) is session-only by default — toggling it changes the current view only. Persistent defaults are set in Settings → Toolbar, grouped per feature (Bounding box, Wireframe, Auto-rotate with default speed and default direction)
- Dream background : on by default, animates EDF orange and blue light blobs behind the mesh for a more vibrant workspace; can be disabled from Settings → Rendering
Usage tips
- Group highlighting :
- Click on a group name in the sidebar to highlight or unhighlight it
- Click on the "clear" button in the sidebar to reset highlight status for all groups
- Click on the "filter" button in the sidebar to choose which groups are easily accessible in the sidebar
- Objects becomes transparent when you highlight their groups, helping visualize details more clearly
- Camera control :
- Hold
Left click and move your mouse to rotate the camera
- Hold
Ctrl + Left click and move your mouse to rotate the camera around an axis
- Hold
Shift + Left click and move your mouse to pan the camera
- Use the
Mouse wheel to zoom in and out
- Click on the
X, Y, and Z buttons at the bottom of the sidebar to quickly align the camera along an axis
- Toolbar :
- The top toolbar provides quick access to the bounding box, wireframe, auto-rotate, screenshot, and record features
- Left-click toggles a feature for the current view only; remembered defaults live in Settings → Toolbar
- Right-click the auto-rotate button for a session-only speed slider and reverse-direction toggle
- Right-click the screenshot button for a menu to capture the whole webview (sidebar included)
- Right-click the record button for options: whole webview, or without the sidebar
- Settings tabs : Rendering (mesh-edge mode, orientation widget, dream background), Groups (per-kind display), Visibility (ghosted objects, highlight transparency), Toolbar (default state for toolbar buttons)
- File management :
- Files generated by the extension are stored in a hidden
.vs-code-aster/ folder next to your project files:
mesh_cache/ — converted .obj files from your .*med meshes, reused on subsequent opensscreenshots/ — PNGs saved from the viewer's screenshot buttonrecordings/ — video files saved from the viewer's record button (mp4 / webm)run_logs/ — one timestamped log per code_aster run (oldest pruned, see vs-code-aster.maxRunLogs)
Troubleshooting
If you encounter an error that seems to have broken the language server (for .comm files), you can restart it without closing VS Code:
- Open the Command Palette (
Ctrl + Shift + P / Cmd + Shift + P).
- Type
Restart the LSP Server for code_aster and select it.
- The language server will restart, restoring hover, signature help, completion, and other language features !
Development
You need to follow the installation steps before proceeding with this section.
1. Prerequisites
You need to have Node.js 20 or later and npm installed on your system :
curl -fsSL https://deb.nodesource.com/setup_20.x | sudo -E bash -
sudo apt install -y nodejs

# Check installation
node -v
npm -v
2. Installing dependencies
- Clone the repository :
git clone https://github.com/simvia-tech/vs-code-aster.git
- Install packages :
npm install
3. Architecture overview
The extension consists of three independently compiled parts :
- Extension host (
src/) — TypeScript compiled with esbuild, runs in Node.js inside VS Code
- Viewer webview (
webviews/viewer/) — Svelte 5 + Vite app that powers the 3D visualizer; built separately into webviews/viewer/dist/
- Export form webview (
webviews/export/) — Svelte 5 + Vite app that powers the .export file editor; built separately into webviews/export/dist/
4. Running the extension locally
Press F5 (or go to Run > Start Debugging) to launch a new VS Code window running the extension.
This starts three background watch tasks automatically (defined in .vscode/tasks.json) :
| Task |
What it does |
npm: watch:esbuild |
Recompiles the extension host on every save |
npm: watch:tsc |
Type-checks the extension host continuously |
npm: watch:webview |
Rebuilds both Svelte webviews (viewer + export form) on every save |
After making changes to the extension host (src/), reload the debug window with Ctrl + R.
After making changes to a webview (webviews/viewer/src/ or webviews/export/src/), wait for the watch:webview task to finish rebuilding, then run Developer: Reload Webviews from the Command Palette.
5. Building manually
To build everything from scratch without starting the debug session :
# Build the webview
npm run build:webview

# Compile and type-check the extension host
npm run compile
Telemetry
VS Code Aster includes optional telemetry features to help improve the tool by collecting anonymous usage data.
By default, usage tracking is enabled, sending anonymous data about which features you use. You can disable this tracking if you prefer.
To deactivate telemetry :
- Open VS Code Settings (
File > Preferences > Settings or Ctrl + , / Cmd + ,)
- Search for
VS Code Aster in the settings search bar
- Find the setting
Enable Telemetry and uncheck it
Telemetry respects your privacy and does not collect sensitive information.
Contributing
Please check out our CONTRIBUTING.md file if you want to contribute to the project.
Thank you to all our contributors :
See Also
License
This project is licensed under the GNU General Public License version 3 (GPL-3.0).
See the full license text in the LICENSE file.
- Summary: You are free to use, copy, modify, and redistribute this software.
- Conditions: Redistributions and derivative works must be licensed under GPL-3.0 and include source or a written offer to provide the source.
- More information: https://www.gnu.org/licenses/gpl-3.0.en.html
Contact us at ulysse.bouchet@simvia.tech or basile.marchand@simvia.tech.
