Git Time Machine for VS Code


Git Time Machine is a simple, powerful VS Code extension that allows you to easily create backdated Git commits directly from your editor.
📥 Installation
- Open Visual Studio Code.
- Go to the Extensions view (
Ctrl+Shift+X).
- Search for
Git Time Machine.
- Click Install.
- Reload VS Code if prompted.
🛠️ How to Use
- Make Changes: Work on your project and have some uncommitted changes ready in your Git repository.
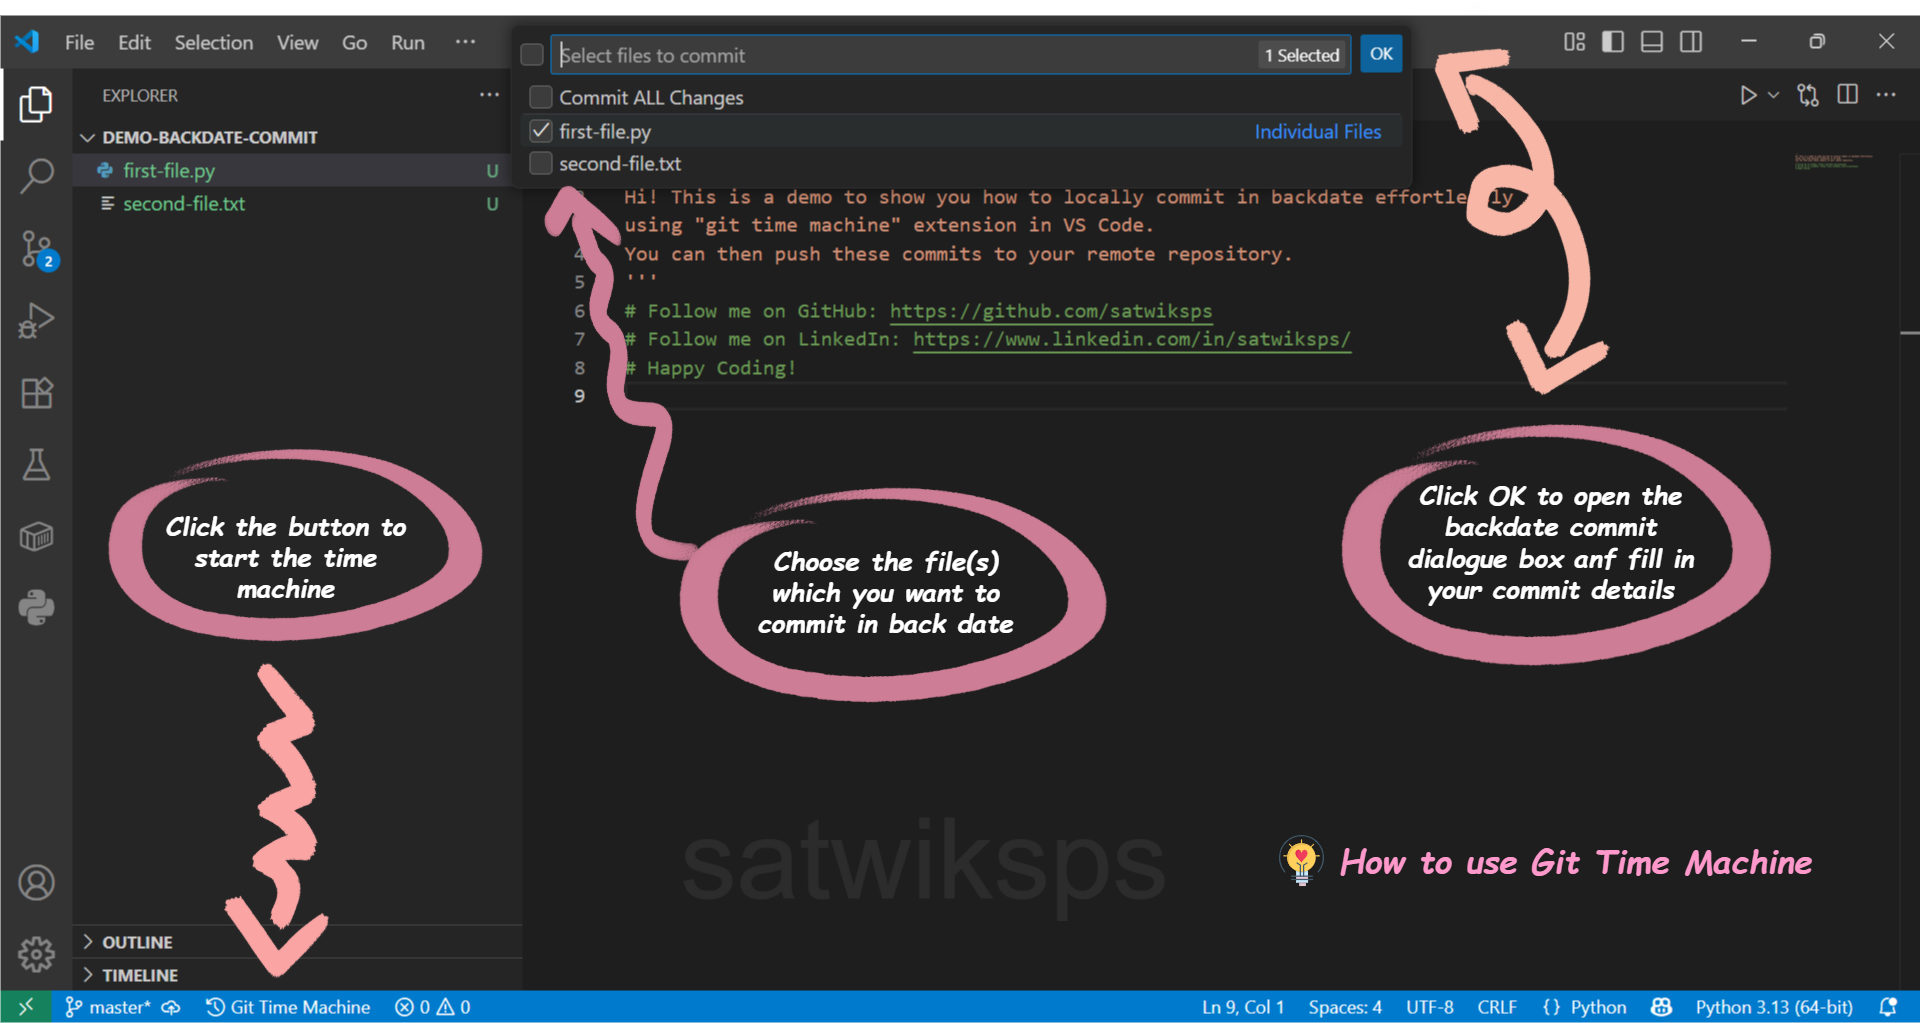
- Launch the Extension: Click the
$(history) Git Time Machine button in the bottom-left of your VS Code status bar.
- (Refer to Image 2 above for visual guidance.)
- Select Files: A quick pick menu will appear at the top of your VS Code window. Choose "Commit ALL Changes" or select individual files from the list.
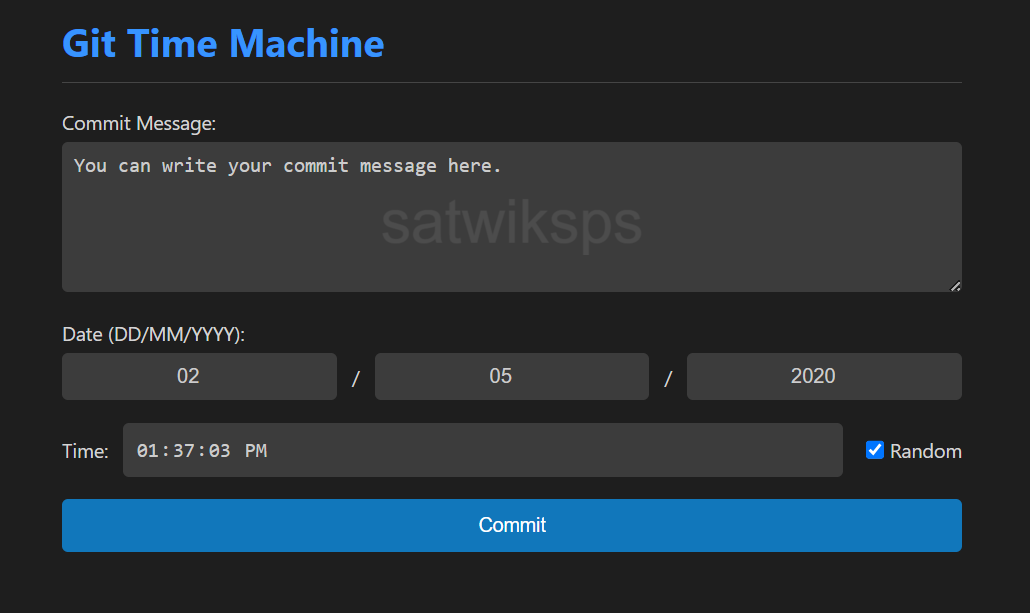
- Enter Details: A new webview panel will open (refer to Image 1 above).
- Write a clear and descriptive commit message.
- Enter the desired past date (DD/MM/YYYY) and time.
- (Optional) Check the Random Time box if you don't need a specific time.
- Commit: Click the "Commit" button.
- Verify: A success notification will appear (refer to Image 3 above). You can also open the terminal and run
git log to see your new, backdated commit at the top of the history!
🚀 Key Features
- ⚡️ Quick Status Bar Access: Launch the Git Time Machine with a single click from your VS Code status bar.
- ✅ Flexible File Selection: Choose to commit all changed files or meticulously select individual files for your commit.
- 🕰️ Intuitive Backdating UI: Easily set your desired commit date (DD/MM/YYYY) and time.
- 🎲 Random Time Option: Opt for a random commit time on your chosen date if the exact hour/minute isn't critical.
- 🎉 Clear Success Confirmation: Receive immediate visual confirmation for every successful backdated commit.
- 🔒 Local & Safe Operations: All commit operations are performed locally on your machine, giving you full control before any pushes.

⬆️ Pushing to GitHub (After Committing with Git Time Machine)
After you've created your backdated commit(s) using Git Time Machine, these commits exist only on your local machine. To share them with your team or to back them up, you need to push them to a remote repository like GitHub.
Scenario 1: Pushing to an Empty GitHub Repository
If you've just initialized a new local Git repository and made your first commits (even backdated ones), and you want to connect it to a brand new, empty repository on GitHub:
- Create a new, empty repository on GitHub: Go to GitHub.com, click the
+ sign in the top right, then New repository. Give it a name (e.g., git-time-machine-project), set it to Public or Private, and do NOT initialize it with a README, .gitignore, or license file.
- Add the remote origin in your local repository:
git remote add origin [https://github.com/your-github-username/your-repo-name.git](https://github.com/your-github-username/your-repo-name.git)
(Replace your-github-username and your-repo-name with your actual details.)
- Push your local commits to GitHub:
git push -u origin main
(Use main or master depending on your branch name.)
Scenario 2: Pushing to an Existing GitHub Repository (with previous files)
If you've made backdated commits to an existing project that already has a GitHub repository set up:
- Ensure your local branch is up-to-date: It's always a good idea to pull any changes from the remote before pushing.
git pull origin main
(Use main or master depending on your branch name.)
- Push your local commits to GitHub:
git push origin main
(Again, use main or master as appropriate.)
📄 License
This extension is licensed under the GNU General Public License v3.0. Please see the LICENSE file for more details. This means the software is free and open-source, and any modifications you distribute must also be open-source.
💬 Feedback & Contributing
This is an open-source project, and contributions are welcome! If you find a bug, have a feature request, or want to contribute to the code, please feel free to:
Happy coding, and may you never have a late commit again!
