Skip to content
| Marketplace
Sign in
Visual Studio Code>Other>Mo AssistantNew to Visual Studio Code? Get it now.
Mo Assistant

Mo Assistant

Pure PM

|
51 installs
| (1) | Free
Mo Assistant is a powerful Visual Studio Code extension designed to enhance your development workflow by integrating AI-assisted features. It provides an intuitive webview interface that allows you to manage commits, documentation, unit testing, and code refactoring directly from the sidebar.
Installation
Launch VS Code Quick Open (Ctrl+P), paste the following command, and press enter.
Copied to clipboard
More Info

Mo Assistant VS Code Extension

Mo Assistant is a powerful Visual Studio Code extension designed to enhance your development workflow by integrating AI-assisted features. It provides an intuitive webview interface that allows you to manage commits, documentation, unit testing, and code refactoring directly from editor.

Table of Contents

  • Key Features
  • Installation
  • Getting Started
  • Usage Guide
  • Commands
  • Mo Assistant Configuration
  • Troubleshooting

Key Features

  • 🤖 AI-Powered Commit Messages: Generate meaningful commit messages automatically based on your code changes.
  • 🔧 Intelligent Code Refactoring: Improve your code quality with AI-suggested refactoring.
  • 🧪 Comprehensive Unit Testing Support: Create, update, run, and validate unit tests with ease.
  • 📚 Context-Aware Assistance: Add files to the AI's context for more accurate and relevant responses.
  • 🎨 Interactive Webview Interface: Access all features through a user-friendly sidebar interface.

Installation

  1. Open Visual Studio Code (version 1.93.1 or higher)
  2. Go to the Extensions view (Ctrl+Shift+X or Cmd+Shift+X)
  3. Search for "Mo Assistant"
  4. Click "Install"

Note: Mo Assistant is compatible with Visual Studio Code version 1.93.1 or higher. Make sure your VS Code is updated to at least this version for the best experience.

Getting Started

  1. After installation, click on the Mo Assistant icon in the Activity Bar.
  2. Set up your Claude AI token (Set up the Claude Anthropic token. Check Anthropic docs here):
    • Open the Configuration panel in the Mo Assistant webview, or
    • Add the following to your VS Code settings:
      {
        "mo-assistant.claudeToken": "your-claude-token-here"
      }
      
      How to set the Anthropic Claude token
  3. You're all set! Start using Mo Assistant's powerful features.

Quick Access to Mo Assistant command palette

Use the keyboard shortcut Ctrl+Shift+A (Windows/Linux) or Cmd+Shift+A (Mac) to quickly ask Mo Assistant for help.

Usage Guide

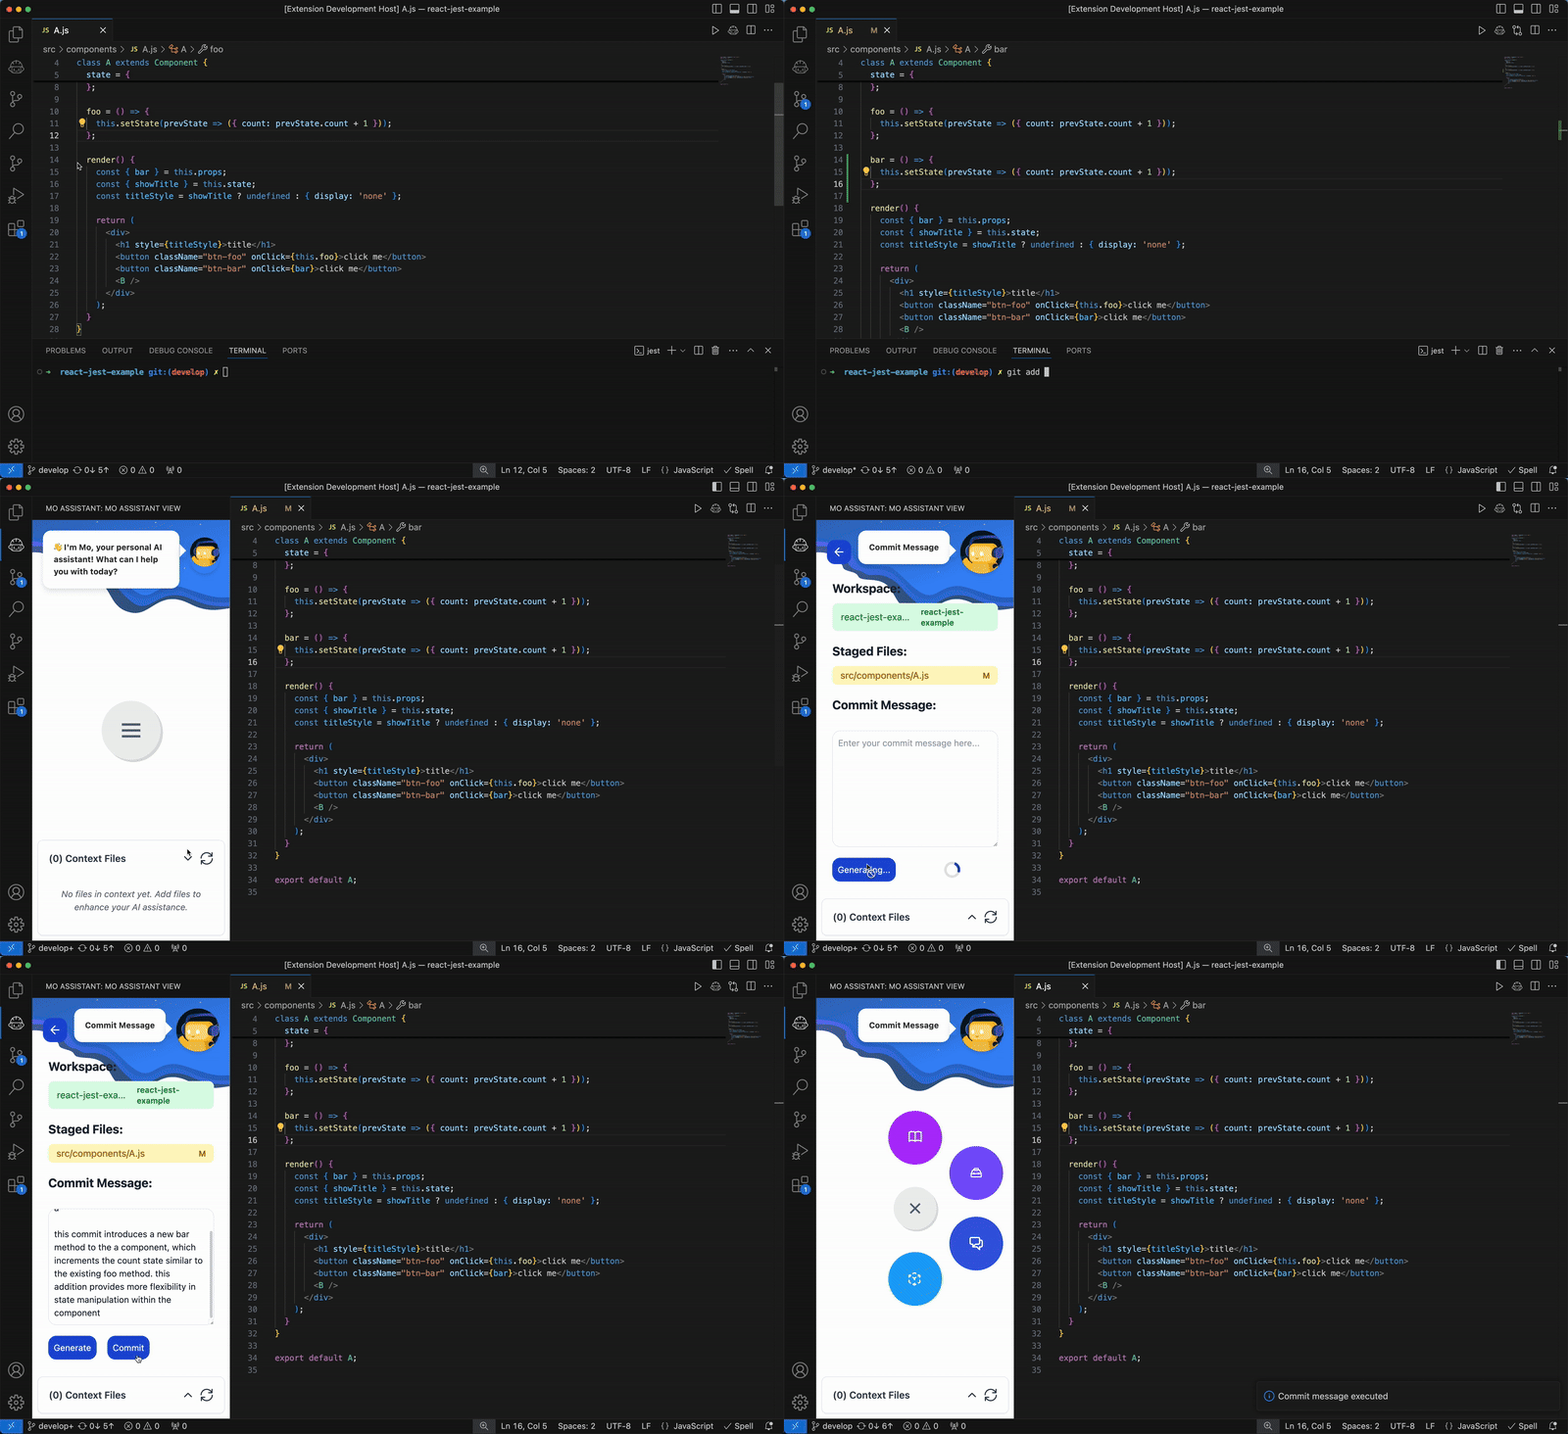
AI-Powered Commit Message Generation

Generate commit messages based on your staged changes:

  1. Stage your files in Git
  2. Open Mo Assistant and navigate to the Commit Message Generation panel
  3. Click "Generate Commit Message"
  4. Review and execute the generated message with a single click

How to create commit messages

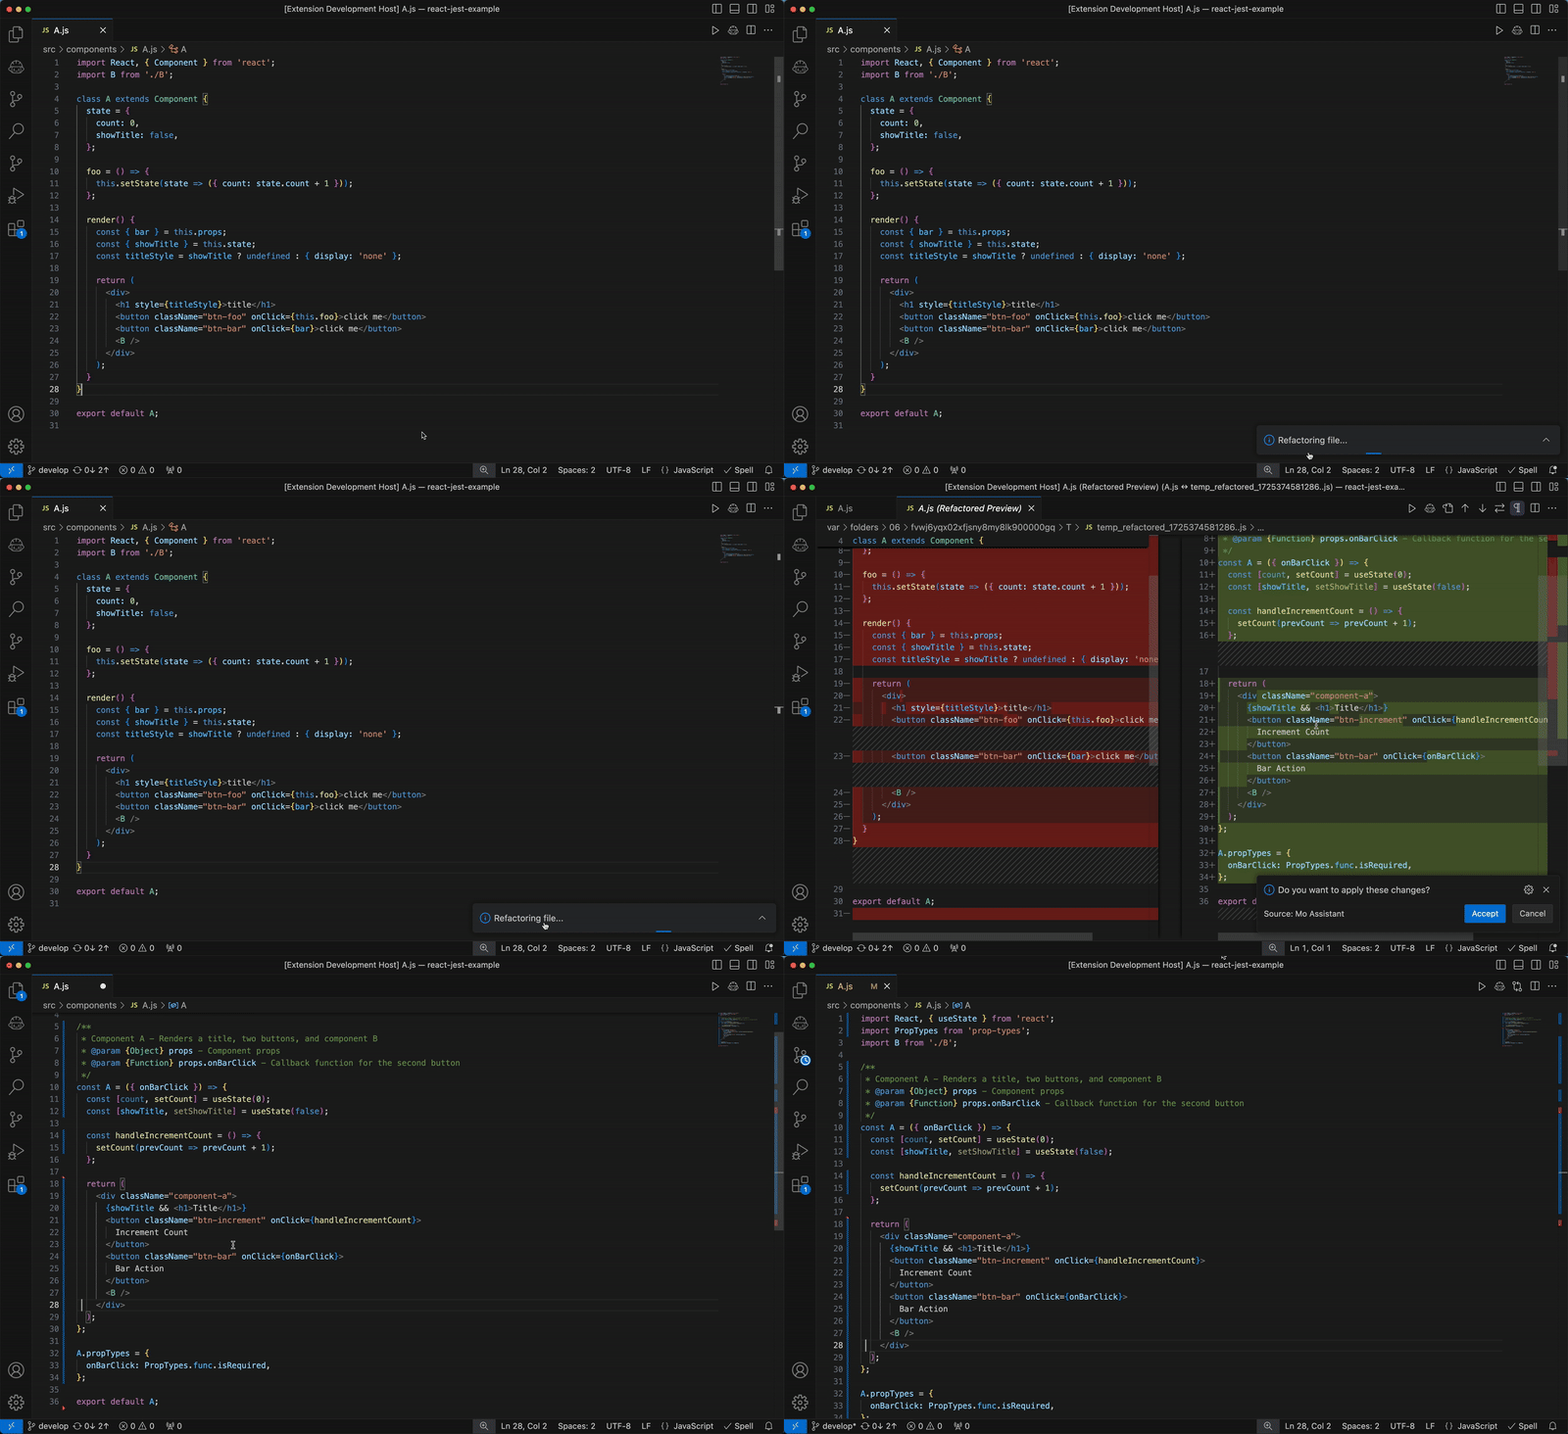
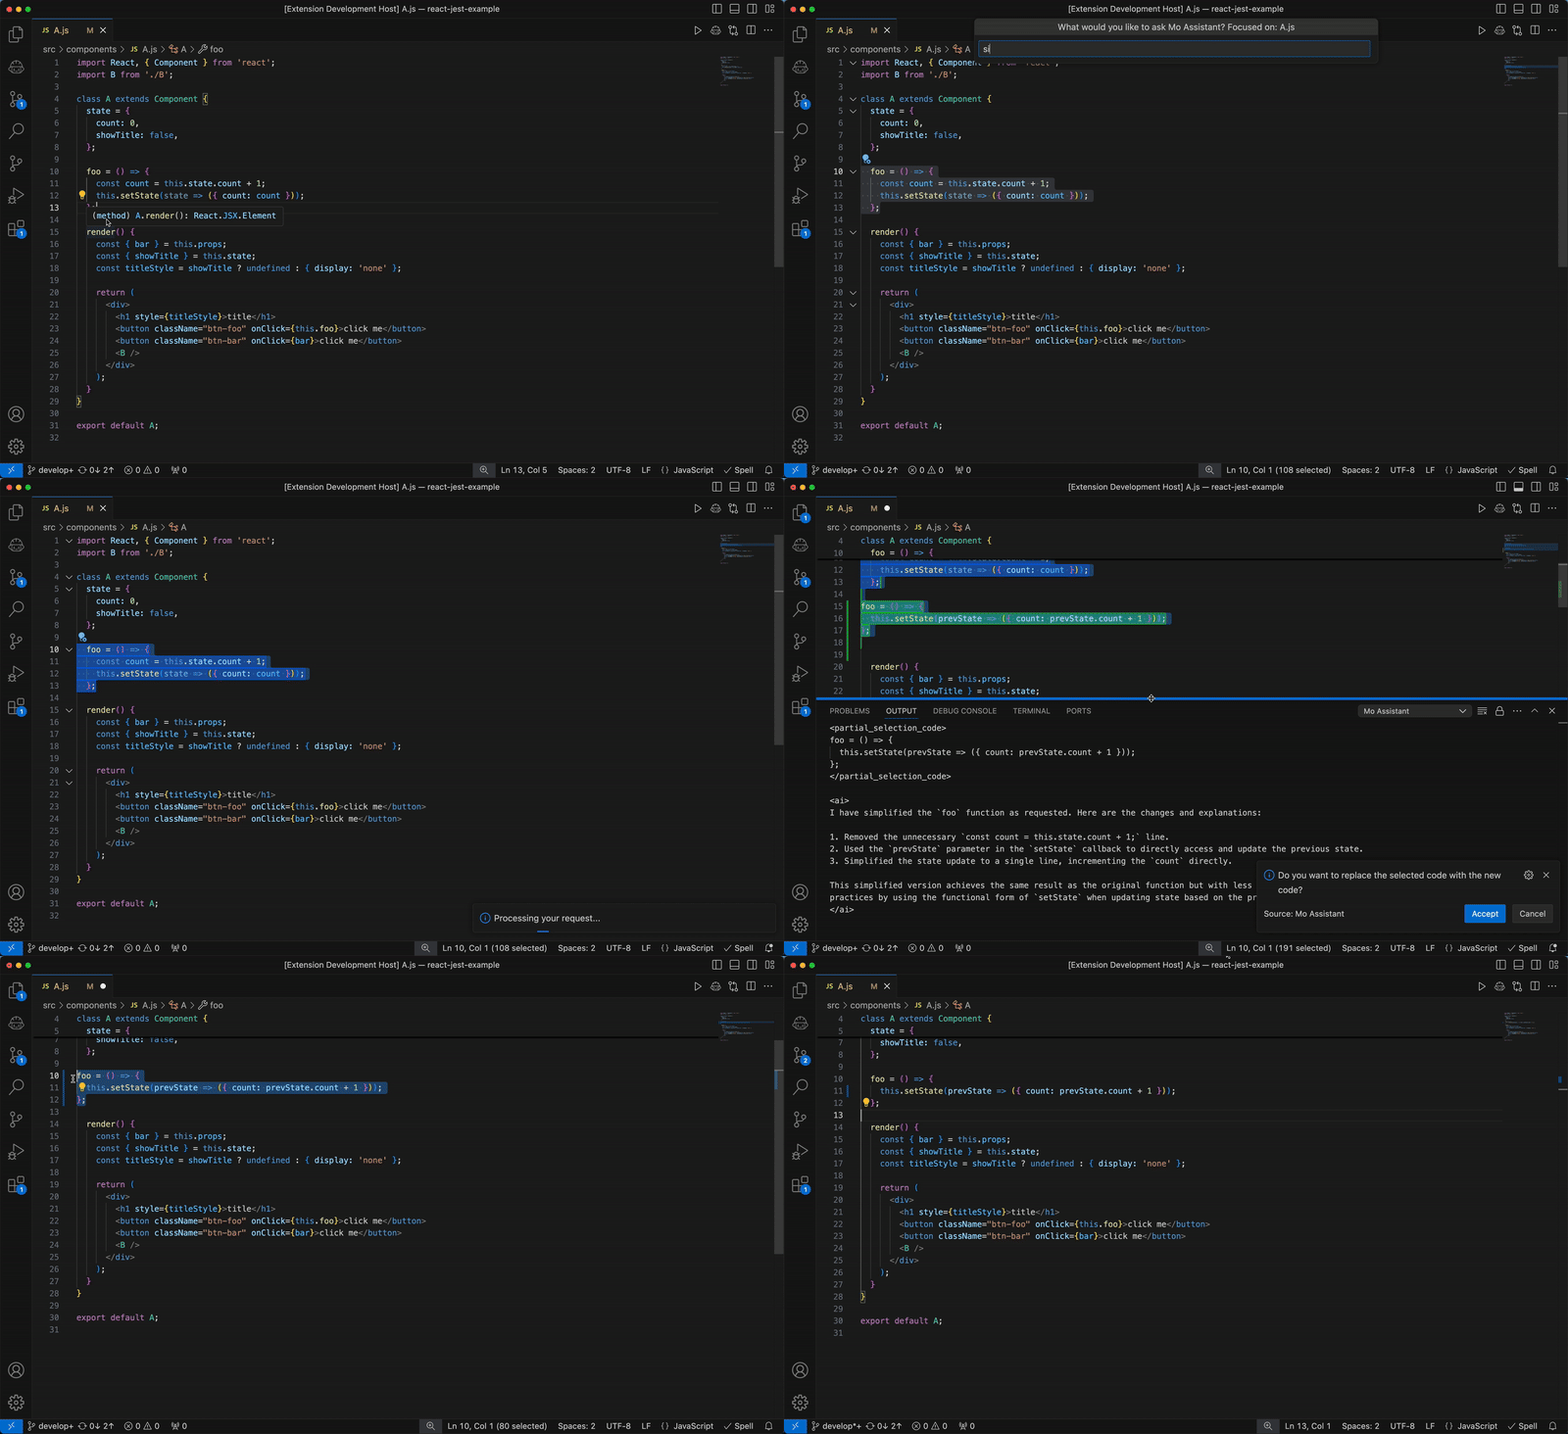
Code Refactoring

Refactor your code using AI suggestions:

  1. Open the file you want to refactor
  2. Use the command palette (Ctrl+Shift+A or Cmd+Shift+A) and search for /refactor
  3. Review and apply the suggested changes

Automatically do a full refactor on file using AI suggestions.

Full AI refactor

Automatically refactor sections of your code using AI suggestions.

Selection code refactor

Context-Aware Code Assistance

Improve AI responses by managing context:

  • Use the command palette (Ctrl+Shift+A or Cmd+Shift+A) and searchfor
    • /context-add to add files to context
    • /context-remove to remove files from context
    • /context-show to show the files in context
    • /context-clear to remove all files from context

Add files to context

Unit Testing Support

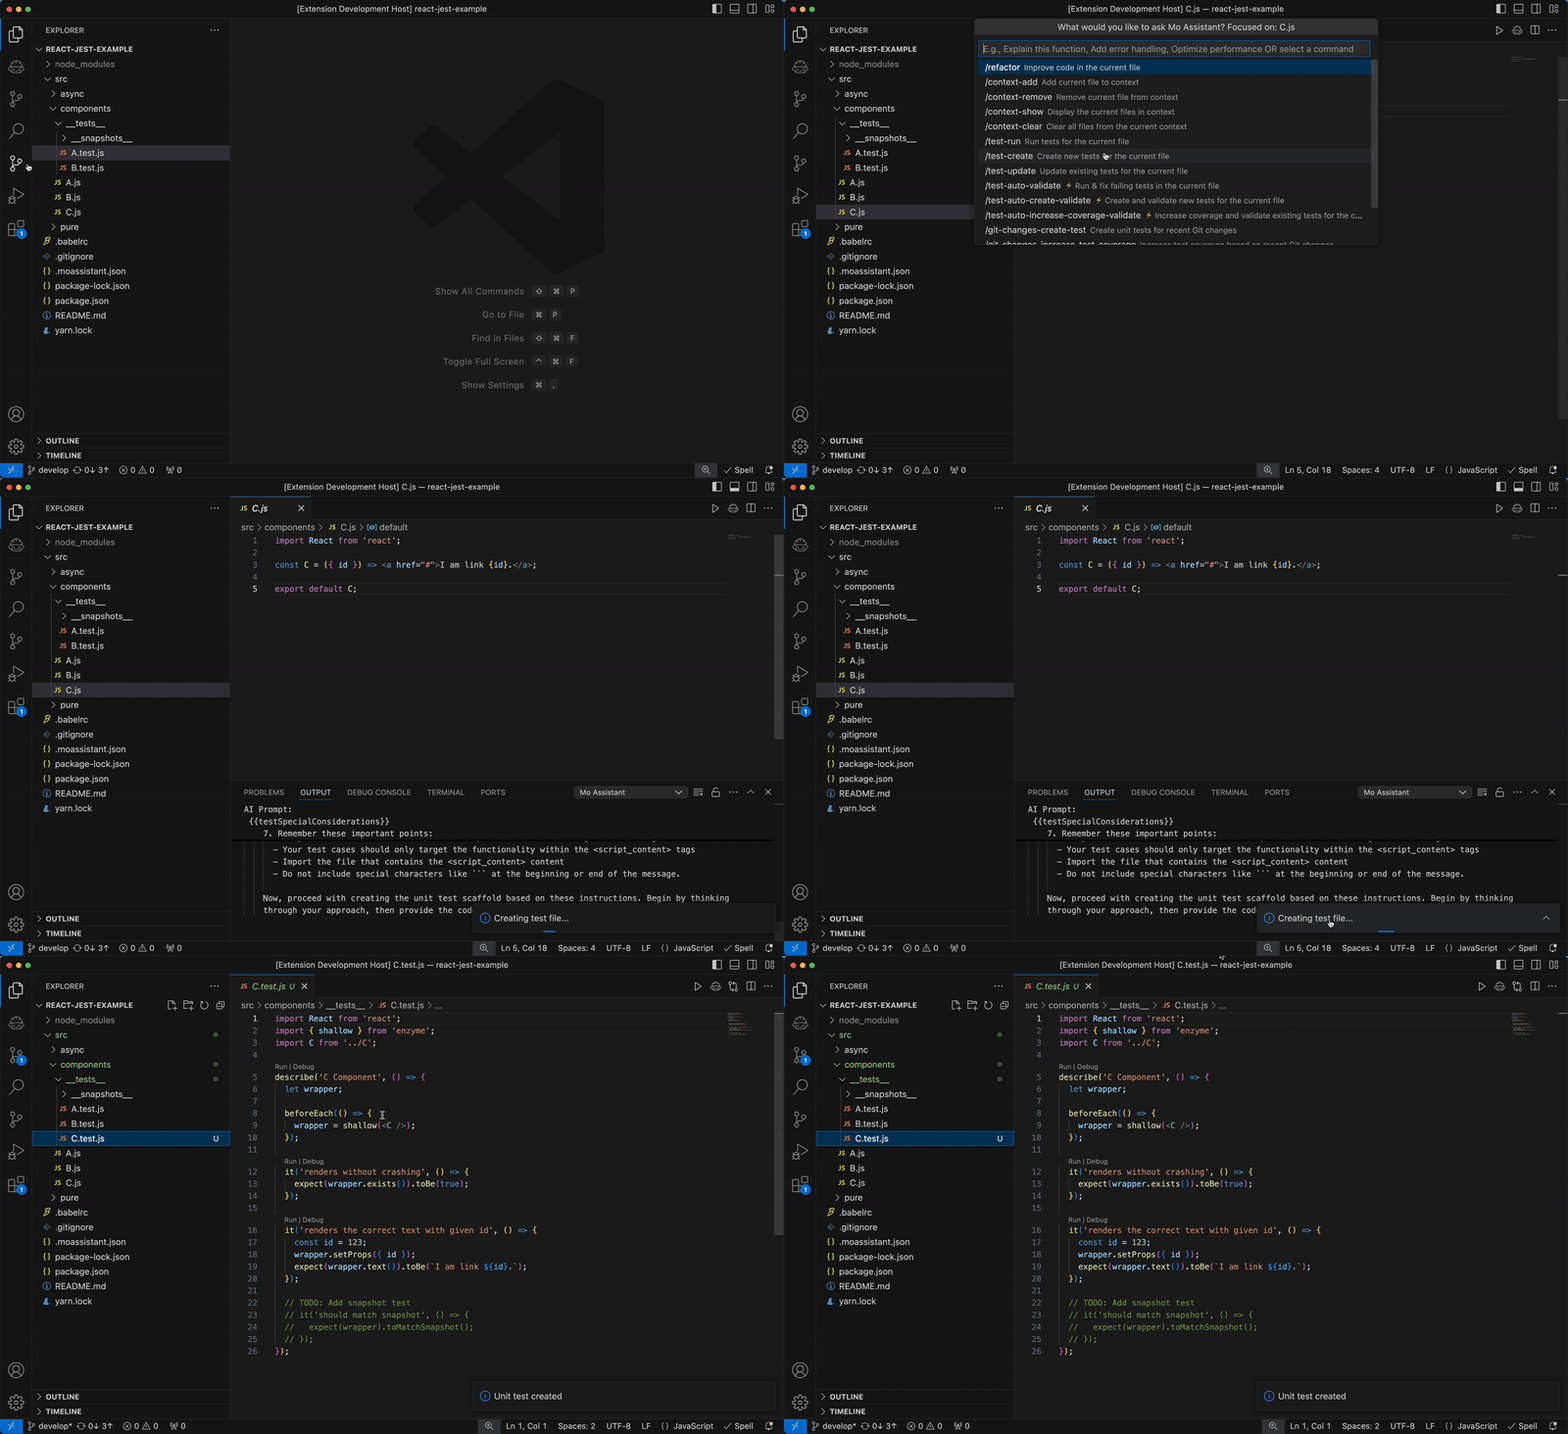
Create and manage unit tests effortlessly:

  • To create a test: Use /test-create
  • To run tests: Use /test-run
  • To update existing tests: Use /test-update
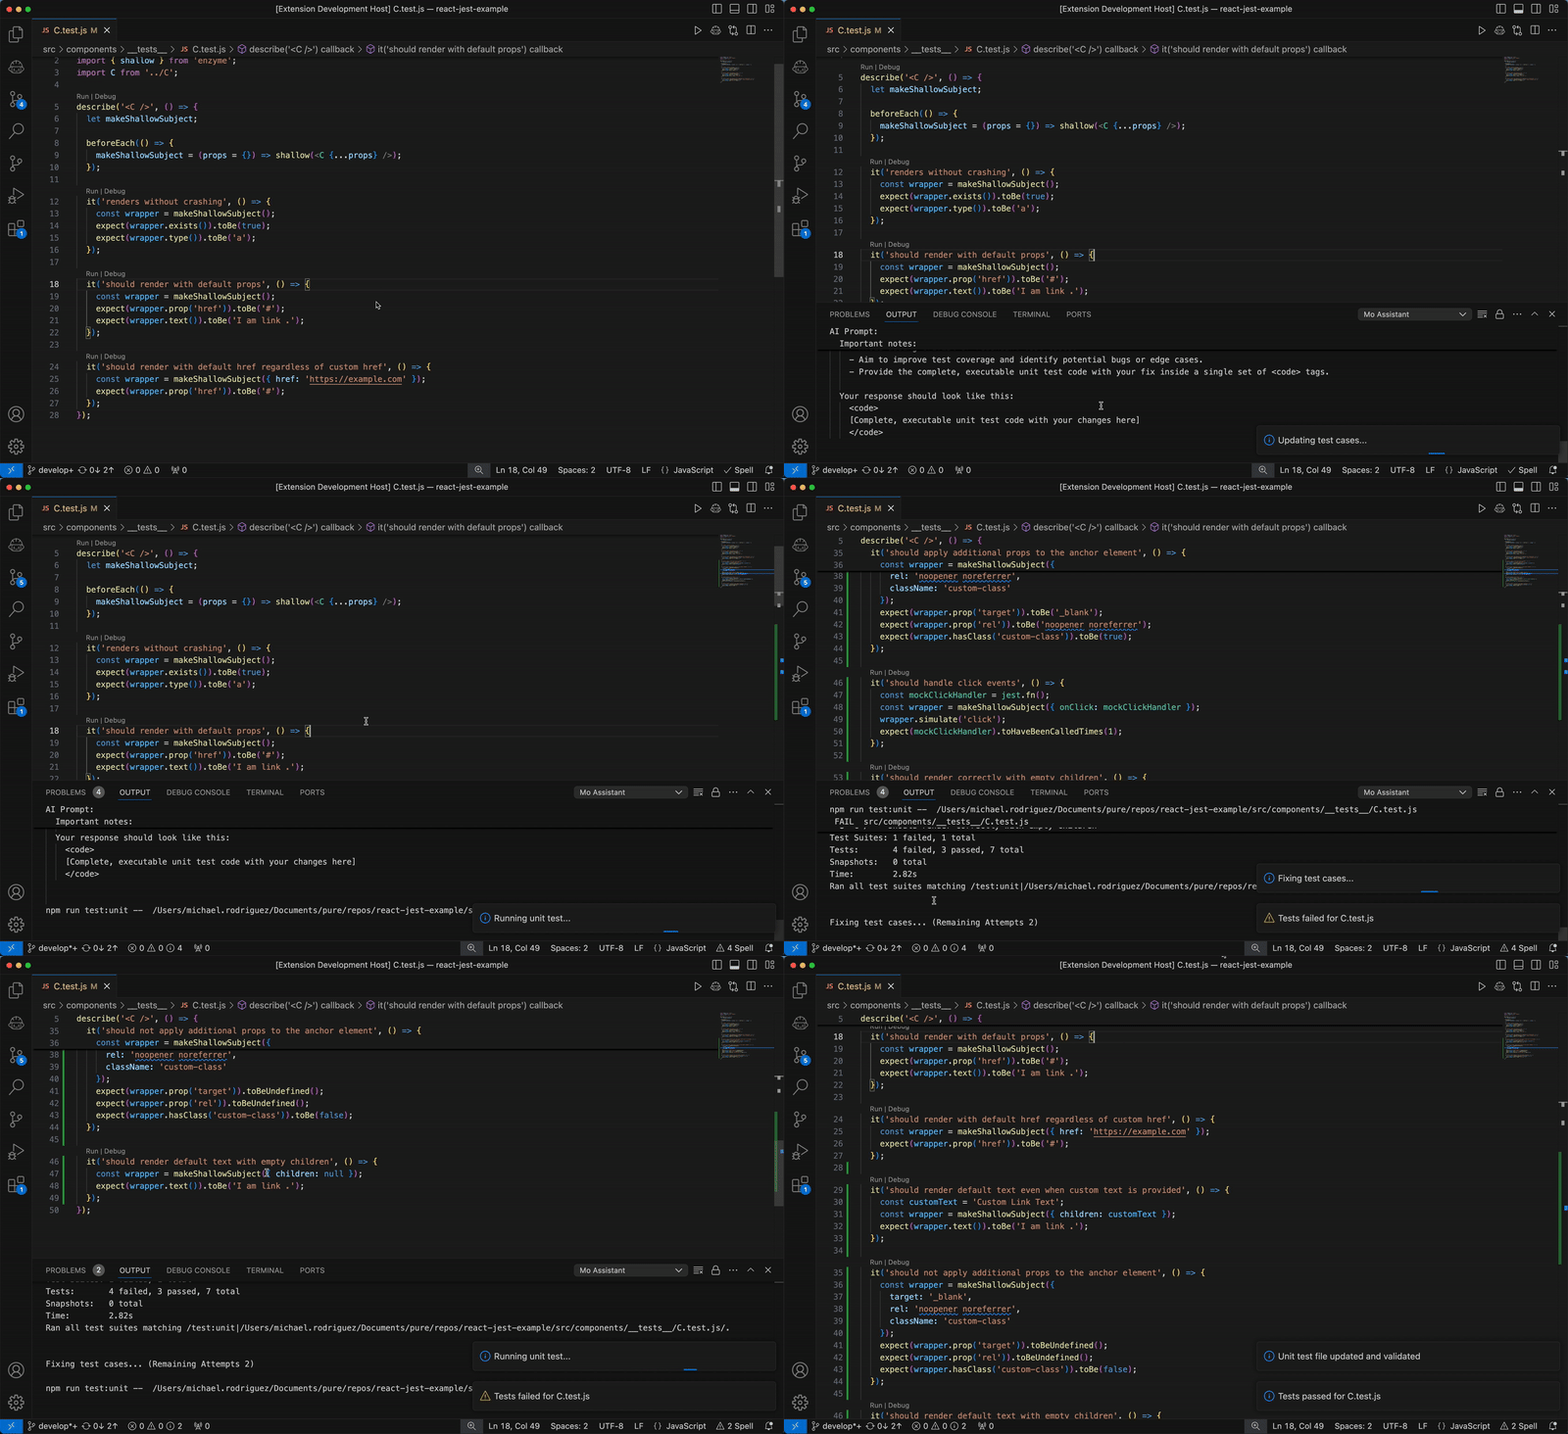
  • To increase coverage and validate: Use /test-auto-increase-coverage-validate

Create unit tests for your code.

How to create unit test

Run a unit test and validate them.

How to create and validate unit test

Update existing unit tests.

How to existing unit test

Increase coverage and validate in one step.

How to increase unit test coverage and validate

Interactive Webview Interface

Access different functionalities through dedicated panels:

  • Documentation
  • Configuration
  • Commit Message Generation
  • Unit Testing
  • Code Refactoring

Commands

Use the keyboard shortcut Ctrl+Shift+A (Windows/Linux) or Cmd+Shift+A (Mac).

Open Mo Assistant command prompt:

  • Ctrl+Shift+A (Windows/Linux) or Cmd+Shift+A (Mac), Mo Assistant: Ask Mo: Initiates a conversation with the AI assistant, allowing you to ask questions or request help with your code.

Mo Assistant provides the following commands:

  • /refactor: Automatically analyzes and suggests improvements for your code using AI-powered refactoring techniques.
  • /context-add: Adds the current file to the AI's context, improving the relevance of its responses.
  • /context-remove: Removes a previously added file from the AI's context.
  • /context-show: Displays the current files and code snippets that are part of the AI's context.
  • /context-clear: Removes all files from the AI's context, resetting it to its initial state.
  • /test-runt: Executes the unit tests for the current file or project.
  • /test-create: Generates a new unit test for the selected code or current file using AI assistance.
  • /test-update: Modifies an existing unit test to reflect changes in the code it's testing, with AI guidance.
  • /test-auto-validate: ⚡ Checks the validity and effectiveness of the current unit test.
  • /test-auto-create-validate: ⚡ Combines the creation and validation of a unit test in one step for faster development.
  • /test-auto-increase-coverage-validate: ⚡ Analyzes the current test coverage, suggests improvements, and validates the enhanced tests.
  • /git-changes-create-test: Automatically generates unit tests for recent changes in your codebase.
  • /git-changes-increase-test-coverage: Identifies areas of low test coverage in recent changes and suggests additional tests to improve coverage.
  • /open-readme: Displays the README file for the Mo Assistant extension, offering detailed information about its usage and configuration.
  • /show-view: Opens the main page of the Mo Assistant extension, providing an overview of its features and functionality.

Mo Assistant Configuration

You can override the default configuration by creating a .moassistant.json file in your project's root directory or package. The structure of this file should match the default configuration object. This allows you to customize Mo Assistant's behavior to better fit your project's specific needs and structure.

Using .moassistant.json

The .moassistant.json file is a powerful way to tailor Mo Assistant to your project's requirements. Here's how to use it:

  1. Create a file named .moassistant.json in your project's root directory.
  2. Add your custom configuration options to this file, following the structure of the default configuration.
  3. Mo Assistant will automatically detect and use these custom settings.

Example .moassistant.json:

{
  "testCommand": "npm run test:unit -- ",
  "testDirectories": ["test", "__tests__"],
  "testFileExtensions": [".test.ts", ".test.js", ".spec.js", ".spec.ts"],
  "testSampleCode": "",
  "testSpecialConsiderations": "",
  "defaultTestExtension": ".spec.ts",
  "gitCommandsConfig": {
      "allowedExtensions": [".ts", ".tsx", ".js", ".jsx", ".vue"],
  }
}

*You cam create multiple configuration files in your project. The Assistant is going to look for the nearest top configuration file from the editor where the command was executed.

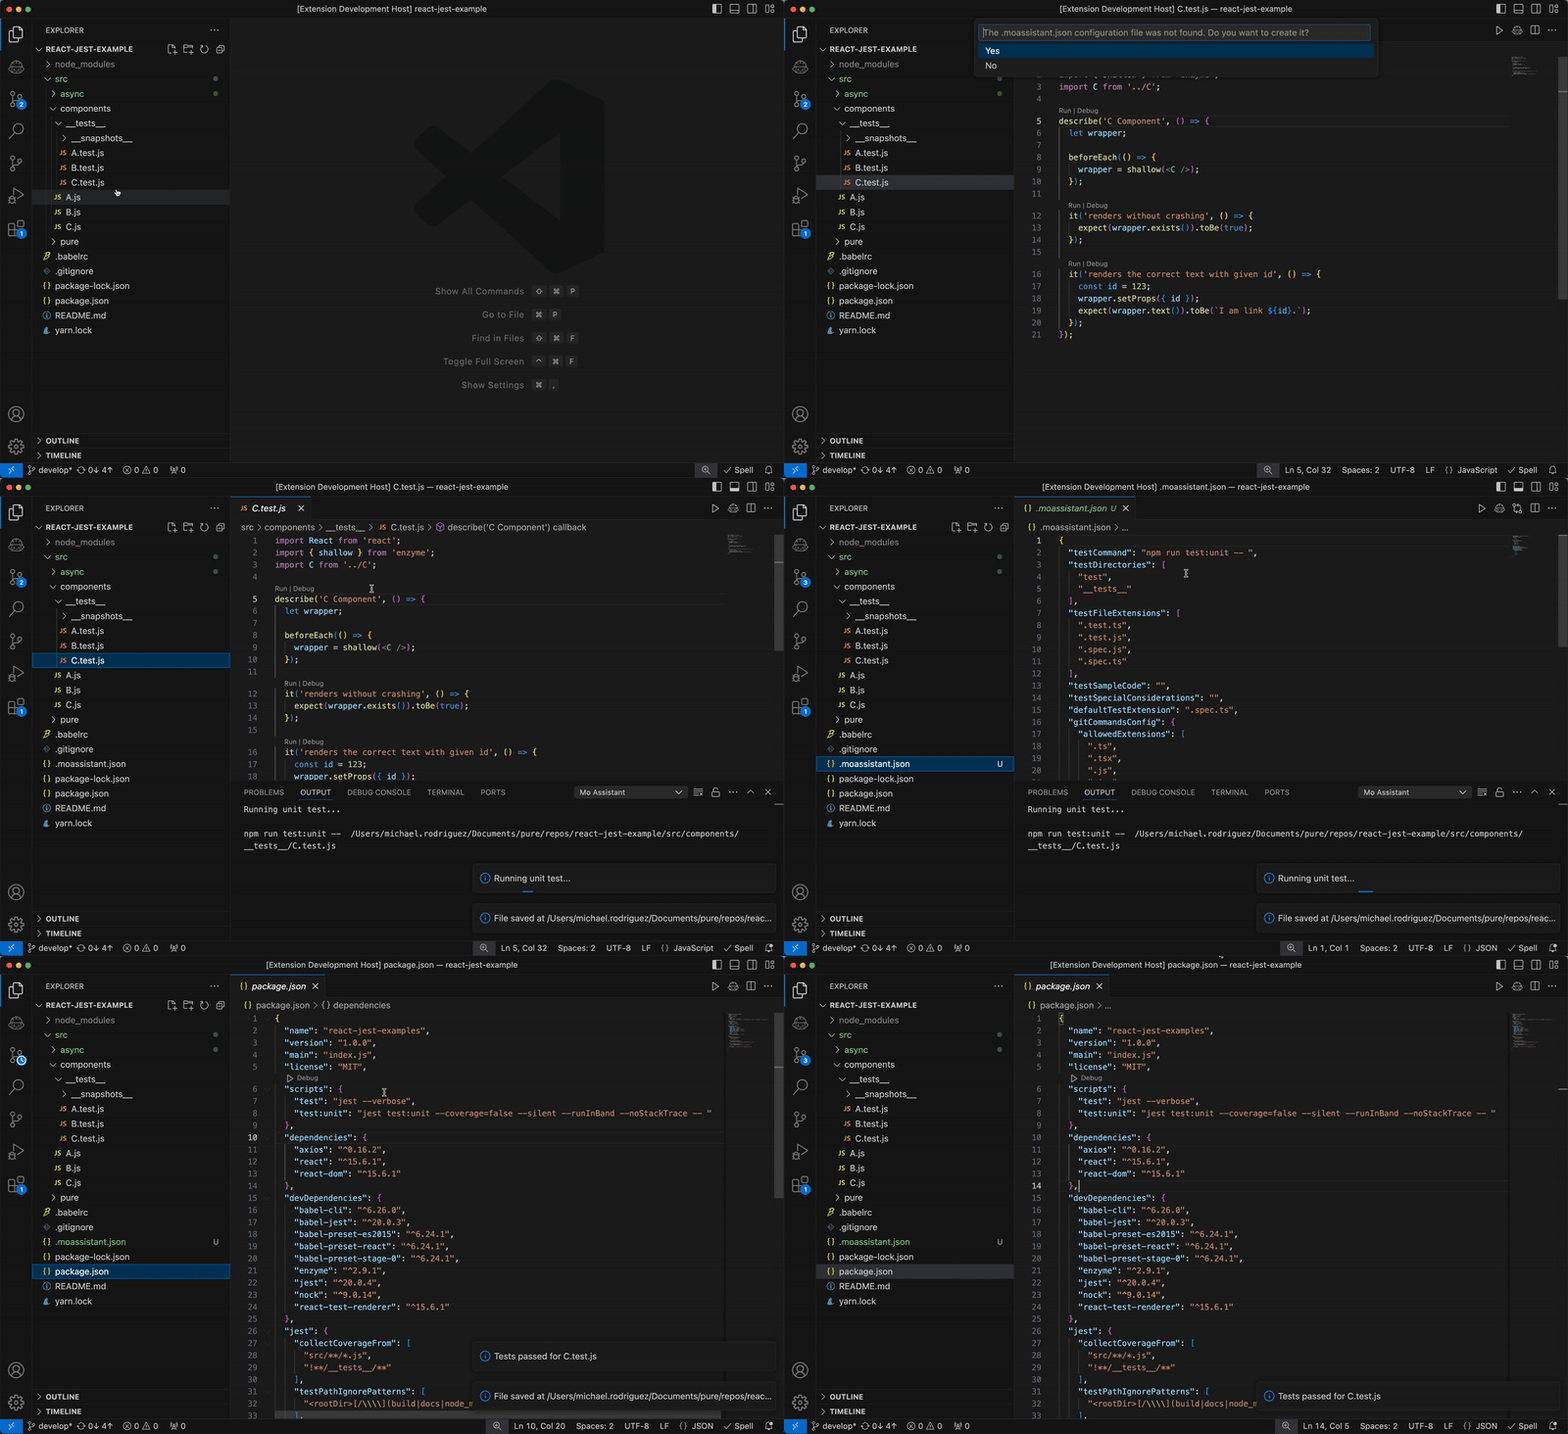
Automatically add Mo Assistant configuration files to your project

Mo Assistant uses a configuration file to set up the working rules for the project when running unit test commands. If you have not created the configuration file you will be prompted to created when working with unit tests.

How to add a Mo Assistant configuration file

Default Configuration

Mo Assistant comes with a set of default configurations that you can customize. Here are the default settings:

Configuration Option Default Value Description
testCommand "npm run test:unit -- " The command used to run unit tests for your project. Note: The "--" parameter is crucial as it ensures that the code can inject the path of the file to be tested after the command.
testDirectories ["test", "__tests__"] An array of directory names where Mo Assistant will look for test files. The first element in the array will take precedence. You can also you ./ for a relative path to the main code.
testFileExtensions [".test.ts", ".test.js", ".spec.js", ".spec.ts"] An array of file extensions that Mo Assistant recognizes as test files.
testSampleCode (example code snippet) A sample code snippet used as a reference for generating an updating unit tests. IMPORTANT: The sample code has to be stringify otherwise it can cause errors. You can use this online tool.
testSpecialConsiderations (special considerations text) Special instructions or considerations for generating and updating unit tests.
defaultTestExtension ".spec.ts" The default file extension used when creating new test files.
gitCommandsConfig.allowedExtensions [".ts", ".tsx", ".js", ".jsx", ".vue"] An array of file extensions that Mo Assistant will consider when working with Git-related features.

Note: When you run a Mo Assistant command for the first time, and it needs configuration, you will be automatically prompted to create the .moassistant.json configuration file if it doesn't already exist. This makes it easy to set up your custom configuration without manually creating the file.

By using a .moassistant.json file, you can ensure that Mo Assistant works seamlessly with your project's specific testing framework, file structure, and development practices.

Troubleshooting

If you encounter any issues while using Mo Assistant, try these common solutions:

Claude API Token Issues

  • Ensure your Claude API token is correctly set in the VS Code settings.
  • Check that your token hasn't expired or been revoked.
  • Verify your internet connection to ensure the extension can communicate with the API.

Extension Not Loading

  • Restart VS Code.
  • Ensure you have the latest version of the extension installed.
  • Check the VS Code output panel for any error messages related to Mo Assistant.

Commands Not Working

  • Make sure you're using the correct keyboard shortcut: Ctrl+Shift+A (Windows/Linux) or Cmd+Shift+A (Mac).
  • Verify that the command palette is showing Mo Assistant commands.
  • Check if there are any conflicting extensions that might be overriding the commands.

Incorrect or Unexpected AI Responses

  • Review the context added to the AI. Use /context-show to see what files are currently in context.
  • Try clearing the context with /context-clear and then re-adding relevant files.
  • Ensure your project's .moassistant.json configuration file is correctly formatted.

Unit Test Generation Issues

  • Verify that your project's test framework is correctly set up.
  • Check that the testCommand in your configuration matches your project's test run command.
  • Ensure the testDirectories and testFileExtensions in your configuration are correct for your project structure.

"Command Not Found" Error When Running Tests (macOS)

If you encounter a "command not found" error when using the /test-run command, it may be due to npm not being accessible in a non-interactive shell. To resolve this:

  1. Ensure npm is accessible at the system root:

    • Open your terminal
    • Run sudo nano /etc/paths
    • Add the path to your Node.js installation, e.g.: /Users/[username]/.nvm/versions/node/[version]/bin
    • Save and exit the editor
  2. Reload the paths:

    • Run source /etc/paths
  3. Verify npm is available:

    • Open a new terminal
    • Start a shell with /bin/sh
    • Run npm --version

If the version number displays correctly, npm should now be accessible to the extension.

Note: The exact path may vary depending on your Node.js installation method (e.g., nvm, direct download). Adjust the path accordingly.

Feedback and Support

For more information and updates, visit the Mo Assistant GitHub repository.

Enjoy using Mo Assistant to boost your productivity and streamline your development workflow!

  • Contact us
  • Jobs
  • Privacy
  • Manage cookies
  • Terms of use
  • Trademarks
© 2025 Microsoft