Mrs. Git Helper
Welcome to Mrs. Git Helper – your powerful GitLab assistant, seamlessly integrated into Visual Studio Code! This extension is designed to automate and simplify the repetitive tasks in your daily Git workflow, allowing you to stay focused on what truly matters: writing quality code.
The "Why"
Are You Tired of the Repetitive GitLab Cycle. Every new ticket often means...
- Context Switching: Leave VS Code, open the browser. Open Jira/Trello to copy the ticket title.
- Switch to GitLab to create a new issue, create one, two, or even three separate branches
- Go to your terminal,
git fetch, git checkout -b ..., paste the branch name.
- Write some code.
- Switch back to GitLab to create one, two, maybe three merge requests.
- Switch to Microsoft Teams/Slack to paste the MR links and ask for a review.
Mrs. Git Helper - a VS Code extension that automates your entire GitLab workflow, allowing you to stay focused on what matters most: writing code
Our Goal:
- Save Time
- Reduce Errors
- Keep you in flow “writing code”
Installation & Setup
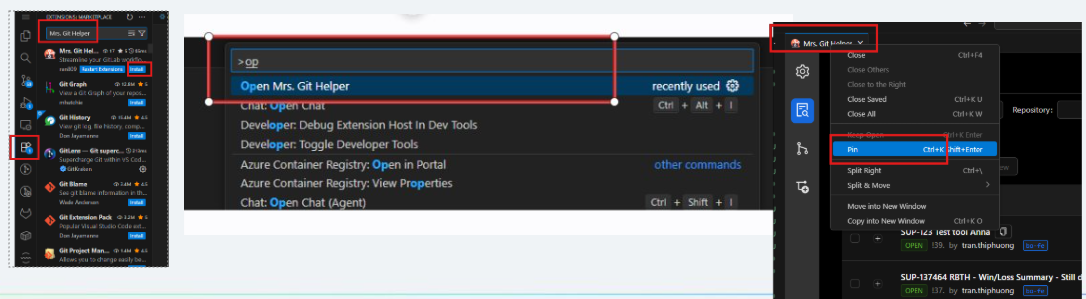
Open the Extensions view in VS Code (Ctrl+Shift+X).
Search for "Mrs. Git Helper".
Click “Install”.
Open the Command Palette (Ctrl+Shift+P).
Type Mrs. Git Helper and select the command "Open Mrs. Git Helper. A full-screen editor tab will open, which is your main dashboard.
💡Pro Tip: Pin the Tab! Right-click on the "Mrs. Git Helper" tab and select "Pin". This will keep the tab always visible on the left side of your editor tabs for quick access.
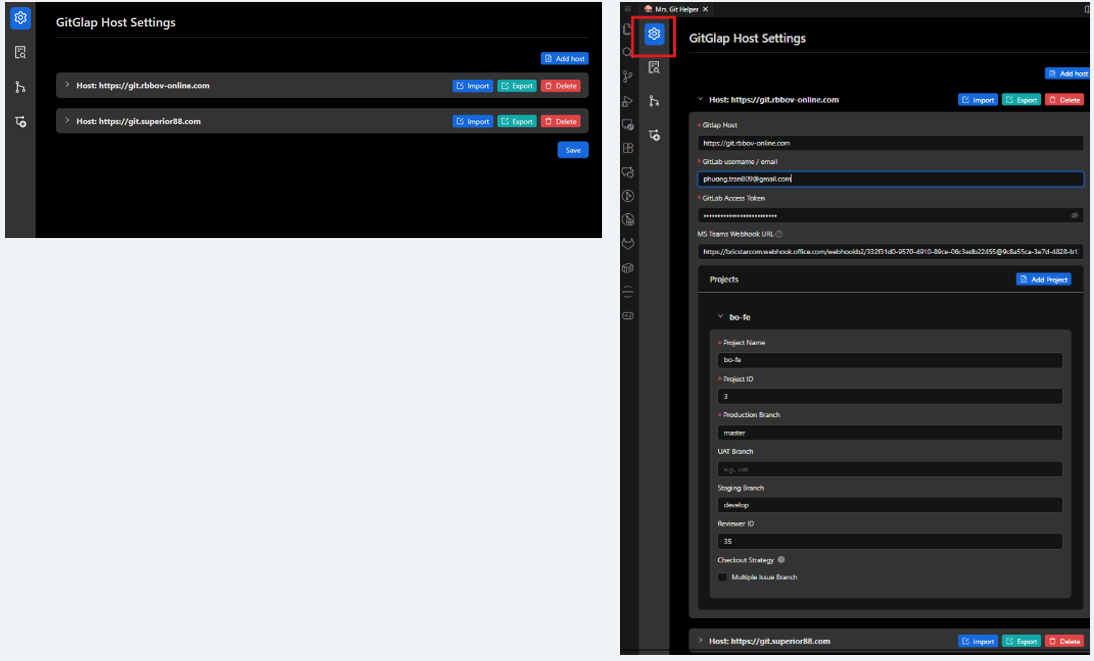
- Navigate to the Settings tab. You have two powerful options:
- Manual Setup:
- Fill in your GitLab: Host URL, username, access Token (with
api scope), MS Teams Webhook URL
- Add all the projects your team works on, defining their environment branches (
staging, uat, prod).
- Use “Import” – “Export”
- One person sets up the Host and all shared projects (manual setup).
- That person clicks the "Export" button for that host configuration.
- Share the downloaded
.json file with the team
- Every other team member simply clicks "Import", selects the file, and their extension is instantly and perfectly configured.
Magic ✨: Allow you to work across multiple GitLab hosts.
✨ Core Features
✨Magic: Create Merge Request - Your Intelligent Assistant
Tired of the tedious process of creating MRs one by one? Mrs. Git Helper turns it into a fast and intelligent experience, whether you're starting from an issue or working on an ad-hoc branch.
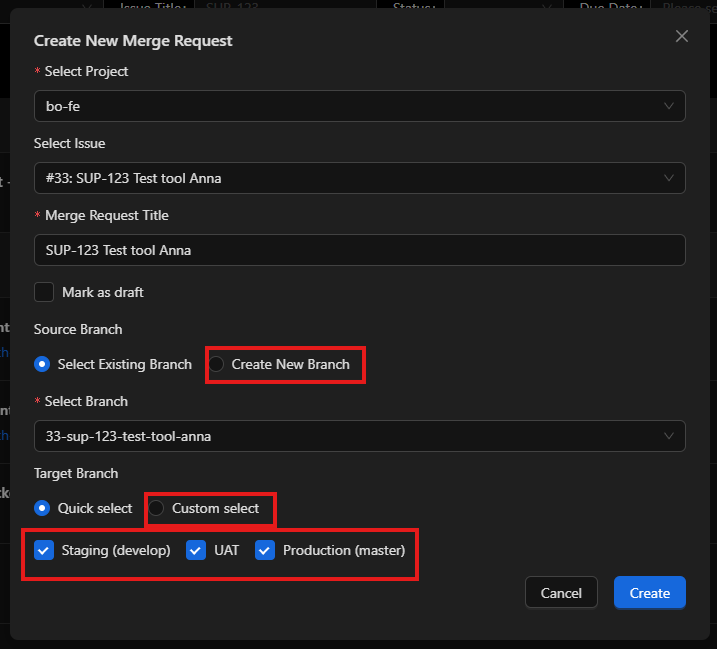
✨Magic: Create Merge Request - Your Intelligent Assistant
- This extension allows you to create issues across multiple projects, and at the same time automatically create the corresponding branches and merge requests with just one click.
- Imagine your ticket requires code changes in two different projects, and each project has its own rules for creating new branches from specific environment branches. Not every project follows a simple pattern like staging–uat–master — each environment may have its own branching structure.
- If you do everything manually, you would need to create two separate issues, then create new branches and merge requests for each project and each environment. This takes a lot of time and forces you to remember the branching rules and the correct environment branches name for every project…
- This tool makes all of that work much easier and far less time-consuming. Instead of handling everything manually, it simplifies the entire process for you.
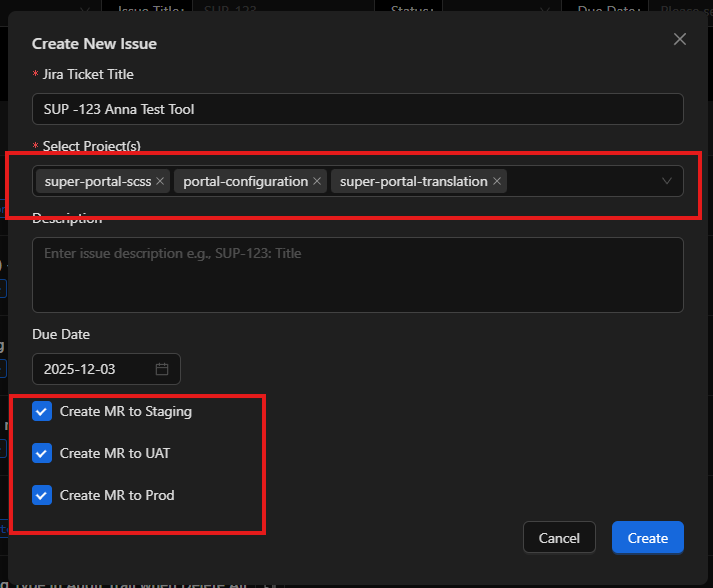
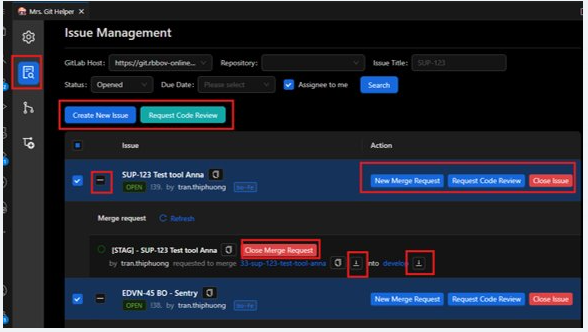
🚀 The Issue Management Tab
- Powerful Filters: Search issues across multiple projects. Filter by Status, Title, Due date, and “assigned to me”
- Contextual Actions:
- Create New Issue.
- Expand any issue to instantly see all its related merge requests.
- Create New Merge Request under issue
- Close / Reopen issues
- Close Merge Request.
- Checkout any source or target branch with a single click.
- Request code review:
- Click the "Request Review" button on any issue or Select multiple issues and request a review for all of them at once. The extension sends a beautifully formatted, professional notification to your team's channel
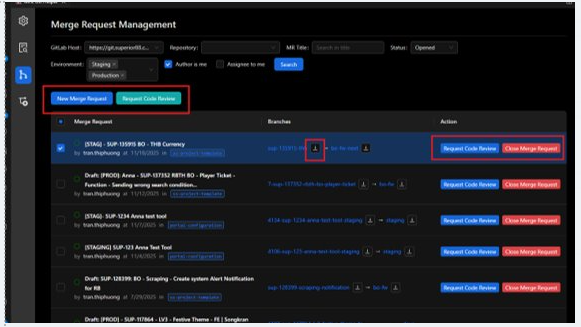
🚀 The Merge Request Management Tab
- Powerful Filters: Search merge requests across multiple projects. Filter by Status, Title, Environment, and “assigned to me” or “author is me”
- Contextual Actions:
- Create New Merge Request..
- Close merge request
- Checkout any source or target branch with a single click.
- Request code review:
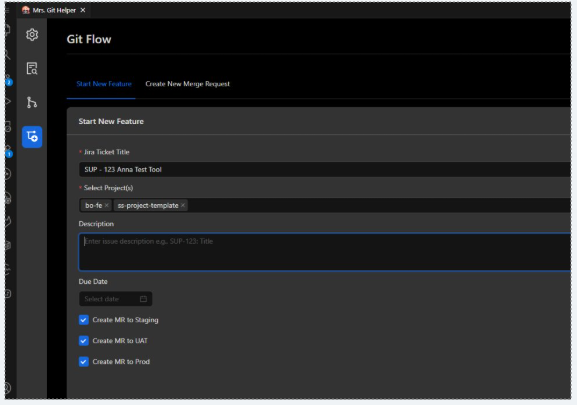
🚀 Git Flow Tab
Allows you to create issues across multiple projects, even if they are on different GitLab hosts, and automatically create the corresponding branches and merge requests with just one click.
Allows create multiple merge request
Contributing
If you have suggestions for improvements or bug reports, please open an issue or submit a pull request on our GitHub repository.
Enjoy a smoother GitLab workflow with Mrs. Git Helper!
| |
