pms-vscode
pms-vscode is a VS Code extension acting as a frontend for pty-mcp-server, a Haskell-based PTY-hosted MCP server.
Ref : socket-telnet-prompt
Ref : serial-nw-setting-prompt
Quick Start
Prerequisite
Before following the steps below, make sure pty-mcp-server is installed according to the instructions here:
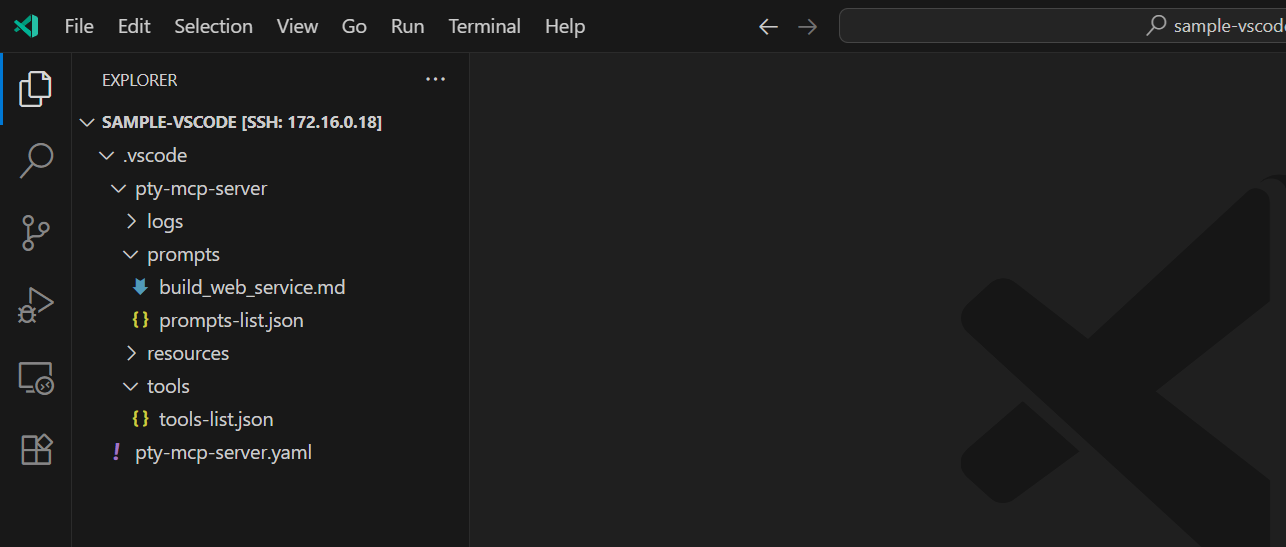
1. Install the VSCode Extension and Open the Project
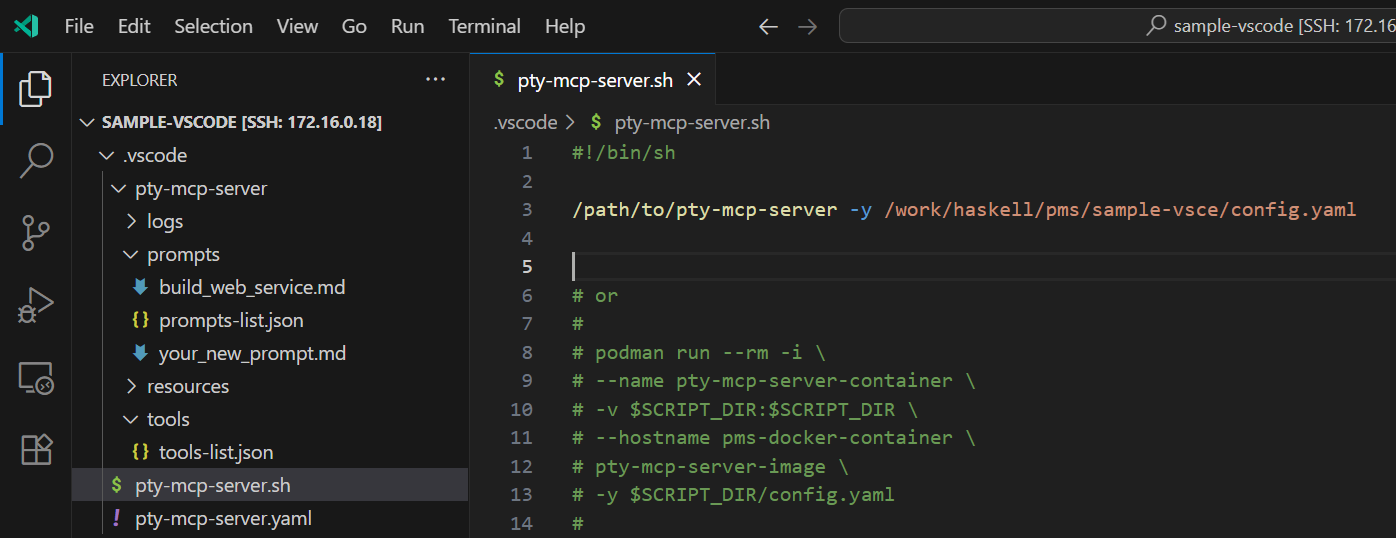
- When you install this VSCode extension and open your project, the necessary directories and files will be automatically created under the
.vscode folder, as shown in the image below:
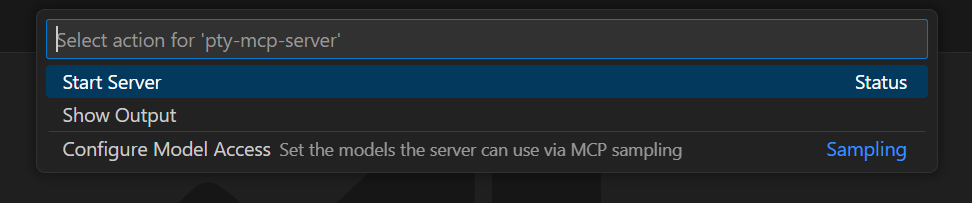
2. Start the pty-mcp-server
- Press
Ctrl+Shift+P to open the Command Palette.
- Type
MCP and select MCP: List Servers.

- Choose
pty-mcp-server from the list.

- Click Start Server.
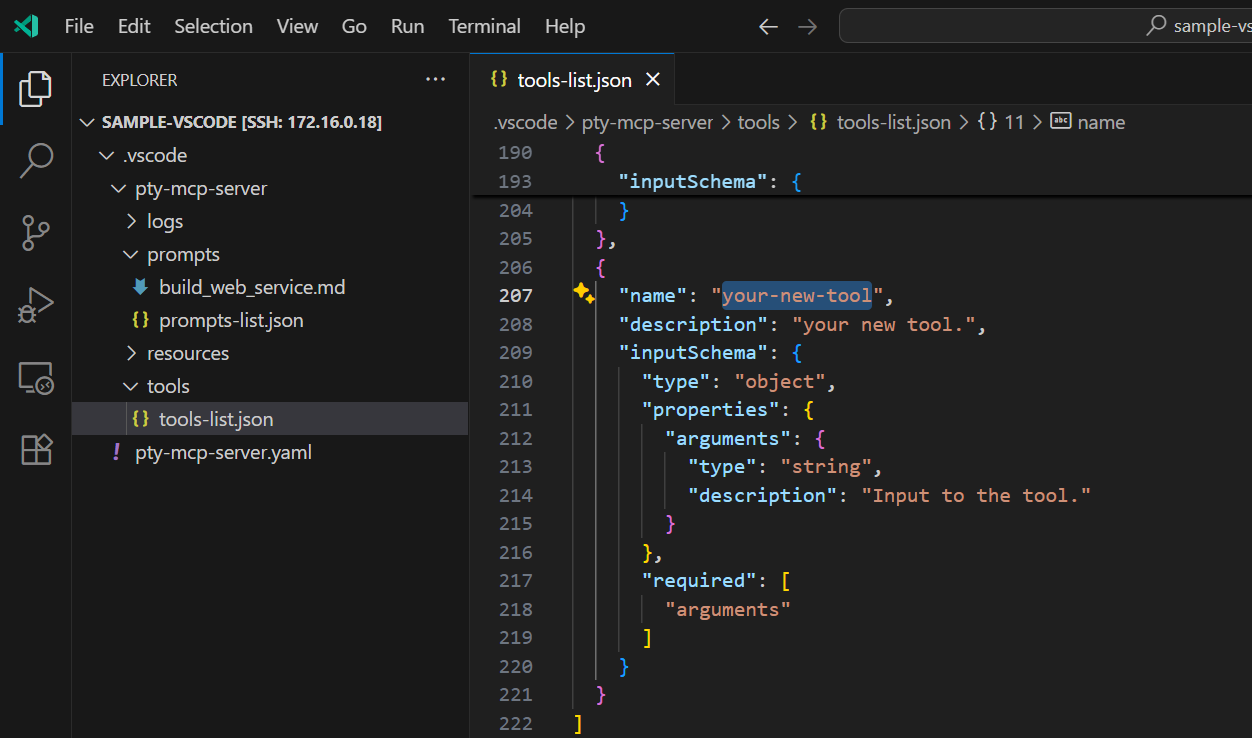
- Edit the
pty-mcp-server/tools/tools-list.json file and add your custom tool. The file will automatically be reloaded and the tool will become available.
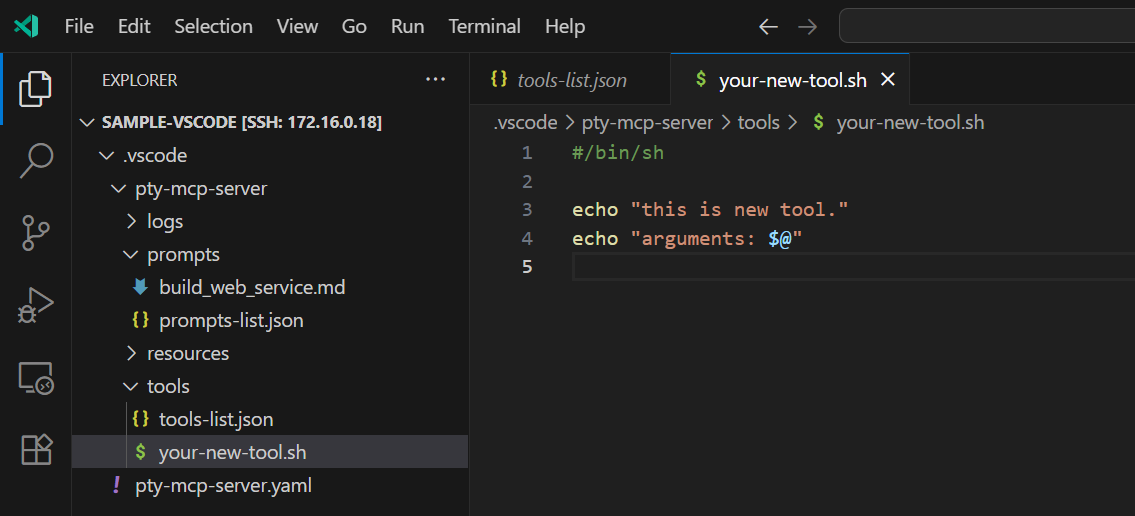
- Create a shell script file with the same name as the tool inside the
pty-mcp-server/tools/ directory.
Implement your logic using shell commands, and make sure to give the script executable permission.
- In the AI chat, you can trigger tool completion by typing
#, then selecting your tool from the list.

4. Add a Prompt
- Edit the
pty-mcp-server/prompts/prompt-list.json file and add your custom prompt. The file will be automatically reloaded and the new prompt will become available.
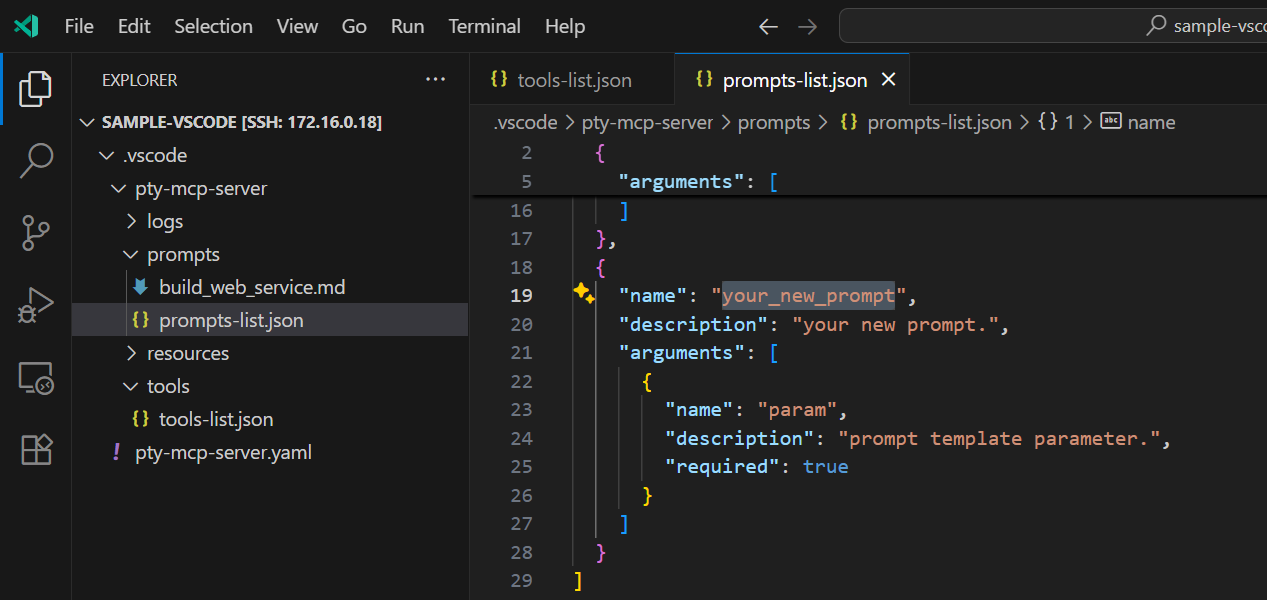
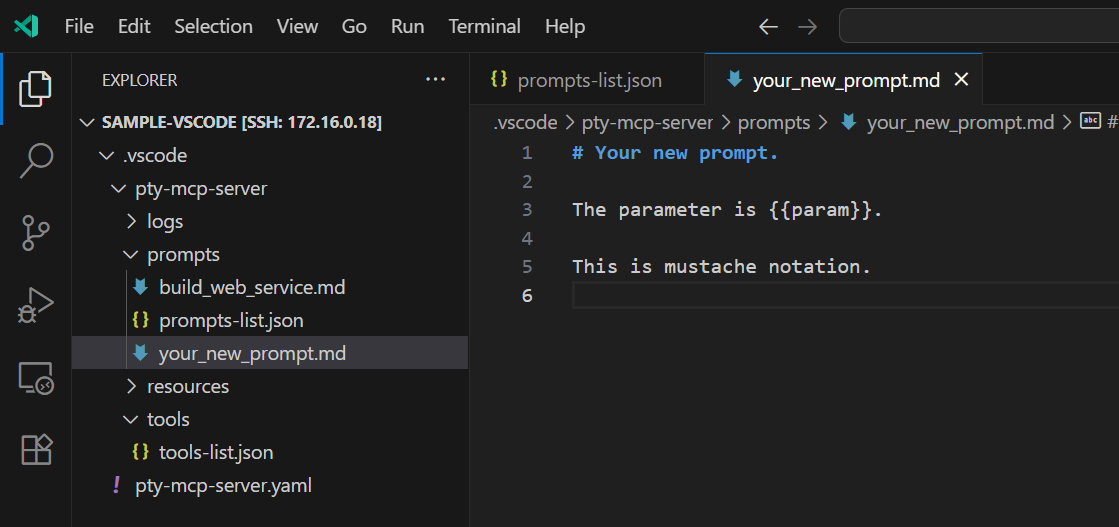
- Create a Markdown file with the same name as the prompt. Write your prompt using natural language and embed parameters using Mustache-style placeholders (
{{param}}).
- In the AI chat, you can trigger prompt completion by typing
/mcp, then selecting your prompt from the list.

5. Customize the pty-mcp-server Execution
If you need to change how pty-mcp-server is executed (e.g. wrapper scripts or custom paths), create a pty-mcp-server.sh script in the .vscode folder and define the desired execution behavior.
6. View Logs
Setup information is displayed in the Output view of VSCode, as shown below.
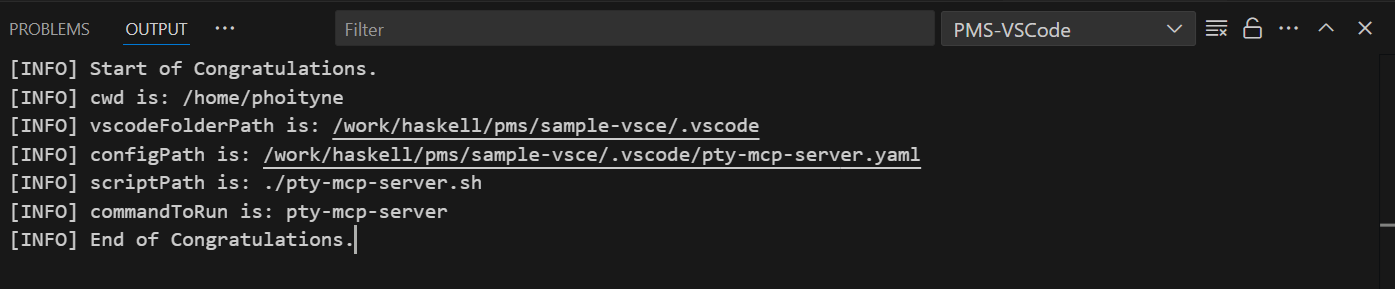
Additionally, the server activity logs are written to files under the logDir specified in the configuration file.
mcp.json Configuration
By default, the pms-vscode extension registers a single pty-mcp-server instance.
However, you can define and register additional MCP servers independently by creating a .vscode/mcp.json file.
This allows you to run as many MCP servers as needed—each tailored for a specific purpose such as local Bash workflows or remote SSH connections.
{
  "servers": [
    "bash-mcp-server": {
      "type": "stdio",
      "command": "pty-mcp-server",
      "args": ["-y", "/path/to/bash-config.yaml"]
    },
    "ssh-mcp-server": {
      "type": "stdio",
      "command": "pty-mcp-server",
      "args": ["-y", "/path/to/ssh-config.yaml"]
    }
  ]
}
Each MCP server publishes its available tools based on a tools-list.json file located in the toolsDir specified in its individual yaml configuration file.
pty-mcp-server
⚠️ Caution
Do not grant unrestricted control to AI.
Unsupervised use or misuse may lead to unintended consequences.
All AI systems must remain strictly under human oversight and control.
Use responsibly, with full awareness and at your own risk.
📢 Notice
Always ensure that pty-mcp-server.yaml is updated to the latest version when upgrading the server. Using an outdated configuration file may lead to compatibility issues or execution errors.
📘 Overview
pty-mcp-server is a Haskell implementation of an MCP (Model Context Protocol) server that enables AI agents to dynamically control PTY (pseudo-terminal) sessions and agent-friendly process, filesystem, socket, and serial interfaces, allowing interaction with real system environments through terminal-based and direct I/O interfaces.
The server communicates exclusively via standard input/output (stdio), ensuring simple and secure integration with MCP clients. Through this interface, AI agents can execute commands, exchange data with external endpoints, retrieve system states, and apply configurations under human oversight.
🎯 Purpose
- Provide AI agents with TTY-based and direct I/O control capabilities
- Enable automated configuration, inspection, and operation using CLI tools
- Facilitate AI-driven workflows for system development, diagnostics, and remote interaction
- Allow AI agents to access and operate on systems beyond the reach of static scripts or APIs
- Support Infrastructure as Code (IaC) scenarios requiring interactive or stateful terminal workflows
- Assist in system integration across heterogeneous environments and legacy systems
- Empower AI agents to support DevOps, IaC, and integration pipelines by operating tools that require human-like terminal interaction
🔧 Example Use Cases
- Dynamic execution of CLI tools that require a PTY environment
(e.g., embedded systems over serial or SSH-based terminals)
- REPL automation: driving GHCi or other CLI-based interactive interpreters
- Interactive debugging of Haskell applications or shell-based workflows
- System diagnostics through scripted or interactive bash sessions
- Remote server management using SSH
- Direct process, socket, serial, and filesystem operations through agent-oriented MCP tools
- Hands-on system operation where CLI behavior cannot be emulated via non-interactive scripting
- Network device interaction: configuring routers, switches, or appliances via console
- AI-assisted IaC workflows: executing Terraform, Ansible, or shell-based deploy scripts that involve prompts, state reconciliation, or real-time input
- AI-driven system integration testing across multiple environments and CLI tools
- Legacy system automation where GUI/API is unavailable and only terminal interaction is supported
User Guide (Usage and Setup)
Features
pty-mcp-server provides the following built-in tools for powerful and flexible automation:
agent-proc-run
Spawns an external process with the specified command and options. The process's stdin/stdout are connected for subsequent agent-proc-read and agent-proc-write operations. Only one process can be active at a time.
agent-proc-read
Reads up to the specified number of bytes from the stdout of the running process. Returns immediately with available data (non-blocking). Returns an empty string if no data is available.
agent-proc-write
Writes the specified string to the stdin of the running process.
agent-proc-terminate
Forcefully terminates the currently running process. Resets internal state so agent-proc-run can be called again.
agent-socket-open
Opens a socket connection for subsequent agent-socket-read, agent-socket-write, agent-socket-read-byte, and agent-socket-write-byte operations. Specify either file for a Unix domain socket, or host and port for a TCP socket.
agent-socket-close
Closes the active agent socket connection.
agent-socket-read
Reads up to the specified number of bytes from the active agent socket connection and returns the data as a UTF-8 string. Returns an empty string if no data is available before timeout.
agent-socket-read-byte
Reads up to the specified number of bytes from the active agent socket connection and returns the data as an uppercase hex string.
agent-socket-write
Writes the specified UTF-8 string to the active agent socket connection.
agent-socket-write-byte
Decodes the specified hex string and writes the resulting bytes to the active agent socket connection.
agent-server-listen
Binds to the specified host and port, starts listening for incoming TCP connections, and launches a background accept thread. Returns immediately after the listener is ready. Only one listener can be active at a time.
agent-server-close
Closes the active accepted connection (if any). If no connection is active, also closes the listener. Call twice to close both the connection and the listener.
agent-server-status
Returns the current server status as a JSON object with isListening and isConnected boolean fields.
agent-server-events
Dequeues and returns all server-side events accumulated since the last call (e.g. ClientConnected, BytesReceived, ClientDisconnected). Returns an empty array if no events are pending.
agent-server-read
Reads data from the active accepted connection and returns it as a UTF-8 string. Returns an empty string if no data is available before timeout.
agent-server-read-byte
Reads data from the active accepted connection and returns it as an uppercase hex string.
agent-server-write
Writes the specified UTF-8 string to the active accepted connection. Note: \r\n is sent as literal characters; use agent-server-write-byte for correct CRLF.
agent-server-write-byte
Decodes the specified hex string and writes the resulting bytes to the active accepted connection. Hex string must not contain spaces or newlines.
agent-serial-open
Opens a serial port connection for subsequent agent-serial-read, agent-serial-write, agent-serial-read-byte, and agent-serial-write-byte operations. Only one port can be active at a time.
agent-serial-close
Closes the active serial port connection.
agent-serial-read
Reads up to the specified number of bytes from the active serial port and returns the data as a UTF-8 string. Returns an empty string if no data is available before timeout.
agent-serial-read-byte
Reads up to the specified number of bytes from the active serial port and returns the data as an uppercase hex string (e.g. FF0A1B41).
agent-serial-write
Writes the specified UTF-8 string to the active serial port.
agent-serial-write-byte
Decodes the specified hex string and writes the resulting bytes to the active serial port. Accepts uppercase or lowercase hex, e.g. FF0A1BFF or 000a1bff.
pms-list-dir
List the contents of a directory at the specified path.
pms-make-dir
Create a directory at the specified path. Missing parent directories will also be created.
pms-read-file
Read the contents of a file at the specified path. Optionally specify startLine/endLine (1-based, inclusive) to read only a partial range of lines.
pms-write-file
Write contents to a file at the specified path.
pms-file-info
Return basic metadata for a file: total line count and byte size. Use this before pms-read-file to understand the file's scale, and use the line count with pms-read-file partial-read to avoid loading more than necessary.
pms-grep-file
Search a file for lines matching a POSIX extended regular expression. Returns a JSON array of hit objects, each with: 'line' (1-based line number), 'text' (full content of the matching line), and 'cols' (array of 1-based column offsets where the pattern matches within that line). Returns an empty array when no lines match. Use the returned line numbers with pms-read-file partial-read to efficiently retrieve surrounding context.
pms-replace-file
Replace literal text in a file. Each replacement is applied in order, and every occurrence of oldText found at that step is replaced with newText. This is not a regular expression replacement.
pms-patch-file
Apply a unified diff patch to a file at the specified path. The patch must be in unified diff format (e.g., @@ -1,3 +1,3 @@). On success, returns the path of the patched file. On failure, returns an error message such as HunkMismatch. NOTE: When using multiple hunks, each hunk's line numbers (both - and + sides) must account for the cumulative line count delta (additions minus deletions) of all preceding hunks.
socket-open
This tool initiates a socket connection to the specified host and port. (Deprecated: This tool is duplicated by agent-socket-open, which provides equivalent functionality with a more agent-friendly interface.)
socket-close
This tool close active socket connection that was previously established using the 'socket-open' tool. (Deprecated: This tool is duplicated by agent-socket-close, which provides equivalent functionality with a more agent-friendly interface.)
socket-read
Reads the specified number of bytes from the socket. The 'size' parameter indicates how many bytes to read. (Deprecated: This tool is duplicated by agent-socket-read-byte, which provides equivalent functionality with a more agent-friendly interface.)
socket-write
Write a sequence of bytes to the socket. (Deprecated: This tool is duplicated by agent-socket-write-byte, which provides equivalent functionality with a more agent-friendly interface.)
socket-message
This tool sends a message over the active socket connection. (Deprecated: This tool is duplicated by agent-socket-write, which provides equivalent functionality with a more agent-friendly interface.)
socket-telnet
A simple Telnet-like communication tool over raw TCP sockets. This tool connects to a specified host and port, sends and receives data, and removes any Telnet IAC (Interpret As Command) sequences from the communication stream. Note: This is a simplified Telnet implementation and does not support full Telnet protocol features. (Deprecated: This tool is duplicated by agent-socket-open, agent-socket-read-byte, and agent-socket-write-byte, which provide equivalent functionality with a more agent-friendly interface.)
serial-open
Opens a serial port connection to a specified device with a given baud rate. Commonly used to access on-premises hardware or network devices via console. (Deprecated: This tool is duplicated by agent-serial-open, which provides equivalent functionality with a more agent-friendly interface.)
serial-close
This tool close active serial connection that was previously established using the 'serial-open' tool. (Deprecated: This tool is duplicated by agent-serial-close, which provides equivalent functionality with a more agent-friendly interface.)
serial-read
Reads the specified number of bytes from the serial. The 'size' parameter indicates how many bytes to read. (Deprecated: This tool is duplicated by agent-serial-read-byte, which provides equivalent functionality with a more agent-friendly interface.)
serial-write
Write a sequence of bytes to the serial. (Deprecated: This tool is duplicated by agent-serial-write-byte, which provides equivalent functionality with a more agent-friendly interface.)
serial-message
This tool sends a specified string to the active serial connection, then waits for a recognizable prompt from the remote side. Upon detecting the prompt, it captures and returns all output received prior to it. (Deprecated: This tool is duplicated by agent-serial-write and agent-serial-read, which provide equivalent functionality with a more agent-friendly interface.)
pty-bash
pty-bash is a tool that launches a bash shell in a pseudo terminal (PTY). It allows the LLM (MCP client) to interact with a real Linux shell in an interactive terminal (PTY). This enables AI to run system commands, collect information, and handle prompts or TUI-based tools as if operated by a human, making it effective for dynamic Linux-based automation and diagnostics. (Note: This tool is duplicated by agent-proc-run, which provides equivalent functionality with a more agent-friendly interface.)
pty-ssh
Establishes an SSH session in a pseudo-terminal with the specified arguments, allowing interaction with remote systems. (Note: This tool is duplicated by agent-proc-run, which provides equivalent functionality with a more agent-friendly interface.)
pty-telnet
Launches the telnet command within a pseudo-terminal (PTY) session. This allows interactive communication with a remote Telnet server, enabling the AI to respond to prompts such as 'login:' or 'Password:' just like a human user. The PTY environment ensures that the terminal behaves like a real TTY device, which is required for many Telnet servers. (Note: This tool is duplicated by agent-proc-run, which provides equivalent functionality with a more agent-friendly interface.)
pty-cabal
Launches a cabal repl session in a pseudo-terminal using the specified project directory, main source file, and arguments. (Note: This tool is duplicated by agent-proc-run, which provides equivalent functionality with a more agent-friendly interface.)
pty-stack
Launches a stack repl session in a pseudo-terminal using the specified project directory, main source file, and arguments. (Note: This tool is duplicated by agent-proc-run, which provides equivalent functionality with a more agent-friendly interface.)
pty-ghci
Launches a GHCi session in a pseudo-terminal using the specified project directory, main source file, and arguments. (Note: This tool is duplicated by agent-proc-run, which provides equivalent functionality with a more agent-friendly interface.)
pty-connect
Runs a command via a pseudo-terminal (pty) to interact with external tools or services, with optional arguments. (Note: This tool is duplicated by agent-proc-run, which provides equivalent functionality with a more agent-friendly interface.)
pty-message
pms-messages is a tool for sending structured instructions or commands to a running PTY session. It abstracts direct terminal input, allowing the LLM (MCP client) to interact with the PTY process in a controlled and programmable way. (Note: This tool is duplicated by agent-proc-write, which provides equivalent functionality with a more agent-friendly interface.)
pty-terminate
Forcefully terminates an active pseudo-terminal (PTY) connection. (Note: This tool is duplicated by agent-proc-terminate, which provides equivalent functionality with a more agent-friendly interface.)
proc-cmd
The proc-cmd tool launches the Windows Command Prompt (cmd.exe) as a subprocess. It allows the AI to interact with the standard Windows shell environment, enabling execution of batch commands, file operations, and system configuration tasks in a familiar terminal interface. (Note: This tool is duplicated by agent-proc-run, which provides equivalent functionality with a more agent-friendly interface.)
proc-ps
proc-ps launches the Windows PowerShell (powershell.exe) as a subprocess. It provides an interactive command-line environment where the AI can execute PowerShell commands, scripts, and system administration tasks. The shell is started with default options to keep it open and ready for further input. (Note: This tool is duplicated by agent-proc-run, which provides equivalent functionality with a more agent-friendly interface.)
proc-ssh
proc-ssh launches an SSH client (ssh) as a subprocess using runProcess. It enables the AI to initiate remote connections to other systems via the Secure Shell protocol. The tool can be used to execute remote commands, access remote shells, or tunnel services over SSH. The required arguments field allows specifying the target user, host, and any SSH options (e.g., -p, -i, -L). (Note: This tool is duplicated by agent-proc-run, which provides equivalent functionality with a more agent-friendly interface.)
proc-telnet
A tool that runs Telnet sessions by internally using PuTTY's plink executable. This enables interactive Telnet connections on Windows without requiring an external pseudo-terminal emulator like winpty. Users supply the Telnet command arguments, which are passed directly to plink to establish the session. (Note: plink.exe must be available in the system PATH.) (Note: This tool is duplicated by agent-proc-run, which provides equivalent functionality with a more agent-friendly interface.)
proc-plink
A Windows tool that launches an interactive console application via plink, a command-line SSH and Telnet client. Suitable for executing SSH or Telnet sessions directly without needing an external PTY emulator. (Note: plink.exe must be available in the system PATH.) (Note: This tool is duplicated by agent-proc-run, which provides equivalent functionality with a more agent-friendly interface.)
proc-spawn
Spawns an external process using the specified arguments and enables interactive communication via standard input and output. Unlike PTY-based execution, this communicates directly with the process using the runProcess function without allocating a pseudo-terminal. Suitable for non-TUI, stdin/stdout-based interactive programs. (Note: This tool is duplicated by agent-proc-run, which provides equivalent functionality with a more agent-friendly interface.)
proc-message
Sends structured text-based instructions or commands to a subprocess started with runProcess. It provides a programmable interface for interacting with the process via standard input. (Note: This tool is duplicated by agent-proc-write, which provides equivalent functionality with a more agent-friendly interface.)
proc-read
Reads available output from the active PTY session without blocking. If no data is available, returns an empty string. (Note: This tool is duplicated by agent-proc-read, which provides equivalent functionality with a more agent-friendly interface.)
proc-write
Writes input data to the active PTY session and returns immediately without waiting for completion. (Note: This tool is duplicated by agent-proc-write, which provides equivalent functionality with a more agent-friendly interface.)
proc-terminate
Forcefully terminates a running process created via runProcess. (Note: This tool is duplicated by agent-proc-terminate, which provides equivalent functionality with a more agent-friendly interface.)
Scriptable CLI Integration
The pty-mcp-server supports execution of shell scripts associated with registered tools defined in tools-list.json. Each tool must be registered by name, and a corresponding shell script (.sh) should exist in the configured tools/ directory.
This design supports AI-driven workflows by exposing tool interfaces through a predictable scripting mechanism. The AI can issue tool invocations by name, and the server transparently manages execution and interaction.
To add a new tool:
- Create a shell script named
your-tool.sh in the tools/ directory.
- Add an entry in
tools-list.json with the name "your-tool" and appropriate metadata.
- No need to recompile or modify the server — tools are dynamically resolved by name.
This separation of tool definitions (tools-list.json) and implementation (tools/your-tool.sh) ensures clean decoupling and simplifies extensibility.
Note:
Commands starting with pty- are not supported on Windows. These tools rely on POSIX-style pseudo terminals (PTY), which are not natively available in the Windows environment.
Running with Podman or Docker
You can build and run pty-mcp-server using either Podman or Docker.
Note: When running pty-mcp-server inside a Docker container, after establishing a pty connection, you will be operating within the container environment. This should be taken into account when interacting with the server.
1. Build the image
Clone the repository and navigate to the docker directory:
$ git clone https://github.com/phoityne/pty-mcp-server.git
$ cd pty-mcp-server/docker
$ podman build . -t pty-mcp-server-image
$
Ref : build.sh
2. Run the container
Run the server inside a container:
$ podman run --rm -i \
--name pty-mcp-server-container \
-v /path/to/dir:/path/to/dir \
--hostname pms-docker-container \
pty-mcp-server-image \
-y /path/to/dir/config.yaml
$
Ref : run.sh
Below is an example of how to configure mcp.json to run the MCP server within VSCode:
{
  "servers": {
    "pty-mcp-server": {
      "type": "stdio",
      "command": "/path/to/run.sh",
      "args": []
      /*
      "command": "podman",
      "args": [
        "run", "--rm", "-i",
        "--name", "pty-mcp-server-container",
        "-v", "/path/to/dir:/path/to/dir",
        "--hostname", "pms-docker-container",
        "pty-mcp-server-image",
        "-y", "/path/to/dir/config.yaml"
      ]
      */
    }
  }
}
Binary Installation
If you prefer to build it yourself, make sure the following requirements are met:
You can install pty-mcp-server using cabal:
$ cabal install pty-mcp-server
Installation via .dxt Package
You can also set up the tool using a pre-packaged .dxt file.
This method is suitable for quick installation into Claude Code or for manual setup via extraction.
🛠️ The .dxt package distribution is currently in preparation,
but you can check the latest status and download links at:
https://github.com/phoityne/pms-dxt
Binary Execution
The pty-mcp-server application is executed from the command line.
Usage
$ pty-mcp-server -y config.yaml
While the server can be launched directly from the command line, it is typically started and managed by development tools that integrate an MCP client—such as Visual Studio Code. These tools utilize the server to enable interactive and automated command execution via PTY sessions.
VSCode Integration: .vscode/mcp.json
To streamline development and server invocation from within Visual Studio Code, the project supports a .vscode/mcp.json configuration file.
This file defines how the pty-mcp-server should be launched in a development environment. Example configuration:
{
  "servers": {
    "pty-mcp-server": {
      "type": "stdio",
      "command": "pty-mcp-server",
      "args": ["-y", "/path/to/your/config.yaml"]
    }
  }
}
config.yaml Configuration (ref)
logDir:
The directory path where log files will be saved. This includes standard output/error logs and logs from script executions.
logLevel:
Sets the logging level. Examples include "Debug", "Info", and "Error".
toolsDir:
Directory containing script files (shell scripts named after tool names, e.g., ping.sh). If a script matching the tool name exists here, it will be executed when the tool is called.
This directory must also contain the tools-list.json file, which defines the available public tools and their metadata.
prompts:
A list of prompt strings used to detect interactive command prompts. This allows the AI to identify when a command is awaiting input. Examples include "ghci>", "]$", "password:", etc.
allowedAgentCmds:
A whitelist of commands that are permitted for use with agent-proc-run. If this list is empty (the default), all commands are denied. Only commands explicitly listed here will be allowed to execute.
Demonstrations
AI handles Binary Protocol Dialogues via pty-mcp-server
Ref : socket-telnet-prompt
This video demonstrates a Telnet login sequence powered by the MCP prompt defined in socket-telnet-prompt.md. Using tools like socket-open, socket-read, socket-write, and socket-message, the AI performs Telnet negotiation, handles prompts, and submits credentials. Binary responses are parsed and displayed in human-readable form.
Network Device Version Check via Serial Connection — powered by pty-mcp-server.
Ref : serial-nw-setting-prompt
This video demonstrates how pty-mcp-server enables AI-assisted automation over a serial connection to a network device.
Device Setup
The user specifies the communication port and baud rate.
Example: COM3, 9600 baud on Windows.
Login Interaction
The AI prompts for a username and password,
and uses them to log in to the network device.
Device Version Retrieval
After logging in, the AI sends a command
to retrieve the installed OS or firmware version.
Online Version Check
The AI accesses the official website to check the latest available version,
and compares it with the installed version.
Session Termination
Once the check is complete, the AI logs out and cleanly closes the serial connection.
Demo: Watch AI Create and Launch a Web App from Scratch
Ref : Web Service Construction Agent Prompt
[Scene 1: Overview & MCP Configuration]
In this demo, we'll show how an AI agent builds and runs a web service inside a Docker container using the pty-mcp-server.
First, we configure mcp.json to launch the MCP server using a shell script.
This script starts the Docker container where our PTY-based interaction will take place.
[Scene 2: Docker Launch Configuration]
The run.sh script includes volume mounts, hostname settings, and opens port 8080.
This allows the container to expose a web service to the host system.
[Scene 3: Starting the MCP Server]
Now, the container is launched, and the pty-mcp-server is running inside it,
ready to handle AI-driven requests through a pseudo-terminal.
[Scene 4: Connecting the AI Agent]
We open the chat interface and send a prompt designed for a web service builder agent.
The AI connects to the container's Bash session via PTY and begins its preparation.
[Scene 5: Initial Setup Commands]
Following the prompt, the AI starts by:
- Creating a project folder
- Moving into the working directory
[Scene 6: AI Ready to Receive Instructions]
Once the environment is ready, we instruct the AI to build a "Hello, world" web service.
From here, the AI begins its autonomous construction process.
[Scene 7: AI Executes Web Setup Commands]
The AI proposes a series of terminal commands.
As the user, we review and approve them one by one.
Steps include:
- Checking for Python
- Installing Flask
- Writing the source code (
app.py) to serve "Hello, world"
- Running the Flask server
- Testing via
curl http://localhost:8080 inside the container
[Scene 8: Verifying from Outside the Container]
To confirm external accessibility, we access the service from the host via port 8080. As expected, the response is: "Hello, world"
[Scene 9: Reviewing the Execution History]
Finally, we review the AI's actions step by step:
- Initialized the Bash session and created the working directory
- Set up the Python environment
- Generated the Flask-based
app.py
- Launched the web server and validated its operation
[Scene 10: Conclusion]
This demonstrates how AI, combined with the PTY-MCP-Server and Docker,
can automate real development tasks — interactively, intelligently, and reproducibly.
Demo: Docker Execution and Host SSH Access
- MCP Configuration with Docke
This is the mcp.json file. It defines the MCP server startup configuration. In this case, the pty-mcp-server will be launched using a shell script: run.sh. This script uses Podman to start the container.
- Starting the MCP Server
Here is the run.sh script. It launches the Docker container using podman run, with the correct volume mount, hostname, and image tag. Once executed, the MCP server starts inside the container.
- Tool List
Next, the list of tools exposed to the client is defined in tools-list.json.
It includes three tools: pty-message, pty-ssh, a shell script named hostname.sh
- Tool Script Directory
In config.yaml, the path to the script directory is defined.
This is where tool scripts like hostname.sh should be placed
- Hostname Script
The hostname.sh script simply runs the hostname command.
It is executed as a tool within the container.
- Executing hostname from Chat
Now, let's run the hostname tool in the chat.
This shows the name of the current host, which is the container.
As expected, the output is: pms-docker-container
This confirms that the command is executed inside the Docker container.
- Using pty-ssh to Access the Host
Next, we use pty-ssh to establish a pty session with the host OS.
SSH connection is attempted using host.docker.internal, which resolves to the Docker host.
After confirming the host identity and entering the password, the login succeeds.
- Confirming Host Environment
Now that we are connected to the host, we run: cat /etc/redhat-release
This confirms that we are now in the host OS, which is CentOS 9.
In contrast, the Docker container is running AlmaLinux 9.
Demo: Interactive Bash via PTY
- Configure bash-mcp-server in mcp.json
In this file, register bash-mcp-server as an MCP server.
Specify the command as pty-mcp-server and pass the configuration file config.yaml as an argument.
- Settings in config.yaml
The config.yaml file defines the log directory, the directory for tools, and prompt detection patterns.
These settings establish the environment for the AI to interact with bash through the PTY.
- Place tools-list.json in the toolsDir
You need to place tools-list.json in the directory specified by toolsDir.
This file declares the tools available to the AI, including pty-bash and pty-message.
- AI Connects to Bash and Selects Commands Autonomously
The AI connects to bash through the pseudo terminal and
decides which commands to execute based on the context.
- Confirming the Command Execution Results
The output of the getenforce command shows whether SELinux is in Enforcing mode.
This result appears on the terminal or in logs, allowing the user to verify the system status.
Demo: Shell Script Execution
- mcp.json Configuration
Starts the pty-mcp-server in stdio mode, passing config.yaml as an argument.
- Overview of config.yaml
Specifies log directory, tools directory, and prompt strings.
The tools-list.json in toolsDir defines which tools are exposed.
- Role of tools-list.json
Lists available script tools, with only the script_add tool registered here.
- Role and Naming Convention of the tools Folder
Stores executable shell scripts called via the mcp server.
The tool names in tools-list.json match the shell script filenames in this folder.
- Execution from VSCode GitHub Copilot
Runs script_add.sh with the command #script_add 2 3, executing the addition.
- Confirming the Result
Returns "5", indicating the operation was successful.
Demo: Haskell Debugging with cabal repl

Ref : haskell cabal debug prompt
- Target Code Overview
A function in MyLib.hs is selected to inspect its runtime state using cabal repl and an AI-driven debug interface.
- MCP Server Initialization
The MCP server is launched to allow structured interaction between the AI and the debugging commands.
- Debugger Prompt and Environment Setup
The AI receives a prompt, starts cabal repl, and loads the module to prepare for runtime inspection.
- Debugging Execution Begins
The target function is executed and paused at a predefined point for runtime observation.
- State Inspection and Output
Runtime values and control flow are displayed to help verify logic and observe internal behavior.
- Summary
Integration with pty-msp-server enables automated runtime inspection for Haskell applications.
| |