Ortoni Runner (Playwright Test Runner)
A friendly, no-fuss extension that lets you run Playwright tests and Cucumber scenarios directly from VS Code — no terminal fumbling, no copying commands. Install, point your environment (once), then click to run tests.
What’s new (v2.0.9)
- Location-only mode: send only
file:line from CodeLens and still use sidebar-selected environment data.
- Custom command wrapping: configure
prefixCommand and suffixCommand to prepend or append any custom command around the generated test location.
- Environment interpolation: use
${env} in prefix/suffix values to inject the selected environment command directly into custom wrappers.
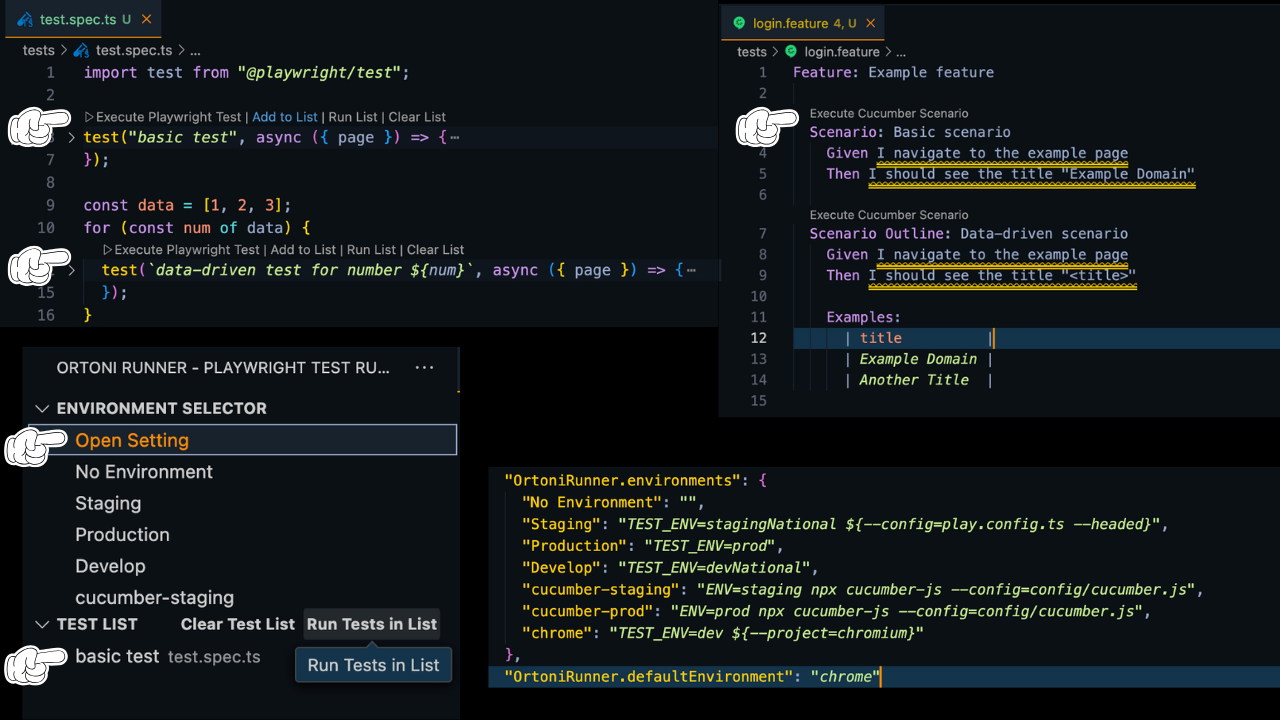
- Test List sidebar: collect tests or scenarios from files, view them in the Activity Bar, and run or clear the entire list with a single click.
- Immediate UI updates: when you add/remove tests, the code lenses update instantly in the active file — no reload needed.
- Feature file support: improved detection and CodeLens support for
.feature (Cucumber) files.
- Cleaner UI: “Run List” and “Clear List” actions only appear when there’s at least one item in your list. Code lenses appear only in the file you’re actively editing.
Quick Start — 1 minute to running tests
- Install the extension from the VS Code Marketplace: Ortoni Runner - Playwright Test Runner.
- Open your project in VS Code (the project that contains your Playwright or Cucumber tests).
- Configure environments (one-time — optional): open Settings → Extensions → Ortoni Runner - Playwright Test Runner → Environments and add any environment commands you use (examples below).
- Open a test file (
*.ts, *.js) or a feature file (*.feature). Look for the small actions (CodeLenses) above tests or scenarios.
- Click Execute to run a single test, or Add to List to collect tests and run them later from the sidebar.
Features — what you can do
- Run single Playwright tests directly from the editor.
- Run Cucumber scenarios (feature files) by clicking the CodeLens next to the scenario.
- Build a Test List (collect tests from multiple files) and run the whole list at once.
- Switch and manage test environments (Development / Staging / Production) from a tree in the Activity Bar.
- All UI is intentionally simple: only show list-related actions when there is something in the list, and only show CodeLenses for the file you’re focused on.
How to use — step-by-step
Running a single test
- Open a test file (
.ts or .js).
- Find the Execute Playwright Test action above the test (CodeLens).
- Click it — the extension will run the test in your terminal using the environment you selected.
Running a scenario from a feature file
- Open a
.feature file.
- Find the CodeLens next to
Scenario: lines.
- Click the CodeLens to run that scenario. The extension sends only the scenario name to your configured command so your test runner will run that scenario.
Using the Test List (collect & run)
- Click Add to List on any test or scenario you want to collect.
- Open the Activity Bar and choose Ortoni Runner - Playwright Test Runner → Test List.
- The Test List shows items you added. Click any item to run it individually.
- Use Run (top-right of the Test List view) to run every item in the list.
- Use Clear (top-right) to empty the list.
- The Run / Clear buttons appear only when the list contains at least one test.
- When you add or clear items, the editor UI updates immediately — no reload needed.
Setting up environments
You can tell the extension how to run tests in different environments (for example: development, staging, production). This is done in VS Code Settings:
- Open Settings → search OrtoniRunner.environments.
- Add names and the command snippets you normally run. Example:
Develop:  TEST_ENV=devNational ${--config=play.config.ts --headed}
Staging:  TEST_ENV=stagingNational ${--config=play.config.ts}
Production: TEST_ENV=prod ${--config=play.config.ts --project=chromium}
- The
${...} part is optional: put any extra Playwright CLI flags you want appended (for example --headed or --config=...).
- After configuring, set your default environment from the Environment Selector in the Activity Bar.
Advanced command customization
The extension now supports custom command wrappers and location-only execution:
OrtoniRunner.locationOnly: when enabled, CodeLens sends just the file:line location. If an environment is selected in the sidebar, the extension still combines the selected environment command with the file path.OrtoniRunner.prefixCommand: text to prepend before the generated command or location.OrtoniRunner.suffixCommand: text to append after the generated command or location.- Use
${env} inside prefixCommand or suffixCommand to inject the selected sidebar environment command directly.
Example env settings with appended ${...} flags:
"OrtoniRunner": {
  "environments": {
    "chrome": "${--project=chromium}",
    "chrome-head": "${--project=chromium --headed}",
    "Develop": "TEST_ENV=devNational ${--project=chromium --headed}",
    "Staging": "TEST_ENV=stagingNational",
    "No Environment": ""
  }
}
Example command wrapper settings:
"OrtoniRunner": {
  "locationOnly": true,
  "prefixCommand": "${env} yarn playwright.api.ts qa",
  "suffixCommand": "--verbose"
}
With locationOnly = true and Develop selected, a CodeLens action for src/example.spec.ts:42 will run as:
TEST_ENV=devNational yarn playwright.api.ts qa src/example.spec.ts:42 --project=chromium --headed --verbose
This gives you the flexibility to keep the editor sending just the file location while still using sidebar environment selection and full custom command composition.
Short Tips & Troubleshooting
- If you don’t see the actions in a
.feature file: save the file (unsaved files sometimes hide lenses), and ensure CodeLens is enabled in VS Code settings (editor.codeLens: true).
- If Run / Clear buttons are not visible: add at least one test to the Test List — those buttons only appear when the list has items.
- If a command seems not to run properly: check the terminal for the exact command and that the environment you chose is correct.
- Prefer Git Bash on Windows: it tends to handle environment variables in the same way the extension expects.
- Active-file-only lenses: CodeLenses are shown only for the file you’re currently working in, which keeps the interface clean.
Requirements
- Playwright setup in your project (your Playwright config file if you use
--config).
- For
.feature (Cucumber) runs, ensure your project is set up to run those scenarios — the extension extracts the scenario name and passes it to your runner.
Thanks for using Ortoni Runner (Playwright Test Runner) — built to make running tests faster and less error-prone. Enjoy!
