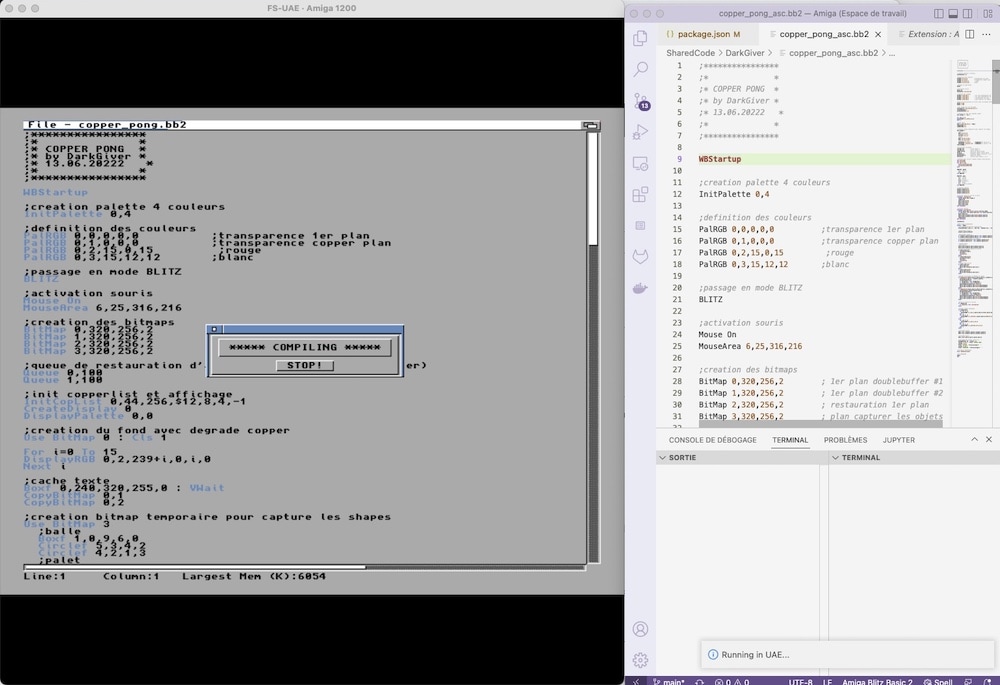
Amiga Blitz Basic 2 Language Support - Javascript Native Edition
This extension adds language support for the Amiga version of Blitz Basic 2 (and Amiblitz) with limited syntax highlighting support. Big thanks to Youen Chéné who has made a lot of improvements to this extension, including converting the external tools to javascript!
PLEASE NOTE for version 0.11.0 and onward!
The build tools that were automatically copied every time to Amiga OS as part of the build process, now need to be copied once* from the command BB2: Copy build tools to Amiga OS / UAE. You can run this command by pressing Ctrl/Cmd+Shift+P and then if you write BB2 you should see the command and can then run it.
*) Once per Blitz Type (BB2/AB3) and again when build tools get updated in the extension or you change your UAE/Amiga OS setup. I will mention in the changelog if an update is needed.
Key Bindings
To open and run your current Blitz Basic 2 source file (.bba) on UAE, use the shortcut Ctrl-F6 (Win, Linux) or Cmd-F6(MacOS).
To open the Blitz Basic 2 source files (.bba) in your current folder, use the shortcut Ctrl-F7 (Win, Linux) or Cmd-F7(MacOS).
To open the Blitz Basic 2 source files (.bba) in your current folder AND run them on UAE, use the shortcut Ctrl-F8 (Win, Linux) or Cmd-F8(MacOS).
To package an ADF, use the shortcut Ctrl-F4 (Win, Linux) or Cmd-F4(MacOS). You need to manually create an executable in Blitz Basic 2 before using this feature.
To package an ISO for CTDV or CD32, use the shortcut Ctrl-F3 (Win, Linux) or Cmd-F3(MacOS). You need to manually create an executable in Blitz Basic 2 before using this feature.
To package a ZIP archive for HD Install, use the shortcut Ctrl-F2 (Win, Linux) or Cmd-F2(MacOS). You need to manually create an executable in Blitz Basic 2 before using this feature.
The feature "Run on real Amiga" is deactivated for the time being (the feature needs testing).
Compatibility
All operating systems that can run both VS Code and UAE (FS-UAE or WinUAE).
Getting Started
Please process to the requirements to setup UAE and Amiga OS.
Add a source file with the extension .bba (Blitz Basic Ascii), it's where you will write your Blitz Basic code.
Code and enjoy the inline help and snippets.
Have UAE and Amiga OS open. Note: UAE can also be launched automatically if you enter a full command line to UAE in the extension settings (see below).
When you execture the shortcut to run on UAE (Cmd-F6or Ctrl-F6), VS Code will :
- write a copy of your file with the extension .bb2 (so TED don't mess up your original .bba file)
- copy all necessary files for Amiga OS,
- launch the AREXX script to launch TED/Blitz Basic 2 and then compile and run your code automatically.
- sometimes the process can fail, just retry the shortcut, sometimes you need to reboot your Amiga OS.
Enjoy coding in Blitz Basic 2 in a modern way!
Once you've generate an executable, you can now add a packaging.json file and hit Cmd-F3or Ctrl-F3 to generate an ADF. The ADF is generated and available in the build folder.
Features
- Syntax highlighting.
- Snippets for most Blitz Basic 2 functions and methods.
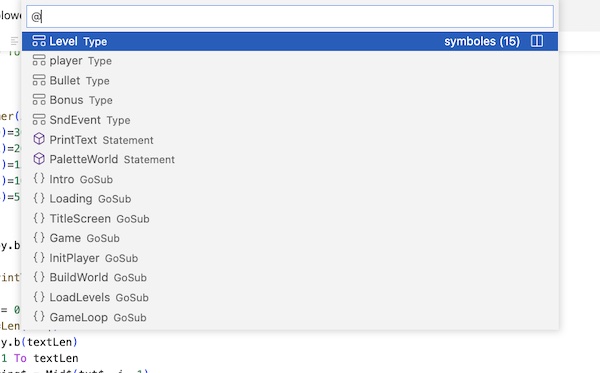
- Outline shows macros, labels, functions and statements.
- Integrated help.


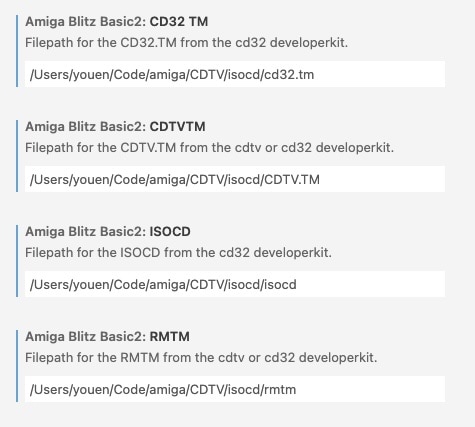
- Settings to tune the integration of your UAE installation:

- Outline View and Go to Symbol (Cmd/Ctrl + Shift + O) integration.


- Generate ADF from a packaging.json file created at the root folder of your project using Ctrl-F4 (Win, Linux) or Cmd-F4(MacOS) :
{
    "supports": [
        {
            "type": "adf",
            "boot": true,
            "supportName": "Blower",
            "exeToLaunch": "blower.exe",
            "includeDiskFontLibrary": true,
            "includeMathTransLibrary": true,
            "filesToIncludeOnRoot": [
                "blower.exe",
                "blower.exe.info"
            ],
            "foldersToInclude": [
                "assets"
            ]
        }
    ]
}
Each support entry (multi disk and multi support) support the following parameters (all mandatory) :
type : adf
boot : true to create a bootable disk (first disk of the game/app), false for any other disk.
supportName: name of your adf, floppy, cdrom. It's the name that will be shown by Workbench. Choose a different name for each support entry of the config file.
exeToLaunch: the exe to launch in startup sequence.
includeDiskFontLibrary: for bootable support, true if you do disk access in your software.
includeMathTransLibrary: for bootable support, true if you do advanced mathematical as sinus or cosinus.
filesToIncludeOnRoot: list all the files to include on the root folder of the support, typically your executable and .info files.
filesToIncludeOnRoot: list all the folders to include on the root folder of the support, typically your assets. All sub-folders are included automatically.
At the end of the process, your ADF file is available in the build folder.
- [Experimental] Generate ISO for CDTV and CD32 from a packaging.json file created at the root folder of your project using Ctrl-F3 (Win, Linux) or Cmd-F3(MacOS) :
Before you start you need extra files that are under copyright from the CDTV and CD32 Commodore Developer Kit (dig into google and eababime.net forums) :
- CDTV.TM file (from CDTV and CD32 dev kit)
- CD32.TM file (from CD32 dev kit)
- RMTM executable file (from CDTV dev kit)
- isocd executable file (from CD32 dev kit)
You need to enter the path of these files into the extension settings :

{
    "supports": [
        {
            "type": "cdtv",
            "boot": true,
            "supportName": "Blower",
            "supportVolumeSet": "",
            "supportPublisher": "Micrix Production",
            "supportPreparer": "",
            "supportApplication": "",
            "exeToLaunch": "blower.exe",
            "includeDiskFontLibrary": true,
            "includeMathTransLibrary": true,
            "filesToIncludeOnRoot": [
                "blower.exe",
                "blower.exe.info"
            ],
            "foldersToInclude": [
                "assets"
            ]
        },
        {
            "type": "cd32",
            "boot": true,
            "supportName": "Blower_CD32",
            "supportVolumeSet": "",
            "supportPublisher": "Micrix Production",
            "supportPreparer": "",
            "supportApplication": "",
            "exeToLaunch": "blower.exe",
            "includeDiskFontLibrary": true,
            "includeMathTransLibrary": true,
            "filesToIncludeOnRoot": [
                "blower.exe",
                "blower.exe.info"
            ],
            "foldersToInclude": [
                "assets"
            ]
        }
    ]
}
supportVolumeSet: (optional) Identifier of the volume set of which this volume is a member.
supportPublisher: (optional) The volume publisher
supportPreparer: (optional) The identifier of the person(s) who prepared the data for this volume.
supportApplication: (optional) Identifies how the data are recorded on this volume.
More information on https://wiki.osdev.org/ISO_9660
The iso packaging works this way :
- it first prepares a folder for the iso
- it then generates and copies the ISO Layout for isocd
- it launches the isocd command line in UAE and then closes isocd
- your iso will be available in the build folder
Quick demonstration
- Generate a ZIP archive for Hard Disk Installation from a packaging.json file created at the root folder of your project using Ctrl-F2 (Win, Linux) or Cmd-F2(MacOS) :
{
    "supports": [
        {
            "type": "zip",
            "supportName": "Blower_HD",
            "folderIcon": "Blower_HD.info",
            "exeToLaunch": "blower.exe",
            "filesToIncludeOnRoot": [
                "blower.exe",
                "blower.exe.info"
            ],
            "foldersToInclude": [
                "assets"
            ]
        }
    ]
}
Each support entry (multi disk and multi support) support the following parameters (all mandatory) :
folderIcon: icon path (.info) for the containing folder inside the zip file. The folder of your game in your hard disk will appear with this icon.
At the end of the process, your ZIP archiveis available in the build folder.
Requirements
You will need to install and configure UAE and Amiga OS:
Install WinUAE (version 5.3.10 or older) or FS-UAE (Windows, MacOS, Linux).
Install Amiga OS (3.x) and Blitz Basic 2 or AmiBlitz 3.x. You can get an updated installation package (that includes an updated pdf manual) for Blitz Basic 2 here.
Ensure that AREXX is started with WorkBench. The line:
SYS:System/RexxMast >NIL:
should exist in either S/startup-sequence or S/user-startup. If not, add it to the end of
user-startup.
WinUAE: set serial port to TCP://0.0.0.0:1234 and select "Direct" below the drop down box (Settings / Host / IO ports). Deselect any other options for the serial port. Save the WinUAE configuration and quit WinUAE. Open the configuration file in a text editor and add the following to the configuration file manually (under the other lines concerning serial):
serial_translate=crlf_cr
For version 0.11.0 (and above) the serial_translate line should not be needed.
NOTE: You need to ensure that your firewall/antivirus allows network traffic for WinUAE.
FS-UAE: In the tab 'Additional Configuration', click the gear icon to open the Custom Configuration window. Add the line:
serial_port = tcp://127.0.0.1:1234
Create the file DEVS:MountList on the virtual harddrive with the following content (if it does not already exist):
AUX:
Handler = L:Aux-Handler
Stacksize = 1000
Priority = 5
Add the following commands to the end of S:user-startup
mount aux:
newshell aux:
Add a virtual hard disk pointing to the folder containing your Blitz Basic 2 or AmiBlitz 3 projects (this folder can have sub folders with code).
This same folder must be your Visual Studio Code workspace folder.
The device name and volume label of the virtual harddrive must match the "Shared Folder" setting for this extension. By default, the folder is named SharedCode but you can change this in the settings for the extension (on user or workspace level).
For AmiBlitz, you must create an AmiBlitz: assign in your user-startup, similar to the Blitz: assign that is created automatically during installation of Blitz Basic 2. The assign must point to your Amiblitz installation folder. Like this (AmiBlitz installed in the DH0:Apps folder):
ASSIGN AmiBlitz: DH0:Apps/AmiBlitz
For Amiblitz, you also have to set a screenmode of 16 colors or more, otherwise you will get a nag screen that will break the automation.
Launching UAE Automatically
UAE can be launched automatically if you enter a full command line for UAE in the settings for this extension. UAE needs to be launched with a configuration file that has everything setup for Blitz Basic 2 development, and it needs to be launched without showing the GUI. For Windows something like this would do:
C:\WinUAE\winuae.exe -config=C:\WinUAE\Configurations\A1200BlitzBasic.uae -s use_gui=no
For Ubuntu Linux (FS-UAE installed using Snap):
/snap/bin/fsuae.fs-uae ~/snap/fsuae/common/FS-UAE/Configurations/A1200.fs-uae
For FS-UAE on MacOS:
open -n /Applications/FS-UAE.app --args ~/Documents/FS-UAE/Configurations/A1200.fs-uae
Activating UAE (bringing UAE to front)
UAE should come into focus automatically on Windows and MacOS without the need for any configuration. On Linux, you need to install xdotool and add execute permissions to the following script:
~/.vscode/extensions/mickgyver.amiga-blitzbasic2*/resources/scripts/activate.sh
MacOS, the script used is the one shown below. It should work as is.
~/.vscode/extensions/mickgyver.amiga-blitzbasic2*/resources/scripts/activate.osa
Known Issues
Syntax highlighting is limited.
Run on real Amiga is not implemented and tested yet in this version.
Random couldn't open file error on Ted/Blitz2. (You can try an older version of UAE, personally I had these errors in WinUAE 6.0 but for version 4.4 it works perfectly). You can also try these settings for the serial port in Amiga OS (Prefs / Serial):
Baud Rate:         31250
Input Buffer Size: 512
Handshaking:       XON/XOFF
Parity:            None
Bits/Char:         8
Stop bits:         1
@MickGyver
@youen_chene
Release Notes
0.11.0
- Build tools for Amiga OS needs to be copied (once per shared folder / Blitz type) using a command (Ctrl/Cmd+Shift+P) instead of automatically being copied at every build process.
- Option to set compiler options automatically as part of the build process (BB2).
- UAE is brought to focus at compile/run (some actions are needed to get this to work on Linux). This implementation is based on amishell.
- Fixed some bugs that could cause the 'outline' and 'go to symbol' functions to fail.
- The line 'serial_translate=crlf_cr' in the WinUAE configuration file should not be needed any more, but it being there doesn't hurt.
- Node.js dependencies updated to remove vulnerabilities.
- Extension settings are now grouped.
0.10.0
- [Experimental] AmiBlitz 3.x support (through ARexx, command line support might be added later)
- Fixed bug that broke commands in version 0.9.5
0.9.5
- Option to launch UAE automatically. You need to give a full command line for launching UAE in the extension settings. See above for details.
0.9.1
- Fixes for Windows compatibility
0.9.0
- Zip packaging for HD Installation
0.8.0
- [Experimental] CDTV and CD32 Packaging
- Fix to avoid cannot Open File in BB2 Editor.
0.7.0
0.6.0
- Blitz Basic 2 Label, NewType, Statement, Function and Macro are now showing up in the Outline view and Go to Symbol..
0.5.0
0.4.0
- Manage projet with multiple .bba files and includes.
0.3.3
- Save document on run UAE.
0.3.2
0.3.0
- Extension Settings: shared folder volume name in AmigaOS.
- Extension Settings: UAE serial port for direct connection.
- blitzbasic2.rexx and BB2NagAway integrated in extension and copied automatically in AmigaOS.
0.2.0
- Integrated help documentation (Hover Mode) - No external tool dependencies.
- Launch bb2 compilation through arexx using native javascript - No external tool dependencies.
0.1.0


