Skip to content
| Marketplace
Sign in
Visual Studio Code>Programming Languages>Autotools IntegrationNew to Visual Studio Code? Get it now.
Autotools Integration

Autotools Integration

Preview

Mergesium Inc.

|
1,866 installs
| (0) | Free
Comprehensive autotools support in Visual Studio Code
Installation
Launch VS Code Quick Open (Ctrl+P), paste the following command, and press enter.
Copied to clipboard
More Info

VS Code Autotools Integration

IMPORTANT: This pre-release expires 2024-05-15 - update or switch to a non-expiring, general release before then.

This extension enables VS Code to interact with projects using the GNU Autotools build system:

  • Manage multiple build configurations per source-tree (out-of-tree builds)
  • Building-related functions:
    • Import build configuration into IntelliSense, enabling accurate syntax highlighting and completions.
    • Generate a build task for every buildable program or library.
    • Build any single target (program, library), or all with keybinds.
    • Navigate build errors/warnings using built-in problem matchers.
    • Project navigation commands the highlight the relationship between files (sources 🏹, intermediary files 🧩, or build goals 🎯).
    • Build diagnostics enables, reliable, fast builds.
  • Testing-related functions:
    • Import test suites into VS Code's Testing UI.
    • Run single tests or full test suites using the Testing UI.
    • Support all automake test results (PASS ✔️, FAIL ❌, XPASS ☑️, XFAIL 🏳️, SKIP ⤵️, ERROR 🔺, and n/a ❔)
    • Debug individual tests, auto-configuring the debugger. pro
    • Live-testing / Test-driven development. pro
    • Discover Generate a test task for every individual test.
    • Manage multiple test environments. pro
    • Output test result grid (build configuration vs test vs environment) in markdown format. pro

First Look - Autotools panel
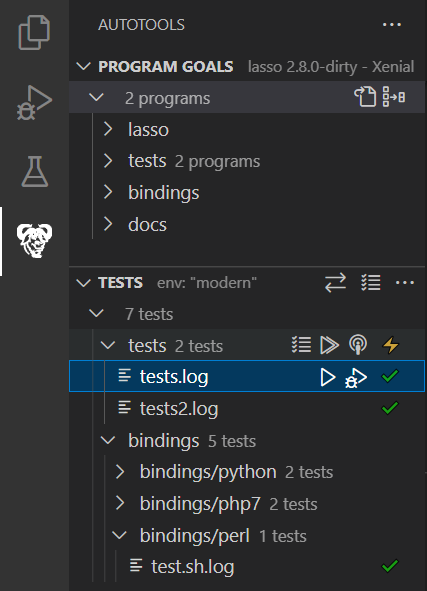
Sample extension UI
Figure 1 - Sample UI in VS Code

Release plan

The extension contains free and paid (pro) features.

Pre-releases are intended for evaluation and expire about 1 month after availability. Their purpose is:

  • allow you to test new features before general release, and give bugs/improvement feedback
  • allow Mergesium to collect error / exceptions / usage info via [telemetry](https://github.com/Mergesium/autotools/blob/HEAD/Telemetry and quality)
  • allow free users to evaluate pro features free of charge.

When a pre-release expires, you can update to the current pre-release, or install a non-pre-release version.

Pre-releases allow full use of all features, free and paid. General releases allow access to community features freely. Professional users can unlock the time-saving features by purchasing a subscription at https://autotools.mergesium.com

Getting started

An autotools project has the following basic stages: boostrapping, configuration, build, test. The extension is aware of the current step, and can run the steps as needed semi-automatically, leaving you to focus on meaningful activities - navigate the source, build it, test it, debug it.

A basic overview of main autotools
Figure 2 - A basic overview of main autotools by Gentoo Authors licensed under CC BY-SA 3.0

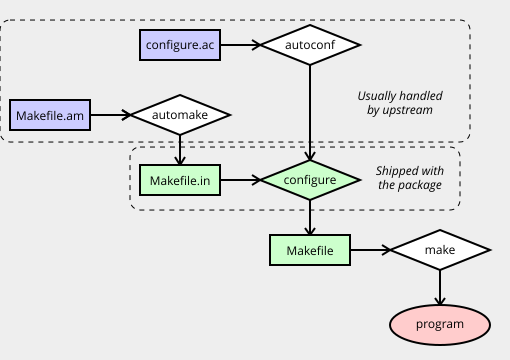
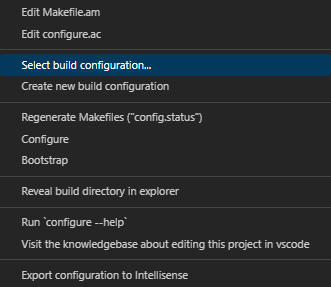
Basic familiarity with autotools projects is implied. Often projects have pre-requisites, like installing dependencies, making configuration choices or running specific bootstrapping commands before the first build. For those cases, the various steps can be run or repeated manually, using palette commands.

Commands available in the project context menu (right-click project/folder name in Autotools panel):

  1. "Bootstrap" - this is automatic when needed, it can be repeated manually any time.
  2. "Configure" - Re-runs the configure script in the current build configuration directory.
  3. "Select build configuration" - switches or creates another build config/directory.
  4. "Edit configure.ac" - shortcut to open the autoconf configuration.
  5. "Edit Makefile.am" - shortcut to open any folder's Makefile.am file.
Shows the main commands to interact with the project, accessible in the context menu
Figure 3 - Main commands in context menu

Bootstrapping, out-of-tree vs in-tree build configurations

When editing an autotools project for the first time, the extension will offer to bootstrap it if necessary; bootstrapping can also be done manually from the command palette using the "Autotools: Bootstrap" command. Auto-bootstrapping is controlled by the setting autotools.autoBootstrap (default = true)

Bootstrapping creates the configure script from the configure.ac manifest, typically by running an included bootstrap.sh, autogen.sh or the command autoreconf -fvi. Some projects have other bootstrapping requirements; see their respective documentation for details.

Once bootstrapped, configurations can be created using the palette using "Autotools: Create new configuration" command. This opens the workspace JSON settings, where configurations can be added as follows:

    "autotools.configurations": [
        {
            "name": "Debug",
            "top_builddir": "/tmp/myproj/Debug",
        },
        {
            "name": "Release",
            "top_builddir": "build/Release",
            "configureArgs": [
                "--disable-debug",
                "CFLAGS=-Wall -Werror",
                "CC=gcc-8"
            ]
        },

The name attribute appears in the vscode UI wherever the current configuration is displayed.

The configureArgs is the list of configuration options given to the configure script. The Release configuration above represents the following build sequence:

mkdir -p build/Release &&
cd build/Release &&
../../configure --disable-debug "CFLAGS=-Wall -Werror" CC=gcc-8 &&
make all

top_builddir is the top build directory where the build configuration is created; this is where the Makefiles and object files will be stored, and where make will be run. It can be a relative (to the source directory) or an absolute path. This is known as an out-of-tree build; the source directory is kept clean, and the temporary object files are created in a separate directory.

If no configurations exist, a "Default" configuration is assumed, with top_builddir set to build/Default.

GNU Autotools support out-of-tree builds by default. Nothing needs to be done, other than correct use of the $top_builddir, $top_srcdir, $builddir and $srcdir. Some projects incorrectly use these predefined variables, breaking their ability to be built out-of-tree. In this case, a single configuration can be supported, aka "in-tree", which mixes source and object files. This is the same as setting top_builddir to ".":

    "autotools.configurations": [
        {
            "name": "Default",
            "top_builddir": ".",
        }

Here is a typical project set up for out-of-tree building:

Example of out-of-tree build
Figure 4 - Out-of-tree build hierarchy by K.Mulier licensed under CC BY-SA 3.0

Note If no configurations are found in the workspace settings, and the project is already configured in-tree, the extension will work correctly, but it won't be possible to create alternate configurations. You can remove the in-tree configuration by running make disclean, which will then allow multiple out-of-tree configurations to be created.

Configuration

Configuration creates Makefiles that implement the recipes/compiler invocations needed to compile the project. They are created from the Makefile.am templates, combined with the configuration items detected by the configure script (eg, pre-processor defines, include paths, dependency paths, conditional build instructions). Makefiles in an autotools project are text files, but are for all intents and purposes, object files, which should not be editted.

The extension automatically runs the configure script whenever the relevant configureArgs setting changes, and whenever a new configuration is created.

The Makefiles are also automatically updated if the source tree is versioned (eg, with git) and it is switched to a different branch.

It should not be necesary to manually configure a build directory, other than changing the configureArgs when needed. A manual configuration can be started with the pallette command "Autotools: Configure"

The palette command "Autotools: Update Makefiles and Headers" can be used to re-generate the Makefiles and configuration header files if they've been manually editted. This will revert them to the auto-generated state. It is equivalent to running config.status

Building

Building runs the command make all in the configuration's top_builddir directory. Typically this compiles all installable programs and shared libraries.

It is possible to add extra arguments to the make command line using the
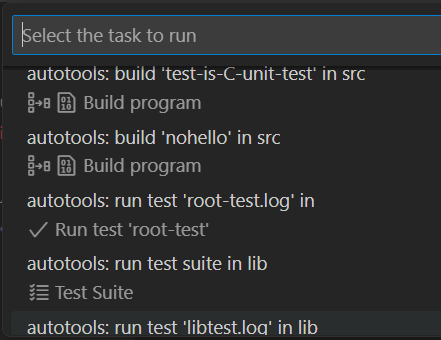
 makeArgs variable for the configuration. This should be used only for arguments that change how make behaves (eg, --jobs=X, --load-average=Y or --silent), but not for arguments that change what make does (eg, overriding the configuration or actions like --touch or --question or --file=xxx). Overriding the actions or configuration would cause the configuration imported to IntelliSense to be different from that used to build; the syntax highlights and completions would not correspond to the build.

Sample autogenerated tasks
Figure 5 - Auto generated tasks

Testing

Testing runs the command make check in the top_builddir directory. Typically this runs the subset of available test suites that the maintainer deemed useful for users of the package to run. Usually this means a battery of integration tests intended to run at distribution/packaging time to ensure the package was built correctly. It might not include detailed unit tests or comprehensive interoperation tests. See the package documentation for detail on what test modes are available. They might be enabled with a configure option such as --enable-extended-tests

The tests included in make check are added to the test suite.

Sample Testing UI
Figure 6 - Testing UI

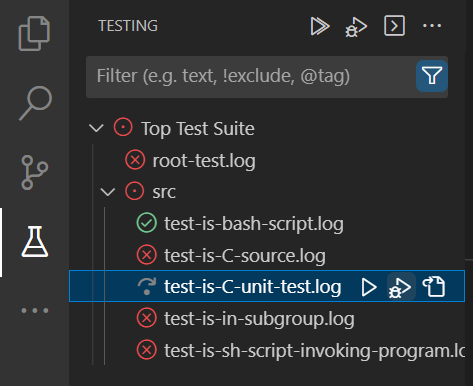
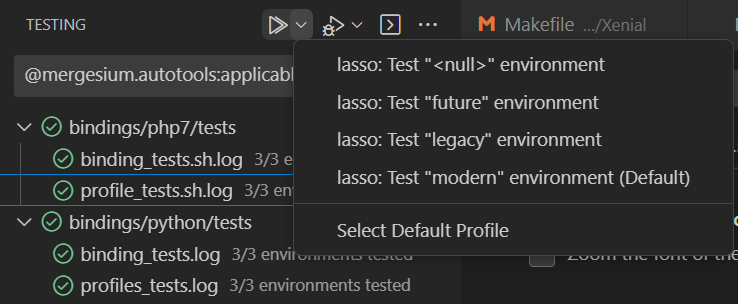
The available tests are displayed in both the Testing panel and the Autotools panel, with slightly different controls and status (eg, XPASS and XFAIL results, Live-testing, link to KB), as the built-in Testing UI is not able to fully support autotools's test features.

Test Environments pro

Autotools supports running the defined test suite with customized environments (ie, the TESTS_ENVIRONMENT variable). This allows reusing the test suite in more than one scenario, though it is up to the developer to decide what an "environment" means.

For example, if the project is an autonomous driving robot, the test suite might include tests for operating vehicle controls, navigation, collision avoidance. The test environments might be "Ford-Model-A", "Modern-Sub-Compact", "Modern-Minivan", "Minivan-in-Snow", "Sub-Compact-at-night", "SUV-in-heavy-rain", etc. The same functionality (operating, navigation, safety) can then be tested in a variety of simulated vehicle contexts.

Environments are defined in settings.json, and have a global part (autotools.TESTS_ENVIRONMENT array of env variables) and a environment specific part (autotools.test_environments["xxx"].TESTS_ENVIRONMENT array, specific to the "xxx" environment). The environment-specific part is concatenated with the global part and used as the TESTS_ENVIRONMENT environment setting when make check runs. The automake testing infrastructure splits this one varible into the individual environment variables before invoking each test program.

Example: given the following settings, each test will find the environment variables VAR_1_G, VAR_2_G, VAR_1_L and VAR_2_L in its runtime environment:

{
    "autotools.TESTS_ENVIRONMENT": [ // global contributions to TEST_ENVIRONMENT
        "VAR_1_G": "value1",
        "VAR_2_G": "value2",
    ],
    "autotools.test_environments": [
        {
            "name": "modern",
            "TESTS_ENVIRONMENT": [ // Contribution while running in the 'modern' environment
                "VAR_1_L": "val 3",
                "VAR_2_L": "val 4",
            ],
        },
        {
            "name": "legacy",
            "dirs": ["bindings/perl"],
            "TESTS_ENVIRONMENT": [ // Contribution while running in the 'legacy' environment
                "VAR_1_L": "val 5",
                "VAR_2_L": "val 6",
            ],
        }
    ],
}

A more compact example:

"autotools.test-environments": [
    { "name: "Legacy-A", "TESTS_ENVIRONMENT": { "DATADIR": "legacyA", "HASHALGO": "md5" } },
    { "name: "Legacy-B", "TESTS_ENVIRONMENT": { "DATADIR": "legacyB", "HASHALGO": "sha1" } },
    { "name: "Modern"  , "TESTS_ENVIRONMENT": { "DATADIR": "modern",  "HASHALGO": "sha256" } },
    { "name: "NextGen" , "TESTS_ENVIRONMENT": { "DATADIR": "next",    "HASHALGO": "qha" } },
]

The values may include spaces and punctuation as needed, and should be escaped only for json purposes. The extension will correctly escape for shell purposes when passing them to make check. The values will not be expanded in the shell. Ie, a value "VAR=$USERNAME" will be passed literally. The test program will find the variable "VAR" with the value "$USERNAME" in its environment.

The test environment set in this way must not include "SECRETS", and is thus able to be safely committed in SCMs (and should be). Secrets, where needed, must be supplied directly through the environment via .bashrc or similar mechanism. The Autotools Integration does not handle secrets.

Note: Test-environments require Makefile.in files generated by automake 1.12 or later, as it makes use of custom test drivers introduced at that version. (autoreconf -fvi can be used to update the Makefile.in throughout the project)

Test grid pro

There is a new Test Explorer context command, "Project Test Summary", which generates a report on the test suite in markdown table format, ready to be cut-pasted into emails, issue reports, etc. The example table below was pasted from a sample project:

Test <null> modern legacy
tests.log ✔️ ✔️ ❌
tests2.log ❔ ✔️ ✔️

The generated report includes the build configuration, as well as the definition of the test environments linked in the heading, such that co-workers can duplicate the results easily, in the same build configuration and test environment.

Multiple Test Suite support

There may be multiple directories with TESTS definitions. Automake treats each such directory as a separate test suite.

Two kinds of test reports can be generated:

  • for the entire project - containing one table per test suite
  • for a specific test suite - containing only that suite's tests

Test environments defined in settings.json can include an optional dirs constraint, which is a list of test suite directories where the environment should apply. If omitted, the environment applies to all suites.

In the following example, the bindings/python test suite will be run in Generic, python 2 and python 3 environments. The bindings/perl suite will run in Generic and perl environments:

    "autotools.test_environments": [
        {
            "name": "Generic",
            "TESTS_ENVIRONMENT": [
                { "GENERIC_VAR": "Some Value"}
            ],
        },
        {
            "name": "perl",
            "dirs": ["bindings/perl"],
            "TESTS_ENVIRONMENT": [
                { "GREETING": "Hello World"}
            ],
        },
        {
            "name": "Python 2",
            "dirs": ["bindings/python"],
            "TESTS_ENVIRONMENT": [
                { "PYTHON": "python2"}
            ],
        },
        {
            "name": "Python 3",
            "dirs": ["bindings/python"],
            "TESTS_ENVIRONMENT": [
                { "PYTHON": "python3"}
            ],
        }
    ]

In the example above, all tests suites have a Generic environment, where neither the GREETING nor the PYTHON variables are set.

When multiple test environments are configured, they appear on the Test Explorer as Run Profiles and Debug Profiles:

Test Environments in Test Explorer

Unexpected test-result waivers (XFAIL_TESTS)

The automake test infrastructure supports XFAIL (unexpected failure, temporarily accepted) and XPASS (broken test, should have detected a FAIL, but detected PASS, ie, unexpected pass) test results. By defining an XFAIL_TESTS and/or XPASS_TESTS variable when make check runs, automake can be told to accept certain tests failing and certain tests unexpectedly passing, for the purpose of calulating an overall test run result (success / fail). See Generalities about testing

The Autotools Integration can specify the XFAIL_TESTS and XPASS_TESTS as list of strings in the same manner as TESTS_ENVIRONMENTS, ie, global and environment-specific. In the following example, tests A, C are expected to FAIL in every environment, while tests N, S are expected to FAIL only in the modern environment, but PASS in the legacy environment:

{
    "autotools.XFAIL_TESTS": // global contributions to XFAIL_TESTS
        [ "A", "C" ],
    "autotools.test_environments": [
        {
            "name": "modern",
            "XFAIL_TESTS": // Contribution while running in the 'modern' environment
                [ "N", "S" ]
        },
        {
            "name": "legacy" // No XFAIL_TESTS in legacy
        }
    ],
}

The interpretation of this configuration is as follows: the functions tested in A and C are newly introduced, and development is ongoing. Currently they have not yet been implemented. Functions tested in N and S are not new. However, the modern environment is a new capability of the software (to keep with the driving robot, suppose the robot could always navigate/N in the country-side/legacy environment, but navigation/N in urban/modern environment is new, and not yet implemented).

When the project is ready for release, there should be no unexpected tests remaining, thus no XFAIL_TESTS or XPASS_TESTS, and the test suite should pass in all defined environments.

Releasing with failing tests

It may happen that a project must be released with failing tests. For example, if a long standing bug is newly identified but cannot be fixed before the next release. In this case, a regression test is written when the bug is confirmed, but it is not possible to fix it in the current release cycle. The software must be released with 'errata' or XFAIL_TESTS waiver, listing the failing test.

In this case, the XFAIL_TESTS belongs in the appropriate Makefile.am, not in the VSCode settings.json file. The end users, including distro maintainers, must be able to run make check and get a pass, even though their build process does not include VSCode.

Build Configuration

A build configuration is the set of arguments given to the autotools configure script, which determine what features are compiled (eg, "--enable-debug"), which dependencies to use when multiple are available (eg, "--with-ssl=libressl"), cross-compilation options (eg, "--host=x86_64-w64-mingw32"), distro-specific options (eg, "CFLAGS=-fPIE -D_FORTIFY_SOURCE=2"), compiler selection (eg, "CXX=g++-12")

A project can have one or more build configurations, each in a separate directory. The built-in capability of autotools to configure a project out-of-tree is leveraged.

Contributed commands:

  • autotools.buildAllConfigurations ("Autotools: Build all configurations" in the palette) can be used to launch multiple builds with one configuratble keyboard shortcut.
  • autotools.buildAll ("Autotools: Build all" in the palette) can be used to "make all" for one selected configuration.

Build-related features

Importing IntelliSense config

The extension extracts the exact compilation arguments for each source code file and relays these arguments to IntelliSense. In turn, IntelliSense builds and maintains a database of indentifiers which is used to drive syntax highlighting and also code completion.

When selecting a different build configuration, IntelliSense is re-configured to reflect it, so that the syntax highlighting seen in the editor accurately corresponds to the configureArgs of the selected build configuration ("What You See Is What You Build"?)

The extension eliminates the need to manually configure intellisense with include paths, compiler version/flavour, C/C++ standard applicable, or defines.

Generate build tasks

Each target that can be built, be it a program or a shared library, is associated with an automatically generated build task, which appears in the Command Pallette under the "Run Task..."/"Build Tasks" menu. This enables:

  • shortening build time by only compiling a program of interest (eg, make oneprogram as opposed to make all)
  • creating Compound Tasks
  • manually building individual targets if needed, possibly with a keyboard shortcut
  • customizing the build recipe for a single program, such as overriding compile flags (eg, make myprogram CFLAGS-Wall)

In very large projects, it may be beneficial to focus on a small part of a project, and the build task allow you to surgically control the build, without resorting to running 'make ...' in a terminal.

Navigating compile problems

Building the project using the auto-generated build tasks allows compilation warnings and errors to be captured, and the offending line of source code to be located and opened with a single click in the "Problems" panel. This powerful built-in feature of vscode would not be available if the project were built by running make in a terminal window.

Navigation Shortcuts

When a build or test is selected in the Autotools panel, the source files that are in the dependency tree for that target are highlighted in the File explorer and the editor tabs, and a new Context Menu command is available on the editor tabs, "Close Irrelevant Files". This command closes all editor tabs that are not relevant to the selected target. The relevant files are badged as sources 🏹, intermediary files 🧩, or build goals 🎯:

Close Irrelevant Files Context Command
Figure 7 - "Close Irrelevant Files" Context Command

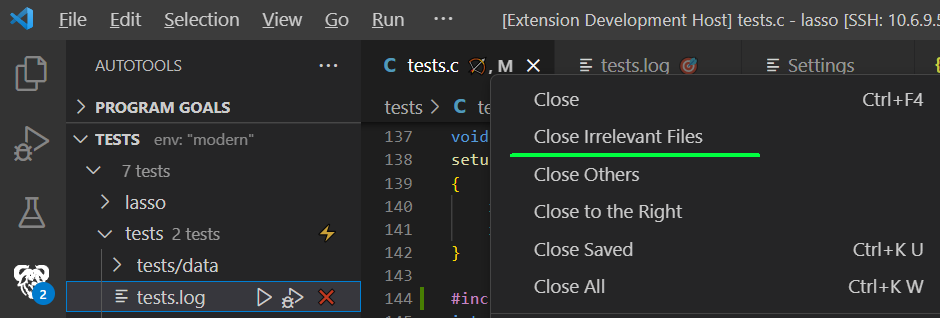
The relevant sources are highlighted in the file explorer, as shown below. The file explorer also gets a new context menu command, "Find dependent targets", which does the reverse, ie, find which targets depend on a selected source file.

Relevant file badges in file explorer and the 'Find dependent targets' command
Figure 8 - Finding reverse dependencies

Build Diagnostics

Sometimes the build specification (configure.ac + Makefile.am) itself contains bugs:

  • incomplete dependency specs
  • Non-portable recipes
  • 'Customizations' that break automake's built-in functionality

Common symptoms:

  • builds fine on O/S "X" but not on "Y"
  • parallel builds error out sometimes (make -j<numcpus>)
  • some targets don't rebuild as expected when sources change (make clean is required)
  • builds are slower could be

These are common issues, often with well understood reasons, but the maintainers don't have the autotools expertise to diagnose or fix them. The extension detects many such conditions and provides links to specific documentation that explains and guides to a solution.

Build diagnostics are output in the "Autotools" section of the "OUTPUT" tab, and when a specific problem is identified, a deep link to the knowledge base is given, eg. https://autotools.mergesium.com/kb/acme-project?v=2.1.0#overrides-check-target - which are human readable, and also takes you to specific info about the error (overriding check target in this case), the project and its version. If no info specific to the given project exist, you'll find relevant, but general info about the error, as well as links to file pre-filled bug reports if appropriate.

The "relevant" badges of the Navigation Shortcuts will often highlight that some part of the project relies unnecesarily on irrelevant sources or header files, giving you feedback on how includes can be trimmed. Including all headers in all sources is easy, but does come at the cost of slower builds.

At this time, a small list of conditions is detected, but it will grow with future releases.

Testing features

The extension implements automake's standard parallel test suite infrastructure interface. If your project follows the automake documentation on writing and running tests, they are seamlessly discovered and used directly from vscode.

Importing test suites

The extension allows vscode's built-in Testing UI to discover test suites declared with the autotools testing infrastructure (ie, declared with the TESTS variable in Makefile.am, documented here and here).

The extension reads the test results generated by automake's test infrastructure and populates the Testing UI, such that the UI always displays an up-to-date view of latest results. Using filesystem watchers the extension is able to update the UI as tests run.

Also see the related vscode documentation on Python testing. This extension brings the same UI functionality to autotools projects.

Generated test tasks

When you use the automake TESTS variable to declare test suites, they are available to run with make check, and this exension is able to discover them, and create individual test tasks for each discovered test.

The test tasks allow: * creating Compound Tasks * keybinding frequently used test suites. * One-click access to each test's output file (log file)

Debugging tests pro

Tests can be debugged with a single click. The extension is a DebugConfigurationProvider which means it can configure the debugger with the same runtime environment that the test normally runs in, without any manual intervention, allowing you to focus on finding the bugs, not on starting the debugger.

If multiple environments are set as Default debug profile in the Test Explorer, clicking the "Debug" link starts each environment in a side-by-side debug session, allowing straight-forward state comparisons between environments where a test passes with those where it fails.

Debugged tests run in the same environment as automake's TESTS_ENVIRONMENT mechanism as described below, and the srcdir variable which is automatically calculated.

Whether the test runs directly or under the debugger, it is provided the same environment.

Additionally, tests that rely on built shared libraries likely use libtool to manage running and debugging the project in its uninstalled test. This ensures that the LD_LIBRARY_PATH is appropriately set. The extension ensures that the correct shared library is linked, whether the test runs directly or under the debugger, by transparently using the libtool logic. Typically, debugging libtool programs is tricky to do correctly, and this extension saves development time by implementing invoking the debugger with the appropriate wrapping for the test being debugged.

Note The extension currently supports only the Parallel Test Harness, but the "older (and discouraged)" harness will be supported in a future version, for compatibility with legacy autotools projects.

Test Framework debugging support

The following test-framework-specific support is implemented, to make debugging more fluent:

Google Test

  • GTEST_BREAK_ON_FAILURE=1
  • GTEST_CATCH_EXCEPTIONS=0

Check

  • CK_FORK=no

Additional test suite support can be added by opening an issue.

Live Testing pro

You can select one test suite to be the "Live test suite" (⚡). This test suite will be updated, rather than run in full, whenever all editor tabs are saved. If you're editing multiple files, the update starts when the last unsaved file is saved, and the results are updated in both the Test Explorer and the Autotools Tests panel.

The Live Testing suite runs in the currently selected test environment.

This mode is expecially suited for running unit tests suites, which are typically small, targeted at a single function, and are very fast to build and run.

You can continue making changes to the sources even as the tests run.

Here is an example live testing session:

Live testing screenshot
Figure 9 - Live Testing in action

In this example:

  • the test suite named "test" is selected as a live suite (⚡).
  • The "modern" test environment is currently selected.
  • the tests.log test target is selected, which activates relevance badges.
  • the tests.c file is modified and saved.
  • the TERMINAL tab shows that the ouput of the "Update test suite log in tests @ modern" task. (In this example the autotools.traceLiveTestRuns setting is true, which enables the Makefile:778: update ... due to: ... make traces)
    • the trace output is useful to diagnose Makefiles, to get unit tests buildable as fast as possible.
  • the tests.log log file in the right-side tab is updated with the test's output, if any (both stdout and stderr are captured)
  • the "debug" icon is available, which will launch this failing test under the debugger, in the modern environment. No tinkering with launch.json needed.

IntelliSense data providers

IntelliSense allows the data provider to be configured using the C/C++: Change Configuration Provider... command. If highlighting is not correct, run this command to ensure the Autotools Integration extension is selected as the data provider.

Telemetry and quality

With your approval, the autotools extension collects anonymous usage data and error traces and sends them to Mergesium servers to help improve our products and services. Read our privacy statement to learn more. This extension respects the telemetry.telemetryLevel setting, which you can learn more about at https://code.visualstudio.com/docs/getstarted/telemetry

Pre-releases require telemetry to be enabled. Telemetry is optional in general releases, but greatly appreciated, as it allows Mergesium to continuously improve quality of the extension and your experience in future versions. Issues found by in this way are tagged tele-found

The traces and errors reported by telemetry should not be seen as a substitute for issue reports. They are useful to detect wide-spread bugs or errors, but don't have enough resolution to detect isolated problems. If we knew what code paths are subject to failure, we'd fix them rather than instrument them with telemetry. Your feedback is invaluable in helping us understand bugs. Please do submit bug reports, especially if the knowledge base contains nothing related to your project; in that case you are very likely the first person to encounter the bug you're seeing.

Knowledge base

Based on submitted issue reports, we compile a knowledge base and publish it at https://autotools.mergesium.com/kb; It can be accessed with the "Autotools: Go to Knowledge Base" command. Projects which have any issues reported have their own KB page (ex. GNU Make's page)

The KB is intended to be the front line of support if a project does not function correctly in Autotools Integration. Many autotools projects make use of various customizations and hooks which prevent the extension from providing a turn-key experience. For instance, GNU Make itself requires a one-time make update after configuring, which fetches localization strings from http://translationproject.org; without this update, building or running test suites fails.

Knowledge base link location
Figure 6 - Knowledge base link in Autotools panel

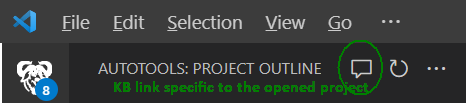
TODO list at this pre-release:

  • more translations
  • more diagnostics
  • syntax highlight / completions for configure.ac and Makefile.am files (other extensions fill this gap for now)
  • check-local target not yet handled
  • Contact us
  • Jobs
  • Privacy
  • Manage cookies
  • Terms of use
  • Trademarks
© 2025 Microsoft