Magpylib Studio VS Code Extension
VS Code shell for the headless magpylib-studio engine (the Python package in
the repo root). It spawns python -m magpylib_studio and talks
newline-delimited JSON-RPC over stdio.
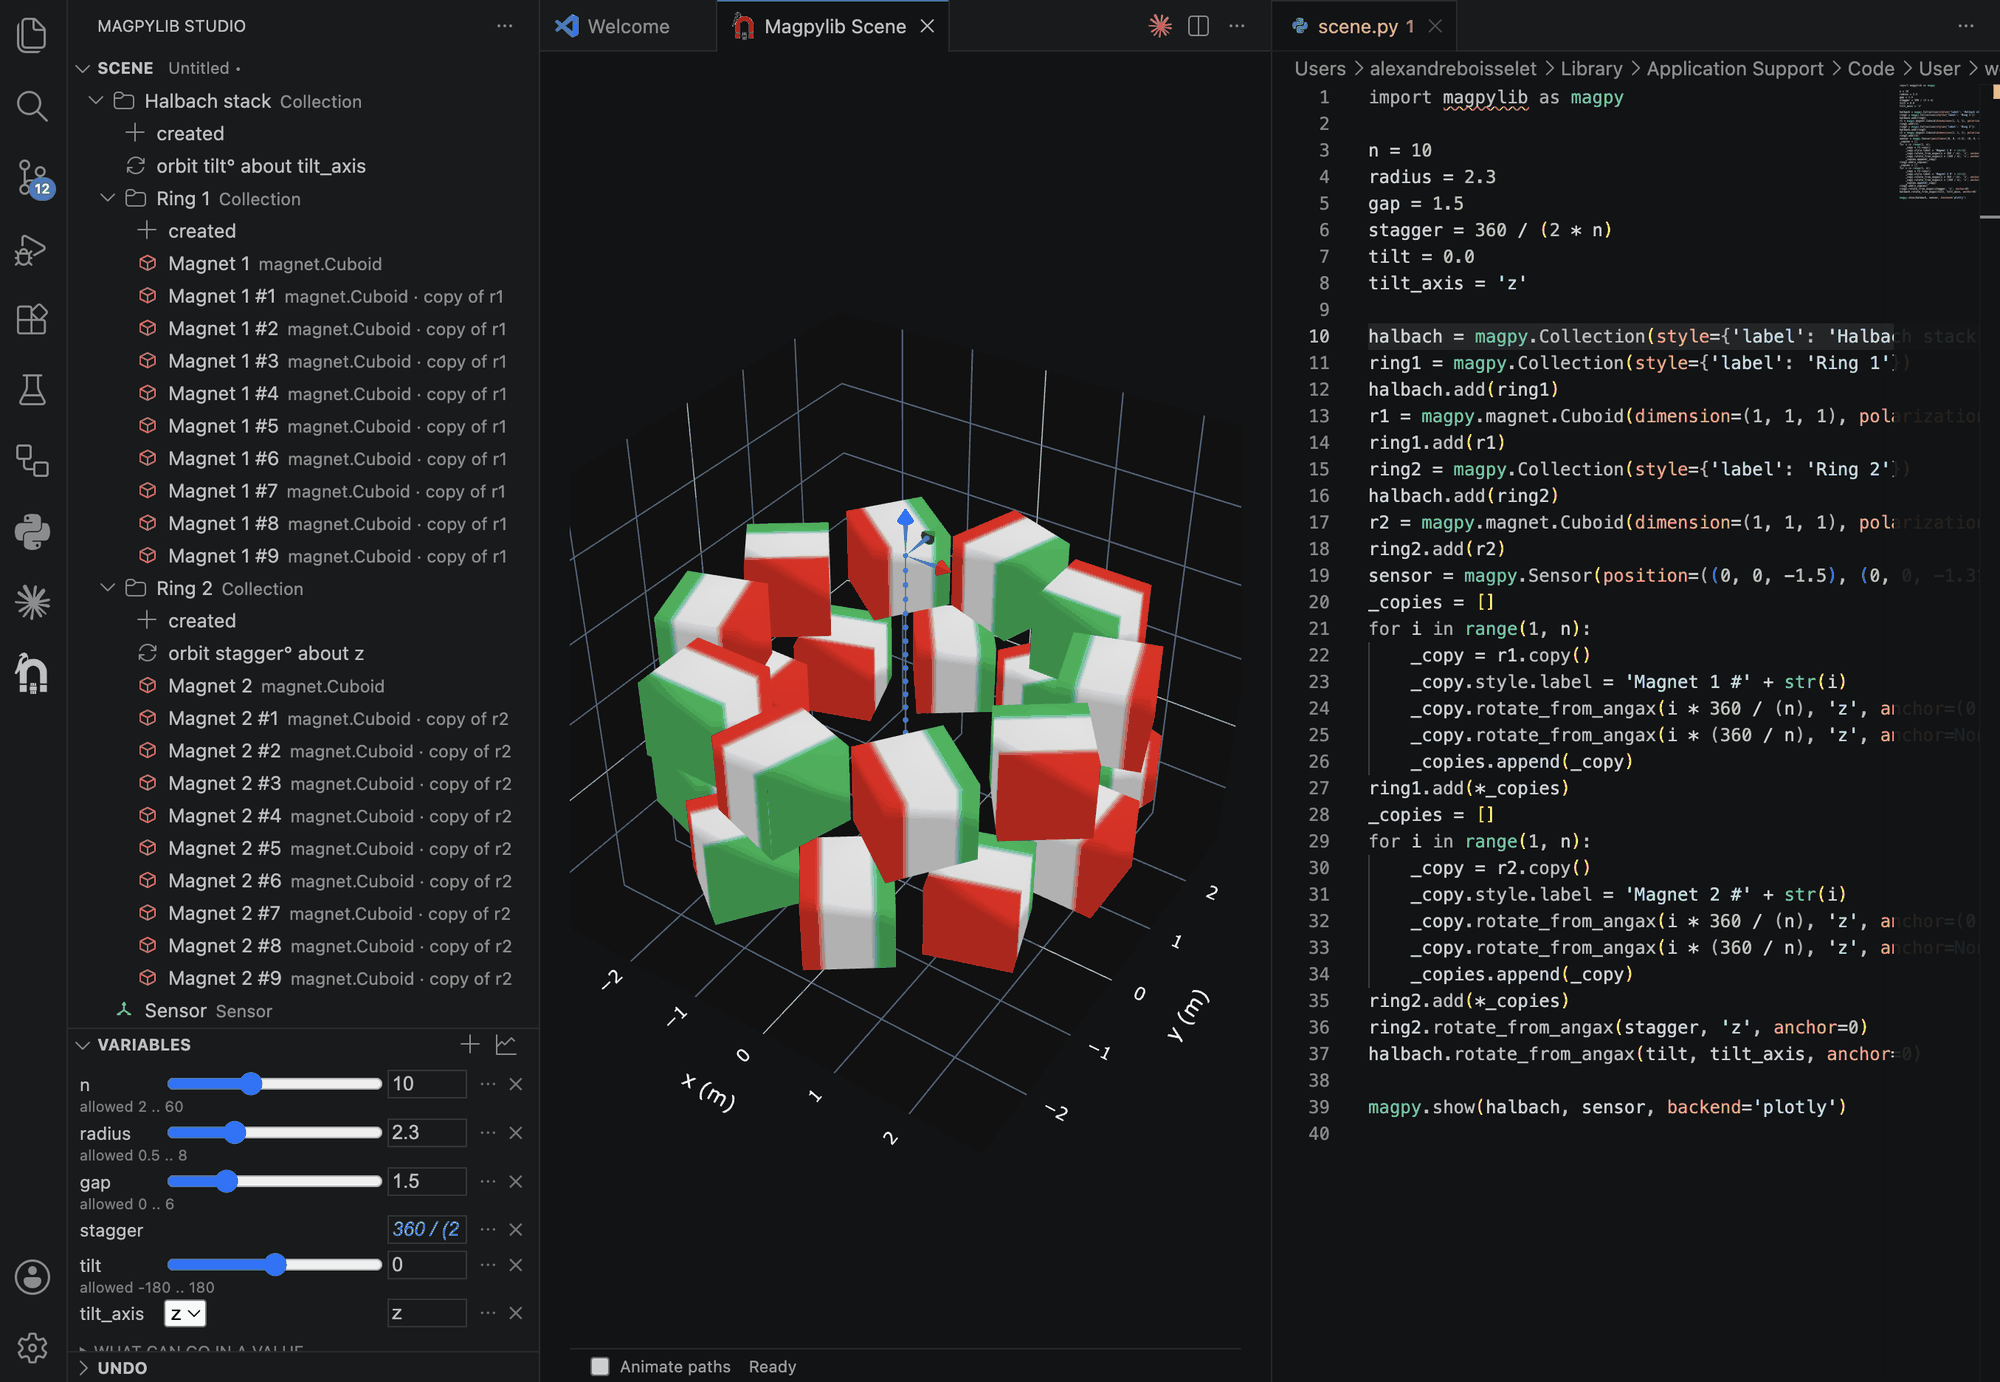
The halbach example: twenty magnets from two create steps and two circular
patterns. Dragging n rebuilds both rings; the script tab on the right is the
same scene, and saving an edit to it rebuilds the scene from what you wrote.
What it provides
- Command
Magpylib Studio: Open Scene View — the "Magpylib Scene" tab: a
live three.js scene you can work in. Click an object to select it, ⌘-click to
add to the selection, and drag the handles to move (W), turn (E), resize (R)
or aim a polarization (P) — along world or object axes, snapping to round
steps with S. Paths play, with a scrubber. Every drag is one step in the
history and one undo, and the field follows as you go. A Chart button
swaps in the Plotly figure, which is read only and has its own animation.
- Scene view — the magpylib-logo icon in the activity bar opens a sidebar
tree of the scene's objects, nested as they are grouped, one icon per type
(magnets red, currents blue, sensors green). Clicking an object opens the plot
and loads it in the Inspector. The scene starts empty: the view offers
Load Example Scene…, which picks between six — a Halbach stack, a
solenoid, a mirrored pair, a magnet array, a parametric measuring plane and a
turning magnet with field arrows, each built from a couple of steps rather
than a heap of objects.
- The construction history is in that tree, under the object it happened to:
expand a magnet and you get created, orbit 36° about z, and so on, before
whatever it contains. Steps are named for what they did; the call that did it
is the tooltip. Hover one for Edit Step… (its values open in the Inspector,
expressions included), move it earlier or later — order is semantic — or
remove it. Editing an early step re-applies everything after it; anything that
no longer applies is flagged in place with the reason, rather than the edit
being refused.
- Build Up To Here on a step folds only the history before it, so you can
watch the scene assemble — and anything you do while rolled back is inserted
at that step. The Scene title bar offers Show The Whole Scene while it is
active.
- Variables view — named values the scene is written in terms of. Each row
is a value box and, once it has bounds, a slider; dragging one moves
everything defined against it. A variable that is a choice rather than a
quantity gets a dropdown instead — a rotation axis is
z, which is a name, so
no range describes it and no slider can offer it. The halbach example ships
with one: tilt_axis picks which way tilt tips the whole stack.
Whole-number variables are refused fractional values outright, because a count
of 7.3 is meaningless rather than merely imprecise. Values may be expressions
over the other variables (360 / n), with the allowed operators, functions
and constants listed in the panel and checked as you type. ⋯ lists what a
variable is — its name, its limits, its kind — each entry showing what it
holds; renaming from there rewrites everything written in terms of it. Sweep
a Variable… plots the field against one in the Field view.
- Undo view — the session's checkpoints, newest first: click any to jump the
scene there, backwards or forwards. This is not the construction history
above; it is document snapshots, and it is gone on reload.
- Add Object… — the
+ icon on the Scene view (or right-click a collection
to create inside it, or the empty-view welcome): pick a type (cuboid,
cylinder, segment, sphere, tetrahedron, current loop/polyline, dipole, sensor,
collection), then set each of its properties — prefilled with defaults and
labelled with units — and it opens selected in the Inspector.
- Editing in the tree — Rename (
F2, Enter on macOS), Copy / Cut / Paste
(Cmd/Ctrl+C / X / V) and Delete (Delete, Cmd+Backspace) while the
Scene view has focus, plus the same items on right-click. A copy follows
magpylib's own convention (Cube → Cube_01 → Cube_02) and copies a
collection's whole subtree; pasting onto a collection puts the object inside
it. The eye icon on hover hides an object from the 3D view (dimmed in the
tree, like toggling a plotly trace) — hidden sources still count in field
calculations.
- Right-click → Transform — Set Position…, Move By…, Rotate… (spin or orbit
the origin), Clear Path, Pixel Grid…, and Pattern…: one step standing for
N copies, around an axis (a ring, a rotor, a Halbach array), along a
direction (do it twice for a grid), or mirrored — where the polarization
reflects as an axial vector should, which is the part that is easy to get
wrong by hand. Counts and steps may be variables, so the whole arrangement
stays one number to edit.
- Field maps — the Field panel's Plane map mode: a heatmap of |B| (or a
signed component) on the xy/xz/yz plane at any offset, with a log option
because field spans orders of magnitude. Colour follows the data's job — one
hue light→dark for magnitude, blue↔grey↔red anchored at zero for signed
components — and the axes are locked 1:1 so geometry is not distorted.
Right-click a Sensor → Transform → Pixel Grid… builds magpylib's own pixel
grid instead: the measurement plane is then a real object, visible in the 3D
view, tilting with the sensor and exported in the script.
- Pose — the Inspector's
pose section: the object's absolute position and
rotation vector, showing the expression a value was written as beside what it
currently comes to. Relative moves and rotations are not here; they record a
step, so they live on the tree's Transform menu. Same operations in chat:
#magpyMove, #magpyRotate, #magpyPose.
- Saving and opening scenes — a scene is a document: Save (
Cmd/Ctrl+S
with the Scene view focused) writes it to a .magpy.json file, and the view
title shows which file it is and a • while it differs from what is on disk.
Double extension on purpose — the file stays JSON to git, to diffs and to
schema validation, while still being a name VS Code can associate, so
right-clicking one in the explorer offers Open Scene. The format carries its
own version number and keeps fields it does not recognise, so a scene written
by a later studio is refused with a clear message rather than opened half-way
and saved back over. Export as Python Script… is the other direction:
runnable magpylib anyone can use without the studio — but it carries no slider
bounds and no hidden flags, which is why it is an export and not a save.
Opening a scene, loading an example or importing a script asks first if there
is unsaved work.
- A reload does not lose the scene. It lives in a subprocess that dies with
the window, so the studio writes a backup after every edit and comes back to
the scene you were editing next time the workspace opens — unsaved changes
included, and still marked unsaved. It does this without asking and without
opening anything, the way VS Code restores an unsaved editor: the scene is in
the tree when you look, and New Scene discards it if you would rather start
over.
- The script tab is editable both ways — Edit Python Script renders the
scene as runnable magpylib, and saving it rebuilds the scene from what you
wrote, as one undo step. Variables and patterns survive the round trip intact;
a script the studio cannot parse is executed instead, and what that flattens
is reported. It is a view of the current scene, not a saved file: a tab VS
Code restores after a reload is re-rendered against whatever scene is loaded
now (unsaved edits excepted), so it never shows the last project.
- Properties — the Inspector's
properties section: the object's physics
parameters (polarization, dimension, diameter, current, moment, vertices,
pixels) as numeric widgets, with units in the tooltips; matrices like polyline
vertices are edited as JSON. Edits go through set_param, so transforms and
styles are preserved.
- Inspector view — below the tree: schema-driven widgets generated from
get_schema() (enum → dropdown, format: color → color picker + text,
bounded number → slider, boolean → tri-state with "(default)"), prefilled with
resolved values. Explicitly set paths are bold with a ↺ reset button; a filter
box narrows the property list. Edits go through apply_edit / reset_style,
so magpylib validation errors show inline.
All three surfaces (plot, tree, inspector) refresh automatically after any edit,
whatever its origin — inspector widget, chat tool, or tree context menu.
- Language Model Tools (native Copilot chat, no API key):
#magpyObjects
(list scene objects), #magpySchema (style JSON Schema for an object),
#magpyEdit (set one dotted style path, validated by magpylib), #magpyAdd /
#magpyRemove (add/remove scene objects), #magpyParam (constructor params:
move, resize, repolarize), #magpyClear (empty the scene in one call),
#magpyBatch (many operations in one call — the tool descriptions steer the
model to it for multi-object work), #magpyVars / #magpyVar /
#magpyBounds (the scene's variables), #magpyDuplicate / #magpyRow /
#magpyMirror (patterns, which the descriptions steer the model to instead of
adding ring magnets one at a time), #magpySweep (the field against a
variable) and #magpyEvents / #magpyEditEvent / #magpyMoveEvent /
#magpyRemoveEvent (the construction history). Edits auto-refresh all
surfaces, debounced so bursts redraw once.
Both the webview and the LM tools share one engine process
(src/engineClient.ts — promise-based RPC client that owns
the request-id space).
Try it out
1. Install the extension — search Magpylib Studio in the Extensions
view, or:
code --install-extension magpylib.magpylib-studio-vscode
Or install the .vsix attached to the latest release, which is the
same build — the asset is named for the tag, not for the package:
code --install-extension magpylib-studio-<tag>.vsix
2. Let it install the engine. The extension is only the UI — it spawns
python -m magpylib_studio — but that is not a step you do first. Open a folder
and use the extension; when it cannot find an interpreter with the engine, it
offers Install the Engine, which
- offers the interpreter the Python extension already has selected, if it meets
the ≥ 3.11 floor — named in the prompt, and declinable, because that one may
be a system Python and "install the engine" is not consent to change it;
otherwise, or if you decline,
- creates a
.venv in the workspace, fetching a matching Python via uv
when uv is installed and falling back to python -m venv; then
pip install magpylib-studio into it, and sets magpylib-studio.pythonPath
to it in workspace settings.
To do it yourself instead, any interpreter ≥ 3.11 with the engine on it works —
pip install magpylib-studio, then point magpylib-studio.pythonPath at it.
Either way you get released magpylib, which is fully supported. The
property-tree branch is optional and adds path-valued physics
properties (current=[100, 200, 300]):
pip install "magpylib @ git+https://github.com/magpylib/magpylib@feat/improve-style"
3. Open it. Click the magpylib icon in the activity bar, press Load
Example Scene… and take the Halbach stack. Then, in rough order of what the
tool is for:
- open Variables and drag
n — twenty magnets rebuild from one number;
- expand a ring in the tree to see the steps that built it, and Edit Step… on
the orbit to change it after the fact;
- Sweep a Variable… on
gap to plot the field against it;
- Edit Python Script to see the whole thing as parametric magpylib, edit a
line, and save it back;
Cmd/Ctrl+S with the Scene view focused to save it as scene.magpy.json,
then reload the window — it comes back;- with GitHub Copilot installed, ask chat
make the magnets green #magpyEdit or
a ring of 8 dipoles at radius 5 #magpyDuplicate.
Working on it
Nothing above needs a clone; this does. Take the repo, install the node
dependencies, then open the repo root in VS Code and press F5:
git clone https://github.com/magpylib/magpylib-studio.git
cd magpylib-studio/vscode-extension && npm install && cd ..
code .          # the repo root, not vscode-extension/
F5 compiles (tsc, eslint and three checks over the webviews, the contributions
and the version) and opens one further window — the Extension Development Host,
with the extension loaded and sandbox/ as its workspace. Two windows total,
which is as few as extension debugging goes. The launch config lives at the repo
root deliberately: opening vscode-extension/ as its own workspace works too,
but then the Python engine is outside the window you are editing in.
Other configs on the F5 menu: Run Extension (no build) for when
npm run watch is already running, and Extension Tests. From a terminal the
equivalents are npm run compile, npm run watch and npm test — the last
downloads a VS Code build the first time and runs the suite in a real host.
To install your build into your normal VS Code, package it — note that vsce
names the file after the package and version, where a release asset is named
after the tag:
npx @vscode/vsce package # -> magpylib-studio-vscode-<version>.vsix
Releases are tag-driven: bump package.json and rename the changelog's
[Unreleased] heading in one commit, then push a v* tag.
npm run check:version keeps those two honest on every build, and the release
workflow checks the tag against both before it publishes anything.
Python interpreter resolution
magpylib-studio.pythonPath setting, if set;.venv/bin/python (or Scripts\python.exe) in a workspace folder, then in
the repo root next to this folder;python3 on PATH.
The probe checks each candidate can actually import magpylib_studio, so a
workspace .venv without the engine cannot shadow a working interpreter.
Notes
- plotly.js is bundled from
plotly.js-dist-min (3.x, matching Python plotly
6.x) and loaded via a webview URI — no CDN, works offline, CSP-clean.
- Engine stderr goes to the "Magpylib Studio Engine" output channel.
| |

