TestAPI – Advanced REST API Client for VS Code


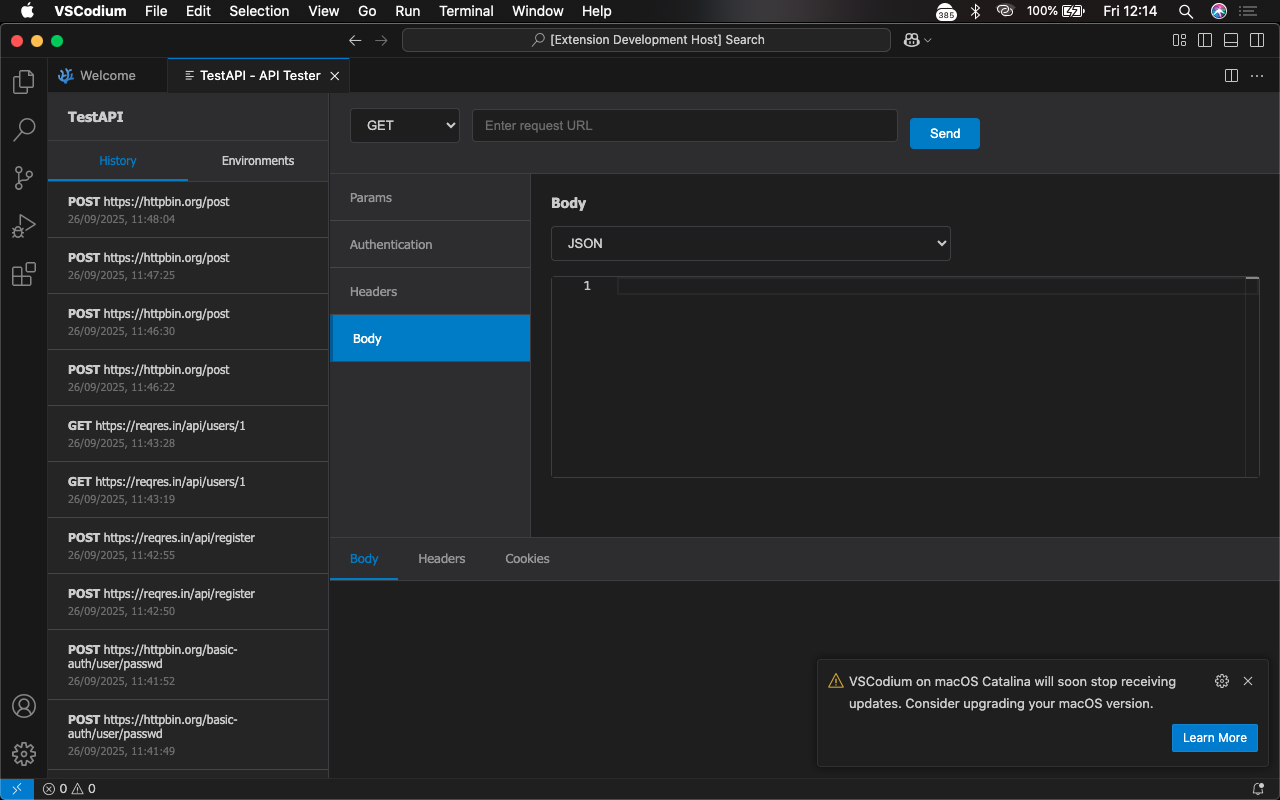
TestAPI is a powerful, Thunder Client-inspired REST API testing tool built directly into VS Code. Test your APIs without leaving your editor with a beautiful, intuitive interface that supports all modern API testing features.
✨ Features
🚀 Core Functionality
- Full HTTP Support: GET, POST, PUT, DELETE, PATCH, HEAD, OPTIONS
- Real-time Response: Instant feedback with syntax highlighting
- Tabbed Interface: Manage multiple requests efficiently
- History Management: Access previous requests with one click
- Environment Variables: Manage different configurations (dev, staging, prod)
🔐 Authentication Methods
- Bearer Tokens: JWT and OAuth2 token support
- Basic Authentication: Username/password encoding
- API Key Authentication: Custom header or query parameter keys
- No Auth: Simple unauthenticated requests
📊 Request Types
- JSON Bodies: Full syntax highlighting and validation
- Form Data: Multipart form data with file uploads
- Raw Text: Plain text, XML, or custom content types
- URL Encoded: Standard form URL encoding
- File Uploads: Support for multiple file types
🎨 User Experience
- Thunder Client-inspired UI: Familiar, professional interface
- Syntax Highlighting: Monaco editor integration for JSON and code
- Response Formatting: Automatic JSON prettifying and syntax highlighting
- Collapsible Sections: Clean, organized interface
- Dark Theme: Native VS Code theme integration
🚀 Quick Start
Installation
Method 1: VS Code Marketplace (Recommended)
- Open VS Code
- Go to Extensions (Ctrl+Shift+X)
- Search for "TestAPI"
- Click Install
Method 2: Manual Installation
# Download the .vsix file and install
code --install-extension testapi-1.0.0.vsix
Your First API Request
- Open TestAPI
- Click the TestAPI icon in the Activity Bar
- Or use Command Palette (Ctrl+Shift+P) and type
"TestAPI: Open"
- Configure Your Request
HTTP
Method: GET
URL: {https://jsonplaceholder.typicode.com/posts/1}(https://jsonplaceholder.typicode.com/posts/1)
- Send the Request
- Click the Send button
- View the response in the bottom panel
📖 Comprehensive Usage Guide
Basic GET Request
GET [https://api.example.com/users](https://api.example.com/users)
Headers: {
  "Content-Type": "application/json"
}
POST Request with JSON Body
POST [https://api.example.com/users](https://api.example.com/users)
Headers: {
  "Content-Type": "application/json",
  "Authorization": "Bearer your-token-here"
}
Body: {
  "name": "John Doe",
  "email": "john@example.com"
}
POST [https://api.example.com/upload](https://api.example.com/upload)
Body Type: Multipart Form-Data
Files: [select your files]
Extra Fields: {
  "description": "Project documentation",
  "category": "docs"
}
Using Environment Variables
- Go to Environments tab
- Create a new environment (e.g., "Production")
- Add variables:
{
  "base_url": "[https://api.prod.com](https://api.prod.com)",
  "api_key": "prod_key_123",
  "token": "eyJhbGciOiJ..."
}
- Use in requests:
{{base_url}}/users
🛠️ Advanced Features
Authentication Setup
Bearer Token Authentication
- Select Auth tab
- Choose "Bearer Token"
- Enter your token:
eyJhbGciOiJIUzI1NiIsInR5cCI6IkpXVCJ9...
- Token automatically added to
Authorization header
Basic Authentication
- Select Auth tab
- Choose "Basic Auth"
- Enter username and password
- Automatically encoded to Base64
API Key Authentication
- Select Auth tab
- Choose "API Key"
- Configure:
- Header name:
X-API-Key
- Value:
your-api-key-here
- Placement: Header or Query Param
Environment Variables Management
Development Environment
{
  "base_url": "http://localhost:3000",
  "api_key": "dev_key_123"
}
Production Environment
{
  "base_url": "[https://api.company.com](https://api.company.com)",
  "api_key": "prod_key_456",
  "token": "bearer_token_here"
}
Usage:
- Use in URLs:
{{base_url}}/api/users
- Use in headers:
{"Authorization": "Bearer {{token}}"}
Request History
- Auto-save: Every request saved automatically
- Quick reload: Click any history item to reload
- Search: Filter through past requests
- Clear: Option to clear history when needed
🔧 Configuration
Extension Settings
TestAPI can be configured through VS Code settings:
{
  "testapi.autoSaveHistory": true,
  "testapi.maxHistoryItems": 50,
  "testapi.defaultEnvironment": "development",
  "testapi.prettifyJsonResponses": true
}
Keyboard Shortcuts
Add these to your keybindings.json:
[
  {
    "key": "ctrl+alt+r",
    "command": "testapi.sendRequest",
    "when": "testapiFocus"
  },
  {
    "key": "ctrl+alt+n",
    "command": "testapi.newRequest",
    "when": "testapiFocus"
  }
]
💡 Examples & Use Cases
Testing RESTful APIs
# Get all users
GET {{base_url}}/users

# Create new user
POST {{base_url}}/users
{
  "name": "Alice",
  "email": "alice@example.com"
}

# Update user
PUT {{base_url}}/users/123
{
  "name": "Alice Smith"
}
File Upload Testing
POST {{base_url}}/upload
Content-Type: multipart/form-data

# Select files through the UI
# Add metadata in extra fields
{
  "userId": 123,
  "category": "profile"
}
API Development Workflow
- Develop locally: Use
http://localhost:3000
- Test endpoints: Quickly validate new API routes
- Debug responses: Inspect headers and status codes
- Share configurations: Export/import request setups
🐛 Troubleshooting
Common Issues
- ❌ "Cannot connect to API"
- Check your internet connection
- Verify the API endpoint is running
- Check CORS settings on the server
- ❌ "Authentication failed"
- Verify your tokens are current
- Check API key permissions
- Ensure proper header formatting
- ❌ "Invalid JSON response"
- Check API is returning valid JSON
- Verify
Content-Type headers
- Use "Raw" view to see exact response
Debug Mode
Enable detailed logging in VS Code Developer Tools:
Help → Toggle Developer ToolsConsole tab shows TestAPI debug info
🔄 API Compatibility
Supported Standards
- RESTful APIs: Full support for REST conventions
- GraphQL: Raw text mode for GraphQL queries
- SOAP: XML support through raw text mode
- Webhooks: Test incoming webhook endpoints
HTTP Features
- Headers: Custom headers with validation
- Cookies: Automatic cookie handling
- Redirects: Follow 301/302 redirects
- Timeouts: Configurable request timeouts
🏗️ Development & Contribution
Building from Source
# Clone the repository
git clone [https://github.com/Koded0214h/Test-IP.git](https://github.com/Koded0214h/Test-IP.git)cd testapi

# Install dependencies
npm install

# Compile TypeScript
npm run compile

# Package for distribution
npm run package

# Install locally
code --install-extension testapi-1.0.0.vsix
Project Structure
Plaintext
testapi/
├── src/           # TypeScript source code
├── media/         # Webview resources
├── images/        # Extension icons
├── package.json   # Extension manifest
└── README.md      # This file
Contributing
We welcome contributions! Please see our Contributing Guidelines for details.
📞 Support & Resources
Documentation
- Full Documentation
- API Reference
- Video Tutorials
- GitHub Issues
- Discord Community
- Stack Overflow
- REST Client
- Thunder Client
📄 License
MIT License - see LICENSE file for details.
🙏 Acknowledgments
- Inspired by Thunder Client and Postman
- Built with Monaco Editor for superior editing experience
- VS Code Extension API for seamless integration
Happy API Testing! 🚀
TestAPI is designed for developers who want to test APIs without leaving their coding environment. Perfect for API development, testing, and debugging workflows.