XBSL for VS Code
English · Русский
Syntax highlighting and on-the-fly linting for 1C:Element sources (.xbsl), powered by the
xbsl engine. It also brings the form designer, a metadata
tree, the platform docs panel, metadata scaffolding, debugging and a deploy button.
Want to try everything on a toy project? Open the demo/
folder of the repository. It is a tiny 1C:Element app with a form and a handful of deliberate findings.
YAML buffer checks are limited to the configured project root and its translation dictionary.
Quick fixes are available for YAML as well as modules. Saving invalidates pending buffer results;
a late response cannot overwrite the newer workspace report or its fixes.
The form wireframe displays UsualCommands in the footer and the Italic, Underline and
Strikeout flags of an absolute font. Tooltips use the property spellings of the source form.
The extension uses the xbsl 1.0.0 engine. Install it in the Python selected by xbsl.linter.pythonPath.
The refresh icon in the status bar rebuilds the project index and checks all project sources.
During the check, the spinning icon shows the stage and its percentage beside it, for example
4/8 File rules · 43%. Its tooltip shows completed and remaining files or rules, the active
project rule and elapsed time, updated once a second. Each stage has its own percentage.
After diagnostics are published and the check finishes, the button returns to its refresh icon.
How it works
The extension is a thin client of the xbsl engine. In the
default LSP mode one long-living xbsl-lsp server answers everything:
diagnostics, navigation, the docs panel and the metadata scaffolding. Without the server the same
checks and scaffolding run through the CLI:
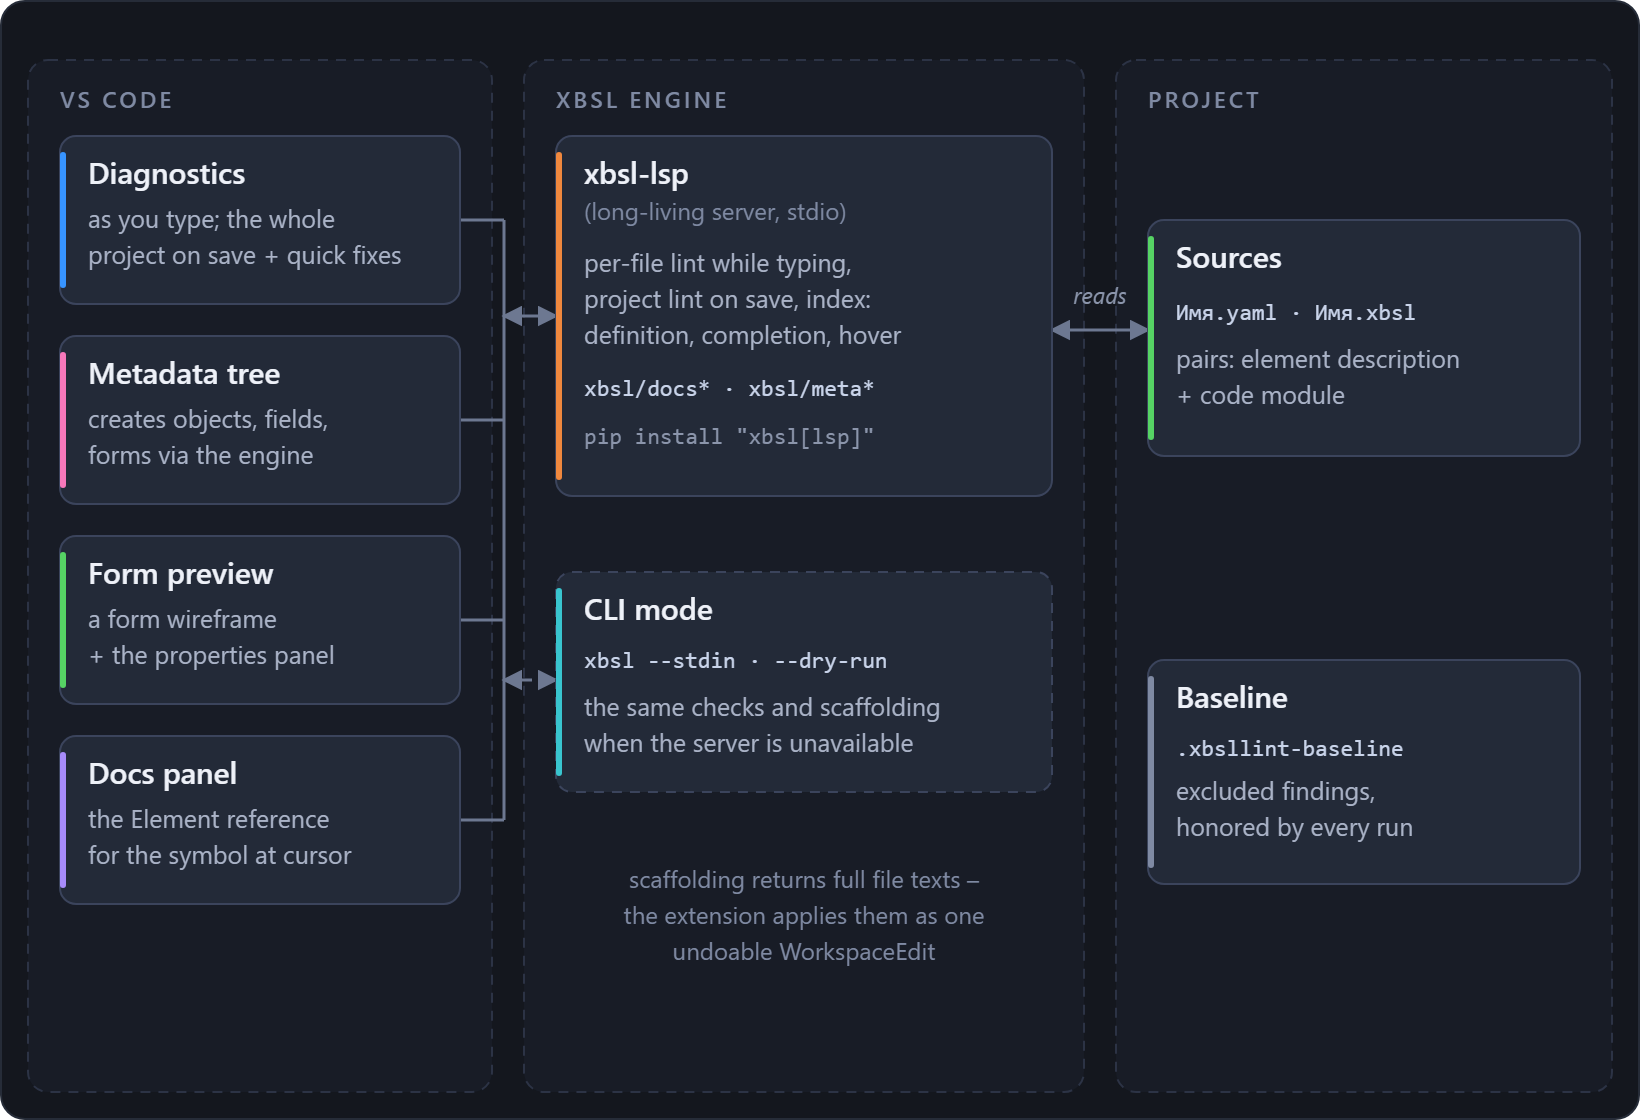
In CLI mode two producers feed one diagnostic collection. The buffer state decides which one runs.
- While you type. On a dirty module, project YAML or translation dictionary buffer, the extension
runs
xbsl --stdin --filename <name> --format json over the live text. Only per-file rules take
part, so the answer comes back fast; the run itself is debounced. Its result replaces the
diagnostics of that buffer only.
- When you save. Saving any
.xbsl or .yaml file runs xbsl <project root> --format json in
the background. If the translation dictionary lies outside the root, xbsl <dictionary> runs next
to it, so project rules never see the dictionary. The check is debounced too, and only one runs at
a time: a save in the middle of a check cancels the stale one and starts over. The result covers
per-file and project-scope rules, so it replaces the diagnostics of every file the check read.
Buffers that are dirty again by then keep their live --stdin diagnostics until the next save.
Modules opened outside the project root keep theirs too: the check does not read them.
That leaves no duplicates and loses no rule. A clean file shows the full picture of the workspace
run, a file being edited shows the instant per-file picture, and each save reconciles the two.
Both runs speak the same {diagnostics, summary} JSON contract that the linter's MCP server
answers with.
A workspace run that fails or exceeds xbsl.workspaceLintTimeout goes to the XBSL output
channel and nowhere else. There are no popups on every save.
Features
- Syntax highlighting for
.xbsl: keywords (both Russian and English forms), declarations,
operators, @-decorators, numbers, comments, and strings with %name / ${...} interpolation.
- Live diagnostics as you type (debounced) and on save. Everything the linter reports shows
up: brackets and block balance, unused locals, typography, code-style conventions. A squiggle
carries the rule id (for example
code/brackets) and the severity.
- Workspace diagnostics. Saving any
.xbsl/.yaml file runs the linter over the whole
workspace folder in the background, so project-scope rules (code/unknown-type,
yaml/unknown-type, Id uniqueness) show up right in the editor, across all files. Controlled
by xbsl.workspaceLint (on by default).
- Whole-project check – the command XBSL: check the whole project runs the same
workspace-wide check on demand.
- Go to definition, find all references and completion across the project, answered by the
language server over its project index. See Navigation and completion.
- Quick Fix for mechanical findings. A lightbulb on a fixable diagnostic (trailing
whitespace, typography characters) applies the exact edit the linter reports. The fix all
source action (
source.fixAll.xbsl) fixes the whole file and can run on save via
editor.codeActionsOnSave. See Quick Fix.
- Deploy to the stand. The XBSL: deploy the project (elemctl) command, and the cloud
button in the title bar of the metadata tree, run
elemctl deploy in a terminal task: build
from sources → upload → apply → restart → a check that the apply actually took effect.
See Deploy.
- Form designer – a panel of three areas: the structure tree on the left, the form's data on
the right, the form frame under them. It follows the active editor and updates as you type. The
selection is linked across the areas, the yaml cursor and the properties panel. The
component palette sits next to the metadata tree while the panel is open.
See Form designer.
- Metadata explorer – a tree of the project objects in the primary side bar, grouped by
ElementKind, with subtrees (Attributes, Dimensions, Forms, enum values ...). It has an
editable properties panel, creation of objects, fields and subsystems, and filtering by subsystems
and packages. See Metadata explorer.
- Documentation – a view in the secondary side bar that shows the 1C:Element reference the
way the docs site does: a "Contents" tree (the developer and administrator guides, the type,
property and query-language references), full-text search, and a page view with images and a link to the
primary source. Right-click a type or variable to open its documentation.
See Documentation.
Panel layout. The extension declares two view containers, and the layout of the screenshot
above comes out of the box. 1C:Element • Project (the metadata tree and the palette) sits in
the primary side bar on the left, 1C:Element • Inspector (properties and documentation) in the
secondary side bar on the right, next to Chat. Nothing is fixed in place: drag a container icon
between the bars to rearrange, and View: Reset View Locations restores the default. The
secondary side bar toggles with Ctrl+Alt+B (View > Appearance > Secondary Side Bar).
.yaml element descriptions keep their built-in YAML highlighting.
Requirements
The extension is a thin client over the xbsl CLI and bundles no checker of its own. You need:
- Python 3.10+ and the linter:
pip install xbsl. If the linter is missing, the extension
offers to install it right from the error message.
- Element language data, generated once from your 1C:Element distribution. See
step 1 of the linter README.
Without it most rules cannot run; the extension surfaces the linter's error once.
By default the extension calls xbsl from PATH. Point it elsewhere with
xbsl.linter.command (an executable) or xbsl.linter.pythonPath (an interpreter – the linter is
then invoked as <python> -m xbsl).
The engine and extension are installed separately. When updating the extension, update the
engine too with pip install -U xbsl.
New project
The XBSL: new 1C:Element project command (xbsl.project.new) creates a project from
scratch. The wizard asks four things: the project name, the vendor, the project kind
(application or library) and the folder. It then scaffolds the project through the same engine
that serves the other metadata operations and opens the generated Проект.yaml.
The vendor is remembered between runs: for one developer it is usually the same. If the project
lands outside the open folder, the extension offers to open it – a fresh project is rarely part
of the current window.
The XBSL: structural form search command (xbsl.forms.search) searches by structure rather
than by text. You give a component type and, optionally, key=value predicates on its
properties. The extension collects the project's forms, unsaved buffers included, sends them to
the engine and lists the matches. Picking one moves the cursor to the component's line in its
yaml.
This is what you want when the question sounds like "where do we have input fields with such a
property". Plain text search does not find that, because in yaml the property and the component
type sit on different lines.
Needs the LSP mode: the matching is done by the engine, which is not running in CLI mode.
Navigation and completion
Navigation comes from the engine. The language server keeps the project index and answers
definition, references, completion and hover. The extension adds no second implementation, so
navigation knows exactly what the engine knows: the return types of project methods, the members
of platform types. Without the LSP mode there is no navigation, because the CLI has no process to
ask.
Go to definition (F12 / Ctrl+Click), in .xbsl and .yaml:
- a project object name (bare, or the root of a dotted chain) → its
.yaml;
<Object>.<LocalType> → the type declaration; <Object>.<TabularPart> → the section in the
object's yaml; <Enum>.<Value> → the value line;<Module>.<Method> (including manager modules named after the object), and a bare method name
inside its own module → the method;Components.<Name> → the component node in the current form's yaml; Components.<Name>.<Method>
→ the method of that module;- in yaml, the value of
Handler: <Name> → the handler in the paired .xbsl.
Find all references (Shift+F12, or Go to References / Find All References in the context menu),
for methods, objects and interface components – every usage, from the same index:
- a method → its calls inside the module,
<Module>.<Method> and Components.<Module>.<Method>
calls, and the Handler: <Name> keys that name it in yaml;
- an object → every place it is the root of a dotted chain;
- a component → its
Components.<Name> uses in the form's module.
Deeper chains would need type inference and are out of scope, as they are for go-to-definition.
A note on names. 1C:Element is bilingual all the way down. Keywords, literals, stdlib types
and the metadata vocabulary each carry a Russian and an English spelling, and this README uses
the English one (var, new, Query{}, Array<String>, True). Sources may be written
either way, and the extension reads both. The English key of a metadata property is what the
platform's own metamodel declares for it. The metadata names used below:
| Name |
What it is |
Attributes · Dimensions · Resources · TabularParts |
the field sections of an object |
Id · Name · Type · Handler |
the yaml keys an element carries |
Reference · Object |
the reference and the object of a type family |
Components |
the components collection of a form |
Multiline · Layout · HorizontalStretch · VerticalStretch · Pages |
the properties of a component |
Completion (triggered by . and :, and in a /// line by @ and /):
- after
<Object>. – the type family (Reference, Object, ...), TabularParts, local types and
manager-module methods; for an enum – its values;
- after
Components. – the components of the current form; after Components.<Name>. – the methods
of that module;
- in yaml, after
Type: – project object names (the object kind is shown as the detail).
Type-aware completion works in LSP mode only. The parsing runs over
tokens, so keywords are understood in both spellings the language has, the English one and the
Russian:
- inside
Query{ ... }, after a table – its fields: the standard fields of the kind, its
Attributes and TabularParts. Aliases resolve too: FROM Product AS P → P. gives the
same fields;
- after the loop variable of a query result (
for Row in Result → Row.) – the columns of the
selection (the SELECT ... AS aliases; a plain field is named by its last segment);
- after a variable of a known type (
var List = new Array<String>() → List.) – the members of
that type. The type comes from the annotation, from new, from a literal (val Key = "" is a
String) or from a call. A call counts both through a module (Module.Method()) and with no
qualifier at all, which is a call of a method of the same module. Method parameters count as
well;
- after a value of a project type – its fields and methods: a structure declared in a module, a
type described in metadata, an interface component (for a form: its
Properties, the methods
of its module and the members of the platform type in Inherits);
- inside
new Type( – the names of what the type carries: the completion writes the Name =
for you;
- after an stdlib type or global (
AccessContext.) – its members. Properties and methods are
listed apart: a method carries its own icon and is inserted with parentheses.
A chain is walked to its end rather than one level deep: Parsed.File!.Read(). answers with the
members of the result, because a non-null operator does not break the chain. A loop variable
takes its element out of the written type of the collection (Array<Catalog.Card> →
Catalog.Card), including when the collection came from a call.
The members of stdlib types come from the Element data (the --data-dir root), everything else
from the project index. A name in scope wins over a type of the same name: once a variable List
is declared, List. is about its type, not about the List component.
Documentation comments. A method documented with /// lines reads in the editor the way it
reads in the environment:
- the hover of a project method shows the description and a section per kind of tag - Parameters,
Returns, Throws, See also; a parameter and an exception are listed as Name - text;
- the signature help of a call of a project method (triggered by
( and ,) shows the
signature and, for the argument being written, the text of its @parameter tag;
- inside a
/// line, @ offers the tags in the language of the module; after @parameter -
the parameters of the method below that the block has not described yet; on the only line of a
block, or on an empty line right above a declaration, the block the environment's own template
writes: a description, a line per parameter, the result;
- the tag word and the name after it are colored the way a JSDoc tag is.
The comment/doc-tag-* rules check the tags against the signature and against what the
environment will show.
Known limits. Outside LSP mode the index knows declarations, not types, so there is no completion
after variables. A type is not inferred where there is nothing to infer it from: a generic
platform method whose result is set by a type argument; an expression built of operations
("a" + X is an operation, not a literal); a name the platform catalogue does not carry. The
members of platform types are offered in their Russian spelling even in an English project,
because the catalogue has no English pair for them. There is no rename. In an ambiguous context
the providers return nothing at all.
Quick Fix
Findings the linter can repair mechanically carry a fix, and the extension turns it into a Quick Fix:
A lightbulb on the diagnostic (Ctrl+.) – Fix: <rule> – applies the exact edit:
trailing whitespace removed, em dash → en dash, … → ..., curly quotes → straight.
A fix-all source action – Fix all (xbsl) – repairs every fixable finding in the file in
one edit. To run it on save, add this to your settings:
"editor.codeActionsOnSave": { "source.fixAll.xbsl": "explicit" }
The engine supplies fixes in its JSON output. Only unambiguous edits are
offered, and only against the exact text they were computed on: a version-stamped snapshot guards
against applying an offset to text that changed since the last lint. Whole-file fixes (mixed
newlines) are left to xbsl --fix on the command line.
A finding whose repair belongs in another file gets a lightbulb of its own.
conventions/missing-translation offers to write the word into the project's dictionary – see
Translation dictionary.
Settings
| Setting |
Default |
Meaning |
xbsl.linter.run |
onType |
When to lint: onType (debounced) / onSave / off. |
xbsl.linter.command |
xbsl |
Linter executable (PATH or absolute path). |
xbsl.linter.pythonPath |
– |
Python interpreter; when set, runs <python> -m xbsl. |
xbsl.linter.dataDir |
– |
Element data root (folder with index.json); empty = auto-resolved. |
xbsl.linter.lang |
auto |
Diagnostic language: (auto) / ru / en. |
xbsl.linter.asCi |
false |
Judge by the rule set the project's CI job runs. The --select/--ignore/--enable flags and the baseline are taken from the xbsl command of the pipeline file: .gitlab-ci.yml or a GitHub workflow next to the project. Without it the Problems panel judges by the defaults while the merge request is gated by another set. With no pipeline file the settings' own set stands and the reason goes to the XBSL output channel. The status bar says which of the two happened: CI: <job> while the job's set is in force, a warning when it is not. A click opens the pipeline file the job stands in. |
xbsl.linter.asCiJob |
– |
Which job of that file to take. A pipeline runs the linter twice as soon as the project checks a second tree (a translation), and those jobs judge by different sets. A part of the name is enough while only one job fits; a filled value turns xbsl.linter.asCi on. |
xbsl.rules |
{} |
The one rules table. The key is a rule (code/brackets), a group (style), a tier letter (A) or *; the value is off or a level. Priority: rule → group → tier → *. A level set on a rule turns on a rule that is off by default; on a group or a tier it only recolours. {"*": "off"} means "only the ones listed here". See Rules. |
xbsl.linter.debounce |
300 |
Delay (ms) before linting while typing. |
xbsl.projectRoot |
– |
Sources root for project-wide runs and the navigation index, relative to the workspace folder (or absolute). Empty – the whole folder. Set it when the repository holds examples or copies next to the project: otherwise project-scope rules (Id uniqueness and others) cross-fire between directories. |
xbsl.baseline |
– |
Baseline file with the accepted findings, relative to the workspace folder (or absolute). Empty – .xbsllint-baseline in the workspace folder when it exists. See Excluding a finding. |
xbsl.workspaceLint |
true |
Full workspace run on every save of a .xbsl/.yaml file. |
xbsl.workspaceLintTimeout |
60000 |
Kill a workspace run after this many ms (0 – no limit). |
xbsl.checkForUpdates |
true |
Ask Open VSX once a day whether a newer extension is published. The extension is installed from a vsix while the editor asks the Marketplace, so nothing else notices a version left behind. The check only lights up the status bar; the Check for a newer extension command works regardless of it. |
xbsl.deploy.* |
– |
The deploy settings: the elemctl binary, the .env, the target application. See Deploy; the elemctl path and the application id are shared with debugging. |
xbsl.debug.* |
– |
Debugging: the platform adapter directory, the Java launcher, opening the debuggee on start. See Debugging. |
In LSP mode, yaml selection is anchored at the resolved project root. Relative roots are resolved
from the first workspace folder. Root path matching ignores letter case on Windows and follows VS
Code's case-sensitive matching on Linux.
Rules: levels and disabling
The old settings (xbsl.groups.*, linter.select / .enable / .ignore) are still read by the
code but no longer shown in the forms. The XBSL: move the rule settings into one table command
moves them into the table in one go.
The table does not have to be edited by hand. The XBSL: rules command opens a panel: every
rule of the engine listed by group, each with its own level or "by default", a search by name, a
"changed only" filter and a reset button. The scope is chosen explicitly, either the user or the
workspace settings, and the panel writes into xbsl.rules and nowhere else.
By group – in the Settings UI. The Rule groups section (search for xbsl.groups in the
Settings editor, or browse Extensions → XBSL) has a dropdown per finding type: code, yaml
descriptions, style, typography, whitespace, encoding, structure, forms, queries, naming,
project, security. The dropdown offers three choices: keep the group's own rule levels, report
all its findings at one level (error / warning / info / hint), or turn the group off entirely.
Turning it off does more than hide the findings – it excludes the rules from the run.
Per rule – from the finding. Every finding carries a "Configure rule..." action in its
lightbulb (Ctrl+.): disable the rule or override its level without leaving the line. The check
reruns right away. The choices land in the xbsl.rules setting, a map from a rule id
(whitespace/trailing) or a whole group (style) to a level or off. An exact id wins over its
group, and any xbsl.rules key wins over the group dropdowns. Works in both the CLI and the LSP
mode.
A rule group added by an engine plugin has no dropdown of its own, because the dropdowns list the
engine's built-in groups. Configure such a group through xbsl.rules by its name
({"conventions": "off"}), or through the "Configure rule..." action on any of its findings.
Both treat a plugin group exactly like a built-in one.
Excluding a finding (the baseline)
Disabling a rule silences it everywhere. Sometimes only one finding has to stay unfixed, because
the code is right on purpose. For that, every finding carries an "Exclude this finding (to the
baseline): <rule>" action in its lightbulb (Ctrl+.). Type the reason, and the finding goes
into the baseline file together with it, recorded by its identity: file, rule and message. Only
that one finding is excluded, and the rule keeps checking every other file and name. To silence a
whole rule, use "Configure rule..." instead. The finding disappears from the editor, and a CI
gate over the same file (xbsl ... --baseline) stops reporting it too.
The file is .xbsllint-baseline in the workspace folder, created on the first exclusion, or
wherever xbsl.baseline points. The reason stays next to the frozen finding, and
xbsl --write-baseline keeps it on a rewrite:
"app/Notes.yaml": {
 "naming/number": {
  "The name 'Notes' is singular – ...": { "count": 1, "reason": "a historical name" }
 }
}
In LSP mode the server applies the baseline; CLI mode uses --baseline.
The identity includes the message text, so the
baseline is bound to the output language. Write and check it under the same xbsl.linter.lang.
LSP mode (default)
The extension runs everything through a long-living xbsl-lsp server instead of spawning the CLI
per event. The Element language data and the project index stay resident, so as-you-type
diagnostics respond in milliseconds. Hover appears – a card for a project object, method or
form component – and so does type-aware completion. Definition,
project-wide diagnostics on save and quick fixes work as before, just faster. Requires the linter
installed with the [lsp] extra (pip install "xbsl[lsp]"). The server is found as xbsl-lsp on
PATH, via xbsl.linter.pythonPath (run as a module), or by the explicit xbsl.lsp.command.
Without the server the extension quietly keeps working in the former CLI mode. Details go to the
XBSL output channel, and the status bar shows the mode actually in use. To switch the server
off entirely, set "xbsl.lsp.enabled": false; changing the setting needs a window reload.
Code templates
The XBSL: code templates command (xbsl.templates.manage) opens the management panel, an
analog of the Options – Templates dialog in 1C:EDT: the list on the left, the editor on the
right, buttons to add, edit, delete, import and export.
A set has two parts. Built-in templates ship with the tool; your own live in
.xbsl-templates.json at the workspace root, and the xbsl.templates.file setting moves that
file elsewhere. Your set extends the built-in one, and a template with the same name replaces the
built-in one. That is how you adjust the default behaviour without breaking anything.
The file format is the one 1C:EDT exports, so a set travels between the IDE and the editor both
ways:
- XBSL: import code templates (
xbsl.templates.import) – merge an EDT export into your file;
- XBSL: export code templates (
xbsl.templates.export) – write the set out in that same
format.
The panel writes nothing on its own: both reading and writing go through xbsl templates, the
same machinery the console command uses. So the set is identical in both extension modes, and
from a shell you can work with it by the same means (xbsl templates list / export / import).
Template completion while typing works in LSP mode. In CLI mode the panel and the file
exchange are available, but there is no completion from templates.
Translation dictionary
A project that translates its sources into English spellings (xbsl translate) keeps its own
names, comment lines and string literals in a dictionary. That dictionary is the
xbsl-translation directory next to the project or above it: several yaml files, thousands of
records. The XBSL: translation dictionary command (xbsl.translate.dictionary) opens it as a
table of five columns: Kind, Key / Translation, Occurrences, Where it occurs,
Dictionary file. Every record takes two lines: the key and the rest of the row on top, the
translation field itself stretched underneath across the full width of the row. It needs the
room, because a real name or a whole comment line goes there. The column headers double as sort
handles, Kind excluded – that one is a plain label, though still a column you can resize. A
border between columns drags with the mouse, the widths are remembered between openings of the
panel, and a double click on a border resets that one column back to its default.
- The translation field is editable. What you type is written by the engine
(
xbsl translate --set) into the right file, with the right scope; an emptied field removes
the record. A failed write shows the engine's message and leaves the table as it was.
- A literal is written the way the source writes it: the text between the quotes, an inner
quote as
\" and a backslash as \\. The value goes back between two quotes of a module, so
the engine checks that it could stand there and refuses anything that would end the literal
early. The refusal is shown with its reason, and the field keeps its old value.
- Two filters: a search over keys and translations, and only untranslated – what the
dictionary does not cover yet. The selector next to them narrows the table to names, to comment
lines or to literals.
- A suggestion stands grey inside the empty field itself, as its native placeholder. It is
the platform's own spelling when the engine offers one, and the machine-translation service's
guess otherwise (see below). A checkmark on the right accepts it, by a click or by
Enter
while the field is still empty; typing anything makes the placeholder vanish. A literal gets a
suggestion only when its text is filled locally from an already accepted name (see below),
because the platform tables spell names, not the whole message that stands between two quotes.
- The occurrence is a link that opens the source file at that line. The dictionary file next
to it is not: a short name with the full path as its tooltip, nothing to click.
- The line above the table counts the rows, the untranslated among them and the project's
coverage. That is the very number
xbsl translate reports and CI gates on. The literals are
counted beside it, the way the engine counts them: they are not part of the coverage, so a
project could otherwise read 100% with its messages still in Cyrillic.
- A long literal keeps its row small. In a real project a literal runs to hundreds of
characters; the key cell is clamped to four lines and the whole text is the cell's tooltip.
The panel writes nothing by itself: reading is xbsl translate --entries plus --gaps, writing
is --set. The layout of the dictionary – which file a new record goes to, the scopes, the
resource keys – stays the engine's business, so the panel and the console command cannot
disagree.
Translating from the finding
The conventions/missing-translation rule (off by default, switch it on in the rules table)
shows every uncovered name, comment line and string literal where it stands. Its lightbulb
(Ctrl+.) offers:
- Translate as "<spelling>" – the platform's own guess, written in one click. It appears
only when there is a guess, so never on a literal;
- Translate "<key>"... – asks for the word, prefilled with that guess; on a literal the
prompt says how the text is written between the quotes;
- Open the translation dictionary – the panel above, filtered by this very key.
The finding carries the exact dictionary key and its kind in its data, so the repair never guesses
either one out of the message – neither for a name, nor for a comment line elided in the text, nor
for a literal. After a write the project is checked again: the server re-reads the dictionary by
itself, no restart, and the finding goes away.
Machine-translation suggestions
Next to a name or a comment line the dictionary does not cover, the Suggest via translation
service button asks an external service (Yandex Translate or Google Translate) to fill in what
it can. The guess appears the same way the platform's own spelling always has, grey inside the
empty translation field. A click on the checkmark or Enter writes it, exactly the write a
hand-typed field sends; nothing changes until then. A literal never reaches the service: it is
filled locally, and only when its text matches an already accepted name in full. One press walks
the whole project. Nothing caps the run and nothing stops it midway, and every batch it sends is
a paid call to the service.
The run's own report stays on screen. How many answers came from the cache, how many were
asked for, how many the service refused – the same three numbers the status-bar message gives for
five seconds – sit in the panel's summary line too. They stay there until the next run, not only
until the message closes itself, and a hover on that line names the reason behind each refusal.
When there was nothing left to ask, the line says so in words instead of showing three zeroes.
When every offer came from a local literal match and never touched the service, it says that too.
Set a credential with the XBSL: Set a machine-translation key command
(xbsl.translate.setKey). It asks which of the three to store – the Yandex API key, the Yandex
folder id, or the Google API key – and keeps it in SecretStorage, never in a setting and never on
the engine's command line. With more than one service configured, the xbsl.translation.provider
setting picks which one --suggest uses.
Code palette
The command XBSL: code palette (xbsl.choosePalette) recolors XBSL syntax with one of the
popular palettes: the 1C:Element web IDE style (red keywords, blue strings), One Dark, Monokai,
Dracula, GitHub Dark. It also resets back to the active editor theme. The choice is applied via
editor.tokenColorCustomizations rules addressing only *.xbsl scopes, so the global theme and
other languages stay untouched. The extension manages only its own rules (prefixed
xbsl-palette) and preserves any customizations of yours.
The command XBSL: form designer (xbsl.previewForm, also a button in the editor title of form
yamls – files whose ElementKind is InterfaceComponent) opens the form panel. A form depends on
its own properties, so its structure and its data are edited where the form is shown: the
structure tree on the left, the data on the right, the form frame under them, with draggable
splitters between them whose position is remembered.
A panel per form. A second form opens its own tab next to the first; each panel keeps its own
tree, selection and expansion memory. A panel and its yaml are linked: picking a tab on one side
brings the other forward, and closing the panel closes the form's yaml (an unsaved one is left
alone). The keyboard works inside the panel: the arrows walk the tree, plus Alt+Up/Alt+Down,
F2, Delete, Ctrl+C/Ctrl+V and Ctrl+Z/Ctrl+Y.
Structure – the tree of slots and components with an icon per kind and linter badges. The
context menu and the keys: Alt+Up/Alt+Down move a component, F2 renames, Delete removes,
Ctrl+C/Ctrl+V carry a yaml fragment. There is also wrapping into a container, duplicating,
focusing on a subtree and the named-only filter. A node drags onto another node: a container
takes it inside, a leaf places it after itself.
Data – the component's own Properties: and the attributes of the owner object. A double click
or a drag of a record onto a structure node creates an input component with its binding already in
place (Boolean -> a checkbox, otherwise an input with Value: =...).
The form frame renders from the yaml: nested vertical and horizontal groups, labels, input
fields with captions and =bindings, buttons (the primary one filled), checkboxes and switches the
way the platform draws them, tables with their real columns, switchable tabs (Pages), cards, image
and HTML-container placeholders, and the form's command bar. Unknown and custom component types
render as labeled boxes with their content inside, so nothing disappears. The area header has a zoom
(−/+, the wheel over the control and Ctrl+wheel over the frame) and a theme picker: light (the
platform web client look, the default), dark, or the editor theme. The choice is remembered.
The selection is shared by the three areas. A click on a frame block and a cursor move in the
yaml expand whatever collapsed groups stand in the way, land on the node in the structure and fill
the "Properties" panel. The selected node keeps the full selection color wherever the focus is.
The way back only follows a yaml that is already open somewhere and never opens a closed one on
its own: a click on a structure node or a frame block moves the cursor there without taking focus.
Opening a closed yaml takes an explicit ask – a double click on a structure node or Ctrl+click
on a frame block. It then opens beside the panel, never in the panel's own column, so it cannot
end up hidden behind the very form it belongs to.
The component palette sits next to the metadata tree and appears while the form panel is open.
A double click on a palette component inserts it into the selected structure node. You cannot drag
from the palette into the panel, because the platform does not carry a drag from its own tree into
a webview. That is why insertion is click-driven.
Properties panel. A click on an element selects it and opens a separate Properties panel,
a tab of its own you can drag below or aside. It works like the platform web editor: enums as
dropdowns (Layout, alignments, spacings, widths, button kinds), HorizontalStretch and
VerticalStretch as Auto / True / False toggles, everything else as text. You get the
component's standard set plus every property present in the yaml, with object values shown
read-only. Edits land in the yaml document as precise text edits, so the regular undo works; an
empty value or (auto) removes the property. Selecting an element and every edit also position
the yaml editor on the affected line, without stealing focus. Ctrl+click or the Show in yaml
button jumps into the editor, which is handy for navigating large forms.
Typed value editors. A color property opens a native color picker plus swatches of the colors
already used in the form and your recent picks; one click reuses a shade. Any single-line value
carries a literal/binding toggle: press = to bind the property to data. In binding mode an
autocomplete offers the bindings already used in the form and the attributes of the form's owner
object (=Object.Name); the abc button switches back to a literal.
It is a layout skeleton, not the platform's rendering. Composition, nesting and captions are
faithful; exact sizes and styles are not, though explicit label colors and font sizes are applied.
Block presets. In the structure area, Save as block preset on a component stores its whole
subtree under a name and keeps it across forms and sessions. Insert block preset (in the palette
title bar or a node's menu) drops a saved preset into the current selection. It is a named,
persistent version of copy and paste for the layouts you rebuild often. Manage block presets
prunes the list.
Mass edit. Select several components in the structure area and use Edit selected together.
One property is set or cleared on all of them at once: pick a key from the ones they already use
or type a new one, then a value; empty clears it. This is how you align widths, toggle visibility
or rebind a group of fields in one step.
The collapse button in the tree title (Collapse to the metadata kinds) stops at the first
level: the list of kinds stays visible while the expanded categories fold. The rest – new project,
grouping, filter, refresh, hiding empty categories – lives in the ... menu of the same title bar.
A dedicated 1C:Element icon in the Activity Bar opens a tree of the project metadata, built
like the platform designer but inside VS Code.
Experimental. The metadata explorer is an experimental feature – expect bugs and rough edges.
The tree. The root is the project descriptor, with Vendor\Name in grey; its context menu opens
the application module. Below are a Subsystems branch and categories by ElementKind:
Catalogs, Documents, Information/Accumulation registers, Enumerations, Common modules, HTTP services,
Structures, Client events and so on – each with its own icon. The .yaml + .xbsl pair of an object
is one row; an object/list form is nested under its owner, forms with no owner go to a Common
forms section.
Object subtrees. A catalog or document expands into Attributes, Tabular sections,
Forms; a register into Dimensions, Resources, Attributes; an enumeration, a
structure and client-work parameters list their values, fields and parameters right under the
element, with + on its row, since they have no other section; an HTTP service into URL
templates with their methods; localized strings into Localization, a node
per language of the section (Localization/<language>/<Name>.yaml), where a click opens the
translated text. A SOAP service client gets a WSDL node for the description its type is
generated from (<Name>.Wsdl.1.wsdl beside the element): a click opens it as XML, several
descriptions get a node each, and Open WSDL in the client's context menu does the same. A SOAP
service has no such node - the platform builds its WSDL from the element.
Imported XML schemas (<Name>.Wsdl.<N>.xsd) appear under the same node and open as XML.
The tree shows its own error and warning counts for all files of an object, including
modules and queries, and totals for packages, subsystems and projects. These counts work
even when the standard problems.decorations.enabled badges are off; Git decorations remain.
The properties panel starts with a documentation comment section for nodes that can
carry one. Edit Markdown, use the formatting buttons and preview the result, then save it
into the current YAML buffer. Ordinary editor undo remains available. Raw HTML stays text
and unsafe links are not active. A changed source comment refuses a stale save and keeps the draft.
The section folds like the property groups: it is folded while the node has no comment and
open when it has one, and a fold or an unfold by hand is kept for the node.
Clicks. An object or a field opens the properties panel on the right. A field's Type
there is a combo of primitives, reference types (<Object>.Reference?) and the project
enumerations, and it still accepts a typed-in value. A common module opens its .xbsl, a form
opens the preview. The context menu adds Properties, open description / module.
Modules. The context menu of an object opens each of its modules and creates the ones
it lacks: Create module (xbsl), Create object module (.Object.xbsl) and, for a
register or a constants set, the modules of a record, a record set and a record key. The
items follow the kind, the way the + next to an element in the project view of the
environment does: a catalog has a module and an object module, a register the modules of
its record types, a common module or a form its own module, and a virtual table, an
event-log event, localized strings or a navigation command none. A new module is an
empty file beside the description, named in the language of the description
(Name.Object.xbsl in a project written in English), and it opens right away.
A tabular section of a catalog or a document offers the module of its row the same way:
Create row module (Object.TabularSection.xbsl) writes an empty Name.Section.xbsl
beside the description, and the attributes of the row are in scope there.
Properties panel – the same one the form designer uses. Scalar properties are edited in place:
dropdowns for VisibilityScope and Environment, a True / False toggle, text for the rest.
Id and ElementKind are read-only; collections (Attributes and the like) are edited in the tree.
Edits are surgical and undo works; save the file (Ctrl+S) to refresh the tree.
The All properties section shows what the file does not set yet, not only for the object
itself but for an item of any of its collections: an attribute, a dimension, a resource, a
structure field, an attribute of a tabular part, a value of an enumeration, a parameter. The
metamodel names the item class itself, and where a collection holds items of different classes it
picks one by the name: the built-in Code, Name and Owner of a catalog are classes of their
own, so their property sets differ too.
Composite (nested) properties – ContentHorizontalAlign { ... }, say – are shown but not
editable: edit those in the yaml.
Creating objects. A category root has an Add <class> action: it asks a name and a
folder (a subsystem, a package of one or the project root; a category under a subsystem or a package
takes its folder without asking), writes a minimal valid yaml (a fresh Id; a paired .xbsl for
module kinds) and opens it. Classes are shown even when the project has none of them yet. Every
class the engine can scaffold is there:
|
Classes |
| Data |
catalog, document, enumeration, information register, accumulation register, virtual table, constant set, structure, stored structure, exchange plan |
| Code and services |
common module, HTTP service, SOAP service, service contract, type contract, entity contract, data processor, scheduled job, event-log event |
| Interface |
common form, command-interface fragment, usual command, navigation command, switchable command, command with a component, client event, client-work parameters, report color scheme |
| Rights and settings |
access key, privilege on an action, privilege on an element, settings storage, self-registration parameter, localized strings |
In the subtree groups a "+" adds an attribute / dimension / resource / value / parameter /
field / tabular section (and an attribute of a tabular section). A catalog or document also has
Add object form: the engine generates a form populated from the object's Attributes,
optionally a list form with columns too, and registers it in the owner's Interface.
A form, owned or common, and any other interface component has Add property... and Add
event... in its context menu. The first asks a name and a type: a primitive, a reference or an
enumeration of the project, or a type typed in by hand. The second asks a name and the type of the
event object – the plain component event or an event with data. The engine writes the item into
the component's Properties or Events and puts a missing section where the designer keeps it:
Properties in front of Events, Events right after Properties. The yaml then opens on the
new item.
The templates and yaml edits are computed by the engine (xbsl 0.16+). The same operations are
available to agents through its meta_* MCP tools and to any editor through the xbsl/meta* LSP
requests or the CLI subcommands. The tree only gathers parameters and applies the returned
changes, and regular undo works.
Subsystems and packages. A Subsystems branch lists the subsystems of the project - a
first-level folder, with or without a subsystem file (a click opens the file when there is one) -
and a subsystem with packages expands into them, nested ones under their parent. Add subsystem
on the branch or on the project root creates a folder with a subsystem file at the project root. In
the By subsystems grouping a subsystem holds its packages and the objects of its root by class.
A package node is the same in both places: a folder below the subsystem, the number of objects in
grey, the full namespace in the tooltip. The placement comes from the engine
(xbsl/metaProjectInfo): the tree is drawn at once and completed when the answer arrives. Create
package on a subsystem or a package asks the name and the first object of the package - a folder
without objects is not a package. Move to package... on an object, or dragging the object onto a
subsystem or a package, moves it with the engine's move-object: the imports and full names the
move needs are updated across the project. Rename package renames the folder and every name that
spells it.
Filter by subsystems and packages. The filter button in the tree title - also in the ... menu,
on the project root and on the Subsystems branch - opens a form with a tree of checkboxes: the
subsystems, their packages with the nesting, and the number of objects at every node. Ticking a
subsystem ticks all of its packages. A subsystem with only some packages ticked shows a partial
mark, and the tree keeps just those packages; the Subsystems branch is narrowed the same way,
its numbers counting the objects that pass. Where a subsystem or a package has objects of its own as
well as packages, an Objects outside packages item stands for those objects. Nothing ticked
means no filter. While a filter is on, the title button is filled, the project label lists the
filter in grey, and Clear the subsystem and package filter sits next to the project name. The
filter is kept per project across window reloads. A package renamed with Rename package stays in
it under the new name, and a deleted one drops out. A subsystem added while a filter is on stays
hidden until it is ticked. The packages come from the engine (xbsl/metaProjectInfo); until it
answers, the form lists subsystems only. A subsystem or a package also filters in one click.
Filter by the subsystem or Filter by the package in its row narrows the tree to exactly that
place, a package with its nested packages, and the filled button of that node clears the filter. The
button is in the Subsystems branch and in the By subsystems grouping.
Resources and their folders. The Resources section lists the files of a Resources folder
as folders with their nesting, a folder icon and the number of files in grey; a file shows its name
and the icon of its type, and the tooltip gives its key - the spelling a Resource{...} reference
takes. A click opens the file, an svg in a preview that follows the editor theme. The description of
the folder, Resources.yaml, is not among the files: a click on the node of the folder opens it.
Create folder on the section or on a folder asks the name and goes on to the first files,
because an empty folder is not kept: resources of the same folder moved into it, or files added from
disk. Add resource files... copies picked files into a folder. Move to folder... on a file
or a folder, or dragging it onto a folder of the section, moves it with the engine's
move-resource, and Rename folder renames a folder: the keys that name the files are rewritten
across the project, and the lookups by a computed string are named in a note. Delete folder
first shows every place that names the files, then deletes. A resource moves only within its own
Resources folder.
Where a resource is used. Find All References on a file or a folder lists the places that
name it in the References view, the panel the editor's own search of references opens. The engine
reads them the way a move does: Resource{...} keys and image property values, strings with the
path, and strings with the folder and a computed file name. A key that lies in two folders is marked,
because the reference may lead to either file. F4 goes to the next place.
Git status. Object, form, subsystem and project rows carry the file's SCM decoration (color and
badge) like the Explorer, while keeping their kind icon.
Deletion. Right-click an object – Delete object (with confirmation; removes the object files,
undoable; references are left as is – the linter flags dangling ones).
A created object is a scaffold in files and does not deploy on its own. A broken one surfaces on
the next deploy, where elemctl catches the rollback, and your working files are never corrupted.
Example: a demo app from the tree, deployed to 1cmycloud.com
The tree can assemble a working app from scratch (the yaml is produced by the same templates the tree
uses):
- Open a folder with a project file – the project root appears in the tree.
- Subsystems → "+" → Add subsystem →
Main.
- Catalogs → "+" → Add catalog →
Products (subsystem Main); the same for Categories.
- Under
Products → Attributes → "+" → Add attribute → Price, SKU.
- Enumerations → Add enumeration →
ProductStatus; + on it → InStock, OnOrder.
- Deploy:
elemctl deploy --app-id <app> --project-dir <project folder> --output <tmp>
(create the app first: elemctl apps ensure <app> --latest-build --wait).
The deploy report on 1cmycloud.com, where ok: true appears only when the build really took effect:
built archive <project> 1.0-N.xasm (version 1.0-N)
build uploaded, apply started, waiting for the app to stabilize...
app is Running, verifying the actual applied version...
verification passed: the build is applied
{
  "uri": "https://<app-host>.1cmycloud.com/applications/<app>",
  "status": "Running",
  "applied-version": "1.0-N",
  "applied": true,
  "uri-status": 200,
  "problems": [],
  "ok": true
}
applied: true and ok: true mean the build actually took effect. The Products and
Categories catalogs and the ProductStatus enumeration built by the tree are then available in
the standard UI; the demo needs no OIDC or login.
Documentation
A container of its own – Documentation (1C:Element) in the Activity Bar – shows the platform
reference the way the docs site does, but built from your own distribution. It matches the
platform version you use and works offline.
The reference shipped with the platform distribution exists in Russian only, so the pages and the contents tree stay Russian whatever the editor language is.
The tree. A curated "Contents" that mirrors the site: the developer and administrator guides,
the type reference (Std::Collections → Array → ...), the properties of project elements and
interface components, the integration process schema, the query language and the glossary. It is
built from the distribution's own sidebar, so the structure matches the site. Clicking a node
opens the page.
Search. The search button in the view title (command XBSL: search the documentation) runs a
full-text search over the whole reference and guide; pick a hit to open it.
The page. Opens as an editor tab beside the current one and does not steal the focus: the
cleaned article with code (samples carry a Copy button), tables and images, plus a Primary
source link to the same page on the docs site. A page's sections are nested under its tree node,
internal links navigate within the same tab, and opening a page reveals it in the Contents tree.
Documentation for the symbol. Right-click a type or variable in an .xbsl file – XBSL:
documentation for the symbol – to open its page. For a type its reference page opens directly. A
member of a type has no page of its own, so the page of the type that declares it opens, scrolled
to the member's block: Array.Size leads to the ancestor that declares the method. When several
unrelated types declare the same name, they are offered to choose from, each with that member's
block as the line under it. For other names with no page of their own the pick-list is ranked by
the receiver before the dot, so Job.Setup prefers the scheduled-job pages over a guide topic.
Where the other entry points lead. Hovering a name in an .xbsl shows the description and a
Documentation link. Over a member of a type that is the call's signature and what it does, and
the link opens the page right at it. In the form designer the Open documentation action sits on
a palette item, and a short description also rides in its tooltip. Both open the page in this same
panel, so reading up on an unfamiliar component costs no trip out of the editor.
F12 falls back to the page. Go to Definition is answered from the project index, so a member of
the platform has no source to jump to. There the key opens the documentation page instead of
reporting a miss. A real definition always wins, and when there is neither, VS Code reports it as
usual.
The data comes from the linter's LSP server, so it needs LSP mode and the
documentation database built from your distribution (see
the linter README).
In the regular (CLI) mode the view reports that the documentation is available in LSP mode.
Deploy
The command XBSL: deploy the project (elemctl) (xbsl.deploy, also a cloud button in the
title bar of the metadata tree) runs elemctl deploy as a terminal task, after a confirmation
dialog with the exact command line. A deploy takes the whole project, not the open file, and the
steps are the usual ones: build, upload, apply, and a check that the apply took effect. On a
failed apply the platform silently rolls the application back while still reporting Running;
elemctl does not trust that status and exits non-zero.
The working directory is the workspace folder. elemctl reads the connection and the target from
its .env (ELEMENT_BASE_URL, ELEMENT_CLIENT_ID/SECRET, ELEMENT_APP_ID,
ELEMENT_PROJECT_ID). A set xbsl.projectRoot is passed as --project-dir; a missing elemctl is
offered for installation right from the error message.
| Setting |
Default |
Meaning |
xbsl.deploy.elemctlPath |
elemctl |
The elemctl executable – used by the deploy command and by debugging. |
xbsl.deploy.envFile |
– |
A .env with the connection and the target, passed as --env-file (relative to the workspace folder or absolute). Handy in a git worktree whose .env lives in the main working copy. Used by debugging too: it takes the stand from here unless the launch configuration sets envFile. |
xbsl.deploy.appId |
– |
Target application (--app-id); empty – ELEMENT_APP_ID from the environment or .env. When it is not set anywhere, the deploy offers the applications elemctl apps list can see: pick one by name, the id is what gets saved. |
xbsl.deploy.extraArgs |
– |
Extra elemctl deploy arguments, space-separated. |
Debugging
Debug 1C:Element applications in regular VS Code, without the Theia-based web IDE:
breakpoints, a call stack that chains client and server frames, variable values, stepping. The
extension is thin here too. It starts the platform's own debug adapter (Java, the DAP
protocol) and gets the session coordinates through elemctl (Console API /actions/debug). A
session id generated on the client ties the adapter and the debuggee together through the
platform's debug server.
Until version 0.57 this was a separate extension, XBSL Debug (keyfire.xbsl-debug). It is
now part of this one. Deploy and debugging address the same application with the same elemctl,
and the split achieved only one thing: the credentials were asked for twice. Settings made for
the old extension (xbslDebug.*) are still read, so an existing setup keeps working.
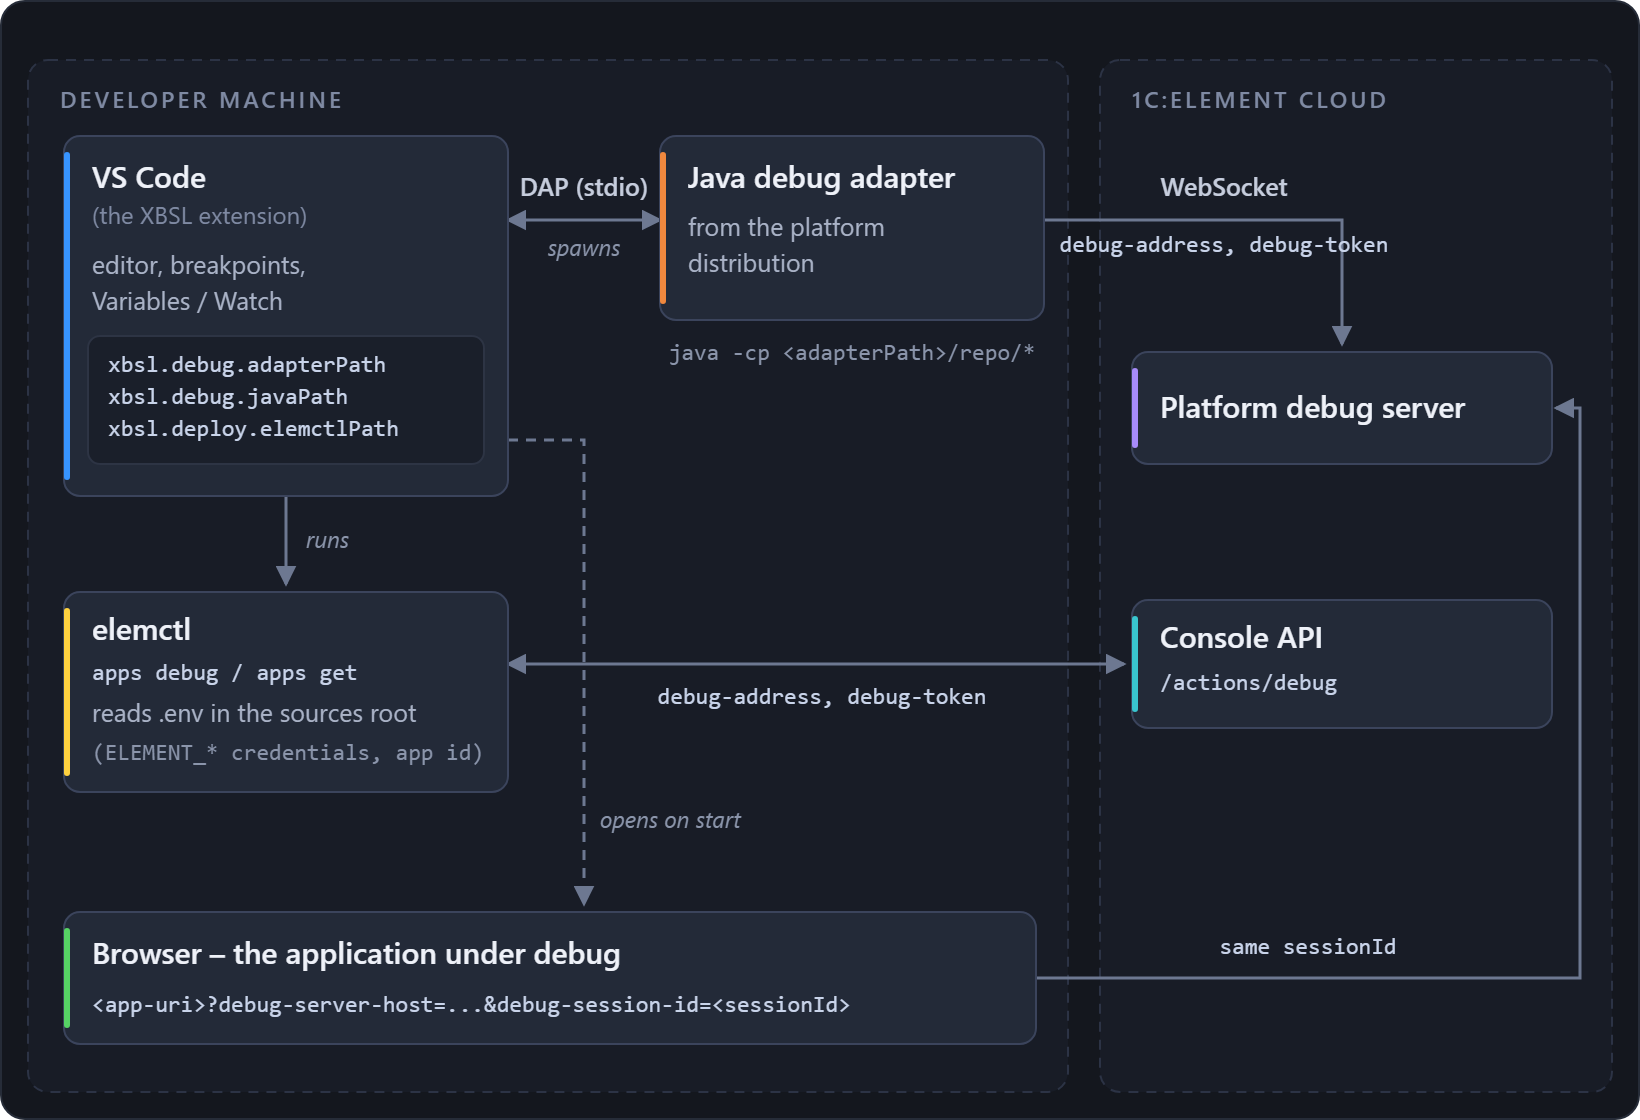
Getting started. Run XBSL: Set up 1C:Element debugging (xbsl.debug.setup) from the
Command Palette. The wizard checks Java, the adapter directory and elemctl, fixes what it can on
the spot and offers to create launch.json. Then open the folder with the sources, put a
breakpoint in an .xbsl file and press F5: the application opens in the browser with the
debug parameters and execution stops on your breakpoint.
What is needed:
- JDK 17+ (21 works too) –
java -version.
- elemctl >= 0.5 (the
apps debug and debug-adapter commands) with a configured
.env in the sources root. Missing elemctl is offered for installation from the error
message and from the wizard.
- The platform debug adapter. Take it from your own 1C:Element distribution
(
.../@1c-appengine-plugin/bin/debugger – a directory with a repo subfolder full of the
adapter's jars) and set xbsl.debug.adapterPath. The adapter is proprietary 1C code and
is not bundled here.
- Debugging enabled on the application server – cloud stands usually have it already.
| Setting |
Default |
Meaning |
xbsl.debug.adapterPath |
– |
The platform debug adapter directory from your distribution – a folder with a repo subfolder holding the jars. |
xbsl.debug.javaPath |
java |
The Java 17+ launcher. |
xbsl.debug.openApplicationOnStart |
true |
Open the debuggee in the browser when the session starts, with the debug parameters. |
xbsl.debug.applicationUrl |
– |
Where to open the debuggee. Empty – the uri of the application card, which is its address inside the platform; set this when the application answers on a domain of its own. The applicationUrl attribute of launch.json overrides it. |
The elemctl binary and the application id are shared with deploy (xbsl.deploy.elemctlPath,
xbsl.deploy.appId). The Console API credentials live in the .env of the sources root, not in a
setting, because elemctl reads them itself. launch.json is optional; its attributes are appId,
envFile, authMode and workspace.
How breakpoints bind. The debug server identifies a module by its path relative to the
sources root, shaped <Vendor>/<Name>/<path inside the project>.xbsl with forward slashes.
The sources must therefore lie in a <Vendor>/<Name>/ directory matching Проект.yaml, and
the workspace must point at the directory containing it. The extension detects that root from the
open folder itself, so opening the repository root or a subfolder both work.
A platform bug worked around here. Expanding a structure in the Variables tree on a client
frame used to hang the debuggee and drop the session. A DAP variables request without the
filter field – exactly what the VS Code Variables view sends for small values – crashes the
application's JS runtime, while a filtered request works fine. The extension rewrites every
filterless request into filtered ones (named + indexed, counts taken from the parent's
answer) and merges the results, so the value tree expands normally on both client and server
frames. This is unconditional and has no setting: switching it off buys nothing but a broken
session.
Commands
- XBSL: new 1C:Element project (
xbsl.project.new) – the project wizard (see above).
- XBSL: check the whole project (
xbsl.lintProject) – lint the whole workspace.
- XBSL: structural form search (
xbsl.forms.search) – find components by type and
properties (see above).
- XBSL: restart the linter (
xbsl.restartLinter) – clear and re-lint open files.
- XBSL: code palette (
xbsl.choosePalette) – pick a syntax palette for XBSL (see above).
- XBSL: code templates (
xbsl.templates.manage), import (xbsl.templates.import) and
export (xbsl.templates.export) – the template set and exchange with an EDT export (see above).
- Metadata explorer commands (
xbsl.metadata.*) are invoked from the tree and its context
menus: properties, add object / field / subsystem, add object form, filter by subsystems and
packages, delete object, refresh. See Metadata explorer.
- XBSL: deploy the project (elemctl) (
xbsl.deploy) – deploy to the stand (see above).
- XBSL: form designer (
xbsl.previewForm) – the panel of the active form yaml (see above).
- XBSL: search the documentation (
xbsl.docs.search) and documentation for the symbol
(xbsl.docs.showForSymbol) – the Documentation view (see above).
The full list
Every command of the extension. Generated from package.json – do not edit by hand.
Project-wide
| Command |
Id |
Invoked from |
| Check the whole project |
xbsl.lintProject |
Command Palette |
| Reindex and check the project |
xbsl.reindexProject |
Command Palette |
| New 1C:Element project |
xbsl.project.new |
Command Palette |
| Search forms by structure |
xbsl.forms.search |
Command Palette |
| Restart the linter |
xbsl.restartLinter |
Command Palette |
| Code palette |
xbsl.choosePalette |
Command Palette |
| Deploy the project (elemctl) |
xbsl.deploy |
Command Palette |
| Check for a newer extension |
xbsl.checkForUpdate |
Command Palette |
| Form designer |
xbsl.previewForm |
Command Palette |
| Open the form |
xbsl.openFormForModule |
Command Palette |
| Go to definition, or to its documentation |
xbsl.goToDefinition |
Command Palette |
Code templates
| Command |
Id |
Invoked from |
| Code templates |
xbsl.templates.manage |
Command Palette |
| Import code templates |
xbsl.templates.import |
Command Palette |
| Export code templates |
xbsl.templates.export |
Command Palette |
Metadata tree: creating objects
| Command |
Id |
Invoked from |
| Add catalog |
xbsl.metadata.addObject.catalog |
Command Palette |
| Add document |
xbsl.metadata.addObject.document |
Command Palette |
| Add enumeration |
xbsl.metadata.addObject.enumeration |
Command Palette |
| Add information register |
xbsl.metadata.addObject.inforegister |
Command Palette |
| Add accumulation register |
xbsl.metadata.addObject.accumregister |
Command Palette |
| Add common module |
xbsl.metadata.addObject.commonmodule |
Command Palette |
| Add HTTP service |
xbsl.metadata.addObject.httpservice |
Command Palette |
| Add client-work parameters |
xbsl.metadata.addObject.clientparams |
Command Palette |
| Add structure |
xbsl.metadata.addObject.structure |
Command Palette |
| Add client event |
xbsl.metadata.addObject.clientevent |
Command Palette |
| Add command-interface fragment |
xbsl.metadata.addObject.cmdfragment |
Command Palette |
| Add common form |
xbsl.metadata.addObject.commonform |
Command Palette |
| Add stored structure |
xbsl.metadata.addObject.storedstructure |
Command Palette |
| Add constant set |
xbsl.metadata.addObject.constantsset |
Command Palette |
| Add virtual table |
xbsl.metadata.addObject.virtualtable |
Command Palette |
| Add SOAP service |
xbsl.metadata.addObject.soapservice |
Command Palette |
| Add service contract |
xbsl.metadata.addObject.servicecontract |
Command Palette |
| Add type contract |
xbsl.metadata.addObject.typecontract |
Command Palette |
| Add entity contract |
xbsl.metadata.addObject.entitycontract |
Command Palette |
| Add event-log event |
xbsl.metadata.addObject.logevent |
Command Palette |
| Add scheduled job |
xbsl.metadata.addObject.scheduledjob |
Command Palette |
| Add data processor |
xbsl.metadata.addObject.processing |
Command Palette |
| Add report color scheme |
xbsl.metadata.addObject.colorscheme |
Command Palette |
| Add usual command |
xbsl.metadata.addObject.usualcommand |
Command Palette |
| Add navigation command |
xbsl.metadata.addObject.navcommand |
Command Palette |
| Add switchable command |
xbsl.metadata.addObject.switchcommand |
Command Palette |
| Add command with a component |
xbsl.metadata.addObject.componentcommand |
Command Palette |
| Add exchange plan |
xbsl.metadata.addObject.exchangeplan |
Command Palette |
| Add access key |
xbsl.metadata.addObject.accesskey |
Command Palette |
| Add privilege on an action |
xbsl.metadata.addObject.actionright |
Command Palette |
| Add privilege on an element |
xbsl.metadata.addObject.elementright |
Command Palette |
| Add settings storage |
xbsl.metadata.addObject.settingsstorage |
Command Palette |
| Add self-registration parameter |
xbsl.metadata.addObject.regparam |
Command Palette |
| Add localized strings |
xbsl.metadata.addObject.locstrings |
Command Palette |
Metadata tree: the rest
| Command |
Id |
Invoked from |
| Collapse to the metadata kinds |
xbsl.metadata.collapse |
Command Palette |
| Refresh the metadata tree |
xbsl.metadata.refresh |
Command Palette |
| Open description (yaml) |
xbsl.metadata.openYaml |
Command Palette |
| Open query (xbql) |
xbsl.metadata.openQuery |
Command Palette |
| Open WSDL |
xbsl.metadata.openWsdl |
Command Palette |
| Open resources description |
xbsl.metadata.openResourcesDescriptor |
Command Palette |
| Open module (xbsl) |
xbsl.metadata.openModule |
Command Palette |
| Open object module (.Object.xbsl) |
xbsl.metadata.openObjectModule |
Command Palette |
| Create module (xbsl) |
xbsl.metadata.createModule |
panel / context menu |
| Create object module (.Object.xbsl) |
xbsl.metadata.createObjectModule |
panel / context menu |
| Open record module (.Record.xbsl) |
xbsl.metadata.openRecordModule |
panel / context menu |
| Create record module (.Record.xbsl) |
xbsl.metadata.createRecordModule |
panel / context menu |
| Open record set module (.RecordSet.xbsl) |
xbsl.metadata.openRecordSetModule |
panel / context menu |
| Create record set module (.RecordSet.xbsl) |
xbsl.metadata.createRecordSetModule |
panel / context menu |
| Open record key module (.RecordKey.xbsl) |
xbsl.metadata.openRecordKeyModule |
panel / context menu |
| Create record key module (.RecordKey.xbsl) |
xbsl.metadata.createRecordKeyModule |
panel / context menu |
| Open row module (Object.TabularSection.xbsl) |
xbsl.metadata.openRowModule |
panel / context menu |
| Create row module (Object.TabularSection.xbsl) |
xbsl.metadata.createRowModule |
panel / context menu |
| Open in the form designer |
xbsl.metadata.previewForm |
Command Palette |
| Open application module (Project.xbsl) |
xbsl.metadata.openAppModule |
Command Palette |
| Properties |
xbsl.metadata.props |
Command Palette |
| Add attribute |
xbsl.metadata.addAttribute |
Command Palette |
| Add dimension |
xbsl.metadata.addDimension |
Command Palette |
| Add resource |
xbsl.metadata.addResource |
Command Palette |
| Add value |
xbsl.metadata.addEnumValue |
Command Palette |
| Add parameter |
xbsl.metadata.addClientParam |
Command Palette |
| Add field |
xbsl.metadata.addStructField |
Command Palette |
| Add tabular section |
xbsl.metadata.addTabular |
Command Palette |
| Add attribute to tabular section |
xbsl.metadata.addTabularAttr |
Command Palette |
| Add property... |
xbsl.metadata.addComponentProperty |
panel / context menu |
| Add event... |
xbsl.metadata.addComponentEvent |
panel / context menu |
| Add a URL template |
xbsl.metadata.addRoute |
Command Palette |
| Add an HTTP method |
xbsl.metadata.addRouteMethod |
Command Palette |
| Add form |
xbsl.metadata.addObjectForm |
Command Palette |
| Delete object |
xbsl.metadata.deleteObject |
Command Palette |
| Add object... |
xbsl.metadata.addObjectPick |
Command Palette |
| Add localization (translation) |
xbsl.metadata.addLocalization |
Command Palette |
| Add subsystem |
xbsl.metadata.addSubsystem |
Command Palette |
| Create package |
xbsl.metadata.addPackage |
Command Palette |
| Rename package |
xbsl.metadata.renamePackage |
Command Palette |
| Move to package... |
xbsl.metadata.moveToPackage |
Command Palette |
| Create folder |
xbsl.metadata.addResourceFolder |
Command Palette |
| Add resource files... |
xbsl.metadata.addResourceFiles |
Command Palette |
| Move to folder... |
xbsl.metadata.moveResource |
Command Palette |
| Rename folder |
xbsl.metadata.renameResourceFolder |
Command Palette |
| Delete folder |
xbsl.metadata.deleteResourceFolder |
Command Palette |
| Find All References |
xbsl.metadata.findResourceReferences |
panel / context menu |
| Filter by subsystems and packages... |
xbsl.metadata.filterBySubsystem |
Command Palette |
| Filter by subsystems and packages (active)... |
xbsl.metadata.editFilter |
panel / context menu |
| Clear the subsystem and package filter |
xbsl.metadata.clearFilter |
Command Palette |
| Filter by the subsystem |
xbsl.metadata.filterBySubsystemNode |
panel / context menu |
| Filter by the package |
xbsl.metadata.filterByPackageNode |
panel / context menu |
| Clear the filter by the subsystem |
xbsl.metadata.clearSubsystemNodeFilter |
panel / context menu |
| Clear the filter by the package |
xbsl.metadata.clearPackageNodeFilter |
panel / context menu |
| Tree grouping (by class / by subsystem) |
xbsl.metadata.groupMode |
Command Palette |
| Hide empty categories |
xbsl.metadata.hideEmptyCategories |
Command Palette |
| Show empty categories |
xbsl.metadata.showEmptyCategories |
Command Palette |
Form designer
| Command |
Id |
Invoked from |
| Refresh the form structure |
xbsl.formStructure.refresh |
Command Palette |
| Go to yaml |
xbsl.formStructure.openInEditor |
Command Palette |
| Move up |
xbsl.formStructure.moveUp |
Command Palette |
| Move down |
xbsl.formStructure.moveDown |
Command Palette |
| Delete component |
xbsl.formStructure.delete |
Command Palette |
| Rename component |
xbsl.formStructure.rename |
Command Palette |
| Duplicate |
xbsl.formStructure.duplicate |
Command Palette |
| Wrap in a container |
xbsl.formStructure.wrap |
Command Palette |
| Unwrap container |
xbsl.formStructure.unwrap |
Command Palette |
| Copy yaml fragment |
xbsl.formStructure.copyYaml |
Command Palette |
| Focus on this subtree |
xbsl.formStructure.focusSubtree |
Command Palette |
| Show the whole form |
xbsl.formStructure.resetFocus |
Command Palette |
| Show only named components |
xbsl.formStructure.filterNamed |
Command Palette |
| Show all components |
xbsl.formStructure.filterAll |
Command Palette |
| Refresh the component palette |
xbsl.formPalette.refresh |
Command Palette |
| Activate the palette component |
xbsl.formPalette.activate |
panel / context menu |
| Insert into the form |
xbsl.formPalette.insert |
Command Palette |
| Add to favorites |
xbsl.formPalette.addFavorite |
Command Palette |
| Remove from favorites |
xbsl.formPalette.removeFavorite |
Command Palette |
| Open documentation |
xbsl.formPalette.openDocs |
Command Palette |
| Paste yaml from the clipboard |
xbsl.formStructure.pasteYaml |
Command Palette |
| Save as block preset |
xbsl.formStructure.savePreset |
Command Palette |
| Insert block preset... |
xbsl.formStructure.insertPreset |
Command Palette |
| Manage block presets... |
xbsl.formStructure.managePresets |
Command Palette |
| Edit selected together... |
xbsl.formStructure.editSelected |
Command Palette |
| Refresh the data panel |
xbsl.formData.refresh |
Command Palette |
| Insert into the form |
xbsl.formData.insert |
Command Palette |
| Add property |
xbsl.formData.addProperty |
Command Palette |
| Rename property |
xbsl.formData.renameProperty |
Command Palette |
| Change property type |
xbsl.formData.retypeProperty |
Command Palette |
| Remove property |
xbsl.formData.removeProperty |
Command Palette |
Documentation
| Command |
Id |
Invoked from |
| Search the documentation |
xbsl.docs.search |
Command Palette |
| Documentation for the symbol |
xbsl.docs.showForSymbol |
Command Palette |
| Refresh the documentation tree |
xbsl.docs.refresh |
Command Palette |
| Open a documentation page |
xbsl.docs.open |
panel / context menu |
Feedback and bugs
The extension is under active development, so bugs and rough edges are expected, the metadata
explorer and the form designer especially. Please report anything that looks wrong in the
project's GitHub issues. Steps to reproduce and the extension and engine versions from the status
bar help a lot.
https://github.com/keyfire/xbsl/issues
VS Code also offers Report Issue on the extension's page (from the manifest's bugs link).
Development
npm install
npm run compile          # esbuild bundle -> dist/extension.js
npm run check            # tsc type-check
npm test                 # unit tests of the pure cores (plain Node, no test runner)
npm run package          # build the .vsix (via @vscode/vsce)
Press F5 in VS Code to launch an Extension Development Host with the extension loaded.
License
MIT – see the repository.

