
🗨️ ChatView — Lightweight Chat Viewer for VS Code
[English] | 日本語
📢 Important Notice (2025-10-25)
ChatView has been streamlined to a single, lightweight edition. The former "Enterprise Edition" is now the standard version, optimized for all environments including corporate settings. PNG/HTML export features have been discontinued in favor of SVG-only export for better compatibility and security.
ChatView is a lightweight VS Code extension designed for visualizing chat-format markdown files. Optimized for corporate environments with SVG-only export functionality, it operates safely in environments with SSL certificate issues or proxy restrictions.
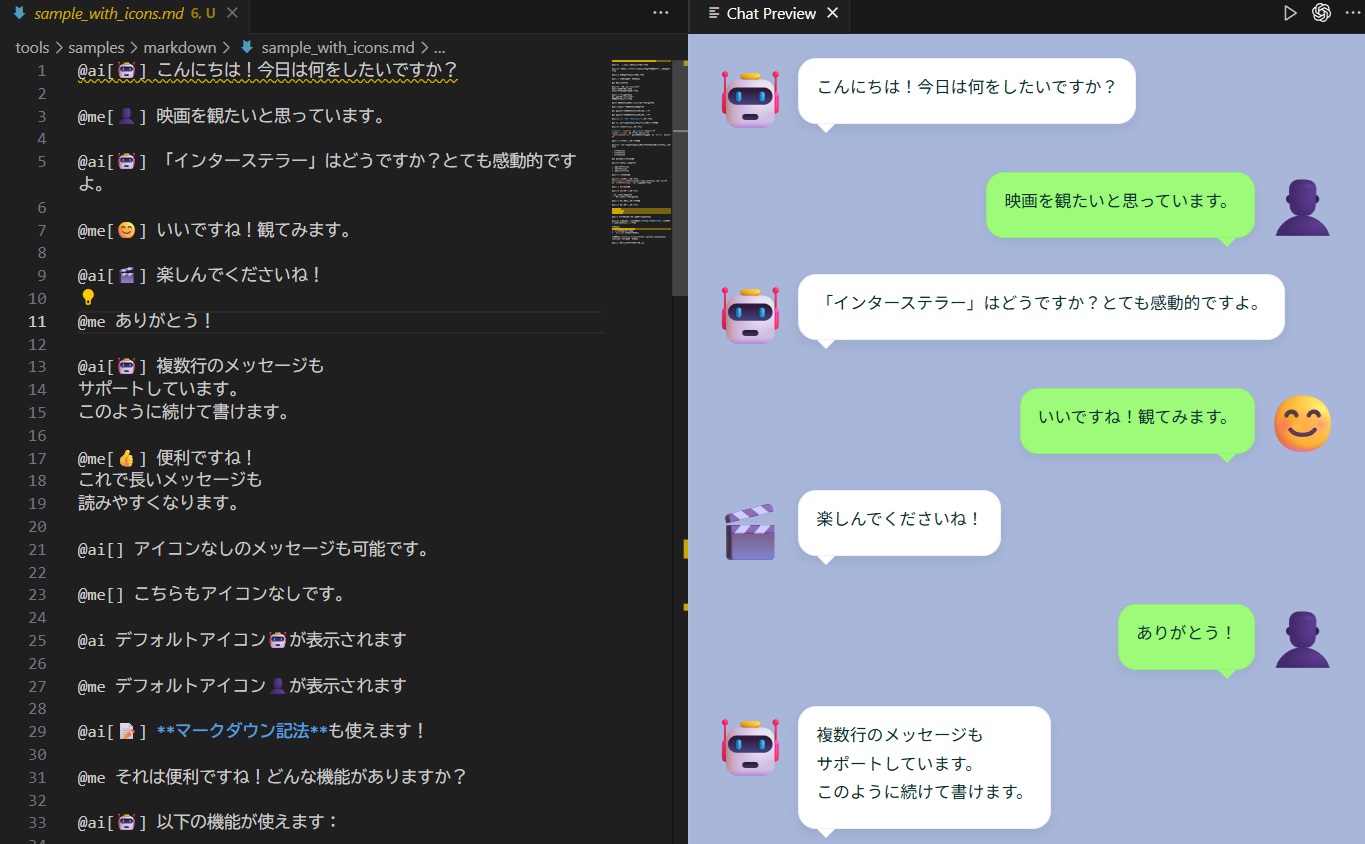
📷 Sample Display
✨ Key Features
- No Browser Automation: No dependencies like Puppeteer or Playwright
- Lightweight Package: No browser binaries required, significantly reducing distribution size
- Enhanced Security: No external browser process launches, avoids SSL certificate issues
- Proxy Environment Support: Not affected by corporate proxy settings
- SVG Export: High-quality output in vector format
- Chat-format Preview: Beautiful visualization of @ai / @me style conversations
- Teams Transcription Converter: Convert Microsoft Teams DOCX transcripts to ChatView format
👤 User Guide
🚀 How to Use
- Open a Markdown file (e.g., sample.md) in VS Code
- Press Ctrl+Shift+P to open the Command Palette
- Execute ChatView: Show Preview | プレビュー表示
- The chat UI will be displayed in the Webview

💾 SVG Export
- While preview is displayed, press Ctrl+Shift+P to open the Command Palette
- Execute ChatView: Export as SVG | SVGエクスポート
- Specify the save location and save the SVG file
🎤 Converting Teams Transcripts
You can convert Microsoft Teams transcript DOCX files to ChatView format.
Download the Script
Download transcript2chatview.py from the GitHub repository:
# Clone the repository
git clone https://github.com/keides2/chatview.git
cd chatview/tools

# Or download directly
curl -O https://raw.githubusercontent.com/keides2/chatview/enterprise-edition/tools/transcript2chatview.py
Requirements
pip install python-docx
Usage
# Basic usage (icons saved as separate files in icons/ directory)
python transcript2chatview.py input.docx -o output.md

# Merge consecutive messages from the same speaker
python transcript2chatview.py input.docx --merge-speaker -o output.md

# Hide timestamps and icons
python transcript2chatview.py input.docx --no-timestamp --no-icon -o output.md

# Embed icons as Base64 (not recommended for large files)
python transcript2chatview.py input.docx --embed-icons -o output.md
Note: By default, speaker icons are saved as separate PNG files in the icons/ directory alongside the output markdown file. This keeps file sizes manageable for large transcripts.
After conversion, you can open and preview the Markdown file in VS Code.
💬 How to Write Conversations (@ai / @me Usage)
In ChatView, you can easily specify speakers in Markdown. By placing the prefix @ai or @me at the beginning of a line, they will be rendered as AI-side or user-side speech bubbles respectively.
Example (Markdown):
@ai Hello, what shall we do today?
@me I'm thinking about watching a movie!
@ai How about "Interstellar"? It's very moving.
Important specifications:
- Each conversation starts with a line prefixed with @ai or @me
- Subsequent lines without a prefix at the beginning are treated as "continuation lines" and grouped into the same speech bubble
- Use lowercase @ai / @me prefixes at the beginning of lines
- Limited Markdown syntax is rendered within speech bubbles (headings #, bold **, italic *, inline code `, lists -, numbered lists, quotes >, links text, etc.)
- In SVG export, Markdown notation is removed and output as plain text
🎨 Customizing Appearance
The UI appearance is mainly defined in media/style.css.
Steps to modify in development environment:
- Edit media/style.css
- Close and reopen the preview, or reload the extension host window (Ctrl+R)
🧑💻 Developer Guide
📦 Project Structure
chatview/
├── src/
│   └── extension.ts           // Extension entry point (includes SVG generation logic)
├── media/
│   ├── style.css              // Chat UI style definitions
│   └── script.js              // Markdown parser in Webview
├── tools/                     // Development and conversion tools
│   ├── converters/
│   │   └── transcript2chatview.py  // Convert Teams transcript DOCX to ChatView format
│   ├── generators/
│   │   ├── create_sample_docx.py   // Generate sample transcript DOCX
│   │   └── generate-icons.ps1      // Generate icon images
│   ├── samples/
│   │   ├── transcripts/            // Transcript samples
│   │   └── markdown/               // Markdown samples
│   └── tests/
│       └── puppeteer-test.js       // Test scripts
├── dist/
│   └── releases/              // Released .vsix files
├── .vscode/
│   ├── launch.json            // Debug configuration
│   └── tasks.json             // Build/development task definitions
├── tsconfig.json              // TypeScript compiler settings
└── package.json               // Extension metadata
🛠 Local Development Setup
Prerequisites:
git clone https://github.com/keides2/chatview.git
cd chatview
git checkout enterprise-edition
npm install
Testing:
- Open the project in VS Code
- Press F5 to launch the extension host
- In the debug window, open sample.md and press Ctrl+Shift+P → ChatView: Preview display
- After editing media/style.css, close and reopen the preview
🔧 Build and Package
# Development build
npm run compile

# Production build
npm run package

# Create VSIX package
vsce package
📥 Installation
System Requirements
- Visual Studio Code: Version 1.103.0 or higher
- No Browser Required: Chrome/Chromium installation is not required
Install from VSIX File
- Download the .vsix file from the release page
- In VS Code, press Ctrl+Shift+P → Extensions: Install from VSIX...
- Select the downloaded .vsix file
Build from Source (For Developers)
- Clone the repository (enterprise-edition branch)
- Run
npm install to install dependencies
- Run
npm run package to build
- Press F5 to launch the extension host
🔒 Security and Privacy
Enterprise Edition meets the following security requirements:
- No External Process Launch: Reduces security risks by not launching browsers
- No Network Access: Export processing requires no external communication
- Privacy Protection: Implementation does not include personal information (such as usernames) in paths
- Avoids SSL Certificate Issues: Works in corporate self-signed certificate environments without using browser automation
📋 Configuration Settings
chatPreview.defaultFolder
Specify the default folder for the save dialog.
- workspace: Workspace root (default)
- home: User home directory
- Absolute path: Any directory path
Example (settings.json):
{
  "chatPreview.defaultFolder": "C:\\Users\\YourName\\Documents\\ChatExports"
}
🆚 Comparison with Standard Edition
When to Choose Enterprise Edition
- Using in corporate proxy environments
- Environments with SSL certificate issues
- Browser installation is restricted
- Need for lightweight package
- SVG format is sufficient
When to Choose Standard Edition
- Need PNG format export
- Need HTML format export
- Need pixel-perfect screenshots
🐛 Troubleshooting
Preview Not Displaying
- Verify VS Code version is 1.103.0 or higher
- Execute Developer: Reload Window in the Command Palette
SVG Export Not Working
- Verify write permissions for the save directory
- Verify the filename does not contain invalid characters
📄 License
MIT License
See LICENSE file for details.