itemis CREATE for Visual Studio Code
With itemis CREATE , you can easily create complex systems in a visual way. Simulate and test your system’s behavior already while you are modeling. Code generators translate your state machine into high-quality source code for different target platforms.
Previously available exclusively as an Eclipse-based tool, itemis CREATE now comes as a modern and streamlined Visual Studio Code extension, bringing the power of state machine modeling and simulation to a broader developer audience.
Besides Visual Studio Code, the extension also runs in Visual Studio Code forks such as Cursor or Windsurf and in IDEs based on Eclipse Theia such as TI Code Composer Studio. See Supported IDEs.
⚠️ Extension in Development
This extension is currently a work in progress. Some features may be missing. We appreciate your patience and feedback as we continue to improve it! If you encounter any issues or have feature requests, feel free to open a ticket on our issue tracker.
The following features are not yet implemented:
- Multi-State Machines: Importing other state machines is not yet supported.
- Domains: The C/C++ domain and others are not yet available, so import statements will not work.
- Subdiagrams: Creating subdiagrams is not supported.
- Import & Export: Exporting or importing existing statecharts is not possible. However, models from the web version with an
.scm file extension can be used.
- SCTUnit: Creating tests with SCTUnit is not supported.
Editing & Validation
Designing a robust and well-structured system starts with creating a clear and accurate model. The Editing & Validation capabilities of itemis CREATE make this process both intuitive and error-resistant.
With a user-friendly graphical editor, you can visually model your system's states and transitions, ensuring that complex system logic is easy to comprehend and maintain. Drag-and-drop functionality, alongside context-sensitive tools, allows you to quickly build, modify, and refine your models with minimal effort.
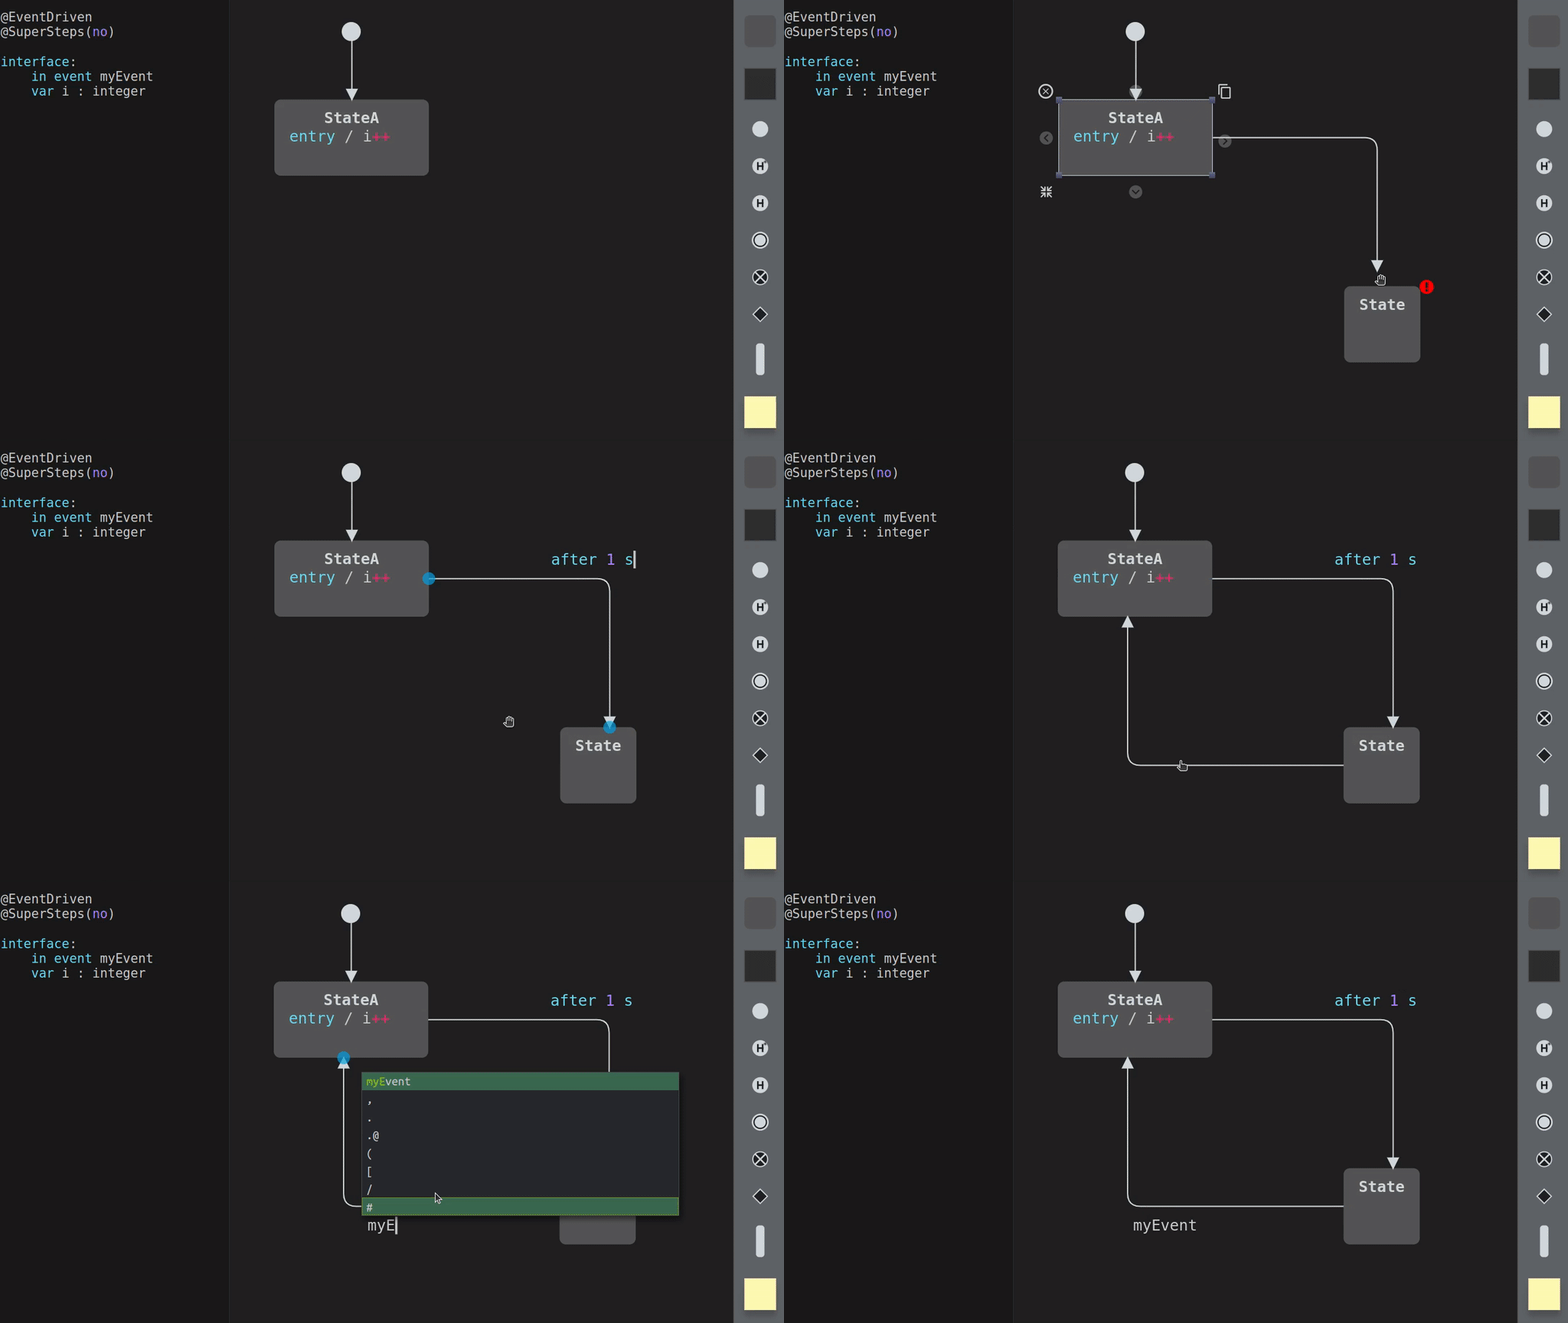
Key Features:
- Graphical Statechart Editing: Create, modify, and connect states and transitions effortlessly.
- Seamless Editor Integration: Integrate state machine editing directly into your VS Code workflow. The
.scm files are recognized as statechart models, and you can edit them as part of your regular development cycle, with itemis CREATE providing the full modeling, simulation, and code-generation functionality.
- Real-Time Validation: Avoid mistakes as you work. itemis CREATE provides instant feedback by validating your model in real time. Errors and warnings are highlighted, guiding you to resolve issues early in the development process.
- Syntax and Semantics Checks: Ensure your models adhere to the rules of statecharts and reflect your intended system logic. This reduces costly debugging later on.
- Consistent Documentation: Automatically maintain clear and consistent documentation of your system's design as part of your modeling workflow.
By enabling rapid iterations and immediate feedback, the Editing & Validation tools empower you to design robust systems with confidence and precision, laying the foundation for successful simulations, testing, and code generation.
Simulation
Time and cost pressures often result in loss of quality. Especially in embedded systems, program errors are getting more expensive the later they are detected; and even worse, they can harm lives.
With itemis CREATE, you can simulate and test your system’s behavior – before writing a single line of code! This dramatically speeds up your code-compile-test cycles.
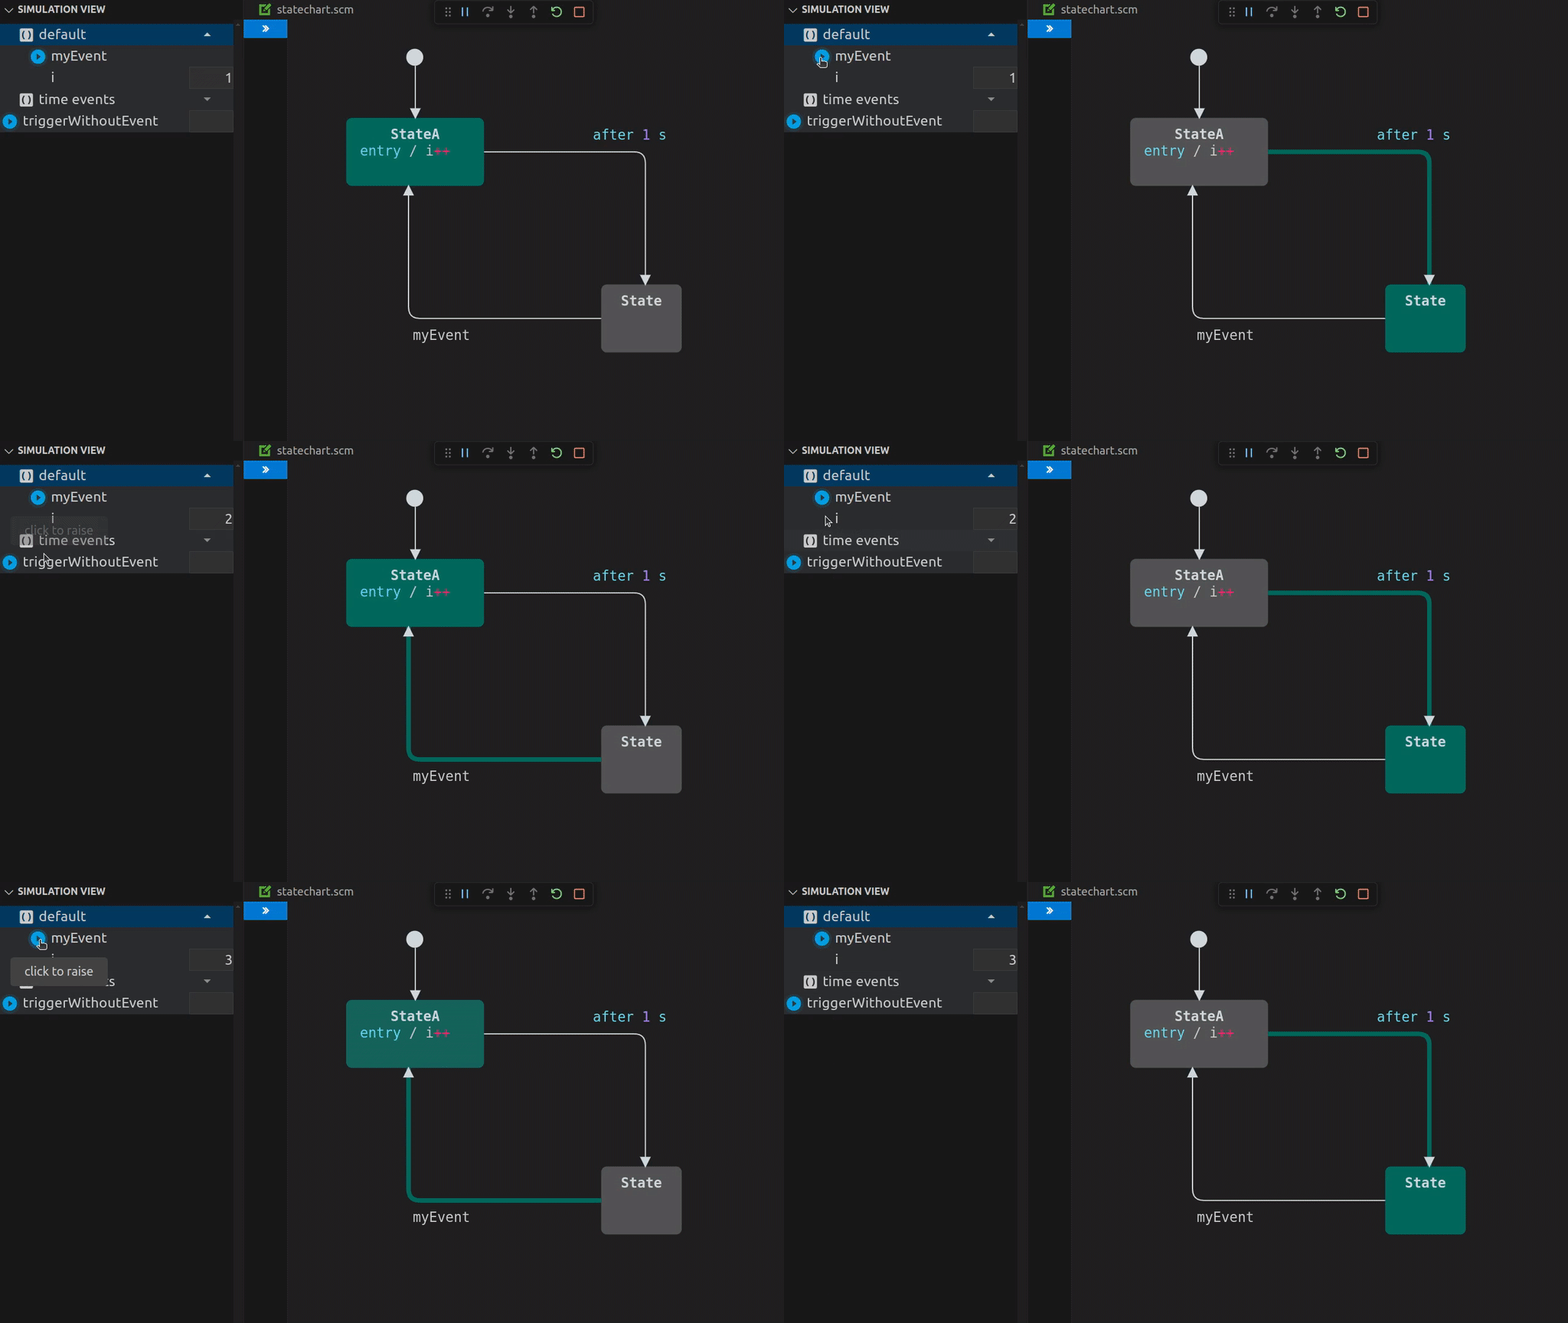
Key Features:
- State Machine Simulation: Simulate your state machine directly within itemis CREATE to visualize and validate its behavior in real time.
- Debug Integration: Integrate simulation directly into your VS Code workflow using
launch.json. You can start the simulation as part of your normal debugging and development cycle, providing a streamlined approach for testing and iterating your state machine models.
- Event Triggering: Raise events manually during the simulation to test how your system reacts to different inputs and scenarios.
- Variable Management: Set and read the values of variables on the fly, ensuring your system's logic is functioning as expected under various conditions.
- Debugging Support: Monitor the current state, active transitions, and variable changes during the simulation, enabling efficient debugging and fine-tuning of your model.
- Interactive Exploration: Explore alternative scenarios and edge cases dynamically without needing to compile or deploy code.
These features ensure that your state machine behaves as intended, helping you catch and resolve issues early in the design process.
Code Generation
Handwritten code needs to be continuously quality assured by time-consuming code reviews to comply with the desired industry coding standards for safety-critical systems. Any change in domain logic may lead to new errors. Especially under time pressure, this becomes a problem for software developers.
With itemis CREATE, this is no longer needed. Your state machine is automatically translated into high-quality source code for different target platforms – no matter if it’s C, C++, Java, or Python. And because state machines are platform-independent, your system is future-proof even if your underlying technology changes.
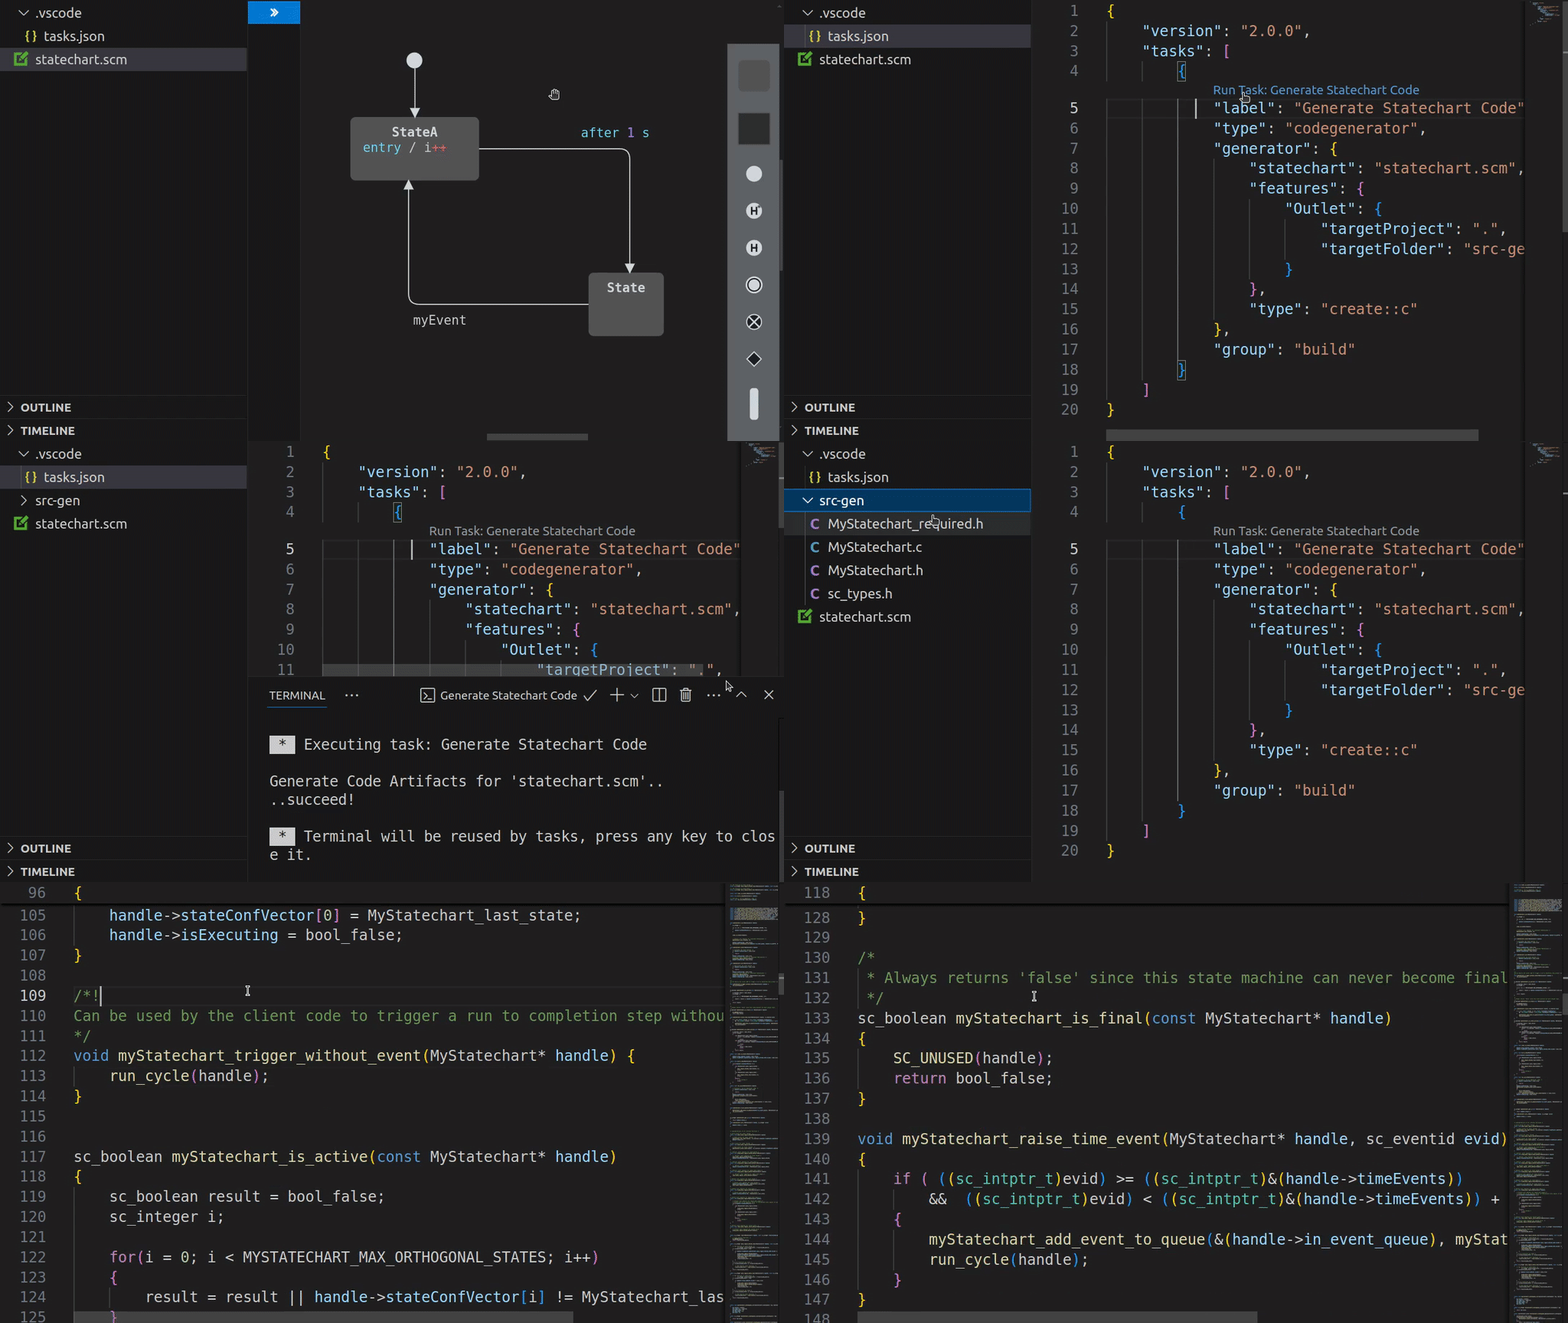
Key Features:
- Multi-Language Code Generation: Automatically generate high-quality code for C, C++, Java, and Python from the same model, ensuring flexibility across different platforms and projects.
- Workflow Integration: Easily integrate the code generation process into your VS Code workflow. With
tasks.json, you can incorporate code generation into your build process, making it a natural part of your regular development cycle.
- Consistent Model-to-Code Workflow: Any changes made to the model are instantly reflected in the generated code, eliminating the need for manual implementation and reducing errors.
- Tested Code: The generated code is designed to follow best practices and high-quality standards, ensuring reliability and consistency for a wide range of applications.
- Time-Saving Automation: Skip time-consuming manual coding processes. With just a few clicks, create platform-independent, production-ready code that aligns perfectly with your model logic.
This approach allows you to focus on designing robust systems while relying on itemis CREATE to handle the implementation details, accelerating your development process and ensuring high-quality results.
Getting Started
This section provides a practical guide to help you get started with creating, simulating, and generating code from statecharts using itemis CREATE. You’ll learn how to set up your first statechart, simulate its behavior, generate production-ready code, and explore pre-built examples:
- Statechart Modeling: Create and edit statecharts with an intuitive graphical editor.
- Simulation: Validate your statechart behavior in real-time.
- Code Generation: Generate high-quality code in multiple languages from your models.
- Examples: Explore prebuilt examples to understand best practices and use cases.
Follow the steps below to get started with creating statecharts, running simulations, generating code, and exploring examples.
Create a Statechart
To create a statechart, follow these steps:
- Add a New File: Create a new file in your workspace with the
.scm extension. An initial statechart will be automatically generated for you.
- Edit the Statechart:
- Open the statechart file to access the graphical editor.
- Use the Properties View in the itemis CREATE panel to customize elements like states, transitions, priorities, and more.
Start a Simulation
You can simulate your statechart in two ways:
Using the Graphical Editor:
- Open your statechart file.
- Click the Run Simulation button (green arrow icon) in the editor toolbar to start the simulation.
Using a launch.json Configuration:
- Add the following configuration to your
launch.json file to your .vscode folder:
{
  "version": "0.2.0",
  "configurations": [
    {
      "type": "simulation",
      "request": "launch",
      "name": "Simulate Statechart",
      "statechart": "<path to your statechart>",
    },
  ],
}
- Open the Run and Debug view in VS Code and select the simulation task to run.
When the simulation starts, VS Code automatically switches to the Run and Debug View. Alongside the standard panels — Variables, Watch, Call Stack, and Breakpoints — a dedicated Simulation View is available. This view provides powerful tools to:
- Raise events dynamically.
- Inspect and modify variable values in real-time, enabling in-depth testing and debugging.
Additionally, a control bar for your session appears, offering options such as Restart and Stop to manage your simulation easily. You can even run multiple simulation sessions in parallel, making it possible to test and compare different scenarios simultaneously.
Generate Code
Code generation is handled through a tasks.json file, which also must be located in your .vscode folder. Add the following configuration to your tasks.json:
{
  "version": "2.0.0",
  "tasks": [
    {
      "label": "Code Generator",
      "type": "codegenerator",
      "generator": {
        "statechart": "<path to your statechart>",
        "features": {
          "Outlet": {
            "targetProject": ".",
            "targetFolder": "src-gen",
          },
        },
        "type": "create::<language>",
      },
      "group": "build",
    },
  ],
}
Supported languages include C, C++, Java, and Python. For a full list of supported features and configurations, refer to the documentation.
Once configured, you can execute the task using the Terminal > Run Task command or by integrating it into your build process or you can open the tasks.json file and click on Run Task: Code Generator.
Open an Example
An Examples View is included in the itemis CREATE View, providing a convenient way to explore and learn from pre-built examples.
To get started:
- Open the Examples View in the itemis CREATE View.
- Browse the tree view, which organizes examples by categories.
- Select an example to open its description in an integrated webview.
A webview displays a detailed description of the example, outlining its purpose and functionality. If you want to work with the example, click the Open button next to it in the tree view:
- Select the destination folder. The dialog starts in your current workspace folder.
- Confirm or change the name of the example folder. The suggested name is a short form of the example's name, for example
basic-tutorial. If a folder with that name already exists in the destination, the next free name is suggested, for example basic-tutorial-2. The example is copied into this new folder, so existing files are never overwritten.
- Choose whether to open the example folder in a new window or in the current window, or keep working in your current workspace.
You can then explore and modify the copy as needed. The original in the examples repository stays unchanged.
These examples serve as practical demonstrations of itemis CREATE's features and are valuable for both beginners and advanced users. They not only help new users get started but also provide hands-on examples for advanced use cases, such as integrating the generated code into embedded systems and other complex scenarios.
Documentation
For more detailed information on itemis CREATE and how to leverage its full potential, please explore the documentation:
User Guide - The complete documentation that covers the basics and advanced concepts of state machines, including what statecharts are, the different elements (states, transitions, choices, etc.), execution semantics, and much more:
Tutorials - Step-by-step tutorials to help you get started with itemis CREATE, from basic modeling to advanced simulations.
Examples - A collection of examples to demonstrate how to use itemis CREATE in various scenarios. These examples are also accessible through the VS Code extension.
These resources provide comprehensive guidance to enhance your experience and expertise with itemis CREATE.
Relase Notes
For detailed information on the latest updates and changes to itemis CREATE, please refer to the official release notes: itemis CREATE Release Notes.
For VS Code-specific release notes, including updates and bug fixes related to the extension, please check the Changelog.
Licenses and Pricing
itemis CREATE for Visual Studio Code is proprietary software of itemis AG. You can install the extension free of charge. It uses a cloud-based service, which requires an account and an active itemis CREATE license. A test license is automatically active for 30 days.
Your use of the extension and the service is governed by the itemis SaaS terms:
See LICENSE.txt and all current legal documents.
Data & Privacy
The extension works together with the itemis CREATE cloud service, which is hosted on Amazon Web Services in Frankfurt (EU). The extension transfers and stores the following data:
- Sign-in: you sign in with your itemis CREATE account through Amazon Cognito. The resulting access and refresh tokens are stored in your IDE's secret storage on your computer.
- Account and subscription: the extension retrieves your user information and subscription status from the itemis CREATE service.
- Models: to validate and simulate statecharts, convert models and generate code, the extension sends the statechart and the code generator configuration to the itemis CREATE service. Generated code is written to your workspace.
- Subscription management: checkout and the billing portal open in your browser.
- Examples: when the extension starts and when you refresh the Examples View, the public examples repository is cloned or updated from GitHub into the storage location on your computer (see Storage Location). Opening an example copies it from there.
The extension does not collect telemetry or usage analytics. Which data the service stores, for what purposes, with whom it is shared and for how long it is kept is described in the Privacy Policy.
Settings
The following settings allow you to customize the behavior of the itemis CREATE extension in Visual Studio Code. You can adjust the drawing canvas, examples repository, and more according to your preferences.
Show Grid
- ID:
itemis-create.showGrid
- Type: Boolean
- Default:
false
- Description: This setting determines whether the grid will be displayed on the drawing canvas. Enabling it helps in aligning objects more easily by providing a visual reference.
Grid Size
- ID:
itemis-create.gridSize
- Type: Number
- Default:
10
- Description: The grid size defines the spacing between grid lines on the drawing canvas. A smaller value will provide a finer grid, while a larger value will result in a coarser grid.
Enable Snaplines
- ID:
itemis-create.enableSnaplines
- Type: Boolean
- Default:
true
- Description: When enabled, snaplines will appear on the drawing canvas, helping you align objects with precision. This can be useful for organizing components or ensuring consistent spacing.
Show Priorities
- ID:
itemis-create.showPriorities
- Type: Boolean
- Default:
true
- Description: This setting controls whether priority labels are shown on transitions and regions. Enabling it makes it easier to see and manage priorities in state machines.
Storage Location
- ID:
itemis-create.examples.storageLocation
- Type: String
- Default:
create_vscode_examples
- Description: Specifies the local path where the cloned examples repository will be stored. Relative paths are appended to the user's home directory, while absolute paths are used as specified.
Remote Location
- ID:
itemis-create.examples.remoteLocation
- Type: String
- Default:
https://github.com/itemisCREATE/examples
- Description: This setting defines the remote URL where the examples repository is hosted. The default location points to the GitHub repository for itemis CREATE examples.
Remote Branch
- ID:
itemis-create.examples.remoteBranch
- Type: String
- Default:
vscode-release5
- Description: The remote branch setting specifies which branch of the remote repository to use. The default branch is
vscode-release5, but it can be changed to any valid branch.
Localhost Sign-In Callback
ID: itemis.create.auth.localhostCallback
Type: Boolean
Default: false
Description: Signing in to itemis CREATE opens your browser. After a successful sign-in, the browser returns to the IDE through the IDE's own URI scheme (for example vscode:// or cursor://). If the browser does not return to your IDE after signing in, enable this setting. The extension then receives the sign-in on a local port instead, using the first free port from 29317 to 29326 on localhost. Some IDEs, such as Code Composer Studio, always use this method.
Notes:
- The setting applies to your user settings and is not stored in the workspace.
- Only connections from your own computer are accepted, and the port is closed as soon as the sign-in completes, fails or times out.
- The setting has no effect in remote sessions (Remote-SSH, WSL, Dev Containers), because the browser can't reach a port on the remote machine. There, the IDE's URI scheme is always used.
- Signing out with the command itemis CREATE: Sign Out returns to the IDE the same way.
- Signing in fails if all ten ports are in use by other programs.
Supported IDEs
The extension runs in Visual Studio Code and in other IDEs that support Visual Studio Code extensions:
- Visual Studio Code
- Visual Studio Code forks such as Cursor, Windsurf, VSCodium, Kiro or Positron
- IDEs based on Eclipse Theia, including the Theia IDE and TI Code Composer Studio (CCS)
If the extension is not available in your IDE's extension marketplace, install it from its .vsix file with the command Extensions: Install from VSIX....
The features are the same in all of these IDEs. Differences you may notice:
- Configuration files: Theia-based IDEs read
tasks.json and launch.json from the .theia folder as well as from .vscode. The extension uses whichever of the two exists. If neither exists, it creates the file in .theia in Theia-based IDEs and in .vscode in all other IDEs.
- Sign-in: after you sign in, the browser returns to your IDE through the IDE's own URI scheme, for example
vscode:// or cursor://. Code Composer Studio receives the sign-in on a local port instead. If the browser doesn't return to your IDE, see Localhost Sign-In Callback.
- Remote sessions: Remote-SSH, WSL and Dev Containers are supported.
- Browser-based editors such as vscode.dev, GitHub Codespaces in the browser or code-server are not supported yet.