🤖 Commity - VS Code Extension
A VS Code extension that generates intelligent Git commit messages using OpenAI with dynamic emoji selection.
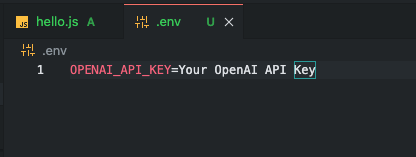
Add your OpenAI API key to the .env file
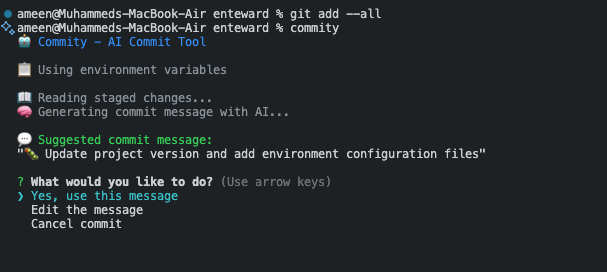
Run the commity command in terminal
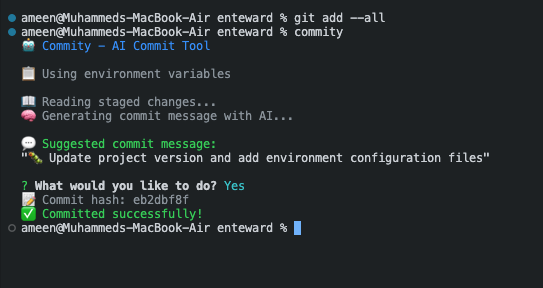
View the AI-generated commit message and successful commit
✨ Features
- 🎯 Dynamic Emoji Selection: Automatically detects change types and adds appropriate emojis
- 🧠 AI-Powered: Uses OpenAI GPT models to generate intelligent commit messages
- 💬 Interactive: Shows suggested message with options to use, edit, or cancel
- 🔒 Secure: API key stored securely in VS Code settings
- ⚡ Fast: Lightweight and efficient
- 🔗 CLI Integration: Use the same settings from command line with
commity command
🚀 Installation
Method 1: Install from VSIX (Recommended)
Download the extension:
# Clone this repository
git clone <repository-url>
cd commity/vscode-extension

# Install dependencies
npm install

# Build the extension
npm run compile

# Package the extension
npx vsce package
Install in VS Code:
- Open VS Code
- Go to Extensions (Ctrl+Shift+X)
- Click the "..." menu and select "Install from VSIX..."
- Select the generated
.vsix file
Method 2: Install from Source
Clone and build:
git clone <repository-url>
cd commity/vscode-extension
npm install
npm run compile
Install in development mode:
# In VS Code, press F5 to run the extension in a new window
# Or use the command palette: "Developer: Reload Window"
⚙️ Configuration
1. Get OpenAI API Key
- Go to OpenAI Platform
- Create a new API key
- Copy the key (starts with
sk-)
Open VS Code Settings:
- Press
Ctrl+, (Windows/Linux) or Cmd+, (Mac)
- Or go to File → Preferences → Settings
Search for "Commity" and configure:
- OpenAI API Key: Paste your API key
- OpenAI Model: Choose your preferred model (default: gpt-4o-mini)
- Enable Emojis: Toggle emoji support (default: true)
3. Alternative: Settings JSON
Add to your settings.json:
{
  "commity.openaiApiKey": "sk-your-actual-api-key-here",
  "commity.openaiModel": "gpt-4o-mini",
  "commity.enableEmojis": true
}
🎯 Usage
VS Code Extension Usage
Stage your changes:
git add <files>
Generate commit message:
- Press
Ctrl+Shift+P (Windows/Linux) or Cmd+Shift+P (Mac)
- Type "Generate AI Commit Message"
- Select the command
Review and commit:
- The extension will show the suggested message
- Choose "Use This Message", "Edit Message", or "Cancel"
CLI Integration
After installing the VS Code extension and configuring your API key, you can also use Commity from the command line:
Install CLI tool:
./install-cli.sh
Use from command line:
git add <files>
commity
The CLI tool will automatically use the same API key and settings configured in VS Code!
Command Palette
Ctrl+Shift+P → "Generate AI Commit Message"
Keyboard Shortcut (Optional)
Add to keybindings.json:
{
  "key": "ctrl+shift+g",
  "command": "commity.generateCommit",
  "when": "gitOpenRepositoryCount != 0"
}
🎨 Emoji Categories
The extension automatically selects emojis based on your changes:
- 🐛 Bug Fixes:
fix, bug, error, issue, problem, exception
- ✨ Features:
add, new, create, implement, introduce
- 📚 Documentation:
readme, docs, documentation, comment
- ⚡ Performance:
performance, optimize, speed, cache
- ♻️ Refactoring:
refactor, restructure, clean, improve
- 🧪 Testing:
test, spec, unit, integration, coverage
- ⚙️ Configuration:
config, setting, env, package.json
- 🔒 Security:
security, vulnerability, auth, password
- 🎨 UI/UX:
ui, ux, style, css, design
- 🗄️ Database:
database, db, sql, migration
- 🔌 API:
api, endpoint, route, controller
- 🚀 Deployment:
deploy, ci, cd, pipeline, docker
- 📦 Dependencies:
package.json, dependencies, npm
- 📝 General: Default for other changes
🔧 Troubleshooting
Common Issues
"OpenAI API key not configured"
- Go to VS Code Settings
- Search for "Commity"
- Enter your OpenAI API key
"No staged changes found"
- Stage files first:
git add <files>
- Check git status:
git status
"Invalid OpenAI API key"
- Verify your API key starts with
sk-
- Check that you have credits in your OpenAI account
- Ensure the key is correctly copied
"Not in a Git repository"
- Make sure you're in a Git repository
- Initialize Git:
git init
Error Messages
- 401 Unauthorized: Invalid API key
- 429 Rate Limited: Too many requests, wait and try again
- 500 Server Error: OpenAI service issue, try again later
🛠️ Development
Building the Extension
# Install dependencies
npm install

# Compile TypeScript
npm run compile

# Watch for changes
npm run watch

# Package for distribution
npx vsce package
Project Structure
vscode-extension/
├── src/
│   ├── extension.ts    # Main extension logic
│   ├── ai.ts          # OpenAI integration
│   └── git.ts         # Git operations
├── package.json       # Extension manifest
├── tsconfig.json      # TypeScript config
└── README.md         # This file
📝 License
MIT License - feel free to use and modify as needed!
🤝 Contributing
- Fork the repository
- Create a feature branch
- Make your changes
- Test thoroughly
- Submit a pull request
🚀 Future Enhancements
- Support for conventional commit formats
- Local AI model support (Ollama)
- Custom prompt templates
- GitLens integration
- Multi-language support
- Team collaboration features
| |