VerifyLens for VS Code and Cursor
See per requirement whether an AI-generated change is verified, different, or not yet verified — right next to your code.
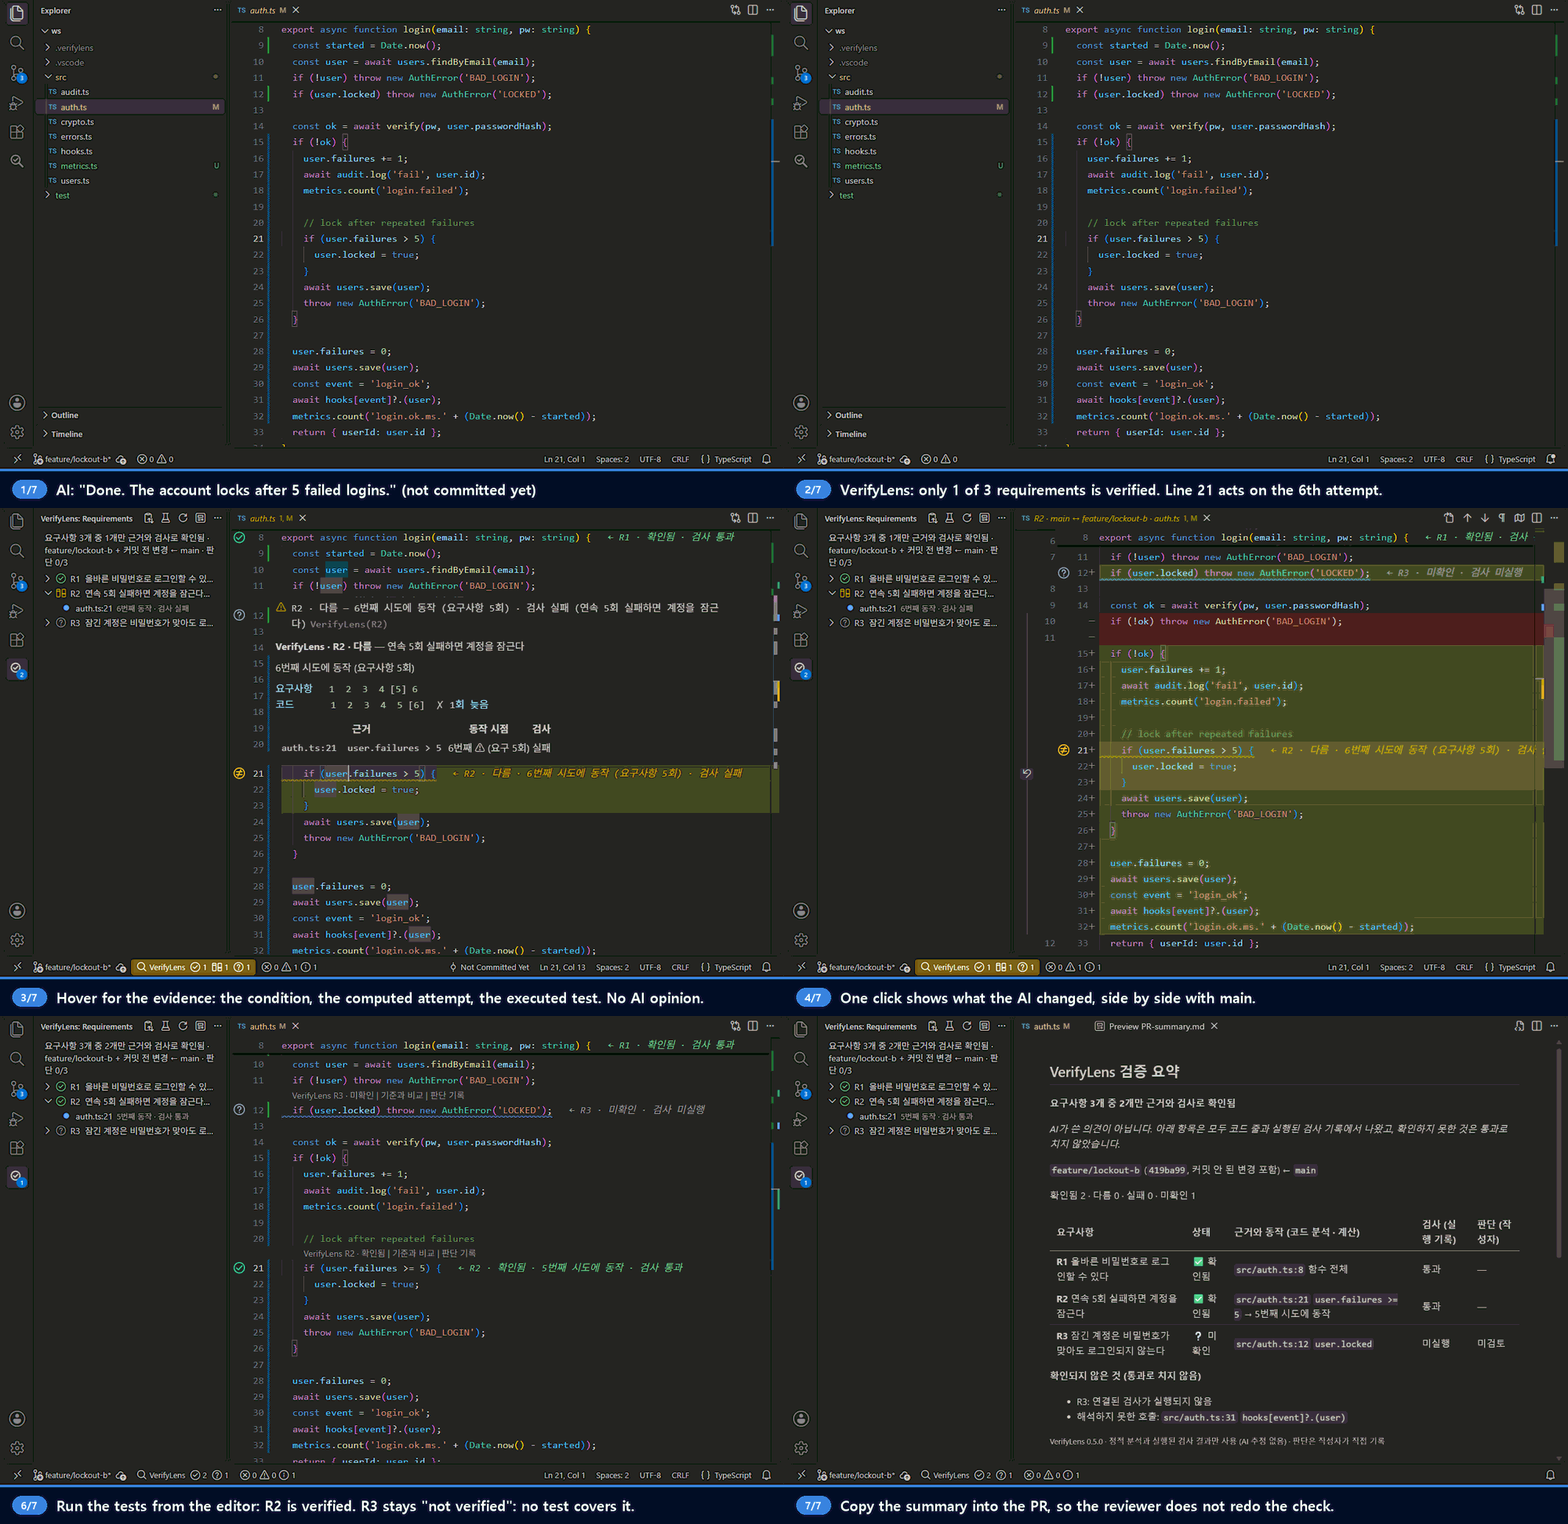
AI tools say "Done, all requirements implemented." VerifyLens checks that claim against your git diff and the tests that actually ran, and shows the result in a side panel, as highlighted lines, and as a lens above the code that decides each requirement.
- No LLM, and your code never leaves your machine. Static analysis (TypeScript compiler API) + git + your JUnit test results, all local. The only optional network use is Import requirements, which reads a PR's or issue's text through your own
gh.
- Unknown stays unknown. No test or an unresolved call means "not verified", never "looks fine".
- You decide. Every mark links back to the code line or test that produced it.
v0 preview: analyzes TypeScript and JavaScript. The report text is currently Korean.
Editors: checked on VS Code 1.146 and on Cursor 3.29 (the same .vsix; the integration tests pass there too). In Cursor, use the editor window: extensions are not loaded in Cursor's agent window. Other VS Code–based editors (Windsurf, VSCodium) should accept the same file but have not been checked.
Try it in 10 seconds
- Click the VerifyLens icon in the Activity Bar.
- Click 샘플로 해 보기 (Run demo).
The demo builds a small sample repo with two AI results for "lock the account after 5 failed logins". Result A uses failures >= 5, result B uses failures > 5. Both claim to be done. VerifyLens shows:
- Requirements panel: R1 verified, R2 different, R3 not verified, with a badge for how many need attention.
- In the editor: the deciding line gets a status icon and a note at its end, for example
← R2 · 다름 · 6번째 시도에 동작 (요구사항 5회) · 검사 실패. Hover it for the evidence table and the failing test's message.
- Side by side: click
A ↔ B 비교 above the line (or the compare icon in the list) to open VS Code's own diff editor at the line where the two results diverge.
- Problems panel: lines that need attention are listed there, so
F8 walks through them.
- Report panel: the full evidence chain. Click any code line in it to jump to that line in the editor.
- Your decision: record use / fix / verify more / hold from the list, the lens or the report. It shows next to the requirement.
- PR summary: the clipboard icon copies a GitHub-markdown summary (status, evidence line, when it acts, test result, your decision, what is still not verified) to paste into the PR, so the reviewer does not redo the check.
The demo runs its tests with Node.js 22.18+ if it finds one, and otherwise uses bundled test results.
Use it on your branch
- Fill in the requirements. Run VerifyLens: Import requirements to pull them from the current branch's GitHub PR and its linked issues, from an issue number, or from text you copied (Jira, Linear, chat). Or run VerifyLens: Create requirements file and type them. Either way you get
.verifylens/requirements.md:
- R1: Users can log in with the right password
- R2: Lock the account after 5 consecutive failures
Plain sentences are enough: English is linked by its own words, Korean through a fixed glossary (no LLM), and numbers are checked against conditions. If a requirement lands on the wrong code, append | keywords: words, in, the, code. Read the imported list before trusting it; it is extracted by rules (sections such as "Acceptance criteria" / "요구사항", checklists, "must / ~해야 한다" sentences, or just the title).
- Run VerifyLens: Check my changes. No commit needed: it looks at your working tree, including uncommitted edits and new files, against the base branch (
main / master / the remote default is picked for you).
After that it keeps itself up to date: save a file, let an AI agent write one, commit, or edit the requirements, and the result refreshes on its own.
- Click the beaker icon (VerifyLens: Run tests and re-check). It detects Vitest, Jest or
node --test from package.json, runs them, reads the report and re-checks. For another runner set verifylens.testCommand. Test results that are older than the code are not used: a pass from before your edit proves nothing about the code as it is now.
- To compare two AI attempts, run VerifyLens: Compare two branches (committed changes).
If your CI already writes a report, point verifylens.junitPath at it (JUnit XML, or Jest/Vitest JSON).
Settings
| Setting |
Default |
|
verifylens.baseBranch |
(ask) |
Branch to compare against |
verifylens.requirementsFile |
.verifylens/requirements.md |
Requirements file, relative to the repo root |
verifylens.junitPath |
.verifylens/test-report.xml |
Test report to read and write (JUnit XML or Jest/Vitest JSON) |
verifylens.testCommand |
(detect) |
Command that runs the tests and writes the report to ${report} |
verifylens.includeUncommitted |
true |
Check uncommitted changes too, and re-check on save |
verifylens.nodePath |
node |
Node.js used to run the demo's tests |
verifylens.autoRerun |
true |
Re-run on commit, branch switch, or when the requirements file or JUnit report changes |
verifylens.inlineNotes |
true |
Show the note at the end of evidence lines |
verifylens.problems |
true |
List lines that need attention in the Problems panel |
verifylens.summaryLanguage |
ko |
Language of the copied PR summary (ko or en) |
verifylens.ghPath |
gh |
GitHub CLI used by Import requirements |
Limitations
- Comparing two branches looks at committed changes only.
- The flagship check is numeric: "after 5 failures" against
failures > 5. Other logic errors are caught only if a linked test fails.
- Requirement ↔ code linking is rule-based and can be wrong; the report shows why each line was picked.
- TypeScript and JavaScript only.
Source, issues and feedback: https://github.com/DamunKorea/verifylens
한국어 요약
AI가 「완료」라고 한 변경이 요구사항마다 확인됨 · 다름 · 미확인인지 에디터 옆에서 보여 줍니다. LLM과 네트워크를 쓰지 않고, 코드는 PC 밖으로 나가지 않습니다.
- 처음 써 보기: 왼쪽 VerifyLens 아이콘을 누르고 샘플로 해 보기를 누르세요.
- 내 변경 확인: 이슈 · PR에서 가져오기(GitHub PR · 이슈 · 복사한 글)나 요구사항 파일 만들기로 요구사항을 채우고 지금 브랜치 확인을 누르세요. 커밋하지 않아도 됩니다. 그 뒤로는 저장할 때마다 스스로 다시 확인합니다.
- 테스트 실행: 목록 위 비커 아이콘을 누르면 Vitest · Jest · node:test 를 알아서 돌리고 결과를 반영합니다. 코드보다 오래된 테스트 결과는 쓰지 않습니다.
- AI 결과 두 개 비교: 두 브랜치 비교를 쓰세요.
근거가 된 줄에는 아이콘과 줄 끝 설명이 붙고, 마우스를 올리면 근거 표가 나옵니다. 줄 위 A ↔ B 비교를 누르면 VS Code 기본 비교 화면으로 두 결과를 나란히 봅니다. 확인이 필요한 줄은 문제(Problems) 목록에도 올라가서 F8로 넘겨 볼 수 있고, 판단(사용 · 수정 · 추가 검증 · 보류)은 목록에서 바로 기록합니다. 목록 위 클립보드 아이콘을 누르면 PR에 붙일 검증 요약(상태 · 근거 줄 · 동작 시점 · 검사 · 판단 · 아직 확인 안 된 것)이 복사됩니다.
| |