


A standalone VS Code extension for managing AWS SQS queues directly from your IDE. No backend required - communicates directly with AWS SQS using the AWS SDK.
Screenshots
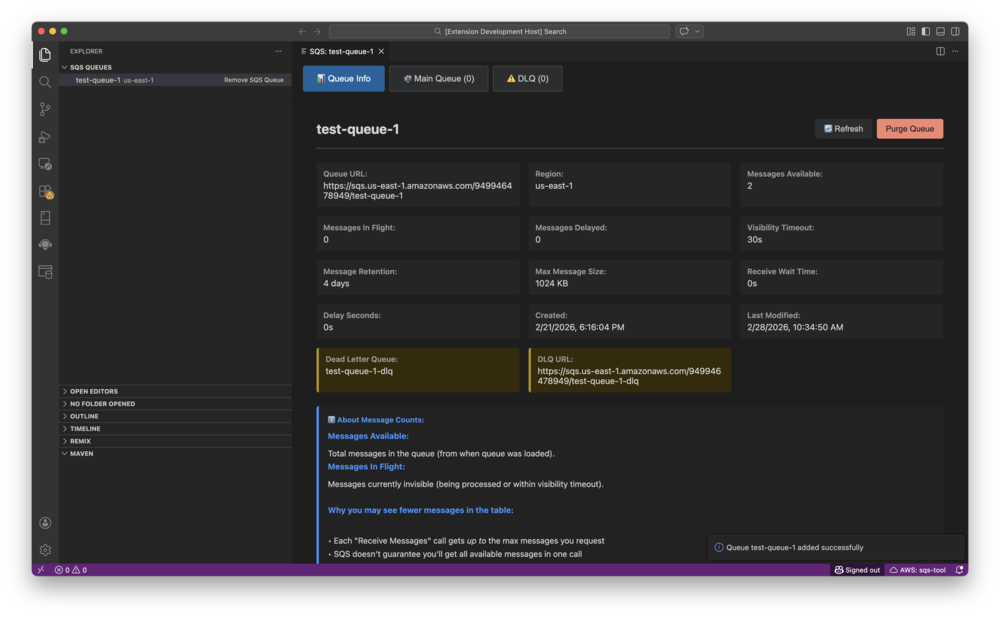
Queue Management
View queue details including message counts, DLQ configuration, and queue attributes.
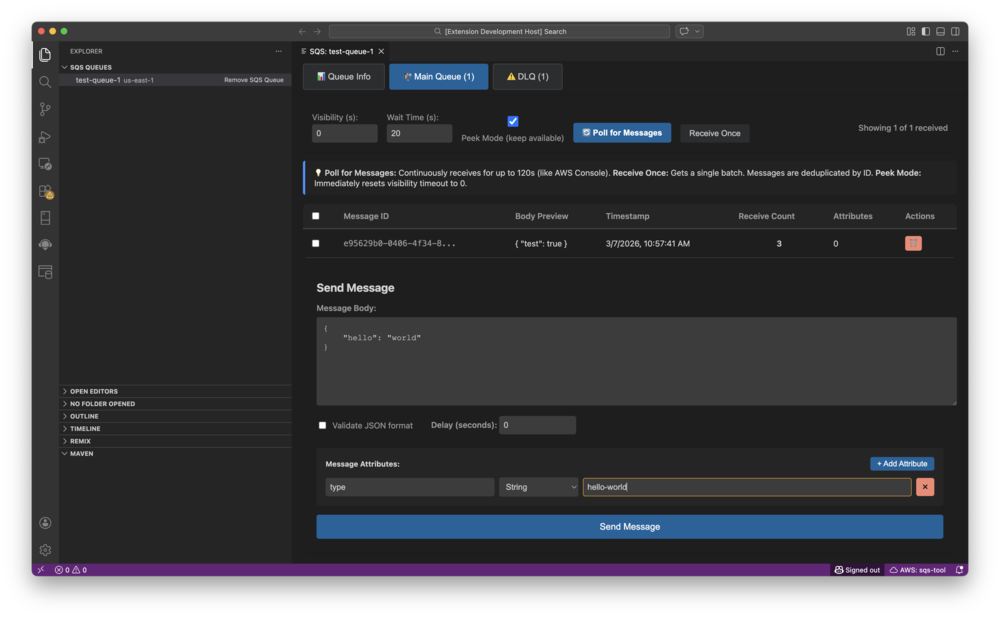
Message Composer
Send messages with custom attributes supporting all AWS SQS data types.
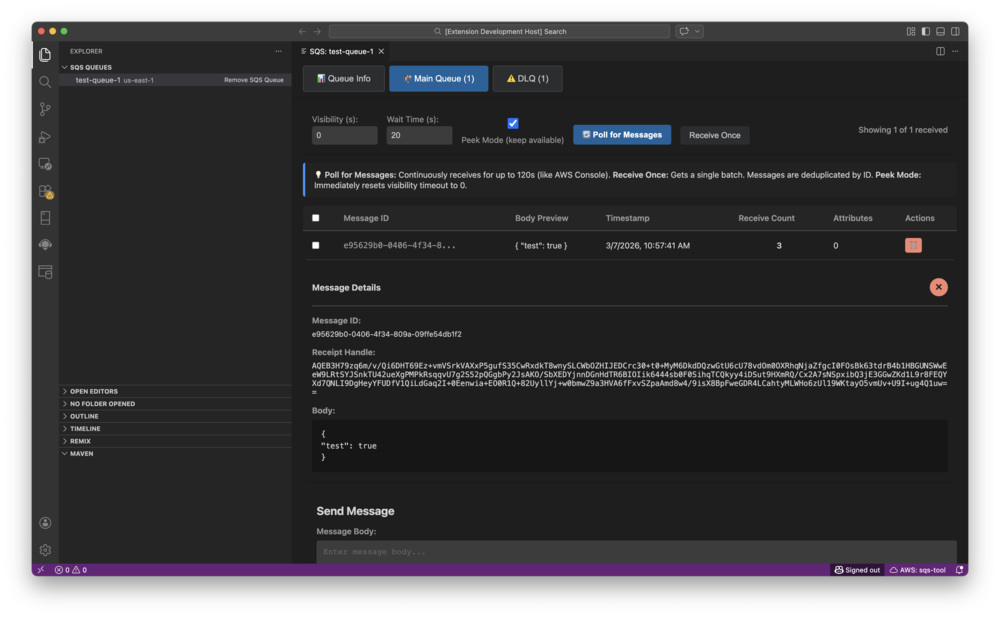
Message Details
View complete message details including body, attributes, and metadata.
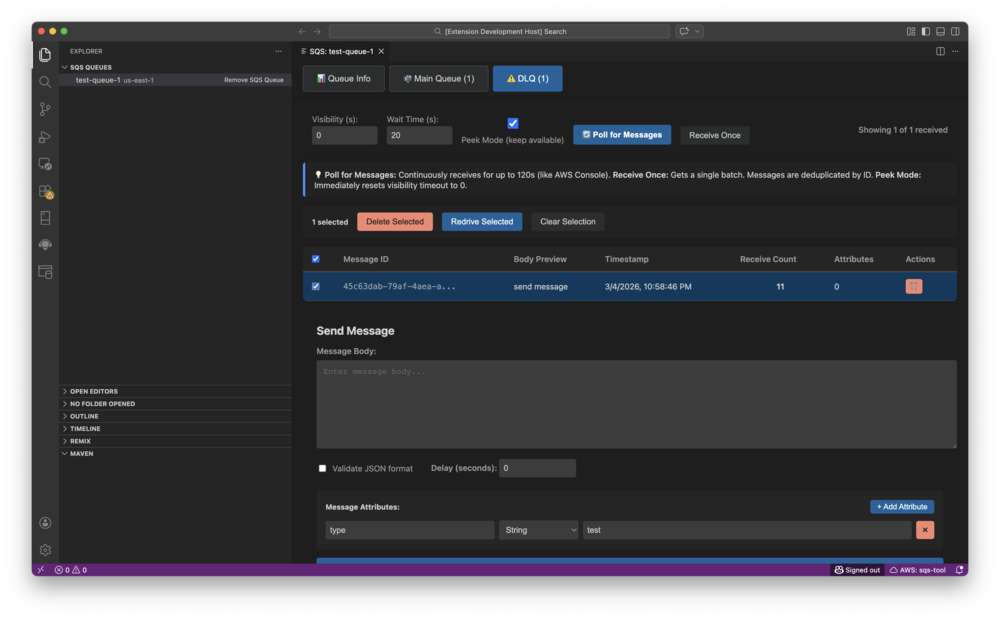
DLQ Redrive
Move messages from Dead Letter Queues back to source queues with progress tracking.
Features
- Direct AWS Integration: Connects directly to AWS SQS without requiring a separate backend service
- Manual Queue Entry: Add queues by name or URL - perfect for restrictive IAM environments without ListQueues permission
- Queue Discovery: Automatically discover queues when ListQueues permission is available
- Message Management: View, send, delete, and change visibility of messages
- DLQ Redrive: Move messages from Dead Letter Queues back to main queues with progress tracking
- Multi-Region Support: Manage queues across different AWS regions
- Secure Credential Storage: Supports multiple credential sources with secure VS Code SecretStorage
- Queue Organization: Group queues by region with visual indicators for standard, FIFO, and DLQ queues
Installation
- Install the extension from the VS Code Marketplace (coming soon)
- Configure your AWS credentials (see Configuration section below)
- Start managing your SQS queues!
Configuration
AWS Credentials
The extension supports multiple credential sources in the following priority order:
Environment Variables (highest priority)
AWS_ACCESS_KEY_IDAWS_SECRET_ACCESS_KEYAWS_SESSION_TOKEN (optional)
AWS Profile (from ~/.aws/credentials)
- Use the "Select AWS Profile" command to choose a profile
- The active profile is displayed in the status bar
VS Code SecretStorage (encrypted storage)
- Enter credentials manually when prompted
- Stored securely in VS Code's encrypted storage
IAM Roles (lowest priority)
- Automatically detected on EC2/ECS instances
Selecting an AWS Profile
- Click the AWS profile indicator in the status bar, or
- Open Command Palette (Cmd/Ctrl+Shift+P) and run "Select AWS Profile"
- Choose from available profiles in your
~/.aws/credentials file
Usage
Adding Queues
Option 1: Auto-Discovery (requires sqs:ListQueues permission)
On first activation, the extension will attempt to discover queues automatically. If successful, you'll be prompted to import them.
To manually trigger discovery:
- Open Command Palette (Cmd/Ctrl+Shift+P)
- Run "SQS: Discover Queues"
Option 2: Manual Entry (works without sqs:ListQueues)
Add by Queue Name:
- Click the "+" icon in the SQS Queues view
- Select "Add Queue by Name"
- Enter the queue name (e.g.,
my-queue or my-queue.fifo)
- The extension will resolve the queue URL automatically
Add by Queue URL:
- Click the "+" icon in the SQS Queues view
- Select "Add Queue by URL"
- Enter the full queue URL (e.g.,
https://sqs.us-east-1.amazonaws.com/123456789012/my-queue)
Managing Messages
- Click on a queue in the SQS Queues view to open the message viewer
- Use the toolbar buttons to:
- Receive messages from the queue
- Send new messages
- Delete selected messages
- Change message visibility timeout
- Purge the queue (delete all messages)
Redriving Messages from DLQ
- Select a Dead Letter Queue in the SQS Queues view
- Click "Redrive Messages"
- Choose to redrive all messages or a specific number
- Monitor progress with the cancellable progress indicator
Queue Operations
Right-click on a queue in the tree view to:
- Refresh queue attributes
- Copy queue URL to clipboard
- Remove queue from the list
Minimal IAM Permissions
The extension works with minimal IAM permissions. Here's what you need:
Required Permissions (core functionality)
{
  "Version": "2012-10-17",
  "Statement": [
    {
      "Effect": "Allow",
      "Action": [
        "sqs:GetQueueUrl",
        "sqs:GetQueueAttributes",
        "sqs:ReceiveMessage",
        "sqs:SendMessage",
        "sqs:DeleteMessage",
        "sqs:ChangeMessageVisibility"
      ],
      "Resource": "arn:aws:sqs:*:*:*"
    }
  ]
}
Optional Permissions (enhanced functionality)
{
  "Version": "2012-10-17",
  "Statement": [
    {
      "Effect": "Allow",
      "Action": [
        "sqs:ListQueues",
        "sqs:PurgeQueue"
      ],
      "Resource": "arn:aws:sqs:*:*:*"
    }
  ]
}
Note: Without sqs:ListQueues, you can still use the extension by manually adding queues by name or URL.
Troubleshooting
"Access Denied" Errors
If you see AccessDeniedException errors:
- Check that your IAM user/role has the required permissions (see above)
- Verify your credentials are correctly configured
- Check the Output panel (View → Output → "SQS Management Tool") for detailed error messages
"Queue Not Found" Errors
If you get QueueDoesNotExist errors:
- Verify the queue name is correct
- Ensure the queue exists in the selected AWS region
- Check that you have
sqs:GetQueueUrl permission
Network Errors
If you experience connection timeouts or DNS errors:
- Check your internet connection
- Verify firewall settings allow AWS SQS access
- Check if you need to configure a proxy
- Verify AWS service status at https://status.aws.amazon.com/
Credential Issues
If credentials are not working:
- Verify credentials are valid using AWS CLI:
aws sts get-caller-identity
- Check the active profile in the status bar
- Try manually entering credentials via "Select AWS Profile" → "Enter Credentials Manually"
Workspace vs Global Storage
By default, queues are stored globally across all workspaces. You can switch to workspace-specific storage:
- Open Command Palette (Cmd/Ctrl+Shift+P)
- Run "SQS: Toggle Workspace Storage"
- Choose between global and workspace storage
Import/Export Queue Configurations
Export Queues
- Click the export icon in the SQS Queues view toolbar
- Choose a location to save the JSON file
- All queue configurations will be exported
Import Queues
- Click the import icon in the SQS Queues view toolbar
- Select a previously exported JSON file
- Queues will be added to your current list
Security
- Credentials are never logged to the Output panel or Debug Console
- Credentials are never sent to the webview
- VS Code SecretStorage uses OS-level encryption
- All AWS communication uses HTTPS
- Request throttling: Maximum 5 concurrent requests per queue
- Queue refresh throttling: Once per 30 seconds per queue
- Queue storage limit: 1000 queues maximum
- Virtual scrolling for large message tables (>100 messages)
Requirements
- VS Code 1.88.0 or higher
- AWS account with SQS access
- Valid AWS credentials
Known Limitations
- Maximum 10 messages can be received per request (AWS SQS limitation)
- Message body size limited to 256 KB (AWS SQS limitation)
- Purge operation limited to once per 60 seconds per queue (AWS SQS limitation)
Development
This extension was built using modern AI-assisted development practices with Kiro, featuring:
- Spec-Driven Development: All features defined in formal specifications (see
.kiro/specs/)
- Property-Based Testing: Correctness verified through systematic testing
- AI Collaboration: Enhanced productivity while maintaining high code quality
- Comprehensive Documentation: Auto-generated docs with human refinement
This approach enabled rapid development of a production-ready extension with extensive test coverage and documentation.
Interested in the methodology? Check out our spec files to see the development process in action, or read about AI-assisted development for more details.
Support
For issues, feature requests, or contributions, please visit our GitHub repository.
License
MIT License - See LICENSE for details.
Changelog
See CHANGELOG.md for release history.