PlainText+ ~Outline & Highlight~
日本語 | English
PlainText+ について
「プレーンテキストのまま、ちょっと便利に」
新しい記法を覚えたり、プレビューと行ったり来たりすることはありません。
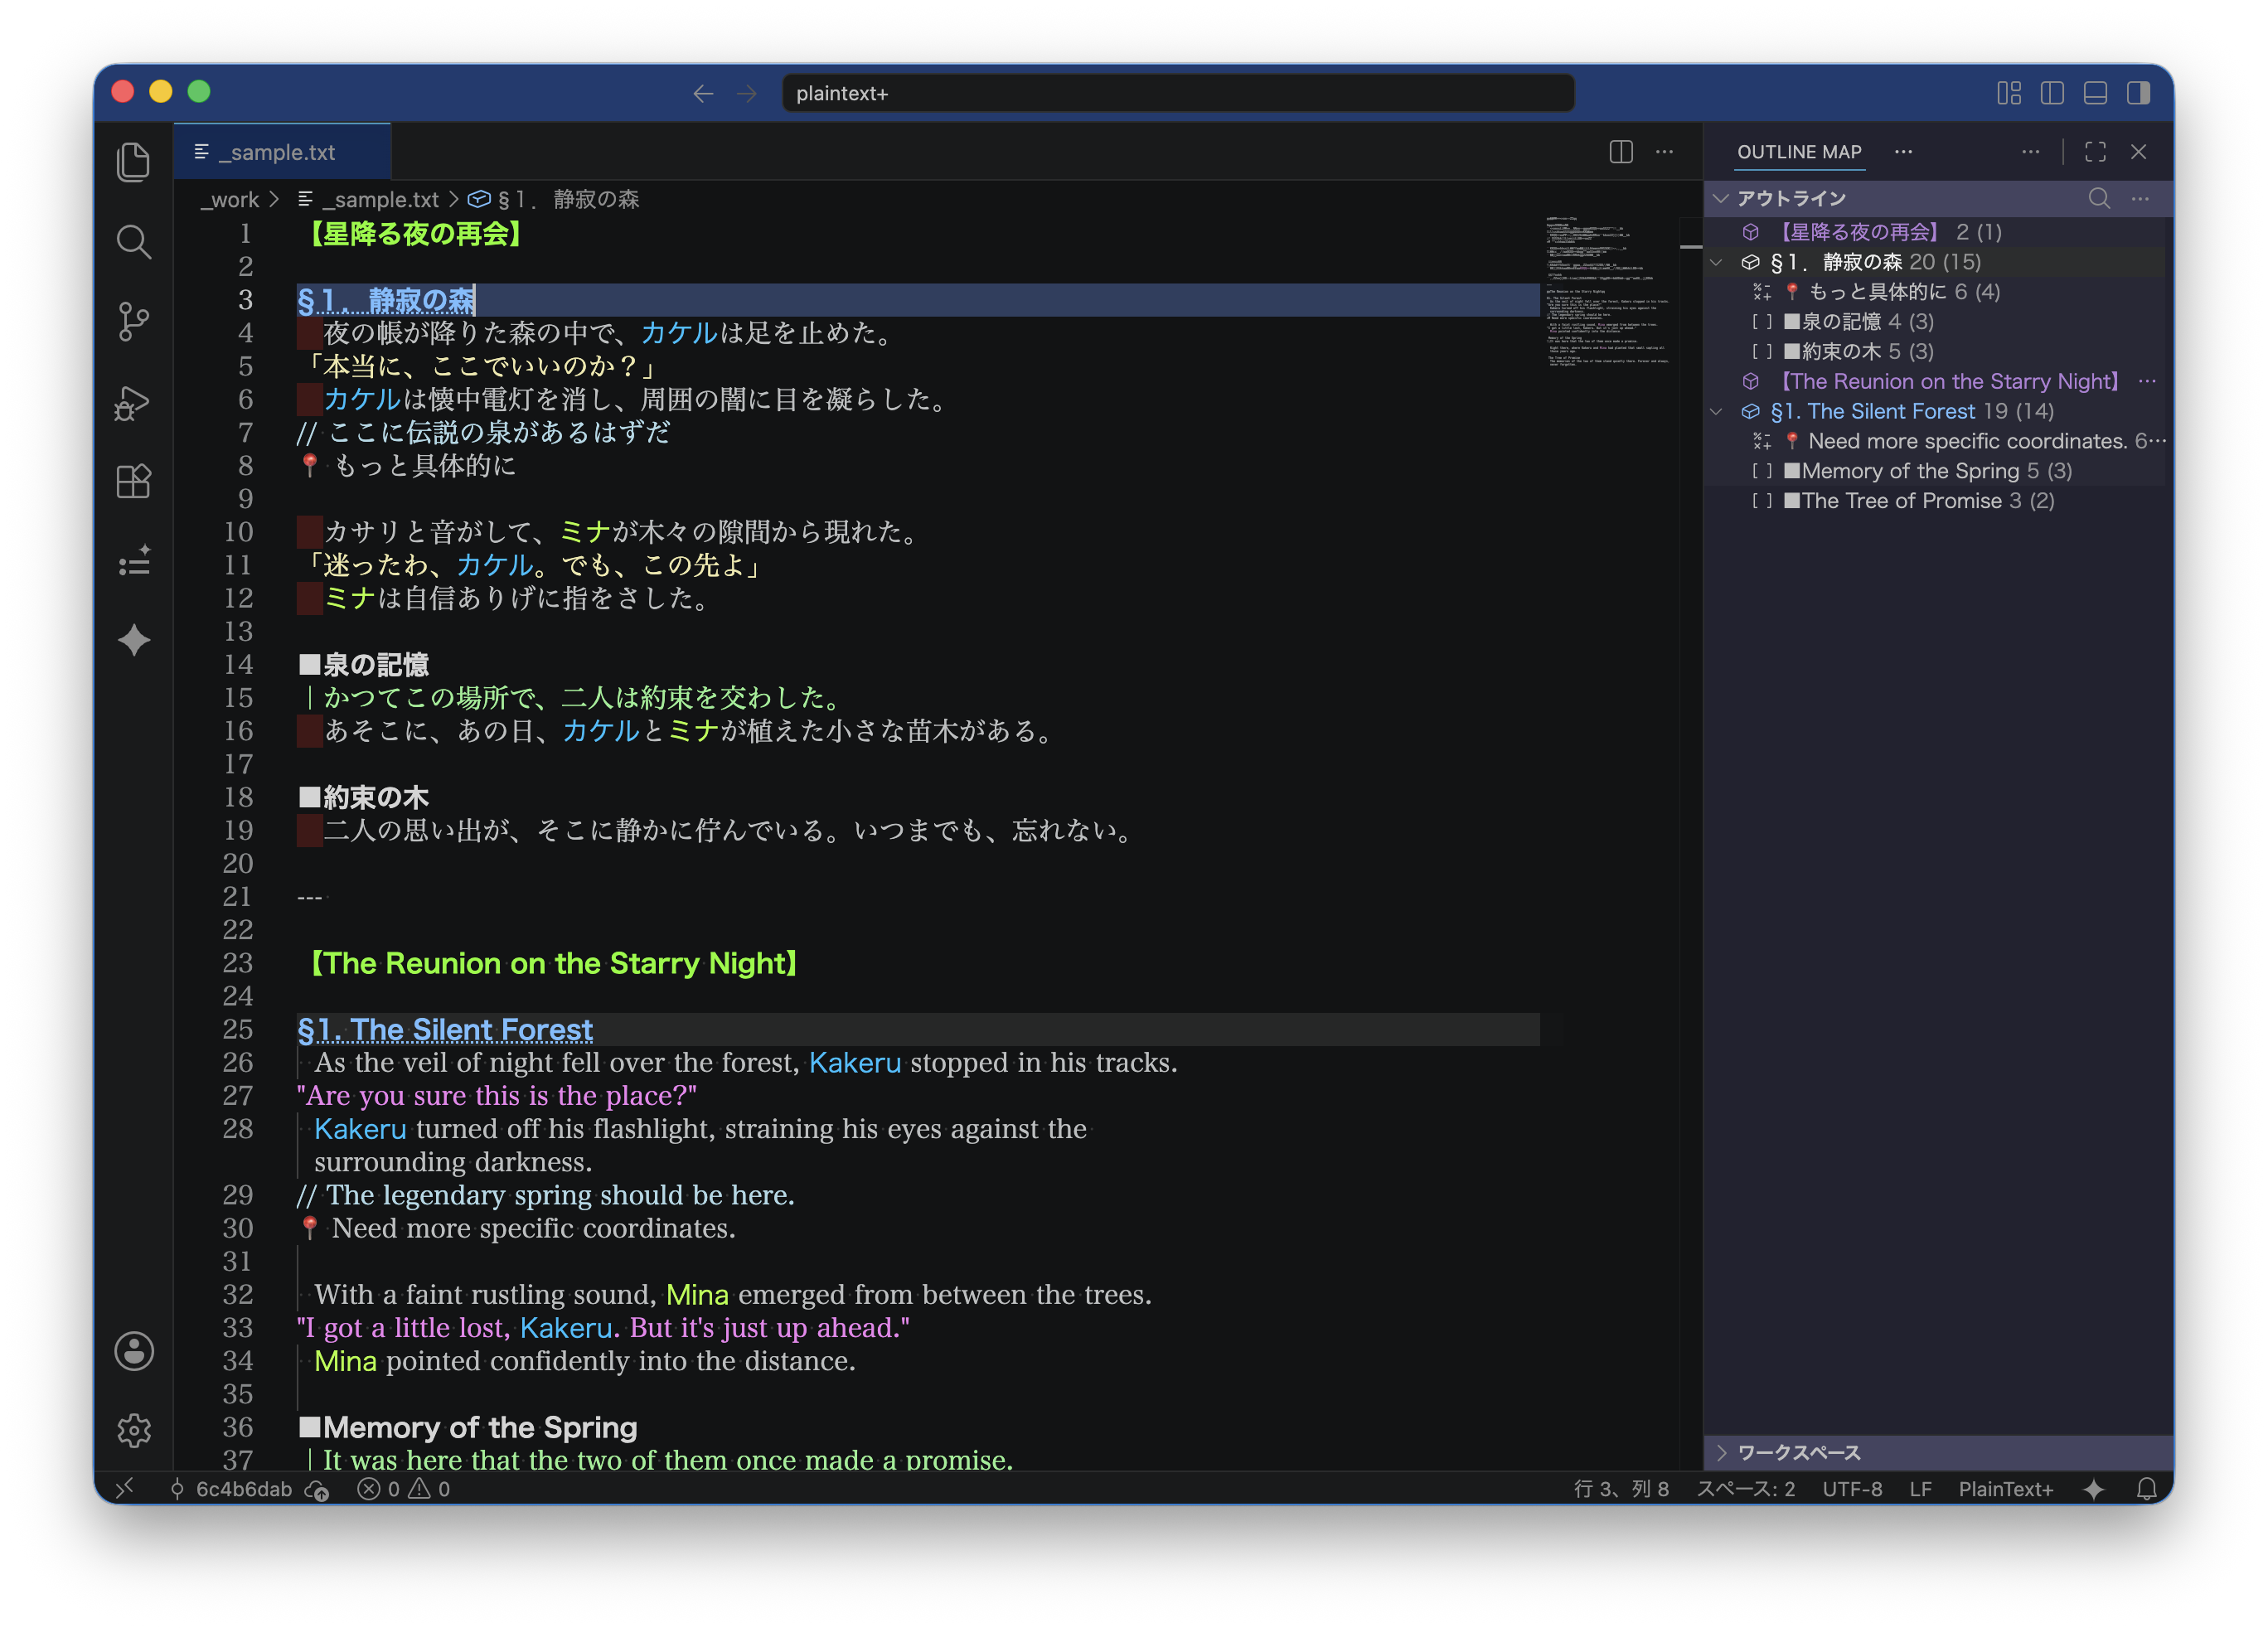
目の前でストレスフリーに書いたテキストが、そのままでも見やすい記号でアウトラインに展開、登録したキーワードや会話文のハイライトもできるVS Code拡張機能です。
ざっくり言うと、入力するのは単なるプレーンテキストで、アウトラインにしたいところに記号を入れるだけ、キーワードは設定しておけば勝手にハイライト、を実現する非常にシンプルなものです。
主な用途
主な機能
- アウトライン:行頭の記号(【、▼、■など)から即座にアウトラインを生成
- ハイライト:Semantic Tokensを活用した、高速かつ柔軟なハイライト機能…キーワード、行、コメントを際立たせたり、溶け込ませたり
- ナビゲーション:次・前のシンボルへジャンプする独自コマンド搭載
どうして作ったのか
プレーンテキストを構造化にしたいときにまず候補に挙がるのは Markdown ですが、そこまで高機能でなくていいのでプレーンテキストのままでアウトラインが表現できたらというところから、区切りに日本語フォントにあるいろいろな記号を置くだけの記法を使っていました。
それをアウトラインに抽出してジャンプしたり、目立たせたいキーワードをハイライトするだけ、ちょっと便利にするために作ったのが PlainText+ です。
「日本語フォントの記号って言われても入力できない」という方には、「-- 」「** 」みたいな、IMEなしでも入力しやすいものを使ってもいいですし、最近では絵文字も当たり前に使えるし目立つので、気に入った絵文字を目印にするのも見やすいと思います😊
Extensionの機能
アウトライン抽出
PlainText+ では、設定した記号や文字列を先頭や行内に入力するだけで、VS Codeのアウトラインビューに表示されます。レベルの設定をすると階層構造にすることも可能です。
各アウトライン項目には配下となる部分の行数が表示されます。カッコ内は空行を除いた行数が表示されます。
また、Sticky Scrollにも対応しています。
ハイライト
マッチしたキーワードの高速なハイライトと、コメント囲み、行全体装飾などを行うことができます。
入れ子構造の「あああ(いいい)あああ」みたいなものにもしっかり対応しています。
コマンド
シンボルジャンプ
アウトラインに抽出されたシンボルを元にジャンプするコマンドです。
keybindings.jsonでショートカットキーを設定するとかんたんに使えます。
- NextSymbol(次のシンボルへ) 例:opt+]
- PrevSymbol(前のシンボルへ) 例:opt+[
日付入力
日記を書いたりするときに便利な、今日の日付を入力するコマンドです。
keybindings.jsonでショートカットキーを設定するとかんたんに使えます。
設定(settings.json)
デフォルト設定をあえて用意していませんので、サンプルをベースに settings.json に追加してください。
ユーザー共通のアウトラインやハイライトの設定はユーザー設定に置いて、作品単位のキーワードなどは対象フォルダーの .vscode/settings.json に置くと管理しやすくなります。
同じキーが対象フォルダー側にもある場合は、そちらが優先になります。
アウトライン設定(plaintextplus.outline)
記号や文字列をキーとして、レベル、シンボル種別を設定します。
同じレベルに複数文字を設定する場合は「|(パイプ)」で区切ってください。
※ 絵文字を使っても便利かも☺️
ここで設定したキーで VS Code のアウトラインに抽出され、シンボルジャンプ機能が使えます。
上位階層(レベルの数字が小さいもの)の後ろに下位階層(数字が大きいもの)があると、ネストして配置されます。
今の階層より上位のシンボルが来ると、その階層までネストが上がります。
レベル1のシンボルは必ず最上位階層にリセットされます。
レベルは1〜9まで割り当て可能です。
アウトラインに関する装飾の設定もここで行います。設定がない場合は自動的にアウトラインシンボルに準じた装飾(VS Code準拠)が自動的に行われます。
【アウトライン用記号の例】
「独自記法の誕生」のところで書いた自分記法からの例。あくまでも一例です。
実際にはお好きな記号や文字列を設定してください。
- 第1階層(レベル1)チャプター(章)…【 , §
- 第2階層(レベル2)パラグラフ(項)…▼, ▲, ▽, △
- 第3階層(レベル3)ディビジョン(目)…■, □, ●, ○, ◎
- 第4~8階層(レベル4~8)必要に応じて設定してください
- 第9階層(レベル9)タグ、目印…†, 📍
最終階層です。
いつでも最下層に位置するので目印に使うと便利です。
※ 同じ階層でもキーを分けると別の装飾にしたりできます🙆♂️
開始終了がある場合は、「|」で区切ってください(例: "「|」")。
「|」がなく単体の場合は、行コメントとして扱います(例: "//")。
※ 「」を設定すると会話文だけフォントや色を変えたりできます
キーワードハイライト(plaintextplus.keywords)
キーワードをハイライトします。
設定したキーワードだけを装飾したり、行全体やキーワード以降を行末まで装飾したりすることができます(range)。
マッチの方法は、「head(行頭)」または「inline(行内)」のいずれかが選べます。
※ 登場人物名などを色分けすると登場頻度がパッと把握できてバランスが取りやすかったりします。
設定項目
【アウトライン専用】
level: 1 ~ 9 数字が大きいほど下位symbolKind: Operator / Method / Array / Field など
【抽出方法】
【ハイライト用】
color: 文字色(色名、#ff0000など)background: 背景色fontFamily: フォントファミリー(例: "'Noto Sans JP'")fontWeight: 太さfontStyle: スタイルtextDecoration: 装飾(下線など)range: match, line(行全体), after(行末まで)
設定サンプル
初期設定時は下記を settings.json に追記するか、対象フォルダーの .vscode/settings.json に追加してください。
{
  "plaintextplus.outline": {
    "【": {
      "level": 1,
      "symbolKind": "Method",
      "match": "head",
      "color": "lawngreen",
      "fontWeight": "bold",
      "range": "line"
    },
    "§": {
      "level": 1,
      "symbolKind": "Field",
      "match": "head",
      "fontWeight": "bold",
      "textDecoration": "underline dotted",
      "range": "line"
    },
    "▼|▽": {
      "level": 2,
      "symbolKind": "Class",
      "match": "head",
      "fontWeight": "bold",
      "range": "line"
    },
    "■|□|●|○": {
      "level": 3,
      "symbolKind": "Array",
      "match": "head",
      "fontWeight": "bold",
      "range": "line"
    },
    "†|📍": {
      "level": 9,
      "symbolKind": "Operator",
      "match": "inline"
    }
  },
  "plaintextplus.comment": {
    "//": {
      "color": "lightblue"
    },
    "|": {
      "color": "lightgreen"
    },
    "<!--|-->": {
      "color": "lightgreen",
      "fontFamily": "'Noto Sans JP', 'BIZ UDPGothic'"
    },
    "/*|*/": {
      "color": "lightgreen"
    },
    "\"|\"": {
      "color": "violet"
    },
    "(|)": {
      "color": "aquamarine"
    },
    "「|」": {
      "color": "palegoldenrod"
    }
  },
  "plaintextplus.keywords": {
    // 要注意文字
    " |―|@": {
      "match": "inline",
      "color": "#ff0000",
      "background": "#ff000033"
    },
    "capp|カプ": {
      "match": "inline",
      "color": "lime",
      "fontFamily": "'Noto Sans JP', 'BIZ UDPGothic'"
    },
    "カケル|Kakeru": {
      "match": "inline",
      "color": "deepskyblue",
      "fontFamily": "'BIZ UDPGothic'",
      "fontWeight": "normal"
    },
    "ミナ|Mina": {
      "match": "inline",
      "color": "greenyellow",
      "fontFamily": "'BIZ UDPGothic'",
      "fontWeight": "normal"
    },
  }
}
keybindings.json サンプル
[
    {
        // opt + ^
        "key": "alt+[Equal]",
        "command": "extension.insertdate"
    },
    {
        // opt + ]
        "key": "alt+]",
        "command": "extension.nextsymbol"
    },
    {
        // opt + [
        "key": "alt+[",
        "command": "extension.prevsymbol"
    },
    {
        // opt + 1
        "key": "alt+1",
        "command": "type",
        "args": {
            "text": "§"
        },
        "when": "editorTextFocus"
    },
    {
        // opt + 2
        "key": "alt+2",
        "command": "type",
        "args": {
            "text": "▼"
        },
        "when": "editorTextFocus"
    },
    {
        // opt + 3
        "key": "alt+3",
        "command": "type",
        "args": {
            "text": "■"
        },
        "when": "editorTextFocus"
    },
    {
        // opt + 4
        "key": "alt+4",
        "command": "type",
        "args": {
            "text": "・"
        },
        "when": "editorTextFocus"
    }
]
アイコンについて
アイコンのヤギさんは作者のマスコットです。
バージョン履歴
- v1.0.0 新規公開
- v1.0.1 スクリーンショット追加
- v1.0.2 スクリーンショット不具合修正、README.md更新
- v1.0.3 スクリーンショット不具合修正
ライセンス
本拡張機能のソースコードおよびアセットは著作権法により保護されています。
Copyright (c) 2026 capp. All Rights Reserved.
本拡張機能のインストールおよび利用(VS Code Marketplace を通じた配布)は許可されていますが、ソースコードやアセットの無断転載・再配布・改変を禁止します。
About PlainText+
"Make your plain text a little more convenient"
No need to learn new syntax or keep switching back and forth with a preview.
This VS Code extension instantly expands stress-free text into an outline using easy-to-read symbols, and can also highlight registered keywords or dialogue.
In short, it's very simple: you just enter plain text and add symbols where you want an outline, and keywords will be highlighted automatically if you set them up.
Main Uses
- Notes
- Diaries
- Novels
etc.
Key Features
- Outline: Instantly generate outlines from symbols at the start of a line (e.g., 【, ▼, ■).
- Highlighting: High-speed and flexible highlighting using Semantic Tokens... make keywords, lines, or comments stand out or blend in.
- Navigation: Equipped with unique commands to jump to the next/previous symbols.
Why I Created This
When you want to structure plain text, Markdown is the first candidate, but I didn't need that much functionality. I wanted to be able to represent outlines in plain text, so I used a notation that just places various symbols found in Japanese fonts as delimiters.
I created PlainText+ to make things a little more convenient by extracting those into an outline for jumping, or highlighting keywords you want to stand out.
If you say "I can't type Japanese font symbols," you can use things like "-- " or "** " that are easy to type even without an IME. Also, these days emojis are commonly used and stand out, so using your favorite emoji as a marker is also easy to see 😊
Extension Features
In PlainText+, simply by entering configured symbols or strings at the start of a line or inline, they will appear in the VS Code outline view. You can also create hierarchical structures by setting levels.
Each outline item displays the number of lines in the section below it. The number in parentheses shows the line count excluding empty lines.
It also supports Sticky Scroll.
Highlighting
It allows for high-speed highlighting of matched keywords, comment enclosures, and whole-line decorations.
It also properly handles nested structures like "aaa (bbb) aaa".
Commands
Symbol Jump
These are commands to jump based on the symbols extracted in the outline.
They can be easily used by setting shortcut keys in keybindings.json.
- NextSymbol(次のシンボルへ) ex: opt+]
- PrevSymbol(前のシンボルへ) ex: opt+[
This is a convenient command for entering today's date when writing a diary, etc.
It can be easily used by setting a shortcut key in keybindings.json.
- InsertDate(日付入力) ex: opt+^
Configuration (settings.json)
Default settings are intentionally not provided, so please add to settings.json based on the sample.
It's easier to manage if you put common user outline and highlight settings in the user settings, and work-specific keywords etc. in the .vscode/settings.json of the target folder.
If the same key exists in the target folder's settings, that one takes precedence.
Outline Settings (plaintextplus.outline)
Set the level and symbol type using symbols or strings as keys.
When setting multiple characters to the same level, separate them with a "| (pipe)".
- It might be convenient to use emojis too ☺️
With the keys set here, they are extracted into the VS Code outline, and the symbol jump function can be used.
If a lower hierarchy (larger level number) follows a higher hierarchy (smaller level number), it will be nested.
If a symbol higher than the current hierarchy appears, the nesting goes up to that level.
Level 1 symbols always reset to the top-most hierarchy.
Levels can be assigned from 1 to 9.
Decoration settings related to the outline are also done here. If no settings are provided, decoration corresponding to the outline symbol (VS Code compliant) will be done automatically.
[Example Symbols for Outline]
Examples from my own notation mentioned in the "Why I Created This" section. These are just examples.
In practice, please set your favorite symbols or strings.
- Level 1: Chapter ... 【 , §
- Level 2: Paragraph ... ▼, ▲, ▽, △
- Level 3: Division ... ■, □, ●, ○, ◎
- Level 4-8: Set as needed
- Level 9: Tag, Marker ... †, 📍
This is the final level.
Since it's always at the bottom level, it's convenient for markers.
- Even at the same level, you can use different decorations by separating the keys 🙆♂️
If there is a start and end, separate them with "|" (e.g., "「|」").
If there is no "|" and it's a single item, it's treated as a line comment (e.g., "//").
- By setting "「|」", you can change the font or color of only dialogue sentences.
Keyword Highlighting (plaintextplus.keywords)
Highlights keywords.
You can decorate only the set keywords, or decorate the whole line or from the keyword to the end of the line (range).
Matching methods can be selected from "head (start of line)" or "inline (anywhere in the line)".
- Color-coding character names etc. makes it easy to grasp the frequency of appearance at a glance and helps maintain balance.
Configuration Items
[Outline Only]
level: 1 to 9. Larger numbers are lower levels.symbolKind: Operator / Method / Array / Field etc.
[Extraction Method]
[For Highlighting]
color: Text color (color name, #ff0000, etc.)background: Background colorfontFamily: Font family (e.g., "'Noto Sans JP'" )fontWeight: WeightfontStyle: StyletextDecoration: Decoration (underline, etc.)range: match, line (whole line), after (until end of line)
Configuration Sample
When setting up for the first time, please add the following to settings.json or to the target folder's .vscode/settings.json.
{
  "plaintextplus.outline": {
    "【": {
      "level": 1,
      "symbolKind": "Method",
      "match": "head",
      "color": "lawngreen",
      "fontWeight": "bold",
      "range": "line"
    },
    "§": {
      "level": 1,
      "symbolKind": "Field",
      "match": "head",
      "fontWeight": "bold",
      "textDecoration": "underline dotted",
      "range": "line"
    },
    "▼|▽": {
      "level": 2,
      "symbolKind": "Class",
      "match": "head",
      "fontWeight": "bold",
      "range": "line"
    },
    "■|□|●|○": {
      "level": 3,
      "symbolKind": "Array",
      "match": "head",
      "fontWeight": "bold",
      "range": "line"
    },
    "†|📍": {
      "level": 9,
      "symbolKind": "Operator",
      "match": "inline"
    }
  },
  "plaintextplus.comment": {
    "//": {
      "color": "lightblue"
    },
    "|": {
      "color": "lightgreen"
    },
    "<!--|-->": {
      "color": "lightgreen",
      "fontFamily": "'Noto Sans JP', 'BIZ UDPGothic'"
    },
    "/*|*/": {
      "color": "lightgreen"
    },
    "\"|\"": {
      "color": "violet"
    },
    "(|)": {
      "color": "aquamarine"
    },
    "「|」": {
      "color": "palegoldenrod"
    }
  },
  "plaintextplus.keywords": {
    // Important characters
    " |―|@": {
      "match": "inline",
      "color": "#ff0000",
      "background": "#ff000033"
    },
    "capp|カプ": {
      "match": "inline",
      "color": "lime",
      "fontFamily": "'Noto Sans JP', 'BIZ UDPGothic'"
    },
    "カケル|Kakeru": {
      "match": "inline",
      "color": "deepskyblue",
      "fontFamily": "'BIZ UDPGothic'",
      "fontWeight": "normal"
    },
    "ミナ|Mina": {
      "match": "inline",
      "color": "greenyellow",
      "fontFamily": "'BIZ UDPGothic'",
      "fontWeight": "normal"
    },
  }
}
keybindings.json Sample
[
    {
        // opt + ^
        "key": "alt+[Equal]",
        "command": "extension.insertdate"
    },
    {
        // opt + ]
        "key": "alt+]",
        "command": "extension.nextsymbol"
    },
    {
        // opt + [
        "key": "alt+[",
        "command": "extension.prevsymbol"
    },
    {
        // opt + 1
        "key": "alt+1",
        "command": "type",
        "args": {
            "text": "§"
        },
        "when": "editorTextFocus"
    },
    {
        // opt + 2
        "key": "alt+2",
        "command": "type",
        "args": {
            "text": "▼"
        },
        "when": "editorTextFocus"
    },
    {
        // opt + 3
        "key": "alt+3",
        "command": "type",
        "args": {
            "text": "■"
        },
        "when": "editorTextFocus"
    },
    {
        // opt + 4
        "key": "alt+4",
        "command": "type",
        "args": {
            "text": "・"
        },
        "when": "editorTextFocus"
    }
]
About the Icon
The goat in the icon is the creator's mascot.
Version History
- v1.0.0 Initial Release
- v1.0.1 Add Screenshot
- v1.0.2 Fix Screenshot, Update README.md
- v1.0.3 Fix Screenshot
License
The source code and assets of this extension are protected by copyright law.
Copyright (c) 2026 capp. All Rights Reserved.
Installation and use of this extension (distribution through the VS Code Marketplace) are permitted, but unauthorized reproduction, redistribution, or modification of the source code and assets is prohibited.