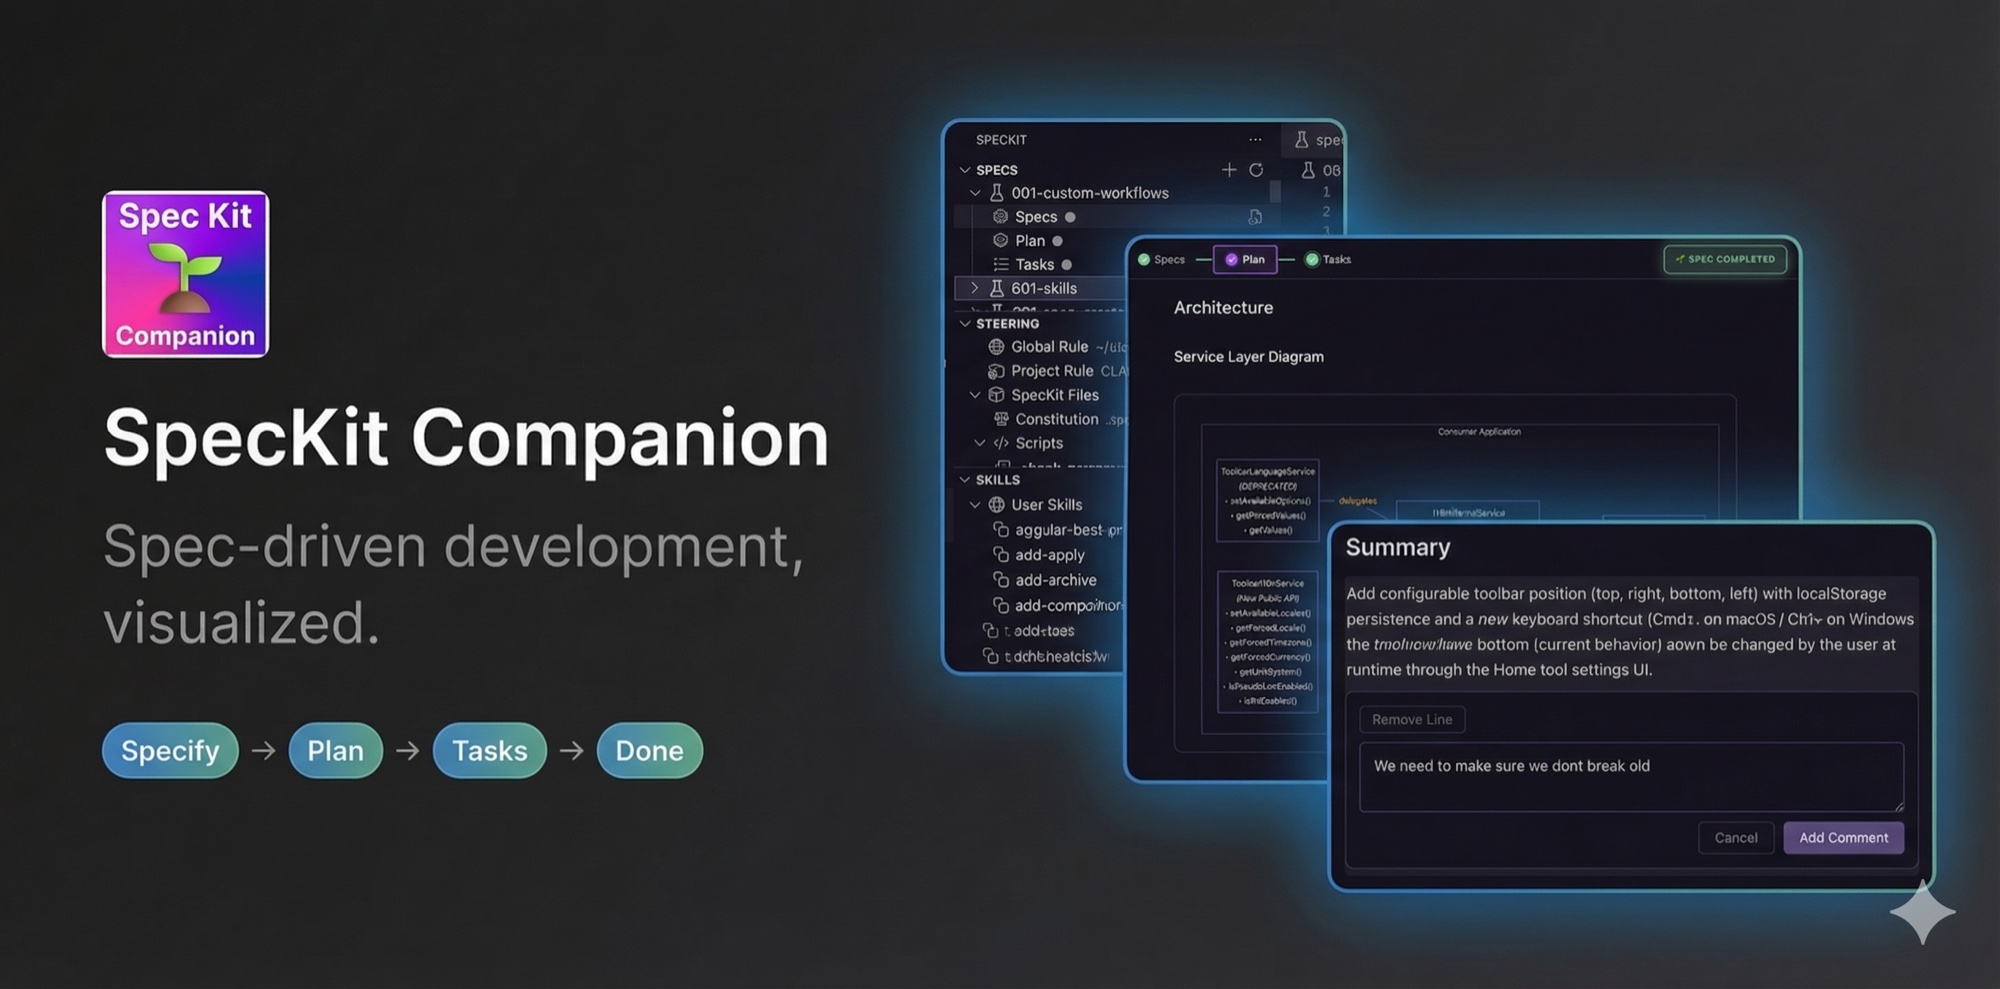
SpecKit Companion: review AI specs before they ship as broken code


The spec workspace for developers running AI agents through Spec-Driven Development. Catch bad specs before they become bad code.
See it in motion: a 38-second walkthrough of the spec viewer — one spec, every phase, rendered and navigable. ▶ Watch the walkthrough
What you get
A spec workspace that turns AI-assisted, spec-driven development into something you can actually see and steer — without leaving VS Code:
- Catch bad specs before they become bad code. Review AI-generated specs the way you review pull requests: inline comments on specific lines, refine in place, and kill a vague requirement before it turns into 200 lines of wrong implementation.
- Watch every feature flow through its phases. Specify → Plan → Tasks → Done, each a one-click action, with live progress, a phase timeline, and an Activity overview of everything the spec tracks.
- Pick one pipeline, run it end to end. Choose stock SpecKit or the leaner SpecKit Companion workflow once — smaller specs, files-and-dependencies tasks, built-in right-sizing for small changes — and every step of the run dispatches that choice.
- Bring your own AI and your own workflow. Eight providers, custom phases, custom commands. Drop in your own SDD process; the sidebar and viewer adapt.
Recently Shipped
- v0.29.0 One coherent sidebar — four views, one icon language, a four-button toolbar, and specs that open calm instead of flooded · the spec viewer redesign lands: a spec opens on its Overview (why it exists, what constrained it, what was verified, the decisions, requirement→test traceability), documents on a left rail, one header instead of two · review comments annotate a line rather than interrupting it, and can be edited, not just deleted · Companion commands finally reach Codex · a completed spec stops spinning at 97%
- v0.28.1 Wibey dispatch actually works on macOS: SpecKit commands now go to an interactive
wibey session (no more "Invalid command format"), the same terminal is reused across actions instead of opening a new one each time, and the session stays alive after each task
- v0.28.0 Hands-off Auto runs now carry a spec all the way to completed with no final click · custom workflow steps can pick their own Claude Code model and effort (cheap fast steps, heavy hard ones) · workflows can point at reference-doc folders that show up under Steering instead of posing as phantom specs · a recovery affordance when a running step goes quiet
- v0.27.0 Wibey joins the provider list (CLI + VS Code panel) · living specs open in the rendered viewer with their tiers as tabs · bring-your-own workflows (GSD, Matt Pocock skills) finally advance step after step — Companion reconstructs their position from the files they write · runnable demo projects under
examples/
- Full changelog →
Why it exists
Review AI-generated specs the way you review code. Add inline comments on specific lines, refine requirements, and catch a vague requirement before the AI turns it into 200 lines of wrong code. Every comment persists to the spec's .spec-context.json the moment you add it, so an in-progress review is durable across sessions and committable to source control.
Plug any AI assistant into any spec-driven workflow. Eight providers ship today (Claude Code, Gemini, GitHub Copilot, Codex, Qwen, OpenCode, IDE Chat, Claude in VS Code), and the workflow engine accepts custom phases, commands, and sub-documents. Drop in Agent Teams Lite, your own SDD process, or anything that takes commands and produces markdown.
Spec-driven phases without leaving VS Code. Each feature flows through Specify, Plan, Tasks, Done, with progress tracking, sticky headers, and a structured viewer built for long specs.
Features
Visual Spec Viewer
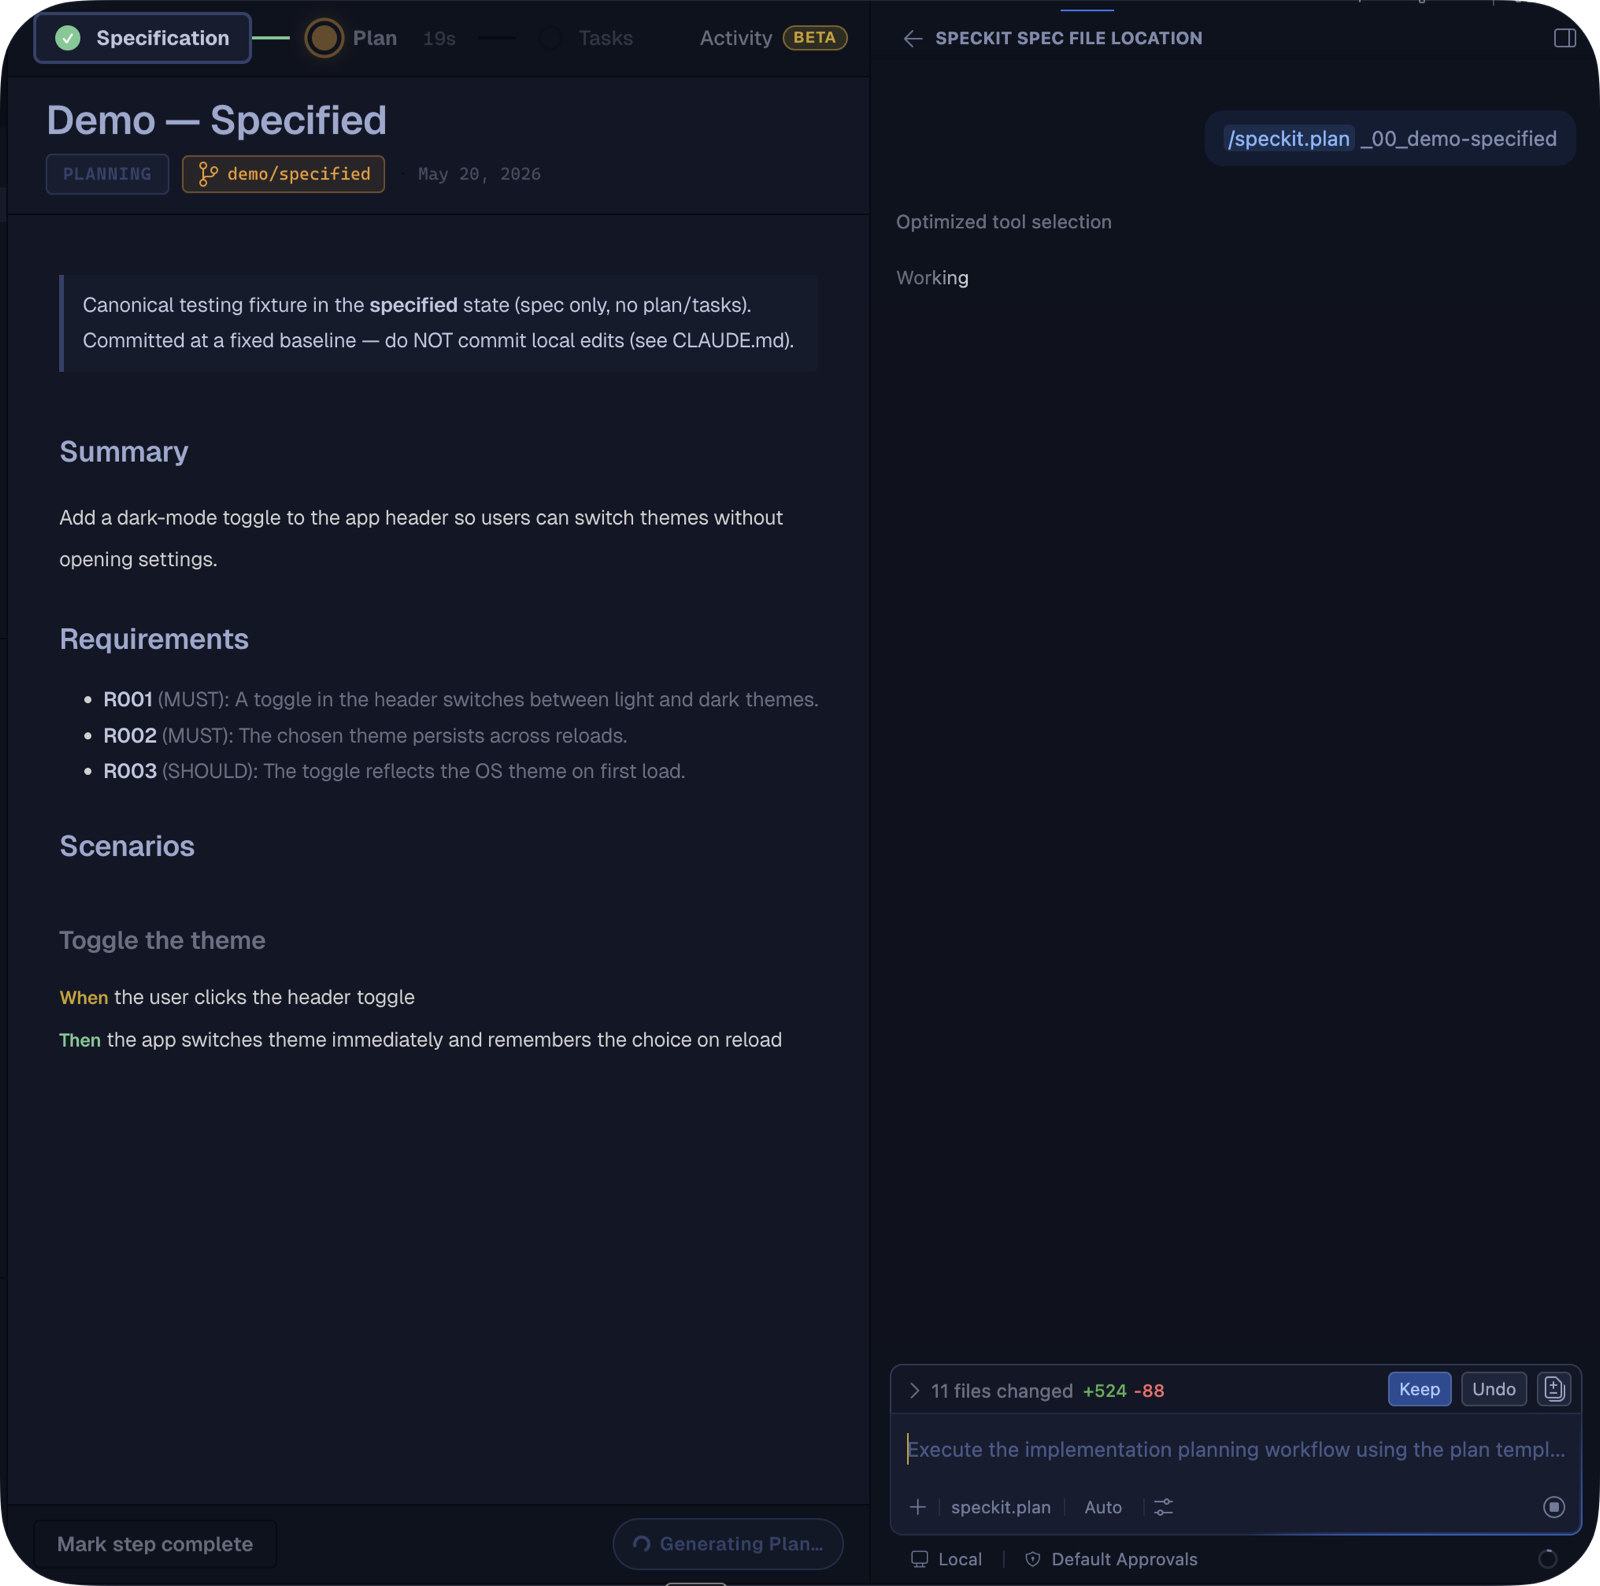
Guide your features through structured phases with a dedicated viewer that renders specs as rich, structured pages — requirements as labeled rows, acceptance scenarios as clean Given/When/Then sentences, key entities and research decisions as cards, and tasks grouped under their phases — shows phase progress, and provides one-click actions for each step. Mermaid diagrams render inline with zoom controls for navigating complex diagrams. After each action, a toast confirms the result and the viewer auto-advances to the next phase.
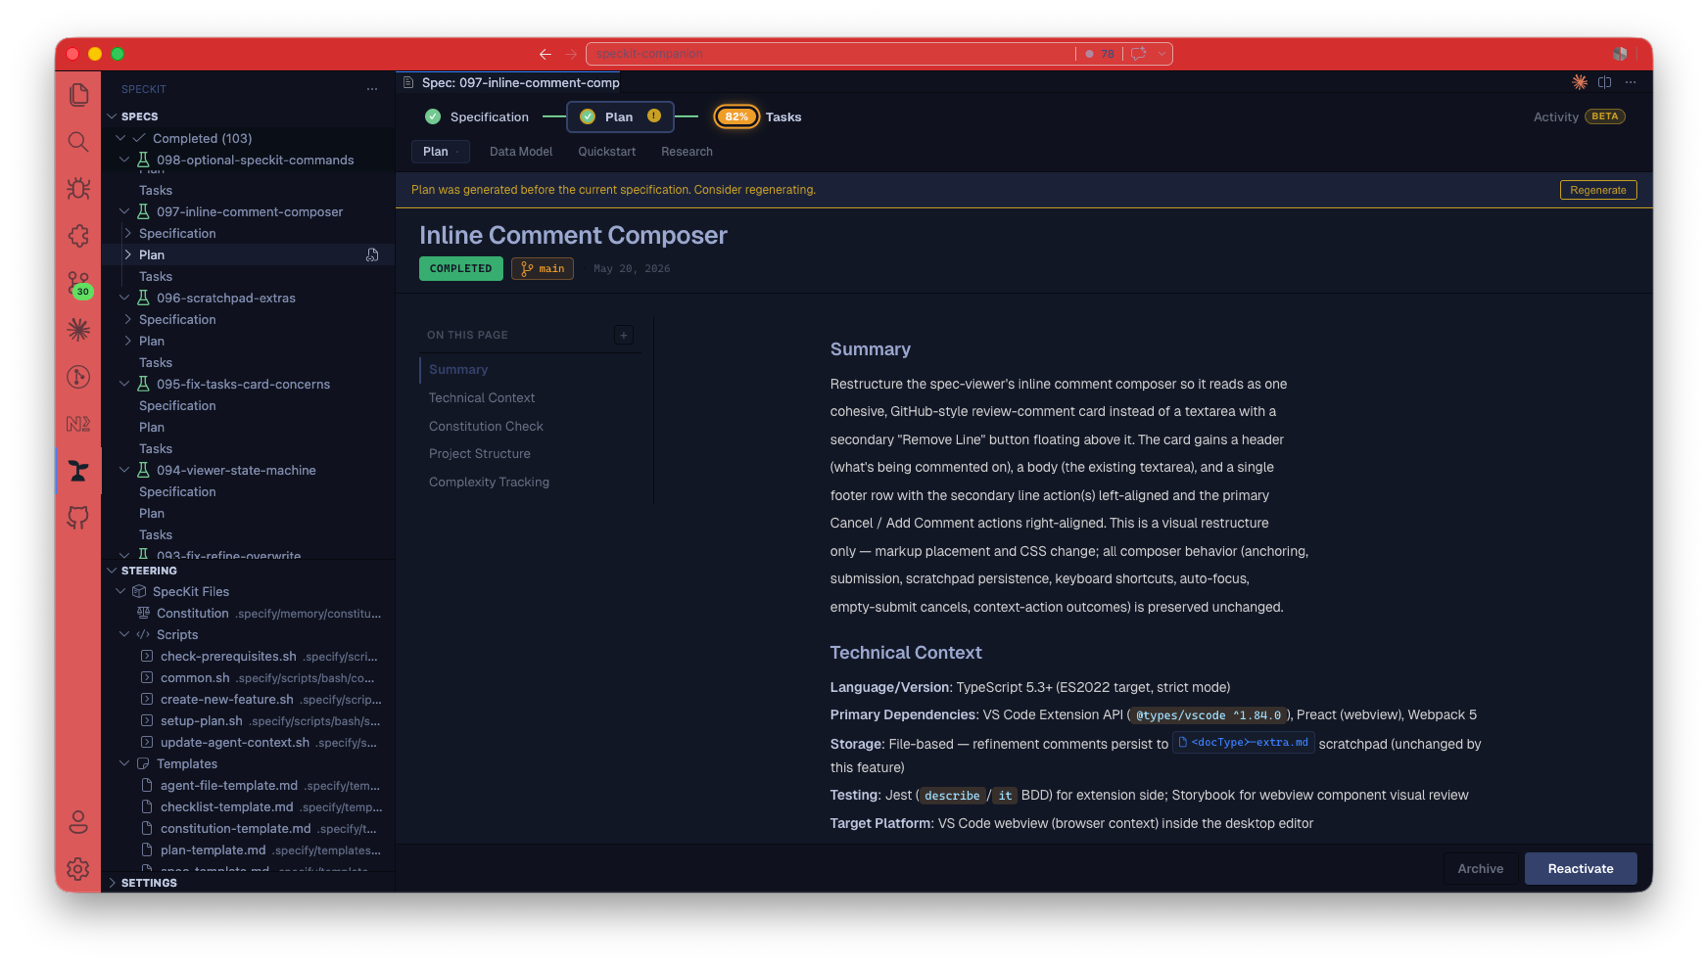 The spec viewer. Step tabs, sub-document chips, an inline diagram, and a footer button that advances Specify → Plan → Tasks → Done. Markdown stays in your repo, never on a server.
Review spec documents with inline comments. Add feedback directly on specific lines, refine requirements, and collaborate on specs before implementation begins. Each comment is persisted to the spec's .spec-context.json the moment you add or remove it — not only when you refine — so an in-progress review survives closing the tab, is committable, and can be picked up later (next session, another machine, or another reviewer after a pull). When you click the Refine button, that document's pending comments are dispatched to the AI for a direct, in-place edit of the source and then marked applied (kept as history — no separate files).
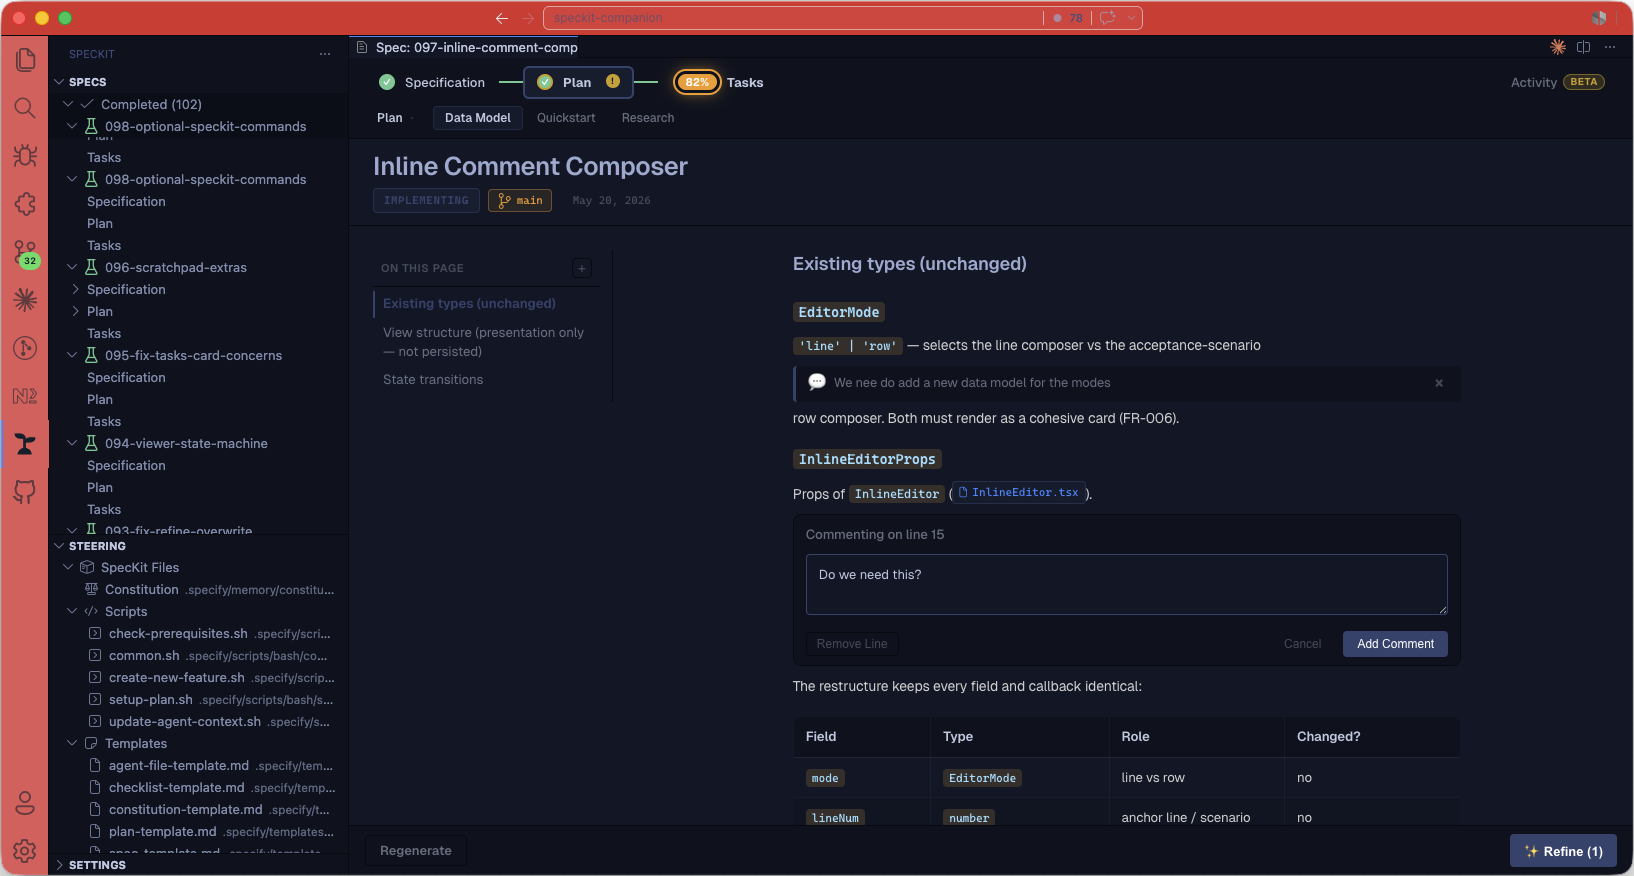 Inline review comments. Catch a vague requirement on line 12 before the AI turns it into 200 lines of wrong code.
Reopen a spec and every pending comment is restored inline, anchored to its source location. Restore is resilient: a comment remembers its nearest heading and surrounding block, so if the source drifted (a line moved or was edited) it best-effort re-anchors to the nearest matching heading rather than being dropped — a comment is never silently lost.
Comments live entirely in .spec-context.json; the old per-document <doc>-extra.md scratchpad files and the read-only "Notes" sub-tab have been removed. There is one storage surface (the committed context file) and one overview surface (the Overview's Review comments card — a consolidated list across spec/plan/tasks with per-comment status, jump-to-line, and a per-document Run refinement action). The inline surface stays the always-on primary path; the Activity list is the power-user overview (with the Overview unavailable — setting off or no activity — inline comments still work and still persist).
Create Specs Visually
Create new specs with a dedicated dialog. Write a detailed description, select your workflow, and attach screenshots or mockups for context. The form is a centered, readable-width column with persistent writing guidance below the field, and the Create Spec button stays disabled until you've written something. When the SpecKit Companion workflow is selected, an Auto button appears next to it that builds the whole spec hands-off — it walks specify, plan, tasks, implement, and completion on its own, with no approval pauses in between — for when you want to describe what you need and walk away. Pick Create Spec for the normal step-by-step flow, or Auto to run the whole pipeline. (Auto needs the companion spec-kit extension; without it the button warns, and with stock SpecKit selected only Create Spec appears — the step-by-step flow always stays available.) The dialog is built for keyboard and screen-reader use: errors, in-progress submission, and image attach/remove are announced, every control has a visible focus ring and a meaningful name, the character limit is conveyed beyond color (and over-limit content can't be submitted), and pressing Esc with typed content asks before discarding.
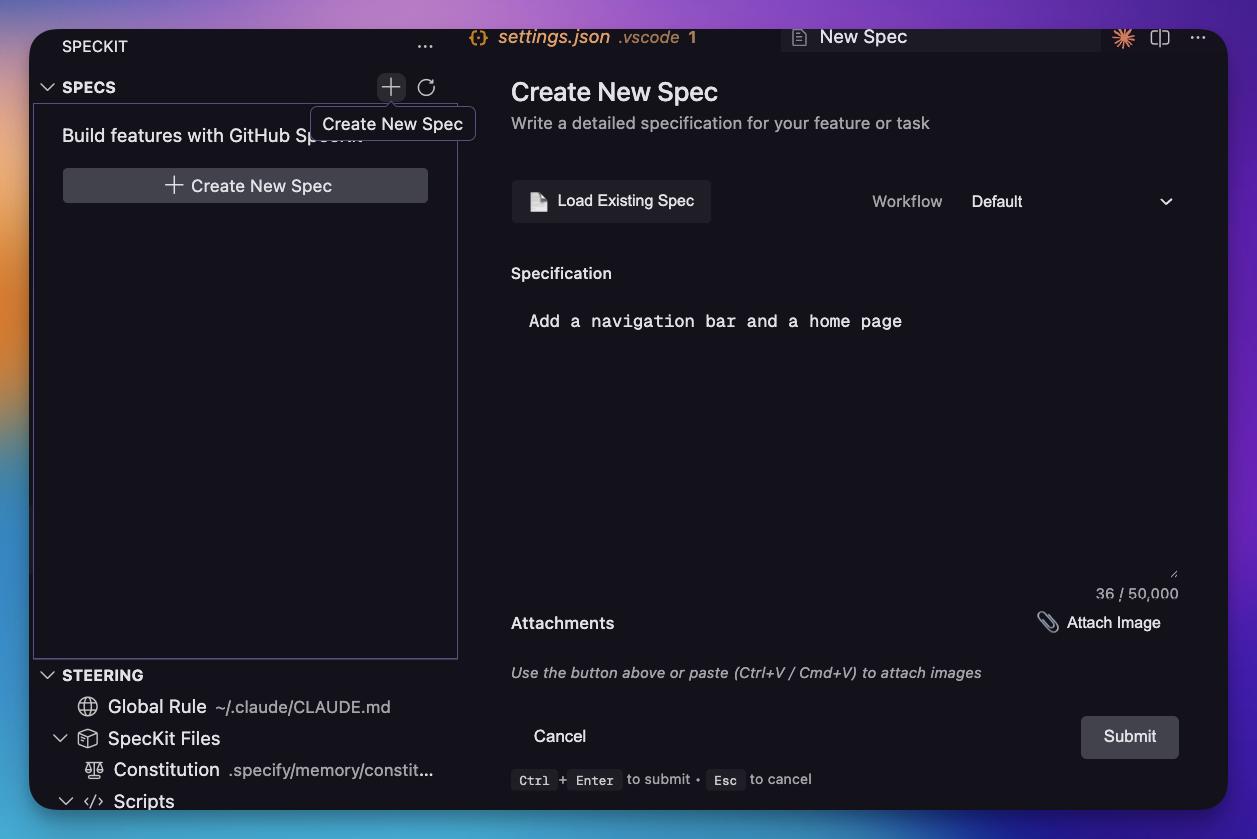 Create-spec dialog. Write a detailed description, pick a workflow, attach a screenshot. The AI never sees a one-liner.
Spec-Driven Phases
Each feature flows through four phases, each a one-click footer action in the viewer above:
- Specify — define requirements with user stories and acceptance scenarios before any code is written.
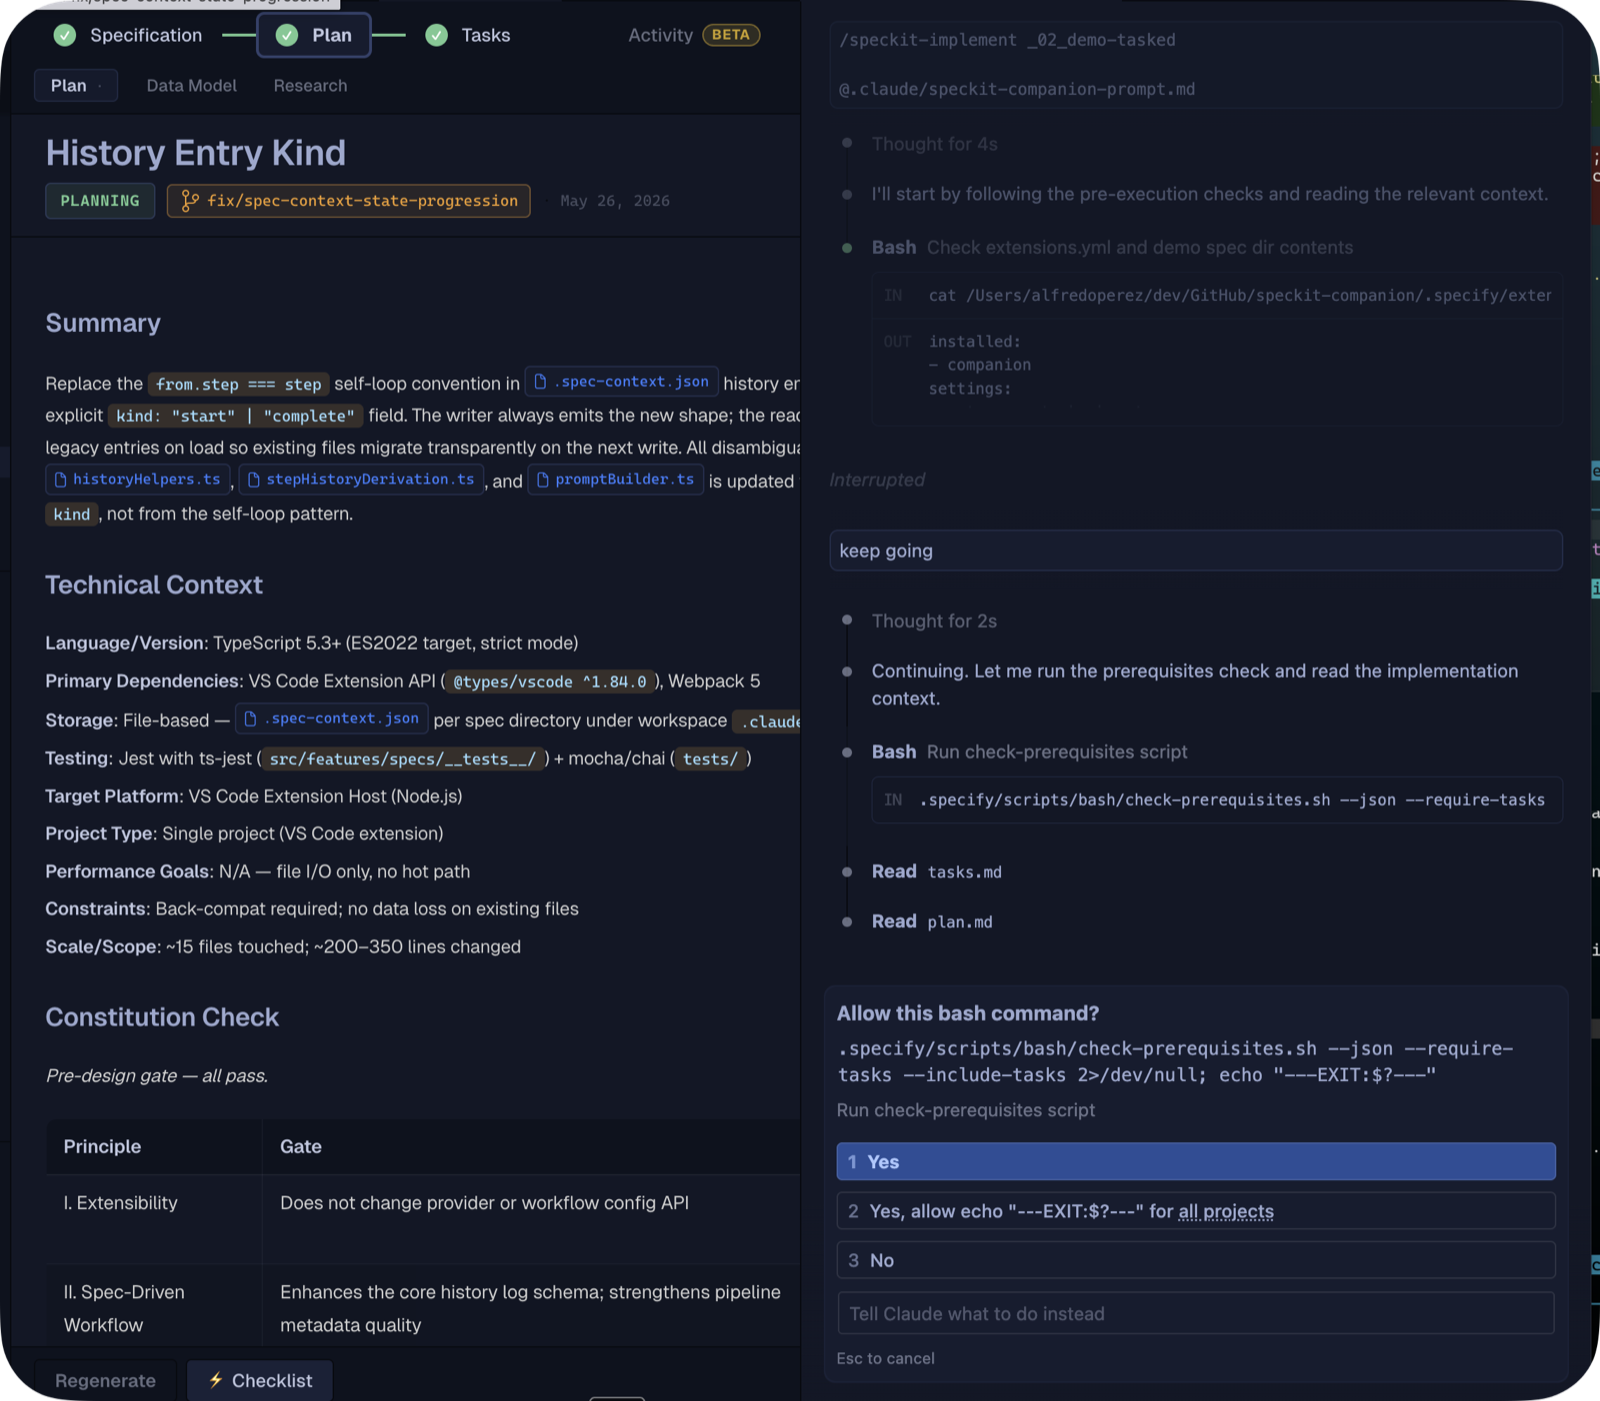
- Plan — create the technical design: architecture, data models, and research, grouped under one step with sub-document chips.
- Tasks — generate an implementation checklist with parallel-execution markers and live progress.
- Done — mark the spec complete (or archive it) once implementation lands.
Reading Specs
The spec viewer is built for fast scanning of long-form specs:
- Title-leading header: the spec name dominates above a compact
[STATUS] [⌥ branch] · date cluster, so the page anchor is the first thing your eye lands on.
- Document rail: the shell puts the workflow's documents on a vertical rail — the selected document sits on a lifted surface while separate completion marks (done check, in-flight spinner + live percent, pending dot) tell you how far along the run is, so "where am I reading" and "how far along is the run" never share one visual. On narrow panes the rail folds into a horizontal chip strip.
- Artifacts on the rail: a step's sub-files (e.g., Plan's
data-model.md, quickstart.md, research.md — or a custom workflow's free-named outputs) group under their owning step on the rail, always visible, one click from anywhere.
- Persistent inline comments: hover a line and click
+ (or tab to it — the control appears on keyboard focus) to leave a review comment. Comments persist to .spec-context.json as you make them and restore inline when the spec reopens (best-effort re-anchoring if the source drifted). The consolidated cross-document list lives in the Activity panel's Review comments card.
- Comments annotate, they don't interrupt: a saved comment rests as one quiet line under the line it's about — a glyph, the comment truncated to a single line, and its state (Pending or Applied). Open it (click, or Enter/Space when focused) to read it in full and act on it: Refine hands that document's pending comments to the AI, Edit reopens the composer pre-filled, and Delete removes it. Nothing is destructive-by-proximity — there is no permanent
×. Applied comments stay on their line as a record of what was already asked and are never counted in the Refine badge. On a completed or archived spec, comments stay readable and none of the actions are offered.
- Table of contents: sticky outline column on the right of the content area. Defaults to h2-only (so phase-heavy
tasks.md reads as a clean ~7-entry list); a small + toggle expands h3 subsections when needed. Auto-hides on narrow panes.
- Quiet content: when the structured header has the metadata, in-content duplicates (the
Input: block, repeated branch chips, literal Slug:/Date: paragraphs) are suppressed so the body is just the spec content.
- Diagrams: wide mermaid diagrams scroll horizontally inside the prose column instead of bleeding past it. Each diagram has its own
− / Reset / + zoom controls.
- Overview first: a spec with recorded activity opens on its Overview — the durable-context dossier (why the spec exists, its constraints, what was verified, the decisions, and requirement→test traceability) — reachable as the first entry on the document rail, right above the pipeline. It only exists when the spec actually has a recorded run; a spec with no run context is just its documents. A one-line run strip above the content keeps phase, task progress, and traceability in view while you read. See Overview below.
- Quiet, intentional footer: a floating action pill (bottom-right) surfaces only what fits the moment, led by a context line naming the next action —
Regenerate plus a forward button labelled with the next phase (Plan / Tasks / Implement / Complete). While a step generates, the forward button is withdrawn entirely and the context line reads Step running — actions unlock when it settles, so the footer never advances ahead of the work. Archive and Mark Completed appear only once the spec is closure-eligible (ready-to-implement and beyond). See docs/viewer-states.md for the full footer state matrix.
- Optional SpecKit commands per tab: SpecKit's three refinement commands surface as one-click footer buttons where each is most useful — Clarify on Spec, Checklist on Plan, Analyze on Tasks. No configuration required; a custom command with the same id wins. They disappear once the spec reaches the closure gate.
Overview (the run's story)
A spec with recorded activity lands on its Overview — a durable-context dossier of everything .spec-context.json carries, ordered by what a future session needs. It sits at the top of the document rail as a destination like any other, so moving between it and a document is one click either way. The one-line run strip above the content keeps the frequently scanned facts (phase, tasks, requirements traced to tests, checks, concerns, honest active time, PR link) in view in both. A spec whose context holds only a work log opens on its documents instead:
- Intent — why the spec exists, set as one prominent statement, with the approach, working area, and sizing beside it.
- Expectations — the fence around the work: constraints that must stay true paired with the deliberately out-of-scope list, as peers.
- Verified — a ledger of what was checked: each check keeps its result and evidence command visually connected (warnings surface amber).
- Decisions — numbered choices future work should not have to rediscover, each with its reasoning and the rejected alternative.
- Coverage — a requirement → task → test traceability table (untraced requirements lead; the full list sits behind a disclosure), plus any open concerns.
- Run log — the how-it-happened detail (latest activity, phase timeline, per-task records, files touched, review comments, living specs) collapsed at the bottom: it describes how the run went, so it doesn't outrank why it happened.
Old specs without the newer capture degrade gracefully — only the sections whose data exists render, and a spec with no .spec-context.json at all simply has no Overview entry. Visibility is gated by the boolean speckit.viewer.activityPanel setting (default on); turning it off makes every spec open directly on its documents.
 Activity panel. The hero answers "how did the run stand" at a glance — status, honest active time, tasks, coverage, checks — and the Plan states the intent, the context the run worked from, and what was explicitly out of scope.
Custom Workflows & Commands
SpecKit Companion isn't tied to a single methodology. Swap out the default phases for any SDD workflow such as Agent Teams Lite, your own team's process, or anything that uses commands and produces markdown files. Define custom steps, labels, output files, and sub-documents. Add custom commands that appear as action buttons in specific phases (e.g., Verify, Archive, Commit, Create PR).
The sidebar, progress tracking, and workflow editor all adapt automatically to your custom workflow. See Configuration below.
The sidebar is one coherent, native VS Code surface — four views, one icon language, and a toolbar you can read at a glance: Specs for feature development, Living Specs for the durable capability documents, Steering for AI guidance documents, and Settings & Feedback.
Specs are grouped into three collapsible sections, each with a count in the header: Active, Completed, Archived. Active is expanded, Completed and Archived are collapsed, and individual spec rows start collapsed — a workspace with hundreds of finished specs opens to a short, readable list instead of a flood. Each spec carries a color-tinted beaker for its lifecycle: plain when specified, blue while in progress, yellow once implemented and awaiting your confirmation, and green once confirmed-completed. Expanding a spec shows each document's own status — a green check for a completed step, a blue dot for the current one, a hollow circle for the rest — and it stays coherent even under a completed or archived spec.
Click a spec's name to open it — the viewer opens on that spec's Overview, the dossier of why it exists, what constrained it, what was verified, and how its requirements map to tests. A spec with no recorded run has no Overview, so it opens on its first document instead. The click expands the row too; to browse a spec's documents without opening the viewer, click the chevron.
The Specs title bar shows at most four actions: Filter…, Sort…, More Actions…, and New Spec (rightmost). Filter opens prefilled with your current query and clears when you submit an empty one. Sort offers five compact options with a check on the current order. Everything occasional — Collapse/Expand All, Install Companion Extension, Upgrade… — lives behind More Actions, a native menu that drops open under the … button, and all of it stays in the Command Palette.
Hover a spec for Resume (when eligible) and More Actions; right-click gives you the same items in the same order — Set Status…, the lifecycle action, Copy Spec Name / Path, both Reveal actions, and Delete alone in its own danger group at the bottom. Multi-select with shift-click or cmd/ctrl-click to bulk-archive, complete, or reactivate, and right-click a group header to apply a lifecycle action to every spec in it, each behind a confirmation. If a mis-click ever strands a spec, Set Status… forces it to any chosen lifecycle status after a confirm — a recovery escape hatch that writes through the sanctioned writer instead of a hand-edited .spec-context.json.
Each active spec row shows its active task and how long ago it moved (e.g. T004 · 22h ago), and the tooltip adds a friendly status and last-activity line — never a raw lifecycle key. Clicking Resume dispatches /speckit.companion.resume for that spec: the pipeline continues from the recorded step, with prior decisions in scope, and the next /speckit.* command is sent to your AI provider — continuing at the next unchecked task when mid-implementation. When a step command is running, the spec shows a spinner and a live elapsed timer; a step-complete notification fires when it finishes (toggle via speckit.notifications.stepComplete).
Living Specs is how Companion moves a team from spec-first to spec-anchored, with a road to spec-as-source:
- spec-first: the spec exists before the code, then dies at ship. Feature specs pile up as history. This is stock spec-kit.
- spec-anchored: a durable spec per capability that stays true over time. Feature deltas fold back into it on completion, and drift between spec and code is detected. This is what Living Specs delivers: the living spec is the artifact, spec-anchored is the practice.
- spec-as-source: the spec is machine-validated and authoritative, and code conforms to it continuously. The drift check already points here.
The Living Specs view is a project-wide index of those capability documents. It lists each capability (with its central or colocated storage location and its architecture/coverage tiers) plus any orphan *.spec.md files no capability claims, and opens any of them on click. It's also actionable: right-click a capability to run a drift or coverage check through your AI assistant, start the adopt wizard from the view's title bar, and read each capability's health at a glance — a 3/5 covered requirement count and a drift note when code has moved ahead of the spec. It appears only when the companion spec-kit extension is installed, and it never renders blank: turned off or empty, it shows one informative row instead. See docs/sidebar.md for the full reference.
The Steering view is built in one explicit order — Companion, your provider, Steering Docs, SpecKit Project Files, References. The Companion node (moss icon, first) shows whether the companion spec-kit extension is installed and, once it is, expands into Configuration (click it to open .specify/companion.yml; expand it to browse its setting groups), Commands (the full /speckit.companion.* set, read live from the installed extension — click one to open the prompt it runs), and Templates. Your provider's node shows its brand logo, and its label and mark always name the same product: an unrecognized host editor gets a neutral chat icon rather than someone else's branding. Missing rule files surface a create action inside the Project or User group it belongs to, naming your provider's real filename. Every file-backed row offers both Reveal actions; only generated steering documents offer Refine and Delete. See docs/sidebar.md for the full reference.
Everything in the sidebar uses VS Code's own themed icons, so it stays legible in light, dark, and high-contrast themes; the only custom artwork is the product mark and the official provider logos. No status depends on color alone.
For the full reference (icon meanings, the toolbar and its More Actions menu, hover and right-click menus, the provider-icon table, the Steering hierarchy, and the lifecycle button matrix), see docs/sidebar.md.
Offline-First UI
Fonts (Geist Variable) and icons (codicons) ship bundled inside the extension .vsix. The spec viewer, spec editor, and workflow editor all render identically on a plane with no internet connection. No runtime requests to CDNs for fonts or icon glyphs.
Safety Affordances for Destructive Actions
Actions that change the spec's lifecycle are protected so a misfired click is easy to walk back:
- Regenerate queues behind a 5-second undo toast. Clicking Undo or pressing Esc cancels the regeneration; otherwise the backend fires when the timer elapses.
- Archive, Complete, and Reactivate each require two clicks. The first click swaps the button label to "Confirm?" for 3 seconds; a second click within that window confirms. Otherwise the label reverts silently and nothing happens.
- Locked future steps: while a step is running, downstream step tabs lock and surface a tooltip explaining why, so dispatched work cannot be interrupted by an out-of-order click.
- The OS-level Reduce Motion preference is honored globally. In-flight step pulses and other infinite animations stop when it's enabled.
Getting Started
- Install the extension from a
.vsix file or the VS Code marketplace
- Open the sidebar: the SpecKit icon is always visible in the activity bar; with no folder open, clicking it shows an empty-state panel with an Open Folder action
- Create a spec: once a folder is open, click the
+ button in the Specs view to start your first feature
Install the spec-kit Extension
There are two installs, and they're independent:
- The VS Code extension (this product) — the Visual Spec Viewer, inline review comments, the sidebar, and command dispatch. Install it from the VS Code Marketplace (or a
.vsix). This works on its own.
- The companion spec-kit CLI extension — adds the lean
/speckit.companion.* pipeline and the lifecycle capture hooks that drive the Activity timeline. This is a spec-kit CLI extension, not a VS Code Marketplace extension, so it installs through the specify CLI.
One-click from inside the editor. When the spec-kit extension is missing, a slim single-line Install spec-kit extension banner appears in the Create-Spec and Activity panels, and an install icon appears in the Specs sidebar. Click Install and the extension runs the install in an integrated terminal — no copy-paste. The banner has an × to dismiss it for good — once dismissed it stays hidden in every project and after a reload. (Already have it installed? You'll never see the banner.)
Manual install. You need a github-source spec-kit CLI first — the stock PyPI specify-cli does not ship the extension subcommand:
# 1. github-source spec-kit CLI (required: stock PyPI specify-cli lacks `extension`)
uv tool install specify-cli --from git+https://github.com/github/spec-kit.git --force

# 2. the companion spec-kit extension (installs/updates)
specify extension add companion --from https://github.com/alfredoperez/speckit-companion/releases/download/companion-latest/companion.zip
The companion-latest/companion.zip URL is a stable rolling asset — it always serves the newest build, so the same command installs and updates. Once the extension is listed in the spec-kit catalog, it shortens to specify extension add companion.
Update it later from the Specs view Upgrade… menu → Update spec-kit Extension (runs the same install command).

Setup & Components
SpecKit Companion is one extension that sits on top of a spec-driven workflow — it does not replace the command-line spec-kit process, and most of its pieces are optional. Here's what's actually required:
| Component |
Required? |
What it's for |
| SpecKit Companion extension |
Required |
Everything in this README — the Visual Spec Viewer, inline review comments, the sidebar, and command dispatch. Install it and the spec-review workflow works. |
spec-kit CLI (specify) |
Optional |
Only needed to run the /speckit.* phase commands (specify / plan / tasks / implement) that the extension dispatches. Install it via specify init (the upstream spec-kit project). The viewer and review comments work without it. |
.specify/ scaffolding |
Optional |
Generated by specify init in your workspace; holds spec-kit's templates and the /speckit.* command definitions your host AI resolves. Present only if you use spec-kit phase commands. |
companion hook in .specify/extensions.yml |
Optional |
Wires the extension's git steps (branch, commit) into spec-kit runs. A convenience for spec-kit users — not required for the extension itself. |
What the extension does on its own. The extension's only runtime coupling to an AI provider is dispatching command text: it assembles a prompt and hands it to a terminal CLI, the host editor's built-in chat, or the Claude Code panel. It never installs the spec-kit CLI for you and never reads a provider's response back. The Visual Spec Viewer and inline review comments read and write the spec markdown and .spec-context.json files directly, so they work with no CLI installed at all.
Extension dispatch vs. running spec-kit in a terminal. Whether a phase is driven by clicking a footer button in the viewer or by typing /speckit.specify yourself in a terminal, the work lands in the same place: the spec markdown under .claude/specs/<spec>/ plus the .spec-context.json that tracks state. There is no separate extension-owned database — the on-disk spec files are the single source of truth. That makes the two surfaces interchangeable and never competing: drive a step from the terminal and the viewer reflects it on the next file change; drive it from the viewer and your terminal sees the same files. Neither "owns" the workflow — they're two front-ends over one set of files.
For the dispatch styles (terminal CLI vs. the editor's built-in chat vs. the Claude Code panel), see Supported AI Providers — IDE Chat and Claude in VS Code route the prompt to an in-editor surface instead of a terminal, but the file-ownership model above is identical. For a deeper architecture walkthrough, see docs/how-it-works.md.
Sample Specs
Looking for "what does good look like?" The repo's own specs/ directory is the answer. Every feature ships with the spec that drove it. A few worth opening:
Compare the file lists side by side to see the contrast between the full and minimal flows.
Supported AI Providers
| Feature |
Claude Code |
GitHub Copilot CLI |
Gemini CLI |
Codex CLI |
Qwen Code |
OpenCode |
IDE Chat |
Claude in VS Code |
Wibey CLI |
Wibey (VS Code) |
| Steering File |
CLAUDE.md |
.github/copilot-instructions.md |
GEMINI.md |
AGENTS.md |
QWEN.md |
AGENTS.md |
Not supported |
CLAUDE.md |
AGENTS.md |
AGENTS.md |
| Steering Path |
.claude/steering/ |
.github/instructions/*.instructions.md |
Hierarchical GEMINI.md |
Hierarchical AGENTS.md |
.qwen/steering/ |
Hierarchical AGENTS.md |
Not supported |
.claude/steering/ |
Project root |
Project root |
| Agents |
.claude/agents/*.md |
.github/agents/*.agent.md |
Limited support |
Hierarchical AGENTS.md |
Not supported |
.opencode/agent/*.md |
Not supported |
.claude/agents/*.md |
.wibey/agents/*.md |
.wibey/agents/*.md |
| Hooks |
.claude/settings.json |
Not supported |
Not supported |
Not supported |
Not supported |
Not supported |
Not supported |
.claude/settings.json |
.wibey/hooks/hooks.json |
.wibey/hooks/hooks.json |
| MCP Servers |
.claude/settings.json |
~/.copilot/mcp-config.json |
~/.gemini/settings.json |
~/.codex/config.toml |
~/.qwen/settings.json |
~/.opencode/opencode.jsonc |
Not supported |
.claude/settings.json |
.wibey/.mcp.json |
.wibey/.mcp.json |
| CLI Command |
claude |
ghcs / gh copilot |
gemini |
codex |
qwen |
opencode |
Built-in editor chat (Copilot / Composer / Cascade) |
Claude Code GUI panel (no terminal) |
wibey |
Wibey chat panel (no terminal) |
Configure your preferred provider: Settings > speckit.aiProvider
IDE Chat
IDE Chat is not a CLI — instead of spawning a terminal, it routes the assembled
prompt to your editor's built-in AI chat (GitHub Copilot in VS Code, Composer in
Cursor, Cascade in Windsurf), detected automatically. Because the chat must
recognize the /speckit.* commands, spec-kit must be initialized for the host
editor (run SpecKit: Initialize Workspace, i.e. specify init). When the
workspace is initialized, IDE Chat auto-submits the prompt; when it isn't, it
prefills the chat and shows a warning instead of sending a command the chat can't
run. This is one-way dispatch — it does not read responses back or sync status.
Claude in VS Code
Claude in VS Code dispatches to the Claude Code GUI panel instead of
spawning the claude CLI in a terminal — for users who live in the panel rather
than a terminal. It shares the same .claude/ setup as the terminal claude
provider (steering, agents, hooks, MCP). The extension opens the panel via Claude
Code's URI handler and prefills the command; the Claude Code panel exposes no
programmatic submit, so you press Enter to run it.
Requires the Claude Code extension;
if it isn't installed, the provider suggests switching to terminal claude.
Configuration
Permission Mode
Controls whether AI CLIs run with permission prompts (safe) or bypass them (YOLO):
{
  "speckit.permissionMode": "interactive"
}
| Value |
Behavior |
"interactive" |
The CLI prompts before taking actions (recommended) |
"auto-approve" |
(YOLO) Skip all permission prompts. Faster but no review of tool calls. |
This applies to all providers that support it: Claude (--permission-mode bypassPermissions), Copilot (--yolo), and Qwen (--yolo). Gemini and Codex ignore this setting.
Copilot exception: GitHub Copilot CLI cannot surface permission prompts in -p mode. Even with permissionMode: "interactive", the extension auto-switches Copilot to auto-approve at dispatch time — otherwise the terminal would silently hang waiting for a prompt that never appears. This is enforced at runtime; dismissing the startup warning toast does not re-enable interactive mode for Copilot.
Telemetry
The extension sends anonymous, PII-free usage telemetry to help prioritize which AI providers and pipeline features to invest in. It is gated on two switches — if either is off, nothing is sent:
{
  "speckit.telemetry": true
}
| Switch |
Effect when off |
speckit.telemetry (default true) |
Disables all extension telemetry, regardless of the global setting |
VS Code's global telemetry.telemetryLevel |
Disables all extension telemetry, regardless of speckit.telemetry |
What is collected (all anonymous):
| Signal |
Example value |
| Selected AI provider |
claude, copilot, gemini, … |
| Default workflow |
speckit / companion |
| Which workflow phase was dispatched |
specify / plan / tasks / implement |
| Spec lifecycle counts |
created / completed / archived |
| Beta-flag on/off states |
a snapshot reported once per session |
| Extension / VS Code versions, spec count |
for version distribution and scale |
| Chosen workflow |
the built-in id, or the literal custom |
What is never collected: prompt content, file paths, spec names, or custom workflow names — only enum-like values, booleans, versions, counts, and a random per-spec id.
That per-spec id is a random UUID, not the spec name or path. It correlates a single spec's events into a funnel (created → dispatched → completed) without ever revealing which spec it is. It is stored in the spec's .spec-context.json so the same id rides every event for that spec.
Beta Features
The opt-in beta toggles appear under Beta Features in VS Code Settings in adoption-funnel order — the sequence you'd enable them in, not alphabetical:
| Order |
Setting |
Requires the spec-kit extension? |
| 1 |
speckit.companion.speckitCompanionWorkflow — turns on the whole SpecKit Companion Workflow (Create-Spec picker + Continue/Resume button) |
Yes |
| 2 |
speckit.companion.installPrompt — install banner when the extension is missing; shows independently of the Companion workflow toggle |
No (it surfaces the missing extension) |
| 3 |
speckit.viewer.activityPanel — per-spec Activity timeline in the viewer |
Yes |
The Companion workflow is the master switch for the workflow picker and the Continue/Resume button: with it off, both stay hidden. The install banner is the exception — it is decoupled from this toggle so that people who have not yet opted into beta still see the nudge to install the extension that powers the workflow. The banner shows whenever the extension is missing and you have not turned its own prompt off (or dismissed it), regardless of the workflow setting. Each setting is detailed in the subsections below.
Workflow Choice
You make one decision, once: run the stock SpecKit pipeline or the SpecKit Companion pipeline. That choice lives in a single setting, speckit.defaultWorkflow, and is pre-selected in the Workflow dropdown of Create New Spec. There is no separate template-profile, turbo-picker, or fast-path toggle — those three settings have been retired and folded into this one choice.
The Companion option is a beta: the Workflow picker only appears once you turn on speckit.companion.speckitCompanionWorkflow and the companion spec-kit extension is installed. Until then, Create Spec runs stock SpecKit with no picker — so you never see a Companion choice that would silently do nothing.
{
  "speckit.defaultWorkflow": "speckit"
}
| Value |
Behavior |
"speckit" (default) |
The stock SpecKit pipeline: /speckit.* commands, same sections and files as upstream spec-kit. |
"companion" |
The SpecKit Companion pipeline: the trimmed /speckit.companion.* commands (no user-story section, files/dependencies tasks, a smaller spec folder), built-in right-sizing for small vs. large changes, and a terminal mark-complete step. Requires the companion spec-kit extension. |
The chosen workflow is recorded on the spec at creation and dispatches its command family for every step of the run, so there's no cross-workflow command leakage. Existing users see no change: the default stays speckit.
Right-sizing is built in. What used to be the opt-in "complexity fast-path" now lives inside the Companion workflow itself — its routing step detects a small change and folds the ceremony (skips the review-gate pauses) without you flipping any setting. Larger changes keep the full specify → plan → tasks → implement pipeline.
When the extension is missing. Companion's /speckit.companion.* commands ship with the spec-kit extension. If you pick SpecKit Companion in a project that doesn't have it installed, each step falls back to the stock /speckit.* command and a one-click "Install spec-kit Extension" prompt appears — you never hit an "Unknown command". Full reference in docs/template-profiles.md.
Measured impact comes from a benchmark (/bench-run-all, 2026-06-10): the same feature set built through each workflow at three sizes (easy / medium / hard), in isolated sandbox clones with a deterministic harness plus an independent judge. Wall-clock is a single sample per cell, so read timing as directional.
| Per size (easy / medium / hard) |
SpecKit |
SpecKit Companion |
Spec size (spec.md lines) |
61 / 91 / 94 |
24 / 29 / 36 |
| Throwaway side files written |
3 / 4 / 4 |
0 / 0 / 0 |
| Wall-clock |
2m05s / 4m31s / 7m38s |
3m03s / 5m03s / 5m59s |
Companion specs run roughly 60 to 68% leaner, write zero throwaway side files at any size (research.md / data-model.md / quickstart.md / contracts/), and trend fastest as the feature gets harder. Correctness was a tie: every cell in both workflows shipped a passing, convention-following build (all-green regression suite, 5.0/5 independent-judge rubric), so neither needed rework. The difference is ceremony and progress visibility, not whether the feature works.
SpecKit Companion Workflow (picker + resume)
A single opt-in beta that defaults to false and turns on the whole SpecKit Companion experience. In VS Code Settings it reads as SpecKit Companion Workflow. With it on, Create Spec offers the SpecKit / SpecKit Companion picker (when the companion extension is installed) and the sidebar shows a resume (▶) button on active specs (active / tasks-done). With it off, both disappear and you're on stock SpecKit only. Toggling it updates visibility immediately, with no window reload. The install banner is not gated by this toggle — it follows its own speckit.companion.installPrompt setting so the nudge to install the extension reaches users before they opt into beta.
{
  "speckit.companion.speckitCompanionWorkflow": false
}
| Value |
Behavior |
false (default) |
No workflow picker; the resume (▶) button is hidden on all specs. The install banner still appears when the extension is missing (it follows its own setting, not this toggle). |
true |
The picker appears (when the companion extension is installed) and the resume (▶) button appears on eligible specs (active / tasks-done). |
This one setting replaces the former separate resume toggle, and was previously keyed speckit.companion.workflowBeta (labeled "Workflow Beta"). A prior speckit.companion.resumeBeta or speckit.companion.workflowBeta opt-in carries over to it automatically on upgrade.
Resume dispatches the command family the spec has been running — a spec on the Companion workflow resumes with /speckit.companion.<step>, a spec on the stock SpecKit workflow resumes with /speckit.<step> — based on the workflow recorded on the spec. This gate lives only in VS Code settings.
Controls how speckit commands are formatted when sent to AI providers:
{
  "speckit.commandFormat": "auto"
}
| Value |
Behavior |
"auto" |
Let the AI provider decide the format (default) |
"dot" |
Always use dot notation (e.g., speckit.plan) |
"dash" |
Always use dash notation (e.g., speckit-plan) |
Use auto unless your speckit version requires a specific command format. Override with dot or dash when the provider's default doesn't match what your setup expects.
AI Context Instructions
Controls whether the extension prepends a short context-update preamble to every SpecKit step prompt sent to the AI CLI:
{
  "speckit.aiContextInstructions": true
}
| Value |
Behavior |
true (default) |
Prepend a marker-wrapped preamble that instructs the AI to keep .spec-context.json current, including canonical substeps (e.g., plan.research, plan.design, implement.run-tests). |
false |
Send the raw /speckit.<step> command with no preamble. Useful if your AI ignores it or you're debugging raw prompts. |
The preamble adds ~200–300 tokens per dispatch and is identical across all providers (Claude, Gemini, Copilot, Codex, Qwen). Extension-side step-boundary writes remain the hard guarantee for startedAt / completedAt: this preamble unlocks finer-grained substep tracking.
Step-Complete Notifications
When a dispatched spec step finishes, the extension shows a VS Code information message naming the spec and step (e.g. Spec 074 · Plan complete). The message includes an Open spec action that focuses the viewer for that spec. VS Code routes info messages to the native OS notification surface when the window is unfocused, so you can tab away during long runs.
{
  "speckit.notifications.stepComplete": true
}
Set to false to silence the message while keeping the in-viewer elapsed timer.
Spec Directories
By default, specs are discovered in specs/ and .specify/specs/ (the SpecKit CLI's own layout), so a spec created either way shows up without extra configuration. You can configure additional directories or use glob patterns:
{
  "speckit.specDirectories": ["specs", "openspec/changes/*"]
}
Simple names (e.g., specs) list their children as specs. Patterns with wildcards treat each match as a spec folder.
Custom Workflows
Define alternative workflows with custom steps, output files, and sub-documents. Any SDD methodology that uses commands and produces markdown files can be plugged into SpecKit Companion.
Real-world example: Agent Teams Lite
Here's a full configuration using Agent Teams Lite, a multi-agent SDD framework:
{
  "speckit.customWorkflows": [
    {
      "name": "agent-teams-lite",
      "displayName": "Agent Teams Lite (SDD)",
      "description": "Multi-agent SDD workflow",
      "steps": [
        { "name": "specify", "label": "Spec",   "command": "sdd-spec",   "file": "spec.md", "subDir": "specs" },
        { "name": "plan",    "label": "Design", "command": "sdd-design", "file": "design.md", "includeRelatedDocs": true },
        { "name": "tasks",   "label": "Tasks",  "command": "sdd-tasks",  "file": "tasks.md" }
      ]
    }
  ],
  "speckit.specDirectories": ["specs", "openspec/changes/*", "openspec/changes/archive/*"],
  "speckit.customCommands": [
    { "name": "verify",  "title": "Verify",  "command": "/sdd-verify",  "step": "tasks", "tooltip": "Validate implementation matches specs" },
    { "name": "archive", "title": "Archive", "command": "/sdd-archive", "step": "tasks", "tooltip": "Archive completed change" }
  ]
}
Notice how custom workflows, spec directories, and custom commands work together:
- The workflow defines Spec → Design → Tasks phases with custom labels and commands
specDirectories tells the sidebar where to find specs (including archived ones)- Custom commands add Verify and Archive buttons to the Tasks phase
Basic example: remap default steps
{
  "speckit.customWorkflows": [
    {
      "name": "my-workflow",
      "displayName": "My Workflow",
      "steps": [
        { "name": "specify",   "label": "Specify",   "command": "myflow.specify",   "file": "spec.md" },
        { "name": "plan",      "label": "Plan",      "command": "myflow.plan",      "file": "plan.md" },
        { "name": "tasks",     "label": "Tasks",     "command": "myflow.tasks",     "file": "tasks.md" },
        { "name": "implement", "label": "Implement", "command": "myflow.implement", "actionOnly": true }
      ],
      "commands": [
        {
          "name": "auto",
          "title": "Auto Mode",
          "command": "myflow:auto",
          "step": "specify",
          "tooltip": "Goes through the whole specification in auto mode"
        }
      ]
    }
  ]
}
Workflow Commands
Workflows can define commands: extra action buttons that appear next to the primary action for a given step. For example, a command with "step": "specify" renders as a button next to Submit in the spec editor.
{
  "commands": [
    {
      "name": "auto",
      "title": "Auto Mode",
      "command": "/myflow:auto",
      "step": "specify",
      "tooltip": "Runs the full pipeline automatically"
    }
  ]
}
| Property |
Required |
Description |
name |
Yes |
Unique command identifier |
command |
Yes |
Command to execute verbatim (e.g., "/myflow:auto"; include the leading / for slash-command providers) |
step |
Yes |
Which workflow step to show this button on (e.g., "specify") |
title |
No |
Button label (defaults to name) |
tooltip |
No |
Hover text for the button |
Commands with step: "specify" appear as secondary buttons next to Submit in the spec creation dialog. Multiple commands per step are supported.
Provider Compatibility
A workflow can declare which AI providers it supports with supportedAiProviders. When set, the workflow is hidden entirely unless the active speckit.aiProvider is in the list — it disappears from the workflow picker, the spec editor, and every step/footer action. Omit the field (or use an empty array) to support all providers.
{
  "speckit.customWorkflows": [
    {
      "name": "my-workflow",
      "displayName": "My Workflow",
      "supportedAiProviders": ["claude"],
      "steps": [
        { "name": "specify", "label": "Specify", "command": "myflow.specify", "file": "spec.md" }
      ]
    }
  ]
}
A workflow whose commands are implemented as Claude Code skills (e.g. /myflow:*) can declare ["claude"] to keep it from appearing — as a dead, unrunnable path — under GitHub Copilot, Gemini, Qwen, or Codex.
| Property |
Required |
Description |
supportedAiProviders |
No |
Array of provider ids the workflow supports: claude, gemini, copilot, codex, qwen, opencode, ide-chat, claude-vscode. Omit or leave empty for all providers. An unknown id matches no real provider, hiding the workflow everywhere. |
The built-in default workflow has no declaration and is always available, so at least one workflow is always selectable regardless of provider.
Steps with sub-files
Steps can declare child documents that appear as expandable items in the sidebar:
{
  "steps": [
    {
      "name": "plan",
      "label": "Plan",
      "command": "speckit.plan",
      "file": "plan.md",
      "subDir": "plan"
    }
  ]
}
This scans plan/ for .md files and shows them as children of the Plan step. You can also use an explicit list:
{
  "subFiles": ["plan/architecture.md", "plan/api-design.md"]
}
Step Properties
| Property |
Required |
Description |
name |
Yes |
Step identifier (e.g., "specify", "design") |
command |
Yes |
Slash command to execute (e.g., "myflow.specify") |
label |
No |
Display name in sidebar (defaults to capitalized name) |
file |
No |
Output file for this step (defaults to {name}.md) |
actionOnly |
No |
When true, the step has no output file (e.g., an "Implement" step that just runs a command). It still occupies its slot on the viewer's pipeline rail, marked as an action; selecting it opens the document it runs from (Implement runs from tasks.md). It stays hidden from the sidebar's document tree |
subFiles |
No |
Array of child file paths shown under this step |
subDir |
No |
Directory to scan for child .md files (non-recursive) |
includeRelatedDocs |
No |
When true, unassigned .md files in the spec folder are grouped under this step. Only one step should have this flag. |
Behavior
- The sidebar shows only the steps declared by the active workflow
- Steps with missing output files appear as "not started"
- Steps with
actionOnly: true are action-only. They render on the viewer's pipeline rail in workflow order — marked as actions, showing completion and in-flight state — and appear in the workflow editor, but not in the sidebar's file tree. Because such a step produces no document of its own, selecting it opens the nearest earlier document it runs from (stock Implement opens Tasks); with no such document it stays inert. Custom commands scoped to an action-only step surface in the footer's actions while the workflow sits at that step
- When a spec is created via the editor, the selected workflow is automatically persisted to
.spec-context.json in the spec directory
- If no workflow is selected, the
speckit.defaultWorkflow setting is used (falls back to the built-in default)
- Once persisted, all subsequent operations (viewer, step execution, command palette) use the same workflow consistently
- The default workflow (
spec.md → plan.md → tasks.md → implement) is always available
Custom Commands
Add custom slash commands that appear in the workflow editor and the SpecKit: Run Custom Command picker.
{
  "speckit.customCommands": [
    "review",
    {
      "name": "commit",
      "title": "Commit Changes",
      "command": "/speckit.commit",
      "step": "tasks",
      "tooltip": "Generate a commit for completed work",
      "requiresSpecDir": false
    },
    {
      "name": "pr",
      "title": "Create PR",
      "command": "/speckit.pr",
      "step": "tasks",
      "tooltip": "Create a pull request for the feature"
    }
  ]
}
Properties:
name: Command identifiertitle: Display name in pickercommand: Slash command to executestep: Phase to show in: spec, plan, tasks, or all (default)tooltip: Description shown on hoverautoExecute: Auto-run in terminal (default: true)requiresSpecDir: Inject spec directory (default: true)
Spec Context (.spec-context.json)
Every spec directory holds a .spec-context.json file that is the single
source of truth for lifecycle state. The viewer derives badges, pulse,
highlight, and footer button visibility from this file only. File
existence is never used to infer step completion.
Canonical schema
{
  "workflow": "speckit | companion | <custom>",
  "specName": "060-spec-context-tracking",
  "branch": "060-spec-context-tracking",
  "currentStep": "specify | clarify | plan | tasks | analyze | implement",
  "status": "draft | specifying | specified | planning | planned | tasking | ready-to-implement | implementing | completed | archived",
  "history": [
    { "step": "specify", "substep": null, "from": { "step": null, "substep": null }, "by": "extension", "at": "ISO" }
  ]
}
history[] is the single append-only source of truth for step
boundaries. Per-step timing (start / completion / substeps) is derived
in-memory by the viewer; it is not persisted. Files written by older
versions that still carry stepHistory or transitions are accepted on
read and migrated on the next write.
The full JSON Schema lives at
src/core/types/spec-context.schema.json and
specs/060-spec-context-tracking/contracts/spec-context.schema.json.
Extension-side lifecycle writes
The extension appends a history[] entry — start or completion — and
flips the canonical status whenever a step is dispatched (via the
SpecKit commands or the viewer's next-step / Regenerate buttons — the
next-step button is labelled with the upcoming phase name, e.g. Plan,
Tasks, Implement, or Complete on the final step), and when a
spawned terminal closes, independent of AI cooperation. Spec status
changes (Mark as Completed, Archive, Reactivate) write the
canonical status and append a history entry. Write failures log to the
SpecKit output channel without blocking dispatch.
Advancing currentStep is atomic: setting it to a new step always
appends the matching start-entry in the same write. currentStep ahead
of history[] is the failure mode that makes the viewer show a fake
"Generating …" with no actual progress.
Invariants
- Unknown top-level fields are preserved across writes.
history is append-only. Never rewrite prior entries.- The last
history[] entry's step matches currentStep.
- When the viewer opens a spec with no context file, it writes a minimal
draft document; no step is marked completed from file presence alone.
Status vocabulary
draft → specifying → specified → planning → planned → tasking →
ready-to-implement → implementing → completed → archived.
Legacy shapes (status: "active", status: "tasks-done", or files that
only contain { status: "completed" }) are coerced by
normalizeSpecContext at read time.
Recovering a malformed context file
A .spec-context.json that is syntactically broken — a truncated write, a hand edit, or merge-conflict markers — cannot be parsed, so the viewer falls back to a read-only, draft-state render of the spec. Instead of failing silently, it surfaces an error notification naming the JSON parse error and the offending file path, with a Reset context action. Choosing Reset context moves the broken file aside to a timestamped backup (.spec-context.json.bak-<timestamp>) and writes a fresh minimal skeleton in its place, then reloads the viewer. The original bytes are never overwritten in place — they survive in the backup so you can salvage lifecycle history by hand. Dismissing the notification leaves the broken file untouched; reopening the spec re-offers the reset. (This covers JSON-syntax failures only — a file that parses but is semantically off is tolerated and coerced as above.)
Development
Setup
git clone https://github.com/alfredoperez/speckit-companion.git
cd speckit-companion
npm install
npm run compile
Running
- Open the project in VS Code
- Press
F5 to launch Extension Development Host
Building
npm run package
# Output: speckit-companion-{version}.vsix
| Platform |
Support |
Notes |
| macOS |
Yes |
Fully supported |
| Linux |
Yes |
Fully supported |
| Windows WSL |
Yes |
Supported |
| Windows |
Yes |
All bash-only providers (Copilot, Claude, OpenCode, Qwen) auto-detect PowerShell and use the equivalent Get-Content -Raw substitution; cmd.exe is supported on a best-effort basis (long prompts may exceed cmd's 8191-char line limit — switch to PowerShell or Git Bash if you hit it). |
Contributing
PRs welcome. See CONTRIBUTING.md for local setup, the F5 dev-host loop, test conventions, the Conventional Commit style this repo uses, and the README docs map you should follow before opening a PR.
Support
SpecKit Companion is free and open source. If it saves you time, you can support its development through GitHub Sponsors. You'll also find a "Sponsor" button on the Marketplace listing and a "Support this project" link in the Specs sidebar.
Acknowledgments
This project started from the amazing work at https://github.com/notdp/kiro-for-cc
License
MIT License
