Antigravity Storage Manager
Unified AI Gateway with visual dashboard, secure Google Drive sync, Telegram notifications, multi-account profiles, real-time quota monitoring, Proxy support, MCP server, and advanced backup tools.


Support
If you find this extension useful, consider supporting the development:


Features
- 🚀 Antigravity Proxy — Unified AI Gateway with visual dashboard to manage multiple AI providers (Antigravity, Copilot, Claude, Codex, Gemini, Z.AI, and more) through a single endpoint.
- 🤖 Telegram Bot Integration — Real-time quota alerts, system stats, and remote sync control via interactive bot.
- 👤 Multi-Account Profiles — Seamlessly switch between different Antigravity accounts (e.g., Personal vs Work) with separate quotas and settings.
- 📊 Advanced Quota Dashboard — Comprehensive real-time tracking of consumption speed, reset cycles, and remaining time estimates with visual indicators.
- 🔌 MCP Server Monitoring — Monitor the connection status and resource availability of your Model Context Protocol servers.
- ☁️ Google Drive Sync — Automatically sync conversations between devices with end-to-end encryption and parallel processing.
- 🌍 Global Localization — Native support for 16 languages (English, Russian, Chinese, Japanese, Korean, German, French, Spanish, Italian, Portuguese, Polish, Vietnamese, Arabic, Czech, Turkish).
- 🔄 Live Updates — Seamlessly syncs data between the status bar and dashboard every minute for up-to-the-second accuracy.
- 🔍 Account Insights — Monitor your Plan/Tier, specific feature availability (Web Search, Browser Tool), and raw Google API responses.
- 🛡️ Proxy Support — Full support for corporate proxies with authentication and strict SSL configuration.
- 📦 Export/Import — Backup conversations to ZIP archives individually or in bulk with conflict detection.
- 📝 Markdown Export — Export conversations as readable
.md files with message grouping and brain artifacts included.
- 🛑 Cancellation Support — Abort long-running operations (Sync, Export, Backup) safely at any time.
- 🛠️ Smart Configuration — Auto-detects missing sync setup and prompts for configuration on startup.
- 📱 Multi-Profile Quota Display — Intelligently combined quota usage for all accounts linked to active profiles on a specific device, with a scrollable and collapsible UI.
- 📝 Customizable Pinned Models — Cleanly save custom model IDs with human-readable labels and advanced validation.
Google Drive Synchronization (New!)
Keep your conversations synchronized across multiple machines using your Google Drive.
Setup Sync
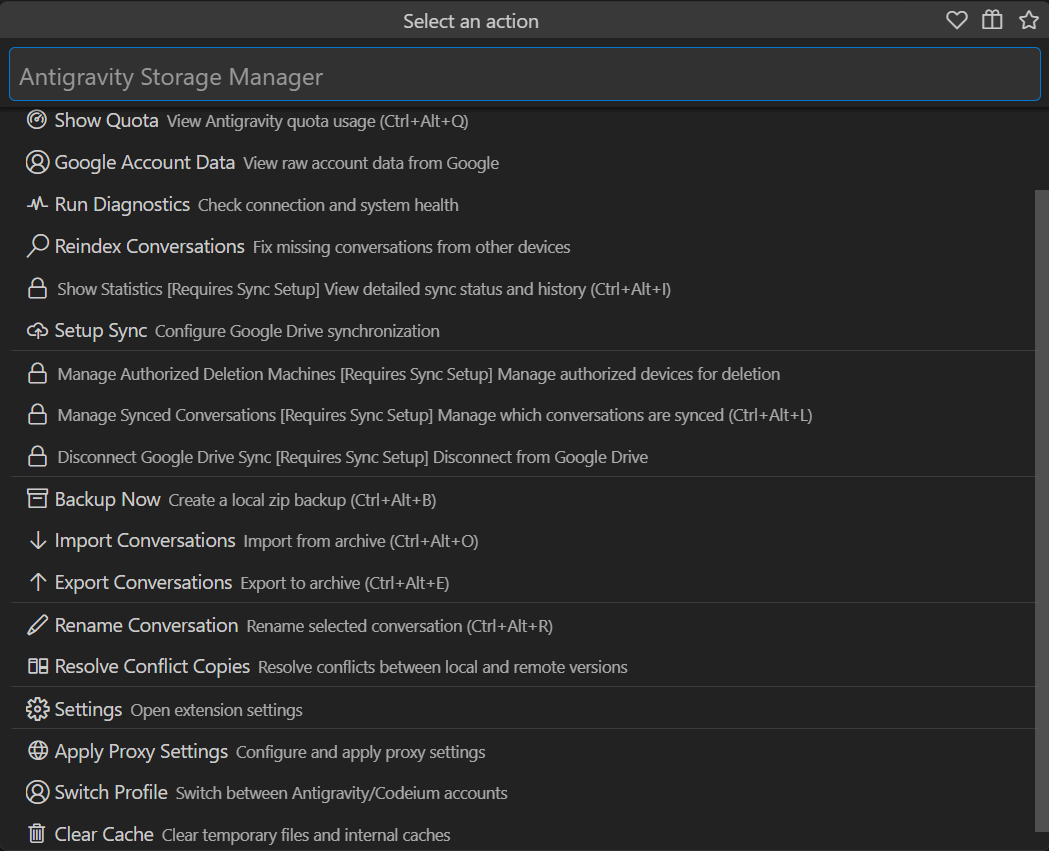
- Run command
Antigravity Storage: Setup Google Drive Sync
- Authentication: Log in with your Google account.
- Session Setup:
- New Session: Create a new device entry (e.g., "Work Laptop").
- Resume Session: Reconnect to an existing device ID from the list to avoid duplicates.
- Master Password: Create or confirm your master password to encrypt your data.
- Done! Conversations will automatically sync in the background.
👉 Detailed Setup Guide: Includes step-by-step instructions for configuring Google Cloud Console, adding test users, and troubleshooting.
Security
- Zero Knowledge: All data is encrypted locally before being uploaded.
- Master Password: Only you know the password. It is stored securely in your OS keychain.
- Limited Access: The extension only accesses files it created (app-specific folder).
Manual Sync
- Click the AG Sync button in the status bar
- Or run
Antigravity Storage: Sync Now
Manage Sync
- Click the AG Sync button in the status bar to open the menu.
- Status Bar Tooltip: Hover over "AG Sync" to see your Last Sync time and session Sync Count.
- Devices Dashboard: Run
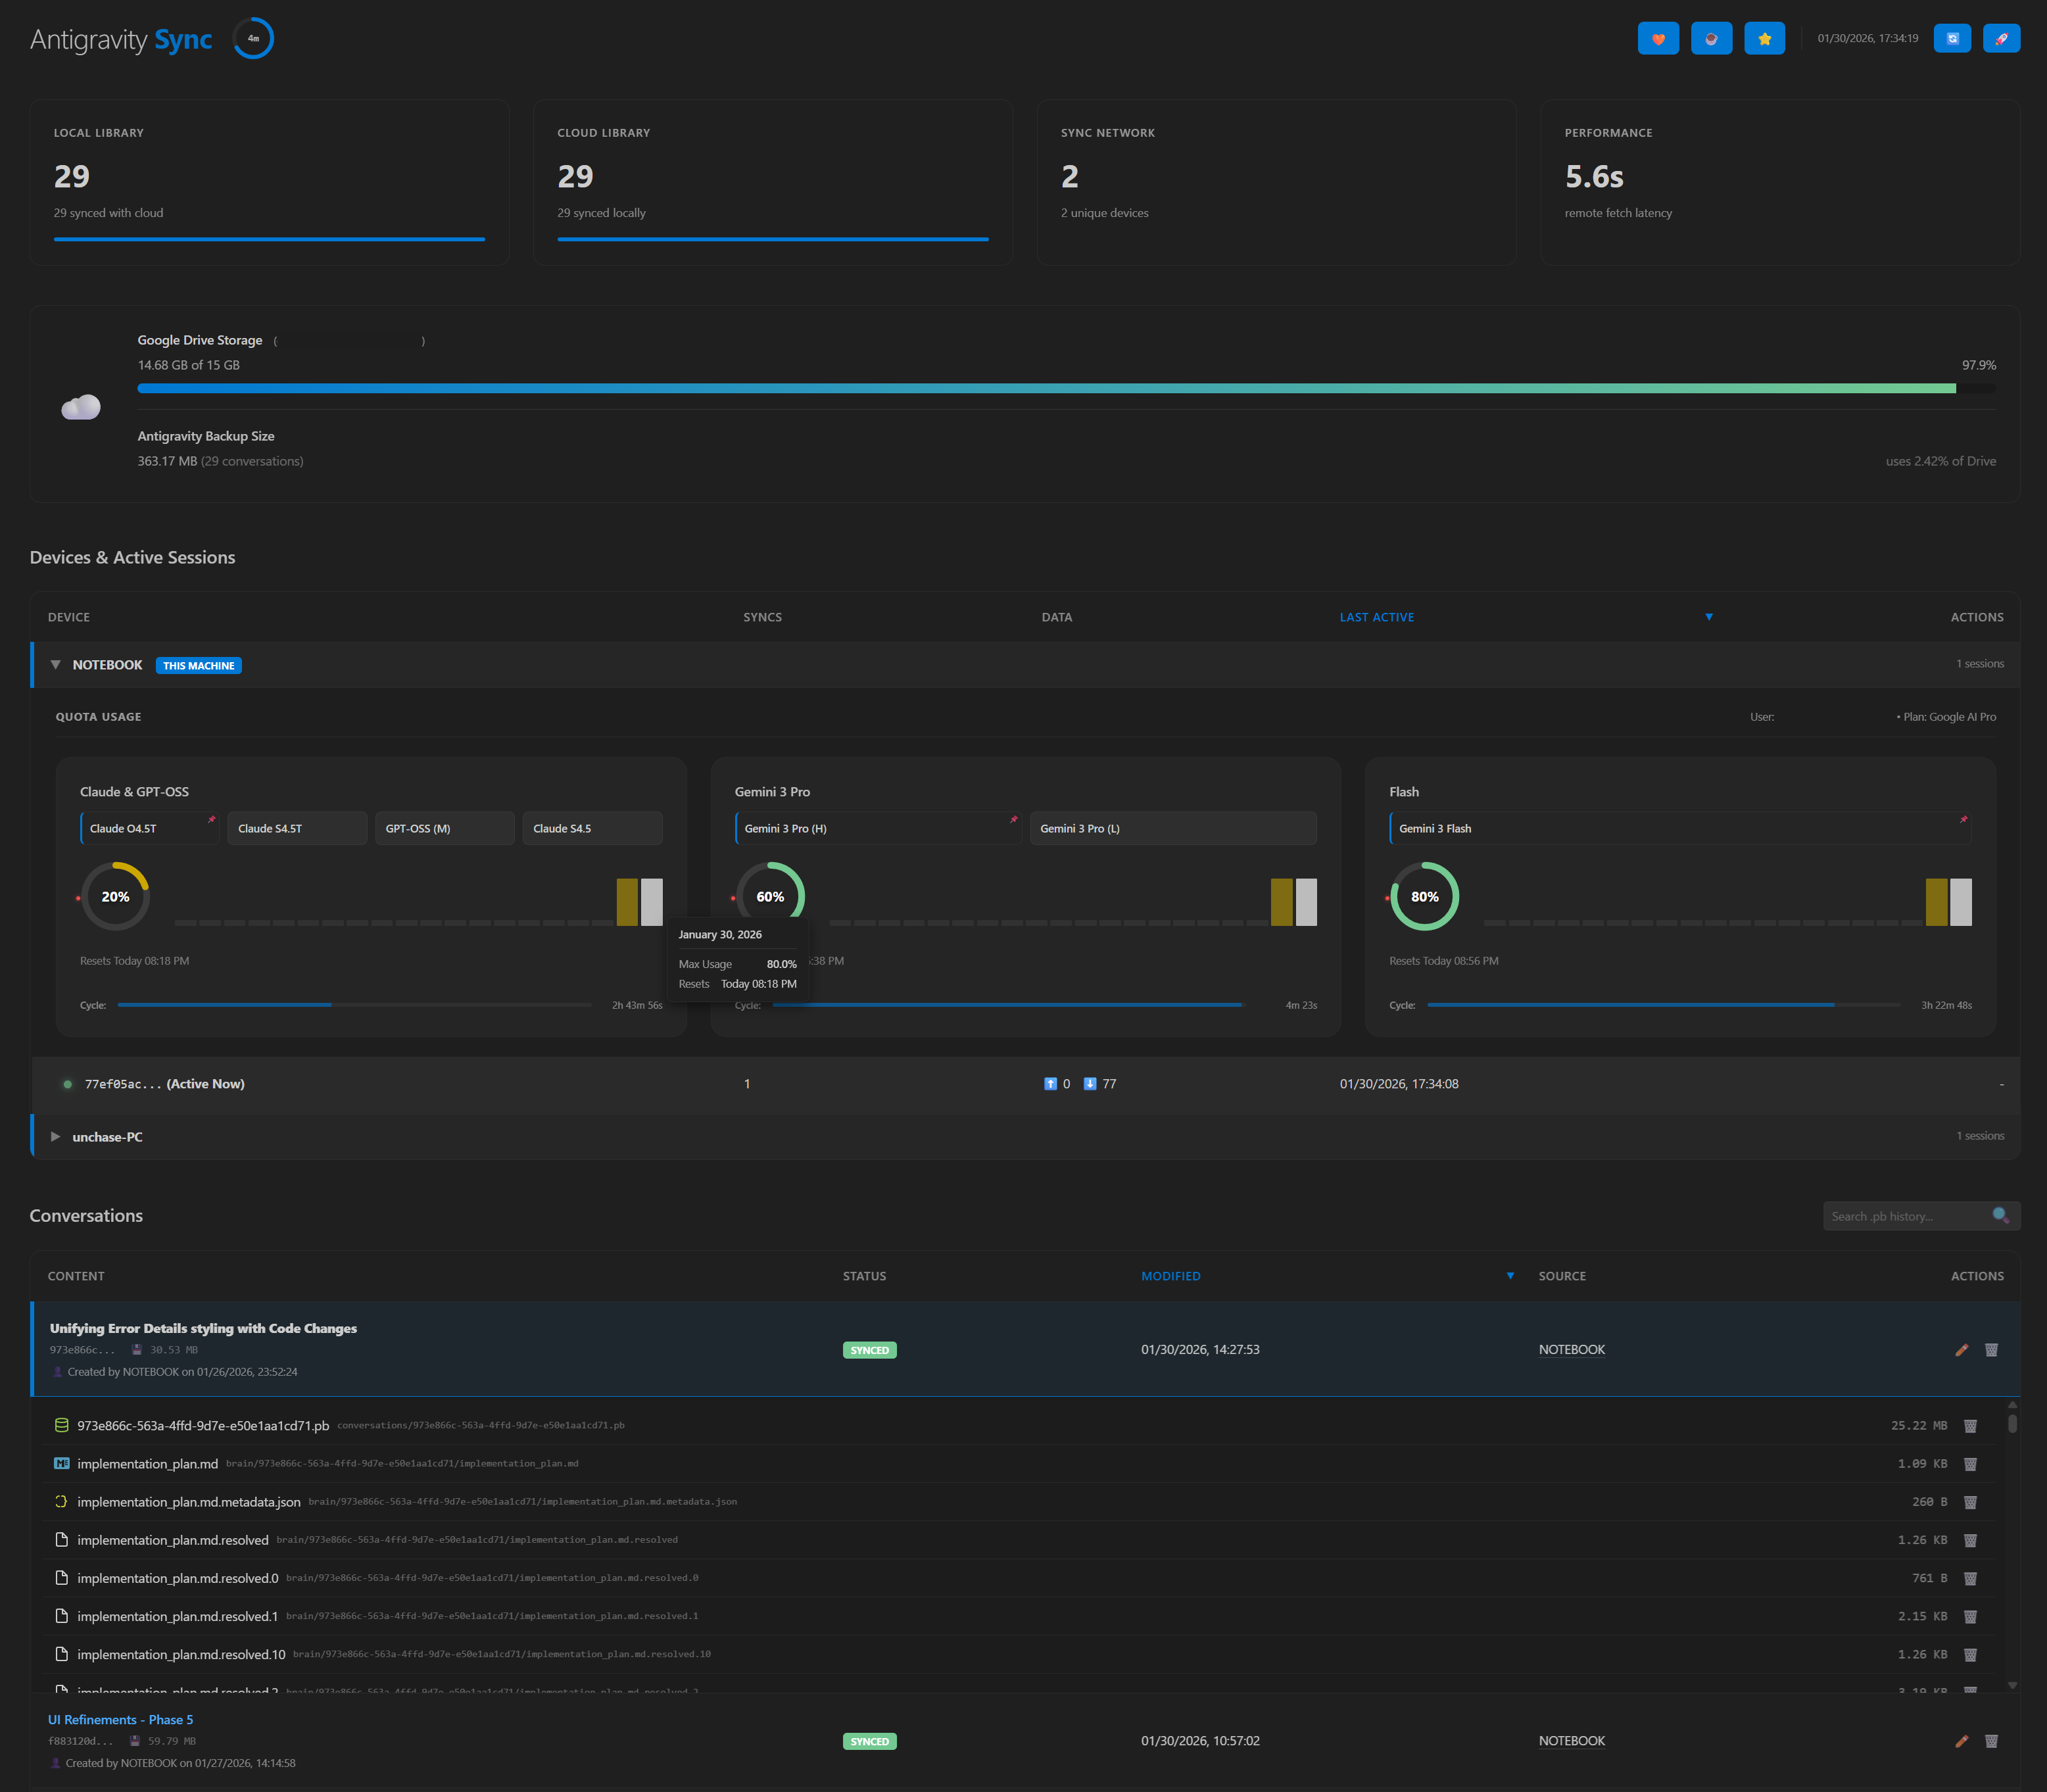
Antigravity Storage: Show Statistics (or Ctrl+Alt+I) to view the interactive dashboard:
- Connected Devices: Visualize sessions grouped by machine (e.g., "Home PC").
- Status Indicators: See which sessions are Online (Green) or Offline (Red) based on recent activity.
- Quota Tracking: Monitor quota usage (Credits/Limits) for each active session.
- Manage Conversations: Rename or Delete conversations directly from the list.
- Selective Sync: Manually Upload (Local Only) or Download (Remote Only) individual conversations.
- Visual Analytics: Interactive pie charts showing sync coverage (Local vs Synced, Remote vs Synced).
- Machine Management:
- Delete (🗑️): Remove stale machines and their sessions.
- Force Push (🔄): Send a sync signal to other devices.
- User Info: Displays the current user's email and plan (from Google AI Studio or Google Drive).
- Active Transfers: Monitor ongoing uploads and downloads in real-time. Click on any item to open the conversation instantly.
- Force Sync (🚀): Manually trigger a forceful synchronization that bypasses local caches and flushes server buffers.
- Real-time Data: Information is automatically refreshed during sync events; you can also use the Refresh Data (🔄) button to reload manually.
- Status Bar: The AG Sync icon updates dynamically (☁️ Cloud, 🔄 Spinning, ⚠️ Error, ✅ Check) to reflect the current state.
- Shortcuts: Default hotkeys are provided for common actions (e.g.,
Ctrl+Alt+S for Sync Now) and are displayed in the menu.
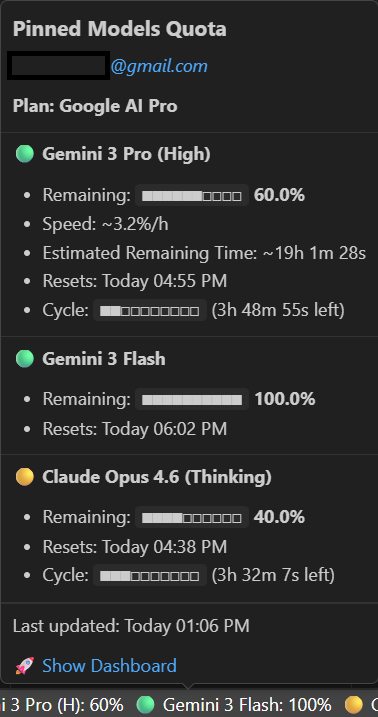
Account & Quota Dashboard (New!)
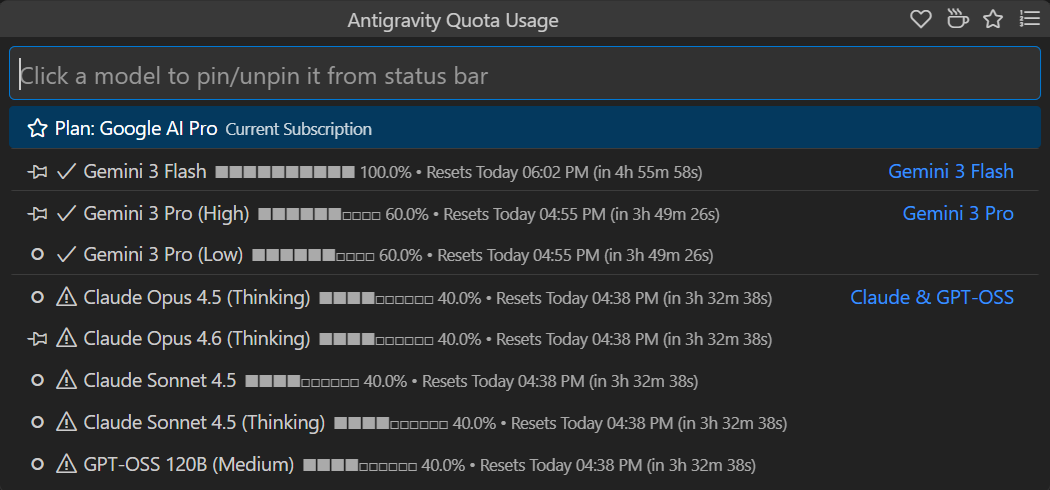
(Fig. 1: Quota Dashboard showing models sorted by Quota)
Monitor your AI usage limits and remaining credits directly within VS Code.
Features
- Real-time Synchronization: The dashboard automatically refreshes data every minute, staying perfectly in sync with the status bar.
- Plan & Tier Analysis: View your exact plan name and tier description directly from authenticated Google API data.
- Model Monitoring: Pin specific models (e.g., Gemini 3 Pro, Claude Sonnet 4.6) to the status bar for quick access.
- Feature Availability: Check which tools (Web Search, MCP, Browser) are enabled for your current subscription level.
- Visual Indicators: Color-coded status dots (🟢/🟡/🟠/🔴) and high-resolution progress bars show usage at a glance.
- Cycle Tracking: High-tier models show a visual time scale
[████░░] indicating positions within their specific quota cycles.
- Detailed Statistics: Precise counters for request usage and token limits for every model.
Usage
- Click the AG Quota (
AGQ) indicator in the status bar (or run Antigravity Quota: Show Quota).
- Pin/Unpin models by clicking on them in the menu.
- The status bar auto-updates every minute.
Status Bar & Settings
(Fig. 2: Rich Tooltip)
- Hover over the database icon in the status bar to see a rich tooltip with pinned model details.
- Configure which models to pin in your User Settings.
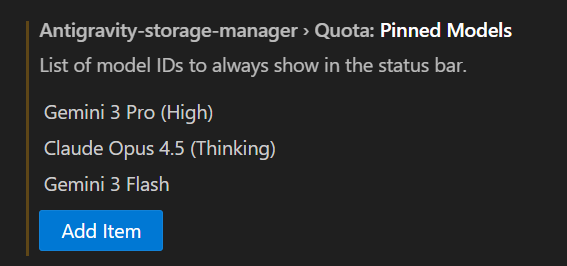
(Fig. 3: Settings UI)
MCP Server Monitoring (New!)
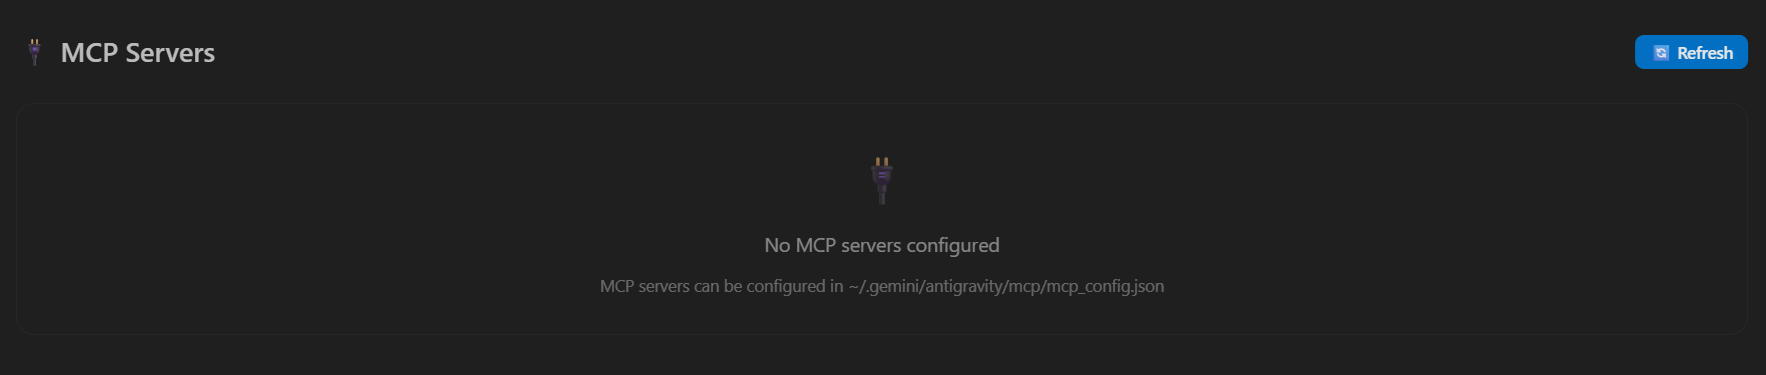
(Fig. 4: MCP Server Status Panel)
Monitor your Model Context Protocol (MCP) server connections directly from the Sync Statistics Dashboard.
Features
- Connection Status: Real-time status indicators (🟢 Connected, 🟡 Pending, 🔴 Error, ⚪ Disconnected) for each server.
- Tool & Resource Overview: Quickly see the number of tools and resources available on each MCP server.
- Error Diagnostics: Detailed error messages are displayed for servers that fail to connect.
- Manual Refresh: Reconnect to all configured MCP servers with a single click.
Configuration
MCP servers are configured in ~/.gemini/antigravity/mcp/mcp_config.json. The panel will automatically display all servers defined in your configuration.
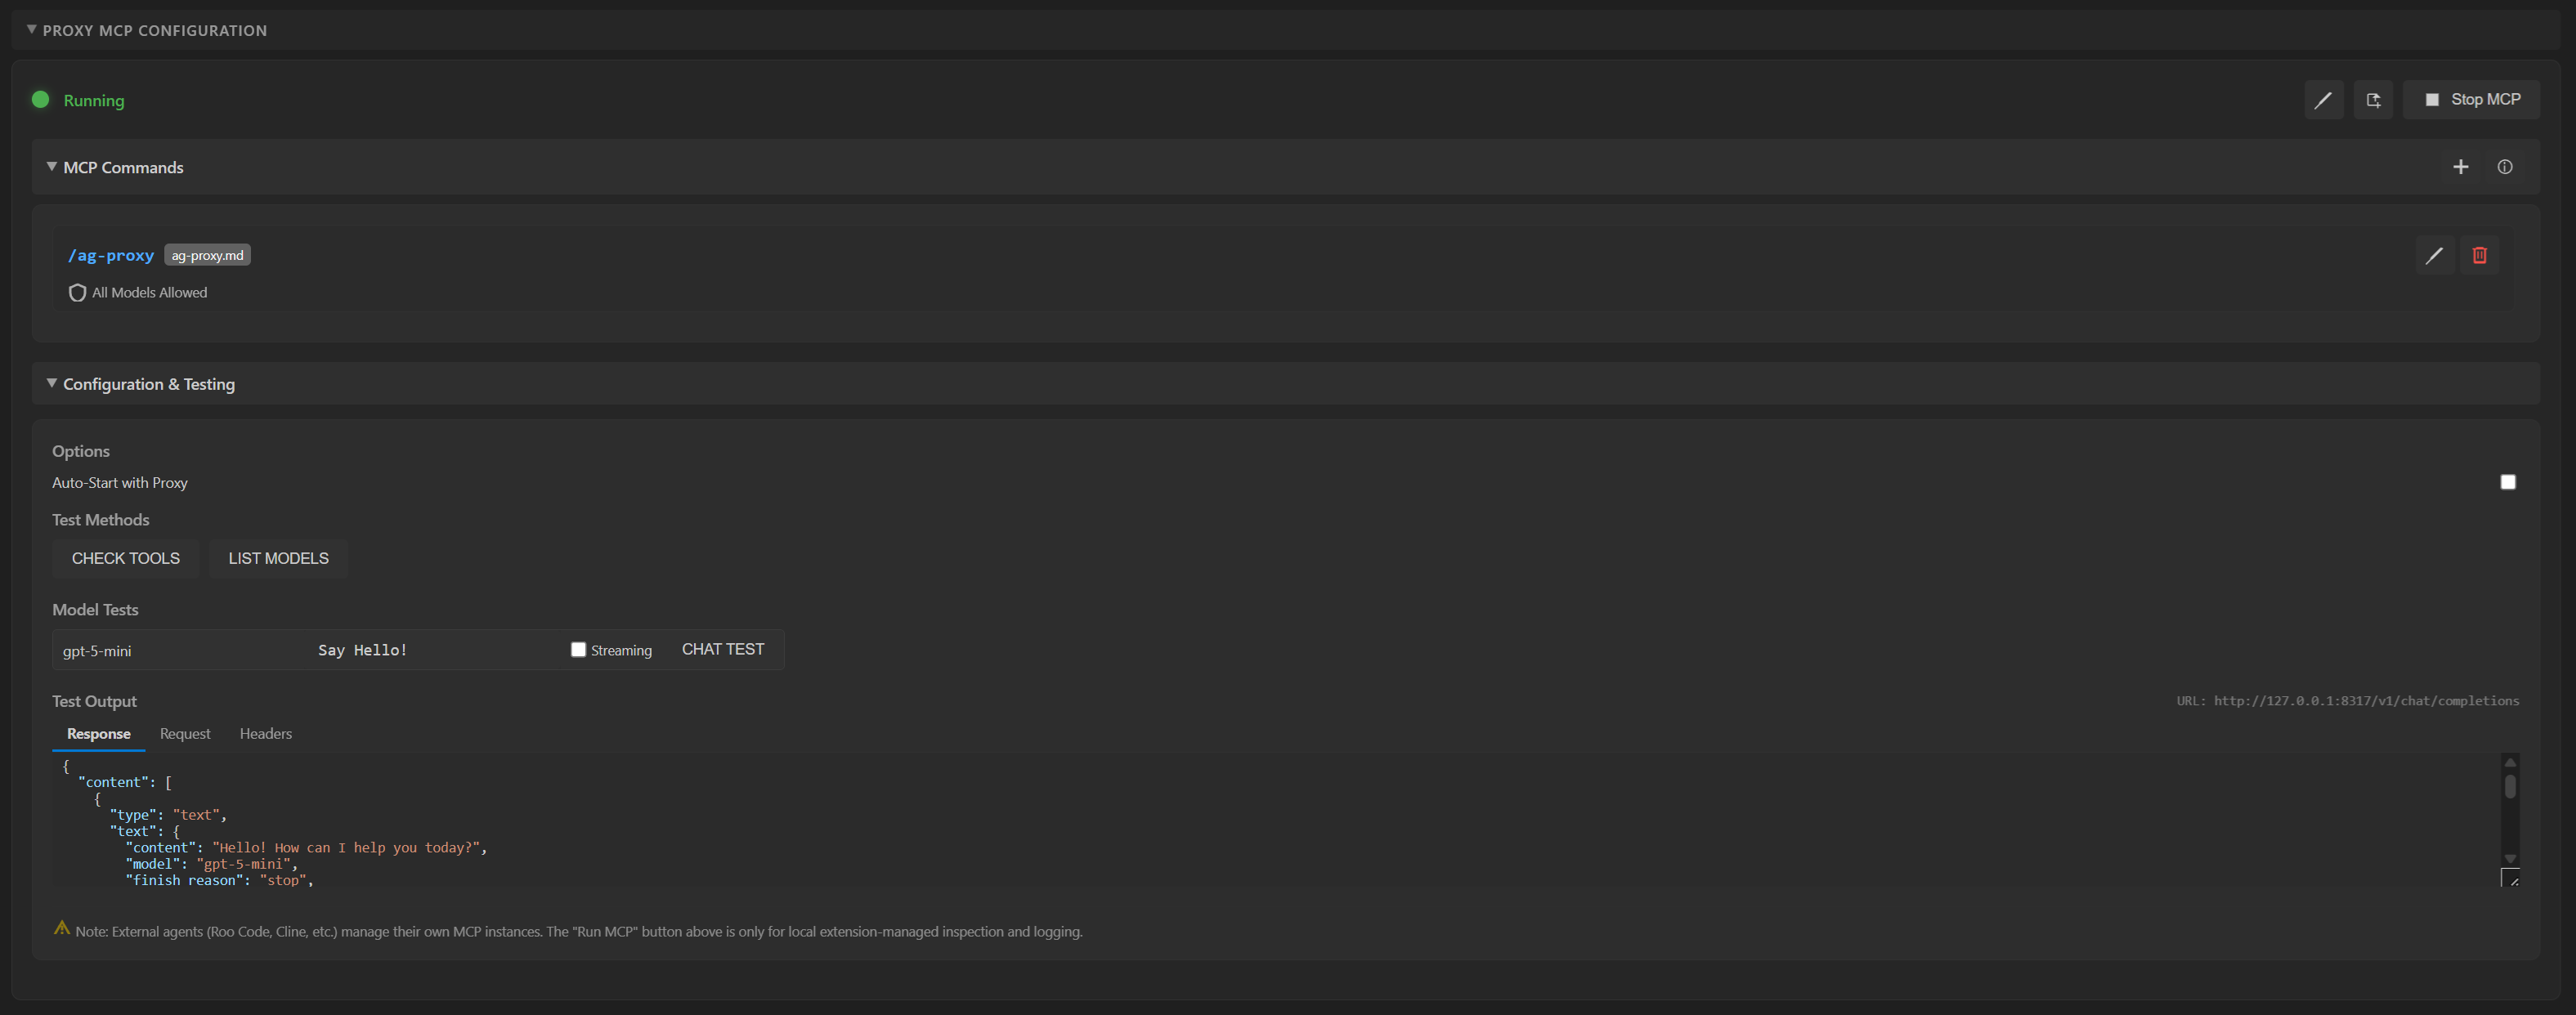
Antigravity Proxy – Unified AI Gateway (New!)
(Fig. 5: Antigravity Proxy Dashboard)
The Antigravity Proxy is a local proxy server that unifies access to multiple AI providers through a single OpenAI-compatible endpoint. Manage all your AI providers from a beautiful visual dashboard without leaving VS Code.
Supported Providers
- OAuth Providers (one-click Sign In):
- Antigravity (Google AI Studio)
- Codex (OpenAI Codex CLI)
- GitHub Copilot (using VS Code's built-in authentication)
- API Key Providers:
- Claude (Anthropic)
- Gemini (Google AI)
- Z.AI (GLM-4 Plus, GLM-4.7, GLM-4.6)
- Vertex (Google Cloud)
- Kiro (AWS)
Dashboard Features
- Provider Cards: Each provider is displayed as an interactive card with:
- Status Badge: Connected (🟢), Not Configured (⚪), or Error (🔴)
- Actions: Sign In, Configure, Test Connection, Delete Auth
- Multi-Account Support: Manage multiple authentication tokens per provider
- API Keys Management: Generate, view, enable/disable, and delete local API keys.
- Management Secret Key: Securely manage the proxy's Web UI password.
- Proxy Control: Start, Stop, and Restart the proxy directly from the dashboard.
- Status Bar: Real-time indicator (
AG Proxy: ON/OFF) in the VS Code status bar.
Quick Start
- Open Command Palette (
Ctrl+Shift+P).
- Run
Antigravity Proxy: Dashboard.
- If the proxy binary is not installed, click Install Proxy to download it automatically.
- Click Start Proxy to launch the server.
- Configure your providers by clicking Sign In or Configure on their cards.
- Use the generated API Key in your applications with endpoint
http://127.0.0.1:8317/v1.
Configuration
- Port:
antigravity.proxy.port (default: 8317)
- Auto-Start:
antigravity.proxy.enabled — Start proxy automatically when VS Code launches.
- Upstream Proxy:
antigravity.proxy.upstreamUrl — Route proxy traffic through corporate proxy.
- Binary Path:
antigravity.proxy.binaryPath — Custom path to cliproxy executable.
Commands
Antigravity Proxy: Dashboard — Open the visual dashboard.Antigravity Proxy: Start — Start the proxy server.Antigravity Proxy: Stop — Stop the proxy server.Antigravity Proxy: Install — Download and install the proxy binary.Antigravity Proxy: Show Log — Open the proxy output channel for debugging.Antigravity Proxy: Open Config — Edit config.yaml directly.
Antigravity Proxy MCP Server (New in v0.14.0!)
The extension now includes a built-in Model Context Protocol (MCP) server that wraps the Antigravity Proxy. This allows AI clients to directly interact with the proxy and its configured providers using standard tools.
Capabilities
proxy_status: Check status, port, and configured providers.list_models: Get a list of all available AI models.chat_completion: Send standard chat completion requests.get_quota: View quota usage for Antigravity, Gemini CLI and Codex.
Configuration
Add the server to your mcp_config.json:
{
  "mcpServers": {
    "antigravity-proxy": {
      "command": "node",
      "args": ["<PATH_TO_EXTENSION>/dist/mcp/proxyMcpServer.js"],
      "env": {
        "PROXY_PORT": "8317"
      }
    }
  }
}
Corporate Proxy Configuration
If you are behind a corporate proxy, you can configure Antigravity to route its internal requests through your proxy server.
Setup
- Open Settings (
Ctrl+,).
- Search for
antigravity proxy.
- Configure:
- Proxy URL:
http://my-proxy:8080
- Username/Password: (Optional) For authenticated proxies.
- Strict SSL: Enable/disable certificate verification.
- Run command
Antigravity: Apply Proxy Settings to apply these settings to your VS Code profile globally.
Note: This command updates the global http.proxy setting in VS Code to ensure the Antigravity Language Server respects your proxy configuration.
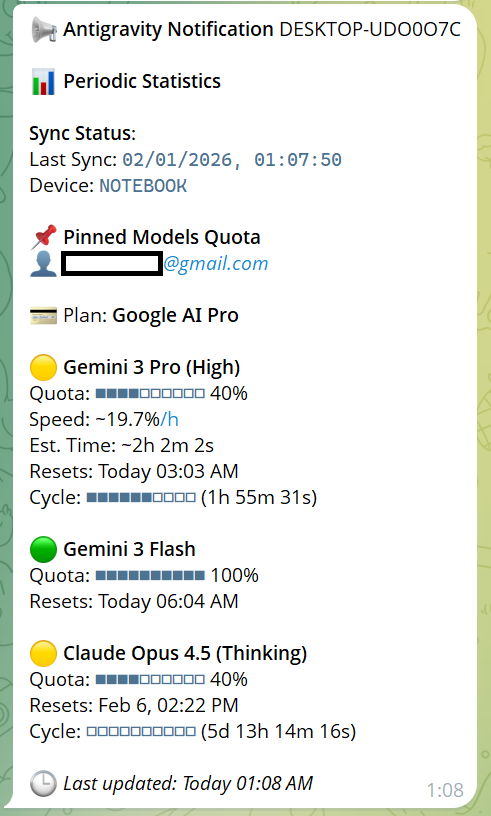
Telegram Bot Integration (New!)
Receive real-time notifications about your quota usage, system statistics, and sync status directly in Telegram. You can also control Antigravity efficiently using interactive commands.
Features
- Quota Alerts: Get notified when your AI credit balance is low or when quotas reset.
- Visuals: Messages include ASCII progress bars for quota usage and reset cycles, and display the linked account email.
- Interactive Commands:
/stats — View system resource usage (CPU, RAM) and uptime./sync — Trigger a synchronization remotely./ping — Check bot health.
- Secure Access: Restrict bot access to specific Telegram User IDs or Usernames. Unauthorized users receive an instant "Access Denied" response with their Chat ID for easy configuration.
Setup Guide
Create a Telegram Bot:
- Open BotFather in Telegram.
- Send
/newbot and follow the instructions to create a bot.
- Copy the HTTP API Token provided by BotFather.
Configure Extension:
- Open VS Code Settings (
Ctrl+,).
- Search for
antigravity telegram.
- Set Bot Token: Paste your API Token.
- Set Allowed User IDs: (Optional) Array of numeric Telegram User IDs allowed to interact with the bot.
- Set Allowed Usernames: (Easier) Array of Telegram usernames (without
@) allowed to use the bot (e.g., ["your_username"]).
- Note: For usernames to work, you must start a chat with the bot first so it can resolve your Chat ID.
Start the Bot:
- The bot starts automatically when VS Code launches if the token is configured.
- Send
/start or /help to your bot to begin.
Configuration Options
antigravity.telegram.botToken: Your bot's API token.antigravity.telegram.userIds: List of authorized numeric user IDs.antigravity.telegram.usernames: List of authorized usernames.antigravity.telegram.statsIntervalCron: Cron expression for periodic stats (default: 0 9 * * * - every day at 9 AM).
Profile Switching (New!)
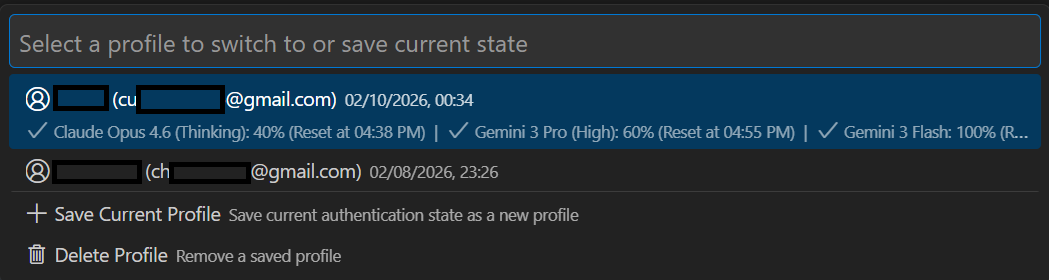
(Fig. 5: Profile Switching)

(Fig. 6: Profile Settings)
Easily switch between different Antigravity accounts (e.g., Personal vs Work) with separate quotas, limits, and authentication states.
Features
- Multi-Account Support: Maintain distinct authentication sessions for different Google accounts.
- Persistent Storage: Configure a custom directory to store your profiles, ensuring they survive extension updates or uninstalls.
- Quick Switch: Use the
Antigravity Storage: Switch Profile command to instantly toggle between environments.
Usage
- Run
Antigravity Storage: Switch Profile from the Command Palette.
- Select "Save Current Profile" to store your current session.
- Select "Create New Profile" (or switch to an existing one) to start fresh.
- Note: A window reload is required to apply the profile switch.
Configuration
By default, profiles are stored in the extension's global storage. To prevent data loss upon uninstallation, set a custom path in settings:
- Setting:
antigravity.profiles.profilesDirectory
- Value: Absolute path to your desired folder (e.g.,
C:\MyProfiles\Antigravity).
Google Account Data (Advanced)

(Fig. 5: Raw Account Data view)
For power users and troubleshooting, you can view the raw JSON data received from the Google API. This includes detailed information about your account status, tier details, and all raw model quota limits.
How to access:
- Open the AG Sync menu from the status bar.
- Select Google Account Data.
- Or click the View Raw JSON button directly from the Account Information dashboard.
Conversation Viewer
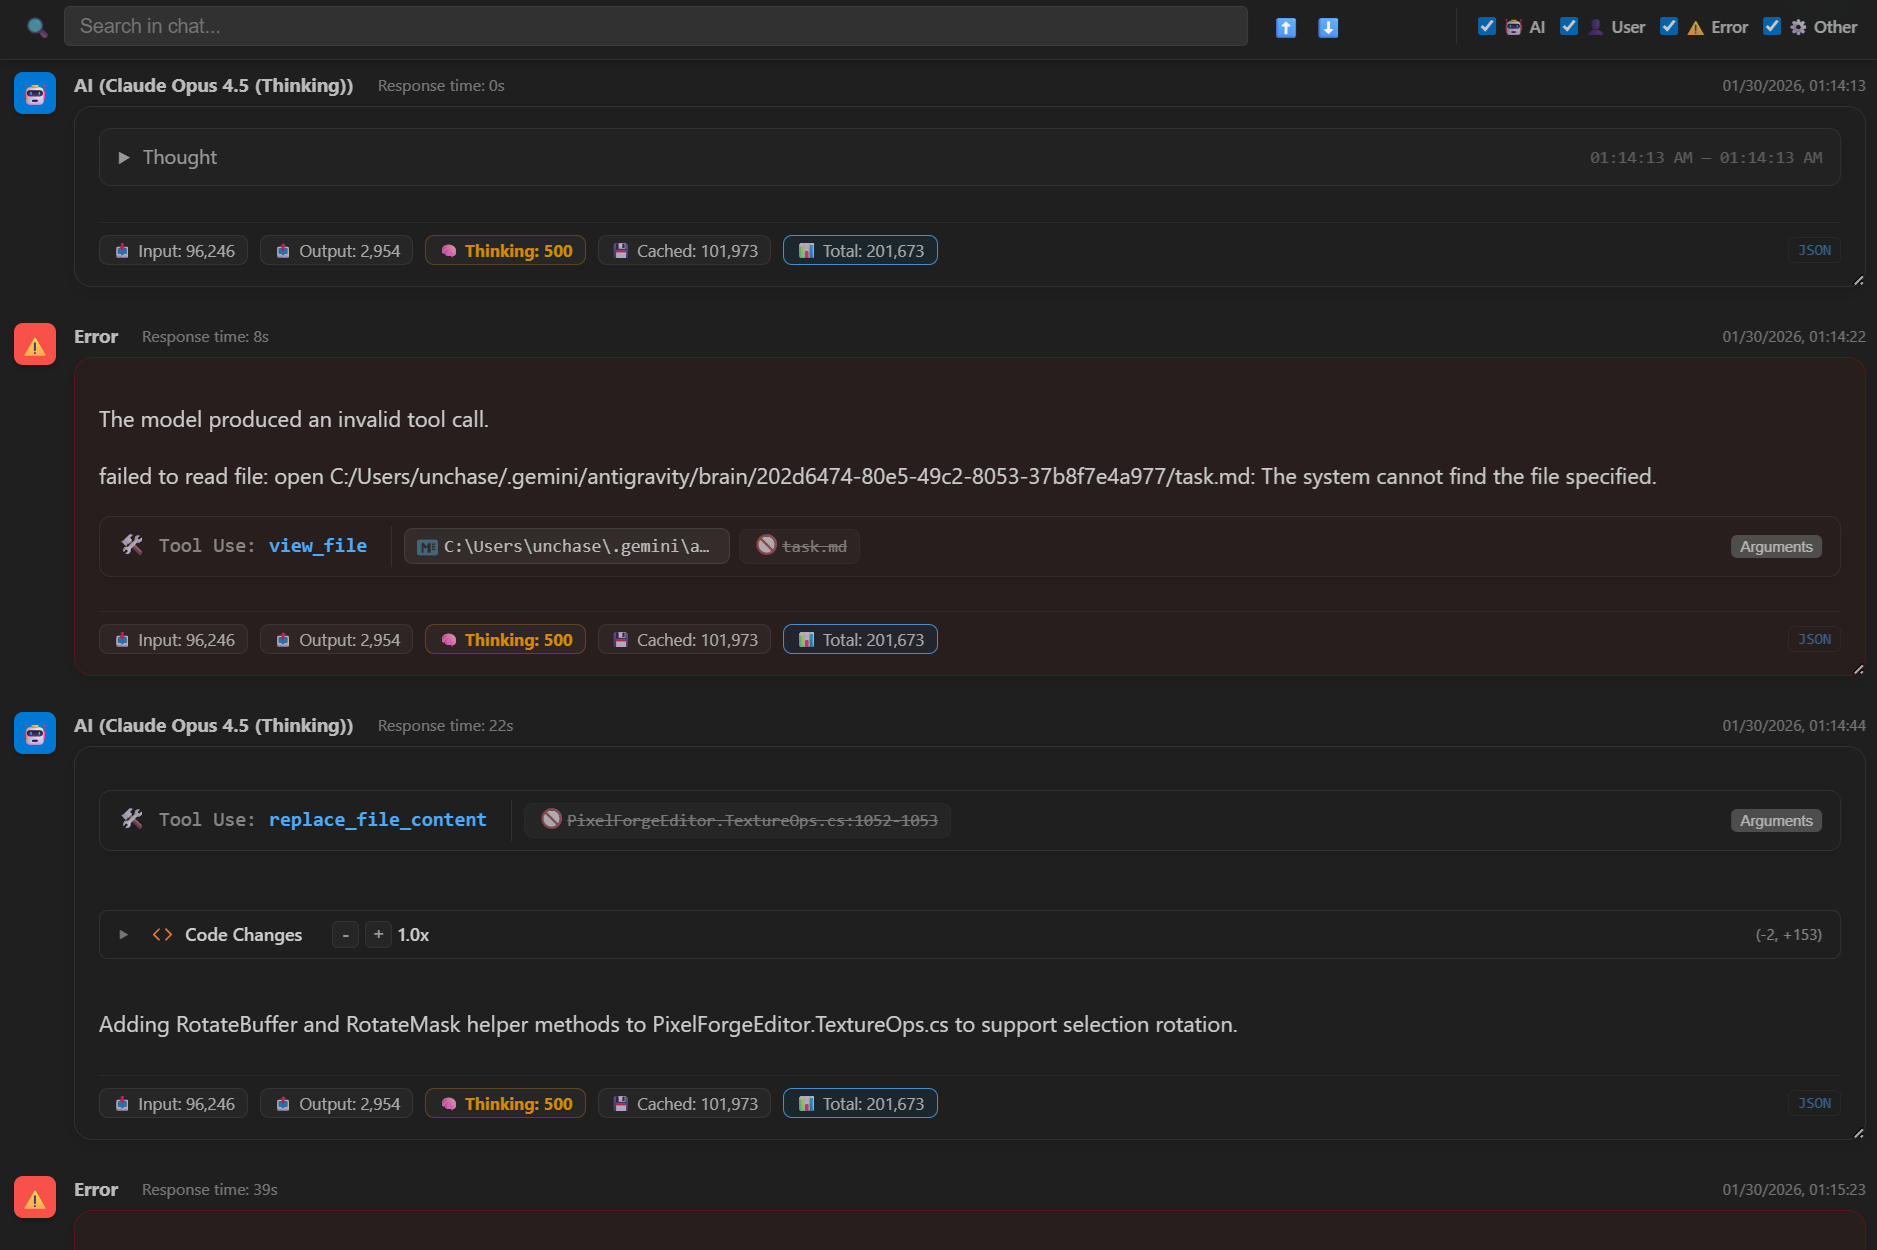
Need to review a long conversation without scrolling through the small chat window? Open any conversation in a full-screen, dedicated editor tab.
Features
- Distraction-Free Reading: Full-width view optimized for readability.
- Rich Markdown Support: Code blocks, tables, and formatting rendered perfectly.
- Syntax Highlighting: Complete language support for all code snippets.
- Quick Access: Just click on any conversation in the Sync Statistics dashboard or use the
Antigravity Storage: Open Current Conversation command.
How It Works (Export/Import)
1. Quick Access via Status Bar
The extension adds AG Export, AG Import, and AG Sync buttons to your VS Code status bar:

2. Command Palette Integration
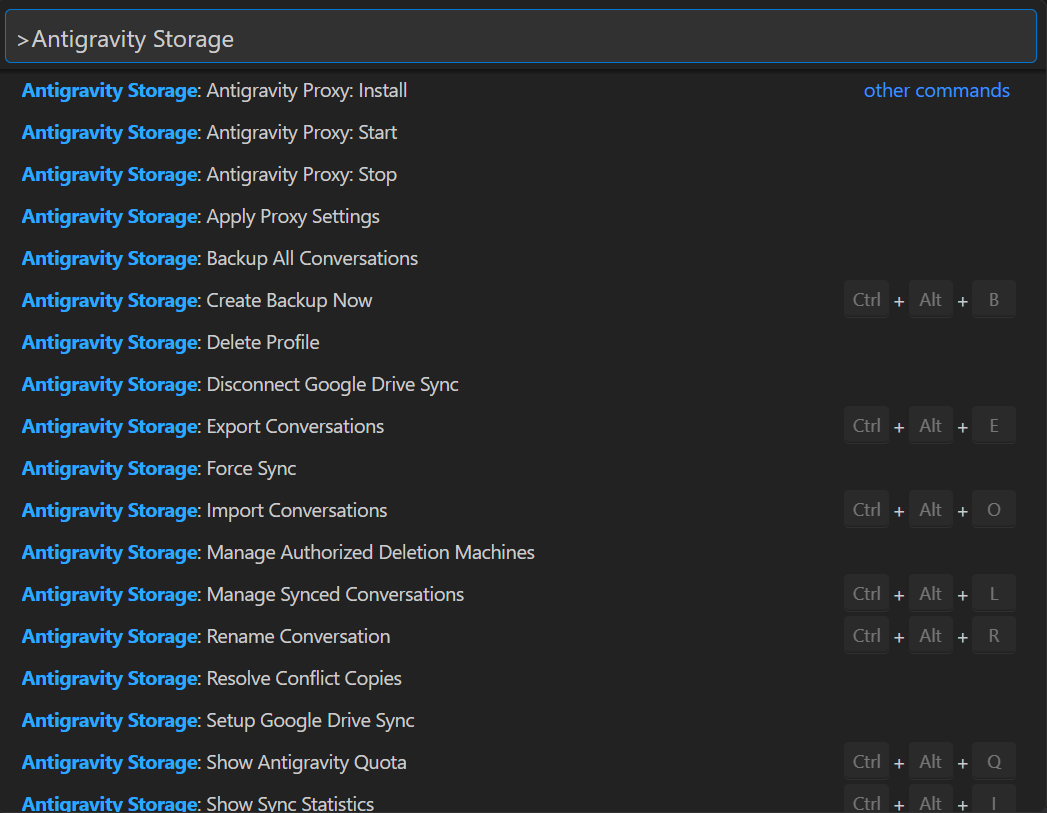
All commands are available through the Command Palette (Ctrl+Shift+P). Just type "Antigravity Storage" to see all available actions.
3. Multi-Select Export
When exporting, you can select multiple conversations at once using the Space key.

Advanced Features
💾 Local Backup
Worried about the cloud? Create a full local backup anytime.
- Run
Antigravity Storage: Backup All Conversations
- Choose a destination folder.
- A single ZIP file containing all your conversations will be created.
⚔️ Conflict Resolution
If you edit the same conversation on two machines offline, a conflict copy is created.
- Run
Antigravity Storage: Resolve Conflict Copies
- Select the conflicting conversation from the list.
- Choose to Keep Original (delete copy) or Keep Conflict (overwrite original with copy).
Installation
From VS Code Marketplace
- Open VS Code
- Go to Extensions (
Ctrl+Shift+X)
- Search for "Antigravity Storage Manager"
- Click Install
Requirements
- VS Code 1.96.0 or higher
- Google Account (for synchronization)
Data Location
Conversations are stored locally in:
- Brain data:
~/.gemini/antigravity/brain/
- Conversation files:
~/.gemini/antigravity/conversations/
Synced data is stored in your Google Drive in the AntigravitySync folder.
Keyboard Shortcuts
The extension comes with default keybindings for common actions:
Ctrl+Alt+S (Windows/Linux) / Cmd+Alt+S (Mac): Sync NowCtrl+Alt+I (Windows/Linux) / Cmd+Alt+I (Mac): Show Sync Statistics
Customizing Shortcuts
You can customize these shortcuts to fit your workflow:
- Open Keyboard Shortcuts (
Ctrl+K Ctrl+S).
- Type
antigravity in the search bar.
- Right-click on any command (e.g.,
Antigravity Storage: Import Conversations) and select Change Keybinding.
Development
Testing
Run all unit tests:
npm run test:unit
Run localization tests (validates all package.nls.*.json and l10n/bundle.l10n.*.json files):
npm run test:localization
Or run specific tests:
npm run test:nls    # Test package.nls.*.json files only
npm run test:l10n   # Test l10n/bundle.l10n.*.json files only
Contributing
See CONTRIBUTING.md for development setup and contribution guidelines.
License
MIT © unchase
