AD Frameworks Manager
A comprehensive VS Code extension for managing AD Framework workspaces, supporting both Framework and Product development environments with powerful tools for addon management, building, publishing, and code generation.
Table of Contents
Key Benefits:
- Dual Workspace Support – Seamlessly switch between Framework and Product workspace environments.
- Unified Management – Manage and control multiple addons from a single interface.
- Batch Operations – Execute commands across selected addons at once.
- NPM Integration – Advanced linking (npm link) and unlinking capabilities for smooth local development.
- Publishing Pipeline – Integrated semantic versioning and publishing workflow.
- File Generators – Built-in workflows to generate required entity files for both addons and products.
Features
Framework Workspace Support
- Addon Management: Select, build, verify, and manage multiple addons simultaneously
- Development Tools: Build, verify, link, and test addons with ease
- Setup & Maintenance: Initialize, reinitialize, and clean addon environments
- Publishing Tools: Publish addons with version control and dry-run capabilities
- Code Generation: Generate components, services, utilities, helpers, modifiers, mixins,etc...
Product Workspace Support
- Product Development: Serve, build, and setup product applications
- Framework Integration: Link and manage framework addons within products
- Configuration Management: Easily configure ports, proxies, and environments
- Code Generation: Generate Ember.js components, routes, controllers, services,utils,etc...
Universal Features
- Smart Workspace Detection: Automatically detects Framework vs Product workspaces
- Terminal Flexibility: Choose between VS Code terminal, Command Prompt, or Admin Command Prompt
- Multi-Selection: Checkbox-based selection system for batch operations
- Real-time Status: Live monitoring of linked addons and workspace status
Prerequisites
- VS Code: Version 1.102.0 or higher
- Node.js: Required for npm operations and building
- hygen: Required Framework addons file generation ( npm install -g hygen )
- GitLab Access Token: Required for initializing new framework workspaces
Installation
Install from VS Code Marketplace:
- Search for "AD Frameworks Manager"
- Click Install
- After Installation complete open AD Frameworks Manager panel
Workspace Types
Framework Workspace
A workspace containing the meta-frameworks directory with addon development tools.
Structure:
client-framework/
├── meta-frameworks/
├── addon-1/
├── addon-2/
└── ...
Product Workspace
A workspace for product development that can integrate with framework addons.
Structure:
your-product/
├── app/
├── workspace/
├── package.json
└── ...
Getting Started
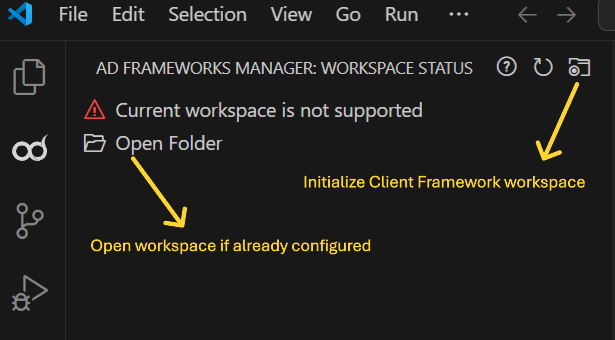
1. Initialize Framework Workspace (First Time)
If you don't have an existing framework workspace:
- Open VS Code
- Open the AD Frameworks Manager panel
- Click "Initialize client framework workspace"
- Enter your GitLab Personal Access Token
- Select destination folder
- Wait for initialization to complete
- Open the created framework workspace
- Use Clone option to clone required addon.
⚠️ Note: Do not clone directly from Git using HTTPS or SSH URLs
2. Open Existing Workspace
- Open your Framework or Product workspace folder in VS Code
- The extension will automatically detect the workspace type
- Available tools will appear in the AD Frameworks Manager panel
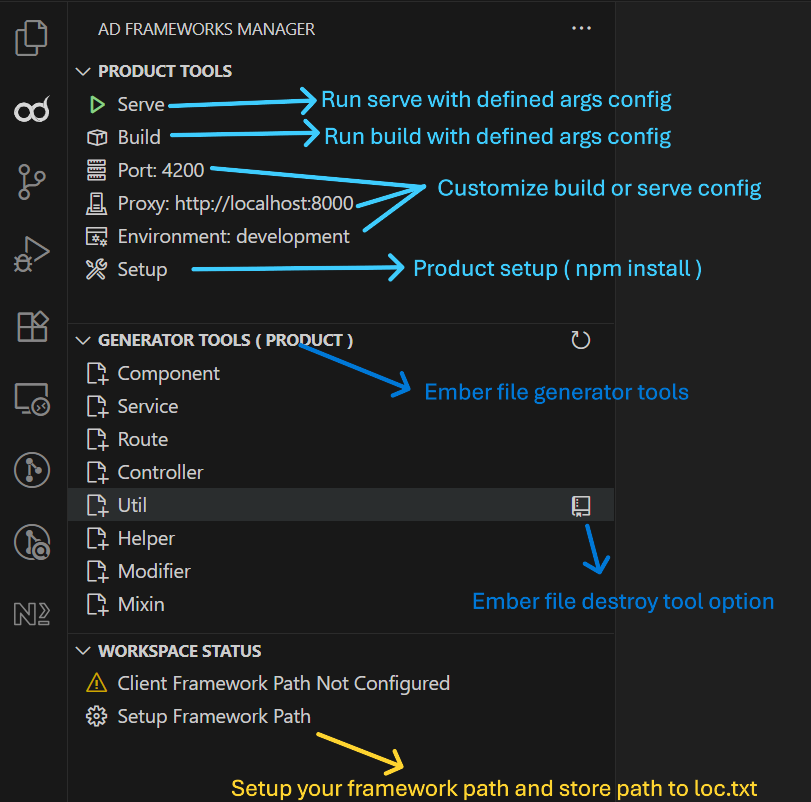
For Product workspaces that can't find the framework path:
- Click "Setup Framework Path" in the Workspace Status
- Browse and select your client framework directory
- The path will be saved to your loc.txt file
UX Guidelines
Initial workspace setup
Framework workspace
Select addons view

Product workspace
Product without Framework
Product with Framework
Framework Development
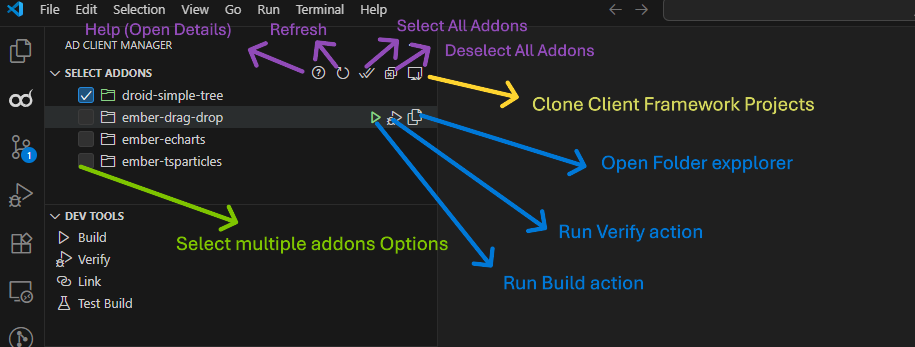
Selecting Addons
- Use checkboxes to select/deselect individual addons
- Use toolbar buttons for Select All / Deselect All
- Selected addons show with green folder icons
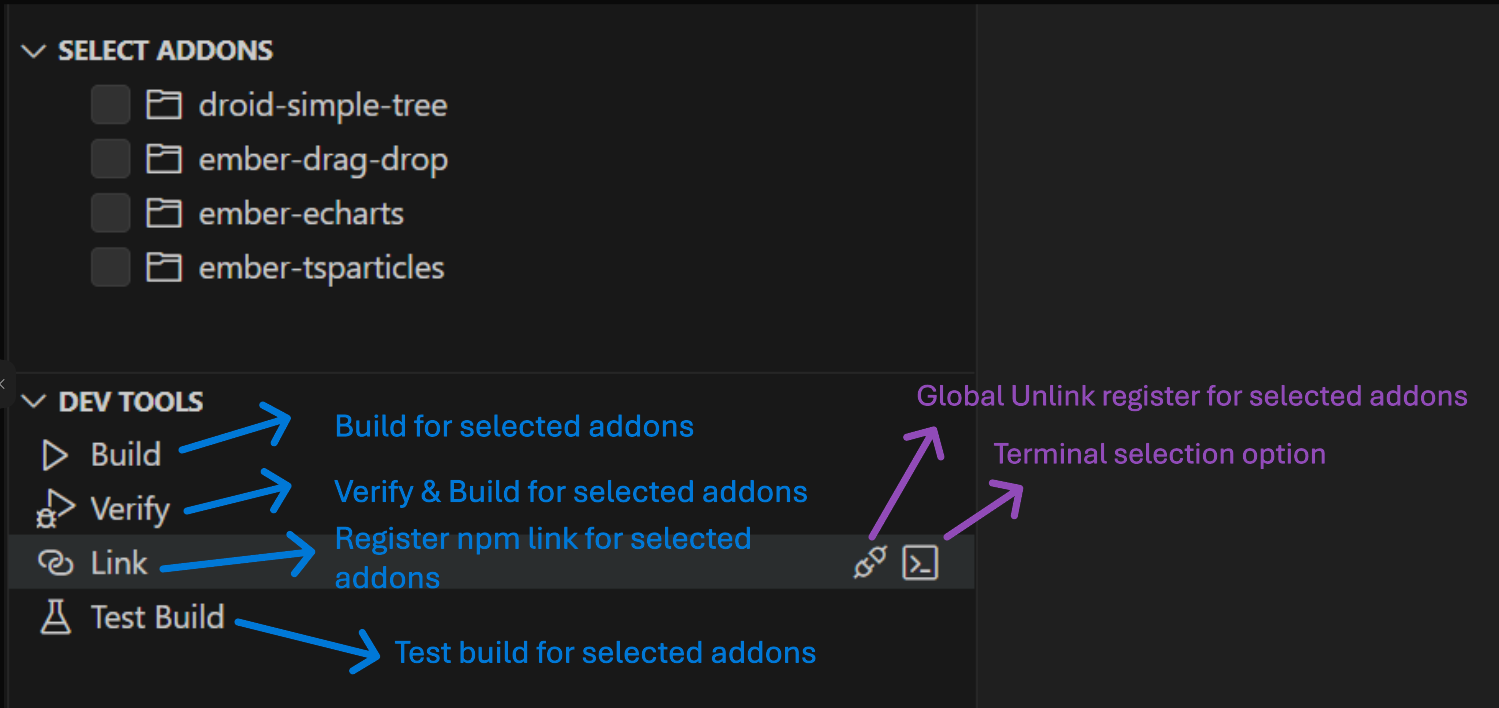
Development Operations
- Build: Compile selected addons ( Prepare dist )
- Verify: Run verification build ( Test dependency verification and prepare dist)
- Link/Unlink: Register npm linking for local connection
Setup Operations
- Setup: Install dependencies ( npm install ) for selected addons
- Customize concurrency limit to install (Default : 5)
- ReInit Options:
- ReInit: Remove temp files and setup again ( default )
- Clean: Remove temp files only
- Clean Dist: Remove dist folders only
- Clean Decs: Remove declaration folders only
Publishing (Framework Workspace)
- Select addons to publish
- Click Publish or Dry Run
- Choose version type:
- patch: Bug fixes (1.0.0 → 1.0.1)
- minor: New features (1.0.0 → 1.1.0)
- major: Breaking changes (1.0.0 → 2.0.0)
- prerelease: Pre-release versions
- Select pre-id if needed (alpha, beta, rc, dev, experimental)
- Enter publish message
- Confirm operation
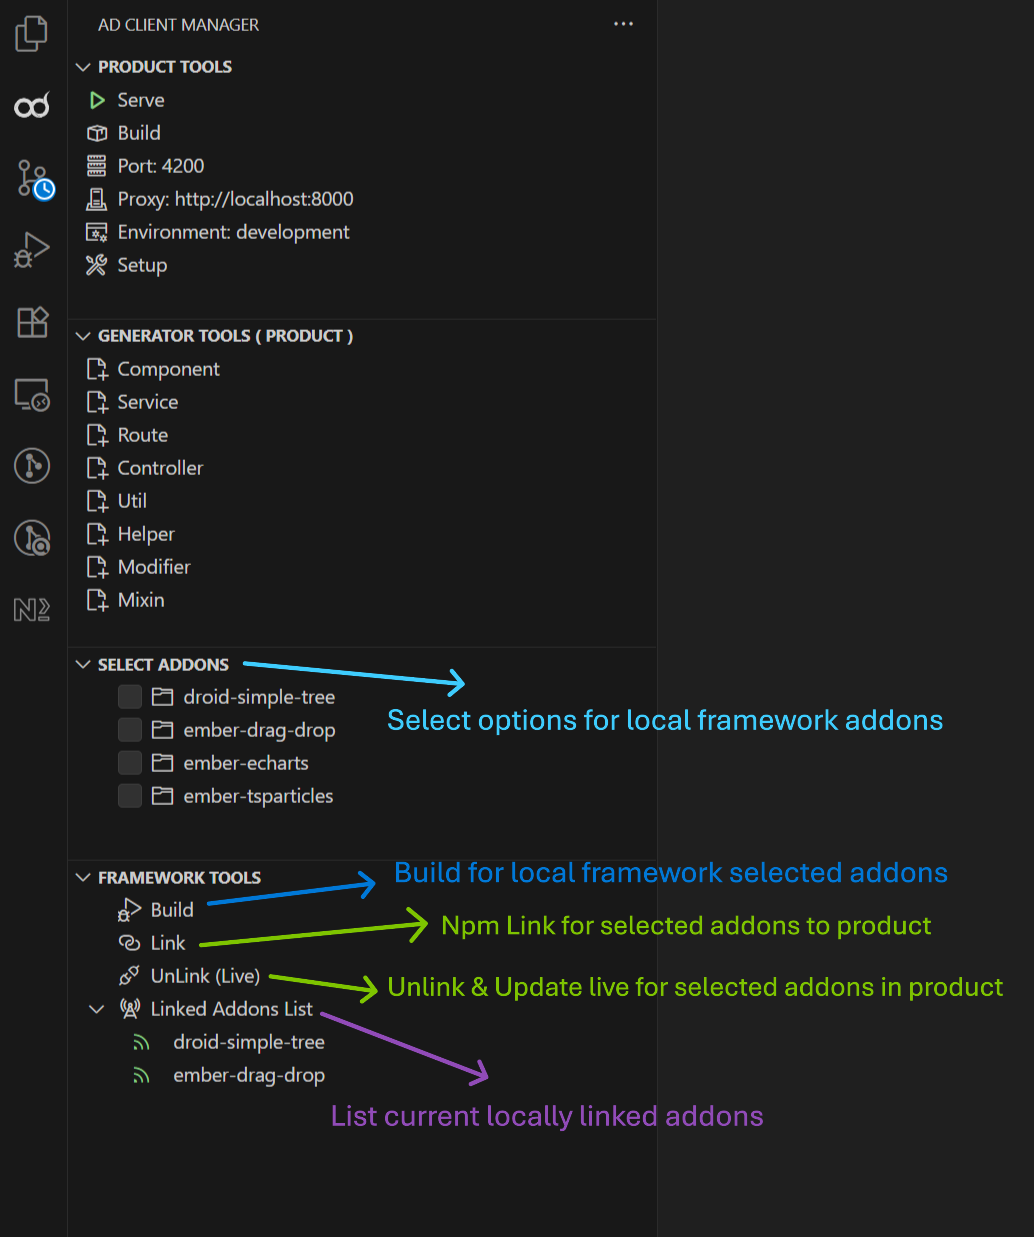
Product Development
Server Operations
Serve: Start development server
npm start -- --port=4200 --proxy=http://localhost:8000
Build: Build for production
npm run build -- --environment=production
Setup: Initialize product
npm run setup
Configuration
Click the edit icon next to any configuration to modify:
- Port: Development server port (default: 4200)
- Proxy: Backend proxy URL (default: http://localhost:8000)
- Environment: Build environment (development/production)
Addons Linking
- Select required addons to link
- Click Link button to run npm link for selected addons
- Also, monitor linked addons in the Linked Addons List
File Generation
Framework Workspace - Addon Generators
Generate files within selected addons:
- Component: Ember.js components
- Service: Service classes
- Util: Utility functions
- Helper: Template helpers
- Modifier: Element modifiers
- Mixin: Object mixins
Usage:
- Select exactly one addon
- Click generator tool
- Enter file name (supports folders:
folder/my-component)
- File will be generated in the addon
Product Workspace - Product Generators
Generate files within the product:
- Component: Glimmer components (with -gc flag)
- Service: Application services
- Route: Application routes
- Controller: Route controllers
- Util: Utility functions
- Helper: Template helpers
- Modifier: Element modifiers
- Mixin: Object mixins
Usage:
- Click generator tool
- Enter file name (supports folders:
folder/my-component)
- File will be generated in the product
Destroy Files: Use the Destroy button to remove generated files.
Terminal Options
Choose how commands are executed:
- VS Code Terminal (Default): Commands run in integrated terminal
- Command Prompt: Commands run in external Command Prompt window
- Command Prompt [Admin]: Commands run with elevated privileges
To change terminal preference:
- Click the terminal icon next to any command
- Select preferred terminal type
- Set as default if desired terminal use star icon
🔧 Troubleshooting
Common Issues
"Current workspace not Support for this action"
- Ensure you're in the correct workspace type (Framework vs Product)
- Verify workspace structure matches expected format
"Please select at least one addon"
- Use checkboxes to select addons before running operations
- Check that addons have valid
addon/package.json files
"Client Framework path is not updated or invalid path"
- Run "Setup Framework Path" from Workspace Status
- Ensure the selected path contains
meta-frameworks directory
- Verify
loc.txt file exists and is properly formatted
"Meta framework path is not configured"
- For Product workspaces, configure the framework path
- Ensure
vsce.json exists with correct clientFramework configuration
Commands not working
- Try different terminal options (VS Code Terminal vs Command Prompt)
- Check that Node.js and npm are installed and accessible
- Verify workspace has proper permissions
Tips & Best Practices
Framework Development
- Always verify addons before publishing
- Use dry-run to test publish operations
- Keep addon dependencies up to date with "Update Version"
- Use concurrent limit settings for large setup operations
Product Development
- Link only the addons you need to avoid conflicts
- Monitor linked addons in the Framework Tools panel
- Use appropriate environment settings for different builds
- Test proxy configurations thoroughly
Code Organization
- Use folder structures in generators:
folder-name/my-button
- Follow consistent naming conventions
- Keep generated files organized within appropriate directories
License
MIT License - see the full license in the marketplace listing.
Contributing
This extension is actively maintained. For bug reports or feature requests, please use the Git repository issue tracker.
Happy coding with AD Frameworks Manager! 🚀