Relay for CLI Agents
Relay for CLI Agents (Relay) sends file paths and code selections from the editor to a CLI coding agent running in a dedicated terminal. It is the VS Code version of Relay. The JetBrains version lives in jetbrains/.
Source code, issues and releases: github.com/sulsira/relay. This extension is in the vscode/ folder.
What it does
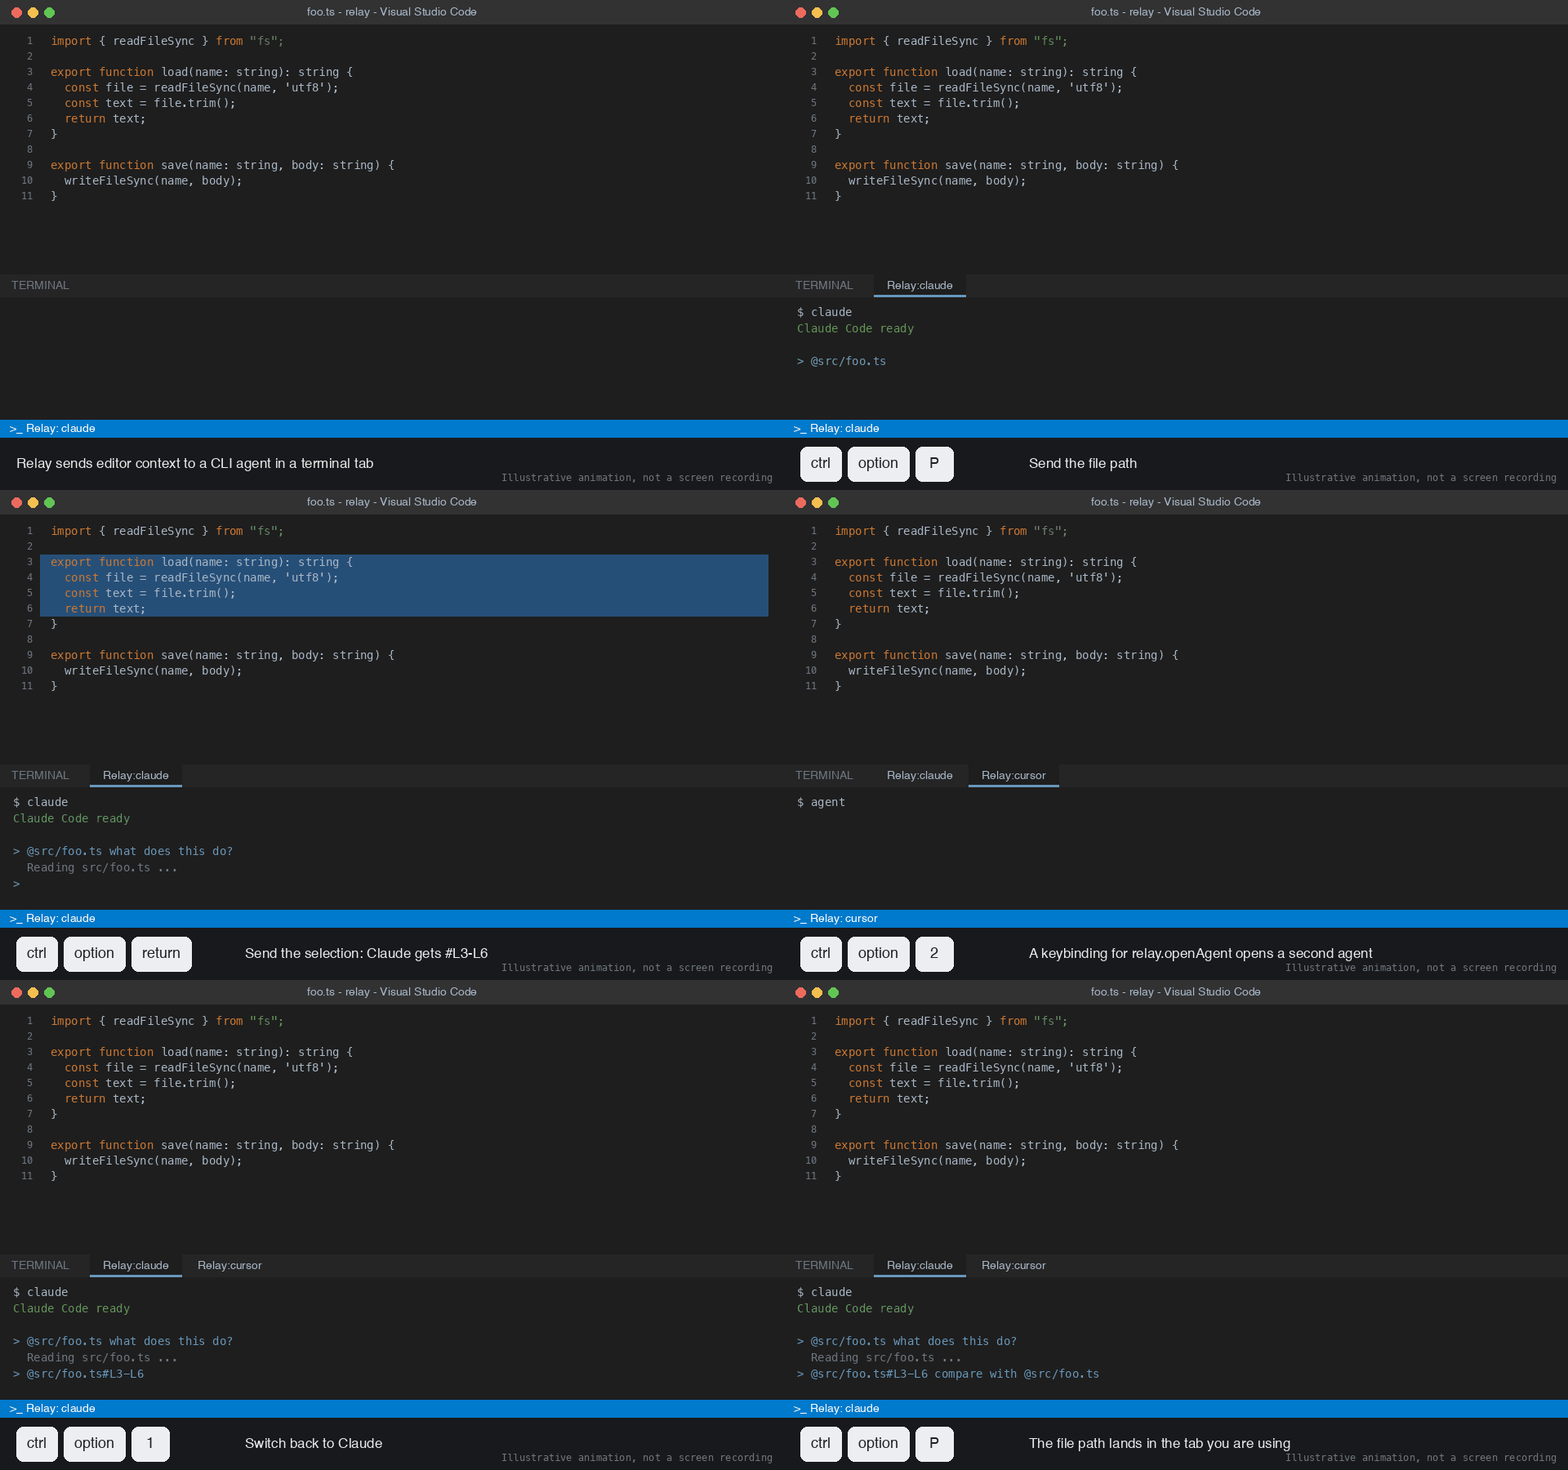
Illustrative animation, not a screen recording.
- You press a shortcut in the editor.
- Relay picks the target terminal: the active Relay terminal, else the last Relay terminal you used, else a new one for the default agent.
- Relay starts that agent's command in the terminal, once.
- Relay pastes a reference to your file or selection into the agent prompt, formatted for that agent. It does not press Enter.
| Input |
Transform |
Output |
| Active file |
Workspace-relative path, formatted for the agent |
@src/foo.ts |
| Selected lines |
Path plus line range, formatted for the agent |
@src/foo.ts#L10-L20 |
| Agent profile |
Command run in the terminal on first use |
Running agent session |
How it works, step by step
Illustrations drawn for this README, not screen captures. Key labels use macOS names: ctrl, option.
1. Open Relay
Press Ctrl+Alt+T. A terminal tab named Relay:claude opens and runs the agent's command.
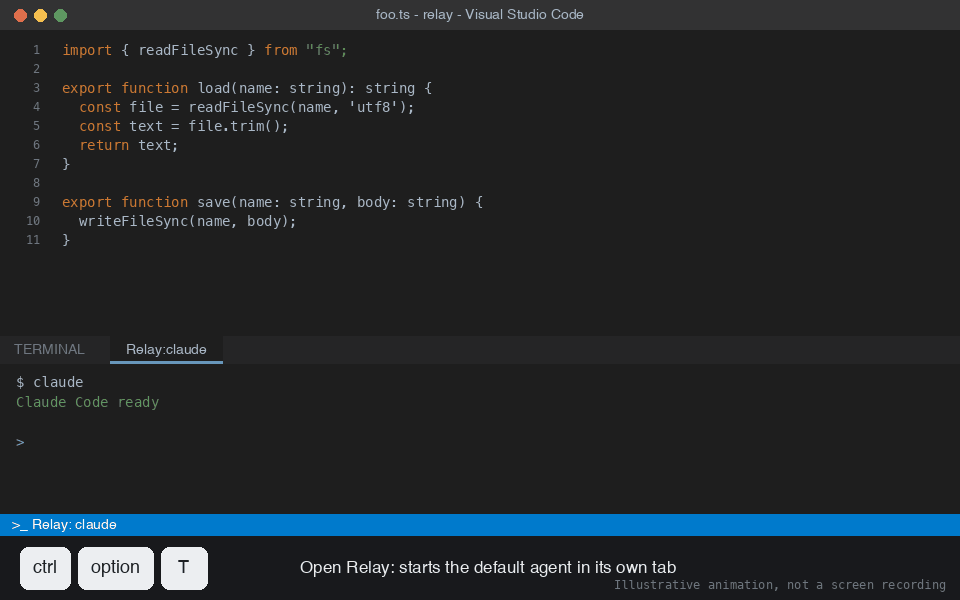
2. Send the file path
Press Ctrl+Alt+P with a file open. Relay pastes @src/foo.ts into the agent prompt. It does not press Enter, so you can keep typing.
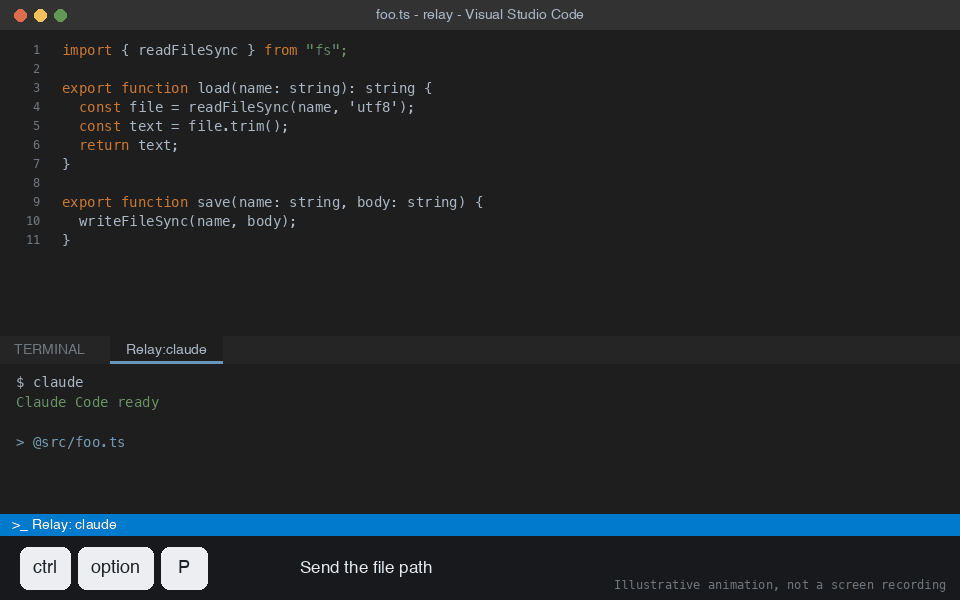
3. Send a selection
Select lines, then press Ctrl+Alt+Enter. Claude gets the line range as @src/foo.ts#L3-L6.
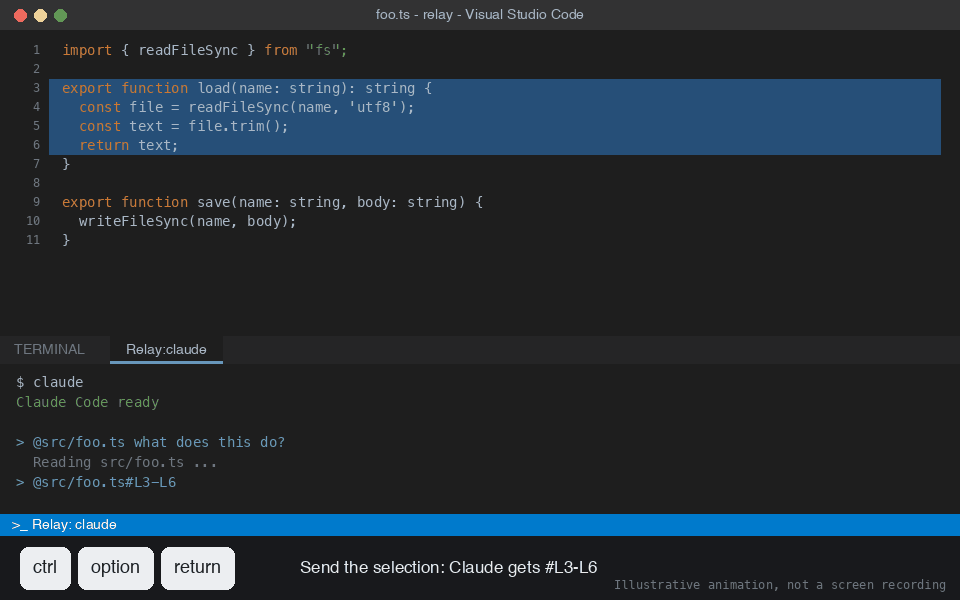
4. Add a second agent
Press the key you bound to relay.openAgent with "args": "cursor" in keybindings.json (for example Ctrl+Alt+2). A second terminal opens, and the status bar shows Relay: cursor. Each agent has its own tab. The same selection now goes out in that agent's format: @src/foo.ts:3-6 for Cursor.
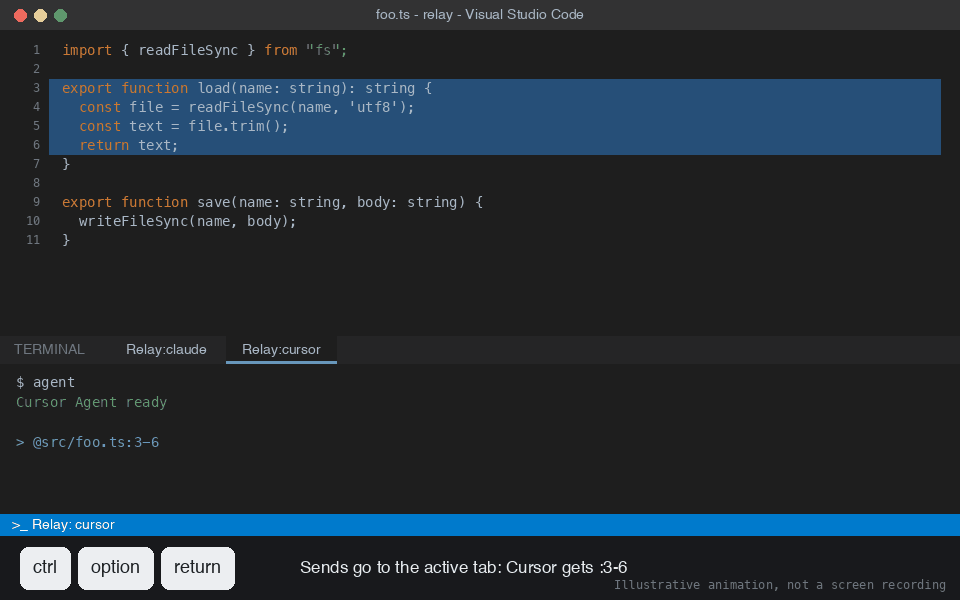
5. Sends follow the active tab
Switch back to the Claude tab. The next file path lands there, in Claude's format. Relay uses the tab you last used, not a fixed default.
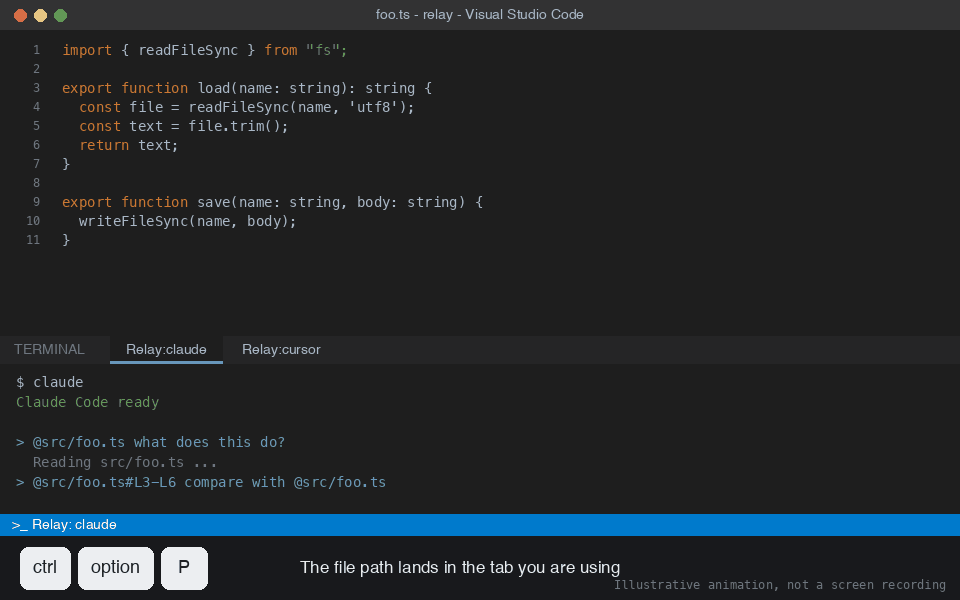
Commands and shortcuts
| Command |
Default key |
Does |
Relay: Open Relay |
Ctrl+Alt+T |
Open or focus the active Relay terminal |
Relay: Send File Path to Relay |
Ctrl+Alt+P (editor focus) |
Paste the current file reference |
Relay: Send Selection to Relay |
Ctrl+Alt+Enter (with selection) |
Paste the selection reference |
Relay: Open Agent... |
none |
Pick an agent and open its terminal |
Relay: Set Default Agent... |
none |
Pick the agent used when no Relay terminal exists |
- All commands are in the editor right-click menu under Relay.
- Change keys in Keyboard Shortcuts (
Cmd/Ctrl+K Cmd/Ctrl+S).
- The status bar item
Relay: <agent> shows who receives the next send. Click it to open an agent.
Per-agent shortcuts
Relay: Open Agent... accepts an agent name as an argument, so each agent can have its own key. Add this to keybindings.json (Preferences: Open Keyboard Shortcuts (JSON)):
[
  { "key": "ctrl+alt+1", "command": "relay.openAgent", "args": "claude" },
  { "key": "ctrl+alt+2", "command": "relay.openAgent", "args": "cursor" }
]
- The shortcut opens or focuses that agent's own terminal, creating it on first use.
- Later sends go to whichever Relay terminal is active.
Where sends go
| Situation |
Target |
| A Relay terminal is the active terminal |
That terminal |
| Another terminal is active |
The last Relay terminal you used |
| No Relay terminal is open |
A new terminal for relay.defaultAgent |
- Several agents can run side by side, one terminal each, named
Relay:<name>.
- Idle terminals keep running and receive nothing.
Settings
Open Settings and search for relay, or edit settings.json.
| Setting |
Default |
What it does |
relay.agents |
cursor, claude, aider |
Agent profiles, see below |
relay.defaultAgent |
cursor |
Agent started when no Relay terminal is open |
relay.agentStartupDelayMs |
500 |
Wait after starting an agent before pasting |
Agent profile fields
| Field |
Required |
What it does |
Values |
name |
Yes |
Unique label. Becomes the terminal name Relay:<name>. With auto it also picks the format when it is cursor, claude, aider, or goose. |
Any unique text |
command |
Yes |
Shell command run once in the new terminal to start the agent. |
Any command, with flags |
referenceMode |
No, default auto |
How file and selection references are written. |
auto, add, read-only, at-mention, plain |
"relay.agents": [
  { "name": "claude", "command": "claude" },
  { "name": "cursor", "command": "agent" },
  { "name": "aider", "command": "aider --model sonnet", "referenceMode": "add" },
  { "name": "review", "command": "claude --model opus", "referenceMode": "at-mention" }
]
Formats for file src/foo.ts and lines 10 to 20:
| Agent or mode |
File reference |
Selection reference |
auto, Cursor |
@src/foo.ts |
@src/foo.ts:10-20 |
auto, Claude Code |
@src/foo.ts |
@src/foo.ts#L10-L20 |
auto, Aider, Goose, other |
@src/foo.ts |
@src/foo.ts:10-20 |
add |
/add @src/foo.ts |
@src/foo.ts:10-20 |
read-only |
/read-only @src/foo.ts |
@src/foo.ts:10-20 |
at-mention, plain |
@src/foo.ts |
@src/foo.ts:10-20 |
Behavior details
- Relay tracks its terminals by object, not by title. A shell that renames the terminal does not create a duplicate.
- Each terminal remembers the agent it started. Edited
referenceMode applies on the next send, but an edited command only applies to new terminals.
- Relay terminals restored from a previous window session are closed on startup. Their agent process is gone, so the next send opens a fresh terminal.
- Relay waits up to 3 seconds for shell integration before typing the agent command. Without shell integration it types the command after that wait.
- Paths are relative to the workspace folder. Files outside it use the absolute path.
Differences from the JetBrains plugin
| JetBrains |
VS Code |
| Settings table with a Shortcut column |
relay.agents in settings.json, shortcuts in keybindings.json |
| Launch column (Goose interactive or plain) |
Not ported. Both modes give the same references today. |
| Default agent switch in the editor menu |
Relay: Set Default Agent... |
Install manually (VS Code)
Use this to install without the Marketplace.
Get the file
Option A: use the prebuilt file in this repository (fastest)
- The installable file is committed at
releases/relay-vscode-1.5.2.vsix. Its checksum is in releases/SHA256SUMS.
- Download it. Either of these works once the repository is public:
- Open the file on GitHub and click Download raw file.
- Or run
curl -L -o relay-vscode-1.5.2.vsix https://github.com/sulsira/relay/raw/main/vscode/releases/relay-vscode-1.5.2.vsix.
- If you cloned the repository, the file is already at
vscode/releases/relay-vscode-1.5.2.vsix.
- Optional check: run
shasum -a 256 relay-vscode-1.5.2.vsix and compare it with releases/SHA256SUMS.
Option B: build it yourself
- Run
npm install in the vscode/ folder.
- Run
npm run package. It writes relay-vscode-<version>.vsix in vscode/.
Install it
Pick one way.
From the command line
- Run
code --install-extension relay-vscode-1.5.2.vsix. Use the full path if the file is not in the current folder.
- Reload VS Code: Command Palette (
Cmd+Shift+P), then Developer: Reload Window.
From the VS Code window
- Open the Extensions view (
Cmd+Shift+X).
- Click the
... menu at the top of the view.
- Choose Install from VSIX....
- Select
relay-vscode-1.5.2.vsix.
- Click Reload if VS Code asks.
If the code command is not found: Command Palette, then Shell Command: Install 'code' command in PATH.
Check it
- The status bar, bottom left, shows
Relay: <agent>.
- Command Palette, then type
Relay. Five commands appear.
- Open a file and press
Ctrl+Alt+T. A terminal named Relay:<agent> opens.
Update or remove
| Goal |
Steps |
| Update |
Install the newer .vsix the same way. VS Code replaces the old version. Reload the window. |
| Remove |
Extensions view, find Relay for CLI Agents, click the gear, choose Uninstall. Or run code --uninstall-extension sulsira.relay-vscode. |
If it fails
| Symptom |
Cause |
Fix |
Unable to install ... engine ... ^1.93.0 |
VS Code is older than 1.93 |
Update VS Code |
code: command not found |
Shell command not installed |
Install it from the Command Palette, see above |
| Nothing appears after install |
Window not reloaded |
Run Developer: Reload Window |
Extension is not signed or similar warning |
A .vsix from disk is unsigned |
Install only files you built or trust, then accept the prompt |
| Status bar item missing |
Extension activates at startup |
Reload the window |
Develop and test
Requires Node.js 20 or newer and VS Code 1.93 or newer.
| Command |
Does |
npm install |
Install dev dependencies |
npm run compile |
Compile TypeScript to out/ |
npm test |
Compile, then run unit tests with the Node test runner |
npm run test:integration |
Launch the installed VS Code (code on PATH) with the extension and run an end-to-end scenario |
npm run package |
Build relay-vscode-<version>.vsix in vscode/ |
- Open the
vscode/ folder of the repository in VS Code.
- Press
F5 (Run Extension). A second VS Code window opens with Relay loaded.
- Install a built package with
code --install-extension relay-vscode-<version>.vsix. See Install manually (VS Code) above.
Code layout
| File |
Role |
src/format.ts |
Agent detection and reference formats. No VS Code imports, so it is unit tested. |
src/settings.ts |
Reads relay.* settings |
src/sender.ts |
Terminal lifecycle, target resolution, agent start, paste |
src/extension.ts |
Command registration, status bar |
src/test/format.test.ts |
Unit tests for format.ts |
src/integration/index.ts |
End-to-end scenario run inside VS Code |
scripts/run-integration.js |
Launcher for the end-to-end scenario |
Automated tests
npm test runs 10 tests for format.ts. They cover agent detection and every reference format.npm run test:integration opens a VS Code window and checks, in order:
- The extension activates and registers 5 commands.
relay.open creates Relay:a1.relay.openAgent creates and focuses Relay:a2, and reopening it creates no duplicate.- File and selection sends reuse the active Relay terminal and open none.
- Closing
Relay:a2 makes sends fall back to Relay:a1 without a new terminal.
- A stray
Relay:ghost terminal is closed.
- The text that reaches the agent is exact, for four agents:
zed (@path), claude (@path#L3-L5), cursor (@path:3-5), and adder in add mode (/add @path).
- The scenario uses a throwaway user-data directory and does not touch your VS Code settings.
- Step 7 uses
cat > file as the agent, sends Ctrl+D twice to flush and close it, and compares the file with the expected text. A trailing newline would fail the check, so it also proves Relay does not press Enter.
- It runs against your login shell, so it assumes a POSIX-style shell where
cat > file works.
Manual test checklist
Run in the F5 window with a workspace open and two agents, for example claude and cursor.
| # |
Step |
Expected |
| 1 |
Press Ctrl+Alt+T with no Relay terminal |
Terminal Relay:<default> opens, agent command runs |
| 2 |
Open a file, press Ctrl+Alt+P |
@path is pasted, not submitted |
| 3 |
Select lines, press Ctrl+Alt+Enter |
Selection reference for that agent's format is pasted |
| 4 |
Bind relay.openAgent with args for two agents, press each |
Each key opens that agent's own terminal |
| 5 |
Focus terminal A, send a path. Focus terminal B, send a path |
Each path lands in the terminal you last used, in that agent's format |
| 6 |
Focus a plain shell terminal, send a path |
Path goes to the last Relay terminal |
| 7 |
Close the Relay terminal, send a path |
A new terminal opens and the agent starts |
| 8 |
Reload the window with a Relay terminal open |
The old Relay:* terminal is gone after startup |
| 9 |
Run Relay: Set Default Agent... |
The status bar shows the new default when no Relay terminal is open |
Known risks
- Closing restored terminals is tested only with a terminal created after activation. A real window reload with persistent terminals is covered by manual step 8 only.
sendText(text, false) pastes without bracketed paste. References are single-line, so this is safe, but a multi-line payload would be typed line by line.- Shell integration events need VS Code 1.93 or newer.
Publishing a release file
- Raise
version in package.json and add an entry to CHANGELOG.md.
- Run
npm test and npm run package.
- Move the new file into
releases/ and delete the old one: mv relay-vscode-<version>.vsix releases/.
- Refresh the checksum:
cd releases && shasum -a 256 relay-vscode-<version>.vsix > SHA256SUMS.
- Update the file name in Install manually (VS Code).
- Publish to the Marketplace with
npx vsce publish.
Source code and support
| |

