SpecLens
A local-first VS Code and Kiro extension that turns your spec-driven development artifacts into a live, read-only reactive dashboard. Designed for agentic AI workflows using Kiro Spec, AI-DLC, OpenSpec, and GitHub Speckit — SpecLens gives you real-time visibility into your requirements, task graph, and test traceability without leaving your editor.
No server, no sync — everything stays in your workspace. Only minimal, anonymous usage telemetry is sent (opt-out available), and no spec content, code, or file paths ever leave your machine.
Features
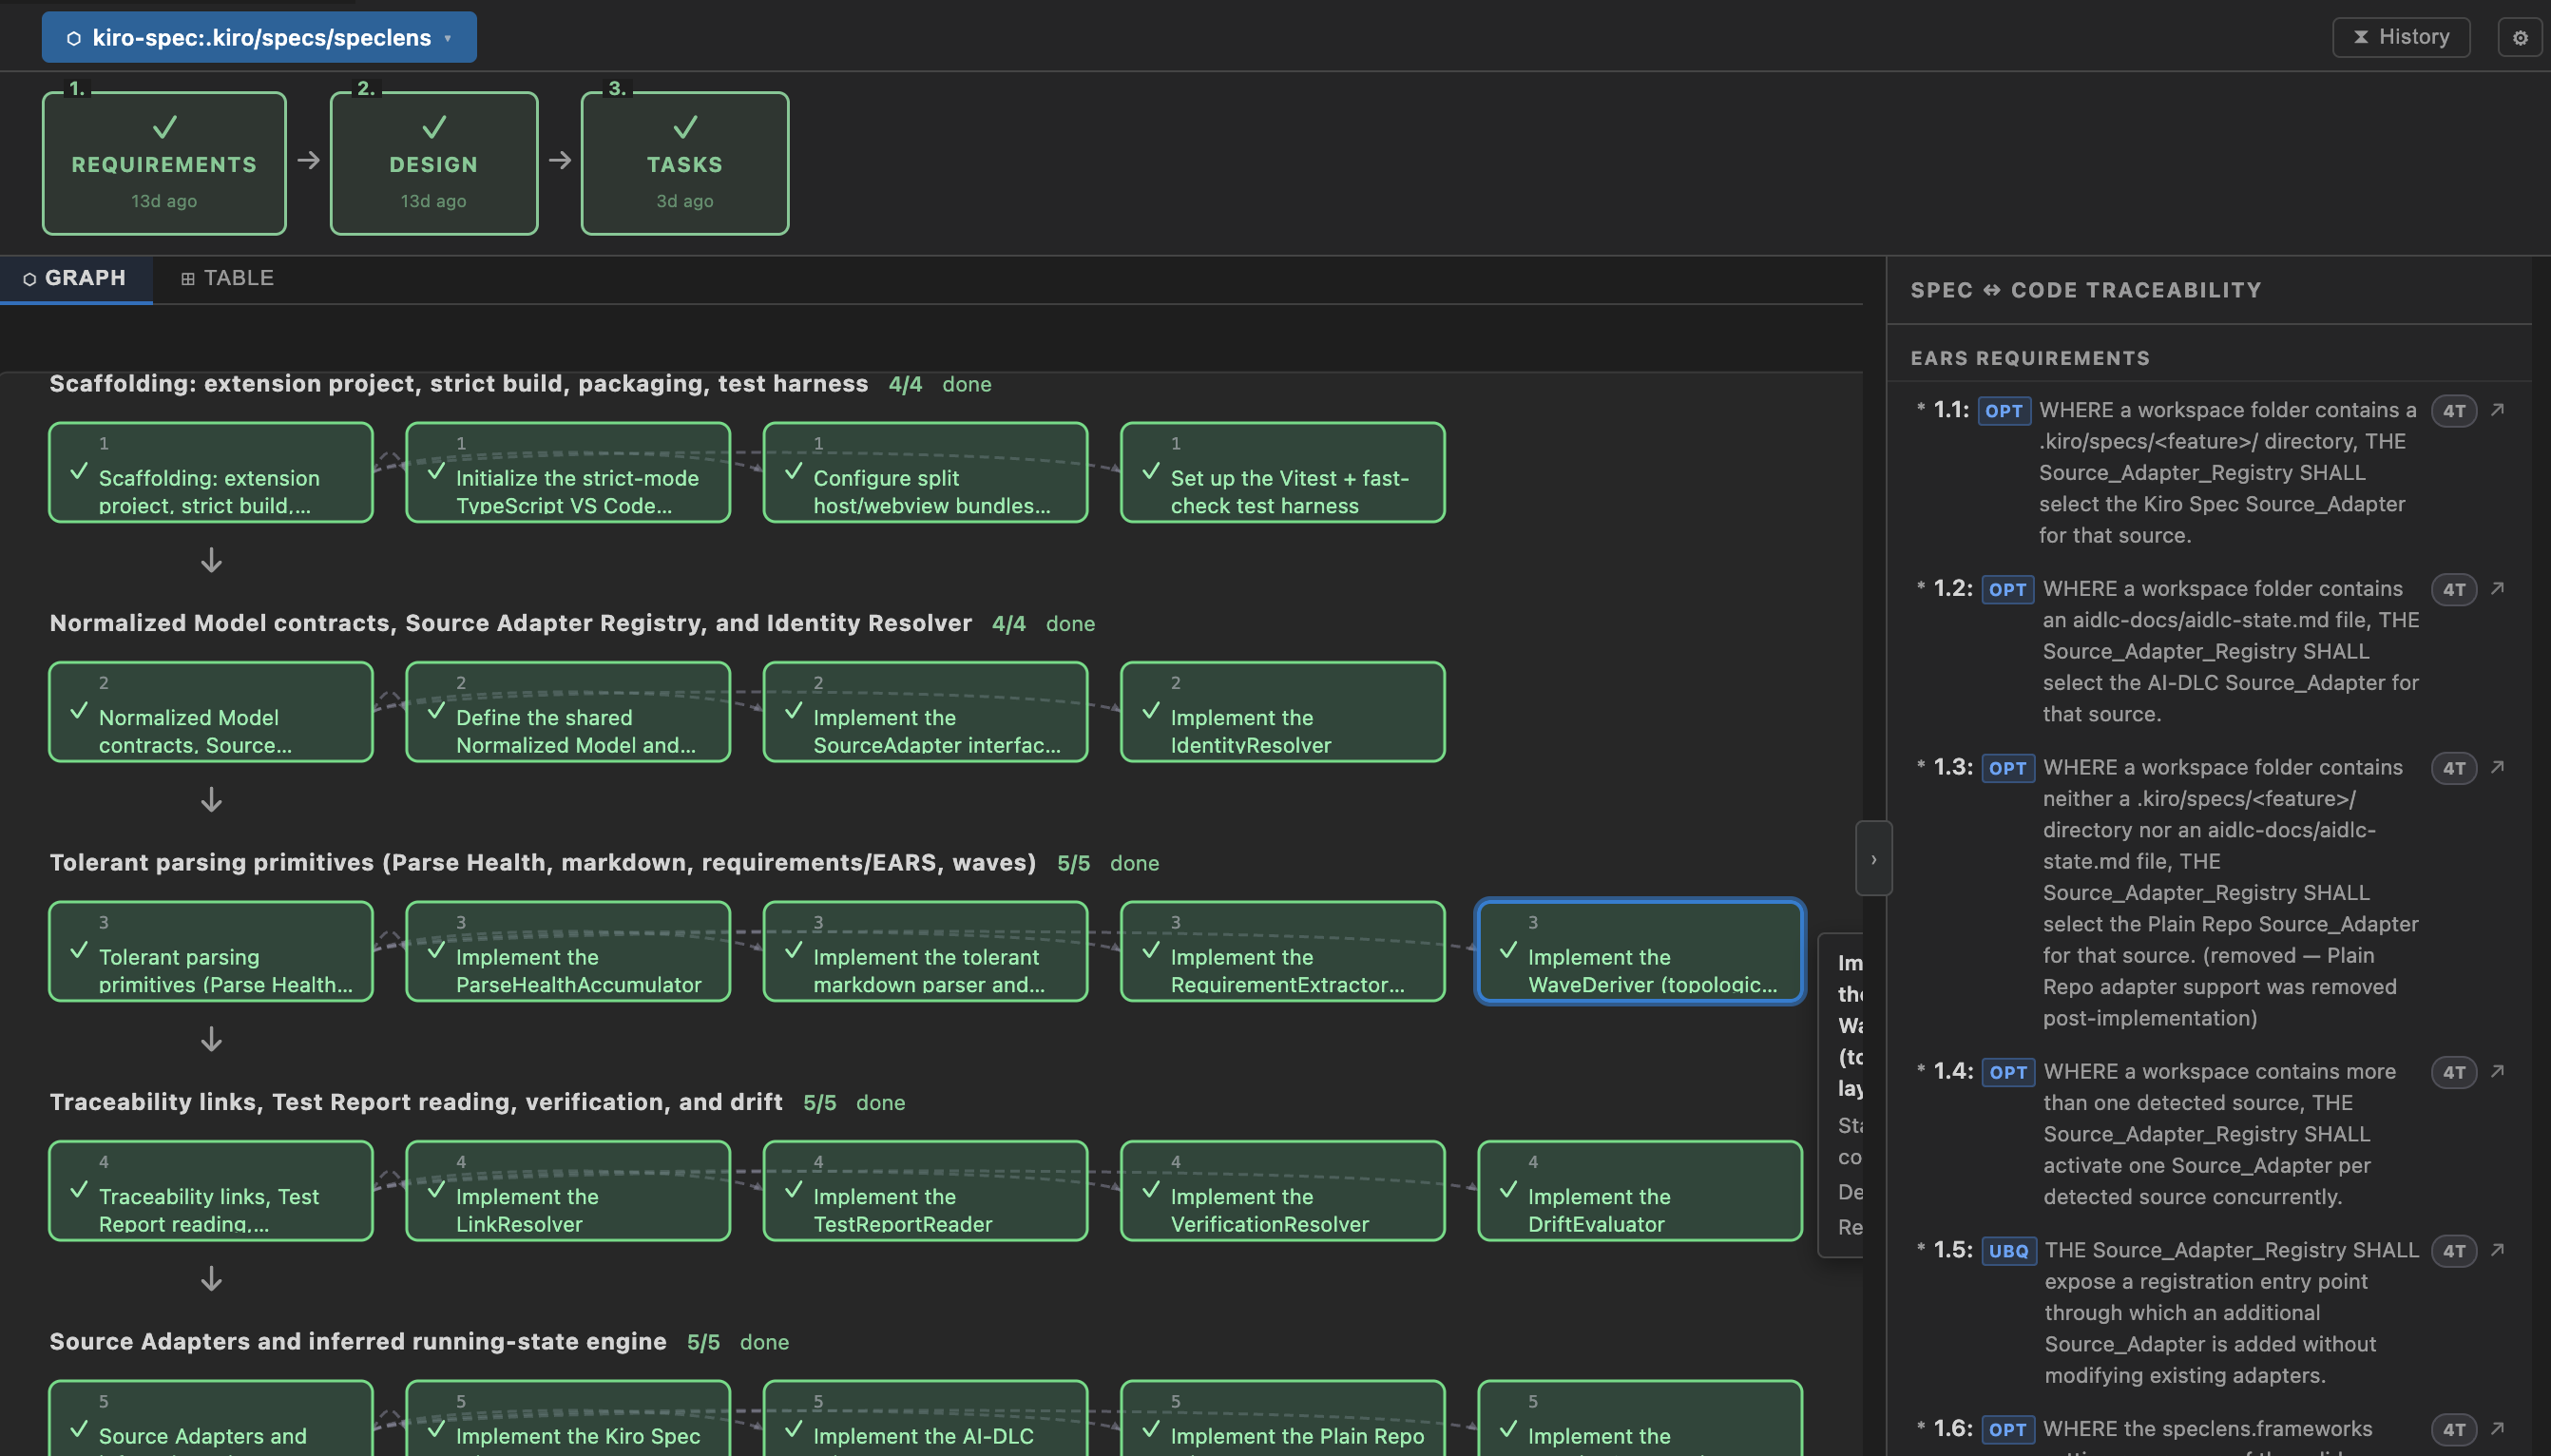
SpecLens parses your spec artifacts on every save and reflects changes instantly — no manual refresh needed. Here's what's on the dashboard:
Pipeline Bar
Tracks the lifecycle phases declared by your framework:
- Kiro Spec — Requirements → Design → Tasks
- AI-DLC — Inception → Construction → Operations
- OpenSpec — Proposal → Design → Specs → Tasks
- GitHub Speckit — Feature Definition → Planning → Task Generation → Implementation
The active phase is highlighted. Completed phases show their last-modified timestamp. Each phase box expands to show a sub-stage checklist (e.g. the individual AI-DLC stages within Inception or Construction), with a completion count summary toggle.
Task Graph
A top-down dependency graph of tasks grouped into topological waves (dependency layers). Tasks are colour-coded by state — pending or completed. Click any node to jump directly to that line in the source file. The graph viewport is resizable by dragging the bottom handle.
Selecting a requirement in the traceability sidebar filters the graph down to only the tasks linked to that requirement. A banner shows the active filter with a one-click clear button.
Spec ↔ Code Traceability
A collapsible sidebar (drag to resize, or click to hide/show) with one row per requirement, showing:
- EARS classification badge — each requirement is automatically classified as Ubiquitous (UBQ), Event-driven (EVT), State-driven (STA), Optional (OPT), or Unwanted (UNW) based on EARS syntax
- Task count badge — number of tasks linked to the requirement group
- Verification status — unverified, verified, or failing — based on a loaded JUnit or JSON test report
- Click a row to filter the task graph to that requirement's tasks; double-click (or Ctrl+Enter) to jump to the requirement in the editor
Snapshot History
SpecLens automatically saves a snapshot every time something meaningful changes (task states, verification status). The History surface (opened via the SpecLens: View History command) lets you:
- Browse and filter snapshots by spec, repo, framework, and date range
- View per-snapshot metrics: task completion, requirement verification coverage, active pipeline phase, and parse health — with delta indicators showing progress between consecutive snapshots
- Track progress over time as your AI agent completes tasks
- Export a filtered snapshot set to a JSON file (with optional path redaction)
- Import a previously exported snapshot file
- Clear history with a confirmation prompt
Why SpecLens?
If you use Kiro Spec, AI-DLC, OpenSpec, or GitHub Speckit to drive development with AI agents, SpecLens gives you situational awareness without disrupting your flow:
- Requirements → tasks, always in sync — see exactly what's done and what's still pending
- Test linkage — connect your JUnit or Vitest results back to the requirements they verify
- Zero config to get started — auto-detects your framework from workspace structure
- Fully offline — no cloud, no accounts, no data leaves your machine
Supported frameworks
SpecLens supports the four main AI-driven spec workflows used with Kiro and other agentic tools:
| Framework |
Detection |
| Kiro Spec |
Workspace contains one or more .kiro/specs/<feature>/ directories |
| AI-DLC |
Workspace contains aidlc-docs/aidlc-state.md |
| OpenSpec |
Workspace contains openspec/config.yaml; each openspec/changes/<name>/ is a separate spec |
| GitHub Speckit |
Workspace contains .specify/ directory (detected via config.yml or extensions.yml); each specs/<name>/ with spec.md is a separate spec |
SpecLens activates automatically when it detects any of these structures. Multiple frameworks can coexist in the same workspace.
Getting started
1. Install the extension
Install from the VS Code Marketplace, or from a .vsix file:
Extensions panel → ⋯ → Install from VSIX…
2. Open a workspace with a spec
SpecLens activates automatically when your workspace contains a recognised spec structure. No configuration is needed to get started.
3. Open the dashboard
| Method |
Action |
| Command Palette |
Cmd+Shift+P / Ctrl+Shift+P → SpecLens: Open Dashboard |
| Activity Bar |
Click the SpecLens eye icon on the left sidebar |
Commands
| Command |
Description |
| SpecLens: Open Dashboard |
Opens or reveals the live dashboard panel |
| SpecLens: View History |
Opens the snapshot history surface in a separate panel |
| SpecLens: Select Spec |
Quick-pick to switch the active spec (when the workspace has multiple) |
| SpecLens: Open Settings |
Opens VS Code Settings filtered to all SpecLens configuration options |
Loading a test report
Point SpecLens at a test report to upgrade verification status from linkage-only to real pass/fail.
Add to .vscode/settings.json:
{
  "speclens.testReportPath": "reports/junit.xml"
}
The value is a path relative to the workspace folder (or an absolute path). Supported formats:
- JUnit XML — generated by Jest, Vitest, pytest, Go test, and most CI systems
- JSON — any
.json file containing an array of { name, passed, isPropertyBased? } entries:
[
  { "name": "my test name", "passed": true },
  { "name": "another test", "passed": false, "isPropertyBased": true }
]
SpecLens never runs tests — it only reads an existing report file. If the file exists but cannot be parsed, a banner is shown in the dashboard.
Settings
Most settings are workspace-folder scoped; speclens.telemetry.enabled is an application-level setting that applies across all workspaces. You can open them directly via:
- Command Palette →
SpecLens: Open Settings
- The ⚙ button in the dashboard header
| Setting |
Type |
Default |
Description |
speclens.testReportPath |
string |
— |
Path to a JUnit XML or JSON test report file (relative to workspace folder, or absolute). Leave unset for linkage-only mode. |
speclens.running.recencyWindowSeconds |
number |
45 |
Reserved for future use. Range: 1–3600. |
speclens.retention.maxDays |
number |
30 |
Maximum days to retain snapshots. Range: 1–3650. |
speclens.retention.maxSizeMB |
number |
25 |
Maximum snapshot store size in MB. Range: 1–1024. |
speclens.candidateLinks.enabled |
boolean |
true |
When enabled, SpecLens infers file-to-task links by name and path similarity. Disable if you only want explicitly declared links. |
speclens.telemetry.enabled |
boolean |
true |
When enabled, SpecLens sends anonymous usage telemetry for 3 event types (dashboard opened, history opened, spec switched) to understand feature usage. No personal information, code, file contents, or paths are ever collected. Set to false to disable. |
speclens.frameworks |
object |
{} |
Per-folder map to override framework detection. Keys are workspace folder URIs; values are "auto", "kiro-spec", "aidlc", "openspec", or "github-speckit". Folders absent from the map use "auto" (presence-based detection). |
Framework override example
Use this when SpecLens detects the wrong framework for a folder, or when you
want to lock a folder to a specific framework regardless of its directory
structure.
{
  "speclens.frameworks": {
    // Key: workspace folder URI  Value: "auto" | "kiro-spec" | "aidlc" | "openspec" | "github-speckit"
    "file:///Users/you/workspace/my-project": "kiro-spec"
  }
}
Folders not listed in the map are auto-detected from their directory structure.
Privacy
SpecLens is local-first. It reads files from your workspace and writes snapshots to VS Code's extension global storage on your machine — no spec content, code, file contents, or file paths ever leave your machine, and there is no sync or external service for your data.
SpecLens does send minimal, anonymous usage telemetry: a fire-and-forget event for only 3 actions (opening the dashboard, opening history, switching the active spec). Disable it anytime via the speclens.telemetry.enabled setting.
License
MIT
Feedback & issues
Found a bug or have a feature request? Open an issue — all feedback is welcome.