Loop Coder
Loop is a highly customizable AI coding assistant, specifically designed to streamline complex, multi-file development workflows.
Quickstart
Follow these steps to quickly start using Loop Coder in your workspace:
- Install Loop Coder: Ensure you have the Loop Coder extension installed in your code editor.
- Open Loop Coder Extension Run
View: Show Loop Coder command.
- Add your first Model:
- Run
Loop Coder: Add Model Configuration command or click Loop Model on status bar.
- You can also edit model configuration settings manually in user settings:
loop-coder.models.
- For configuration examples see Model configuration examples.
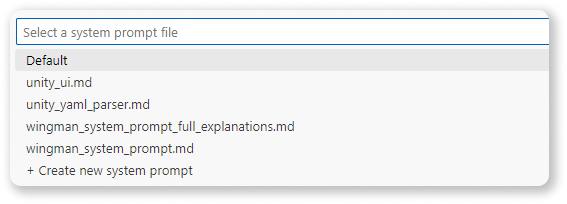
- Modify a System Prompt:
- Run
Loop Coder: Create System Prompt command or click Loop System Prompt on status bar.
- Select '+ Create new System Prompt'.
- Copy of default system prompt named
loop_system_prompt.md will be created on your workspace in .loop-coder/SystemPrompts/ directory. Modify or rename it according to your needs.
- Run
Loop Coder: Select System Prompt and select your new prompt.
- Explore creating more specialized prompts later (see System Prompts).
- Start Coding!
- Open a file in your workspace that you want to work on.
- In the chat input, type your request. For example:
Write a function in Python that sorts a list.
- Press
Ctrl+Enter to send your prompt.
- Review and Accept Changes:
- Loop Coder will display the AI's response and any proposed code changes.
- Carefully review the changes in the diff view.
- Click 'Accept' to apply the changes to your files, or 'Reject' to discard them.
- Iterate and Refine:
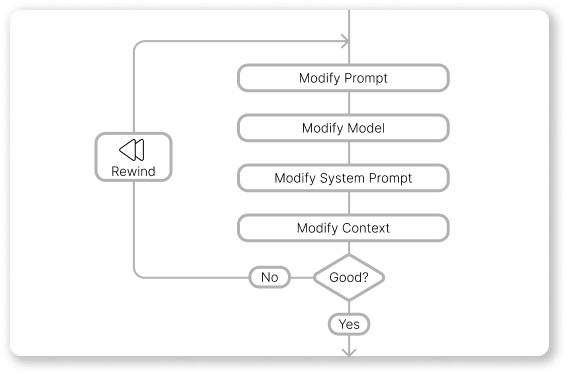
- If the result isn't quite what you wanted, use the 'Rewind' feature to go back, adjust your prompt, model, or system prompt, and try again.
Congratulations! You've just used Loop Coder to enhance your coding workflow. Explore the other features like Context Management and System Prompt customization to further optimize your experience.
Features
- Iterative Refinement (Rewind): Easily undo the last interaction (prompt and response) to refine your request, adjust settings, or change the context without losing your place.
- Flexible Prompting: Utilize any compatible AI model, define custom system prompts, and precisely control the context sent to the model.
Code Generation
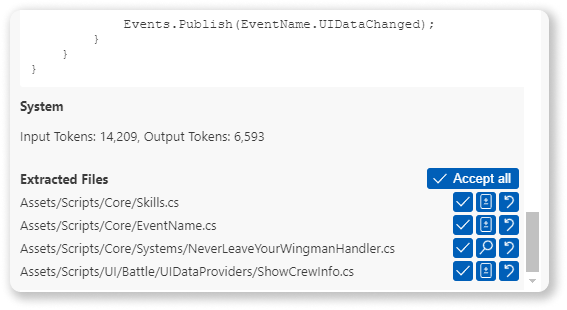
Loop empowers you to generate new code or modify existing files based on your prompts. Following a generation request, Loop presents a clear overview of proposed changes:
- Preview: Review newly created files before adding them to your workspace.
- Diff View: Examine modifications to existing files line-by-line.
- Selective Acceptance: Accept or reject changes on a per-file basis.
- Bulk Operations: Accept all proposed changes with a single action.
Rewind
If the AI's response doesn't meet your expectations, the Rewind feature allows for efficient iteration by:
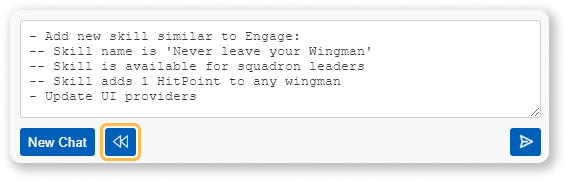
- Restoring the last prompt in the input field, ready for editing.
- Removing the last prompt and its corresponding AI response from the chat history.
- Discarding changes that are not accepted.
This enables you to quickly:
- Modify the prompt for clarity or specificity.
- Experiment with different AI models or adjust their parameters.
- Switch to a different system prompt tailored to the task.
- Add or remove files from the context to guide the AI.
Important note: Rewind feature does not undo accepted changes. Use source control for this scenario.
Model Configuration
Loop offers robust model management capabilities:
- Multiple Model Definitions: Configure settings for various AI models. You can define the same base model multiple times with different parameters (like temperature, stop words, topP, max output tokens) to tailor its behavior for specific use cases (e.g., "Creative Coder" with high temperature, "Strict Code Reviewer" with low temperature and specific stop words).
- Provider Flexibility: Integrate with popular providers like Groq, Together.ai, and others supporting standard APIs.
- Local Model Support: Connect to local models running via services like LM Studio.
- On-the-Fly Switching: Change the active AI model configuration between prompts as needed.
Supported APIs currently include:
- OpenAI API
- Google Generative AI (Gemini) API
Configuration:
- Command: 'Loop Coder: Add Model Configuration'
- Command: 'Loop Coder: Select Model'
System Prompts
Define and manage multiple system prompts to tailor the AI's behavior for specific tasks, languages, or frameworks.
- Multiple Profiles: Create and save distinct system prompts (e.g., "Python Expert," "React Component Generator," "Documentation Writer").
- Easy Switching: Select the most appropriate system prompt for your current task at any time.

- Template System: Enhance reusability and modularity by creating system prompt templates. Reference other prompts as "building blocks" to construct complex instructions efficiently. Leverage community resources like Cursor.directory or awesome-cursorrules for inspiration.

Configuration:
- Command: 'Loop Coder: Select System Prompt'
- Command: 'Loop Coder: Create System Prompt'
Created System Prompts are in workpace folder .loop-coder/SystemPrompts'.
Context Management
Provide the AI with relevant workspace context for accurate code generation and modification.
- File Inclusion: Add specific files to the context window to serve as references or targets for modification.
- Exclusion Option: Temporarily exclude files from the context without removing them entirely. Easily re-include them later.
- In-Prompt File References: Type
# within the prompt input to trigger a file selection dialog. Selecting a file automatically adds it to the context and inserts its path into your prompt, allowing for direct instructions regarding specific files within your workspace.

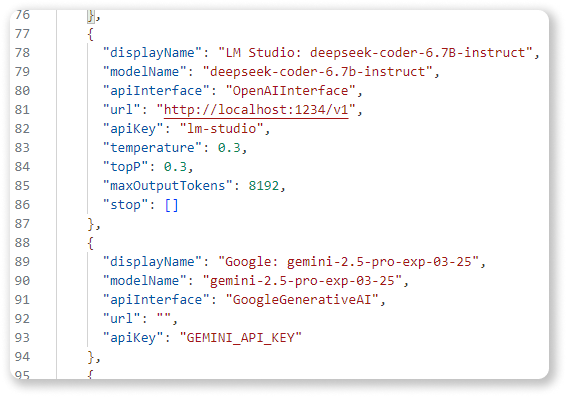
Model Configuration Examples
Here are examples of how to configure different models in your settings.json under "loop-coder.models":
  "loop-coder.models": [
    {
      "displayName": "LM Studio: deepseek-r1-distill-llama-8b",
      "modelName": "deepseek-r1-distill-llama-8b",
      "apiInterface": "OpenAIInterface",
      "url": "http://localhost:1234/v1",
      "apiKey": "lm-studio"
    },
    {
      "displayName": "LM Studio: deepseek-coder-6.7B-instruct",
      "modelName": "deepseek-coder-6.7b-instruct",
      "apiInterface": "OpenAIInterface",
      "url": "http://localhost:1234/v1",
      "apiKey": "lm-studio",
      "temperature": 0.3,
      "topP": 0.3,
      "maxOutputTokens": 8192,
      "stop": []
    },
    {
      "displayName": "Google: gemini-2.5-pro-exp-03-25",
      "modelName": "gemini-2.5-pro-exp-03-25",
      "apiInterface": "GoogleGenerativeAI",
      "url": "",
      "apiKey": "API_KEY"
    },
    {
      "displayName": "Google: gemini-2.0-flash-thinking-exp-01-21",
      "modelName": "gemini-2.0-flash-thinking-exp-01-21",
      "apiInterface": "GoogleGenerativeAI",
      "url": "",
      "apiKey": "API_KEY",
      "temperature": 0.3,
      "topP": 0.3,
      "maxOutputTokens": 8192,
      "stop": []
    },
    {
      "displayName": "OpenAI: gpt-4o",
      "modelName": "gpt-4o",
      "apiInterface": "OpenAIInterface",
      "url": "",
      "apiKey": "API_KEY"
    },
    {
      "displayName": "OpenAI: gpt-4o-mini",
      "modelName": "gpt-4o-mini",
      "apiInterface": "OpenAIInterface",
      "url": "",
      "apiKey": "API_KEY",
      "temperature": 0.3,
      "topP": 0.3,
      "maxOutputTokens": 8192,
      "stop": []
    },
    {
      "displayName": "Nebius: DeepSeek-R1",
      "modelName": "deepseek-ai/DeepSeek-R1",
      "apiInterface": "OpenAIInterface",
      "url": "https://api.studio.nebius.com/v1/",
      "apiKey": "API_KEY"
    },
    {
      "displayName": "Groq: qwen-qwq-32b",
      "modelName": "qwen-qwq-32b",
      "apiInterface": "OpenAIInterface",
      "url": "https://api.groq.com/openai/v1",
      "apiKey": "API_KEY"
    },
    {
      "displayName": "Gemini/OpenAI: gemini-2.0-flash-thinking-exp-01-21",
      "modelName": "gemini-2.0-flash-thinking-exp-01-21",
      "apiInterface": "OpenAIInterface",
      "url": "https://generativelanguage.googleapis.com/v1beta/openai/",
      "apiKey": "API_KEY"
    }
  ],